Home » Posts tagged 'Word Wishes Dies'

Tag Archives: Word Wishes Dies

Easter Swap Cards

Hello Stamping Friends,

HAPPY EASTER!!  What a joyous time as we celebrate that Jesus is alive and He provided the sacrifice for all our sins!!

I will share my Easter swap card and the swap cards from the club.  Jo and Sharon sent their April swap cards early so I have extra cards for you to enjoy!

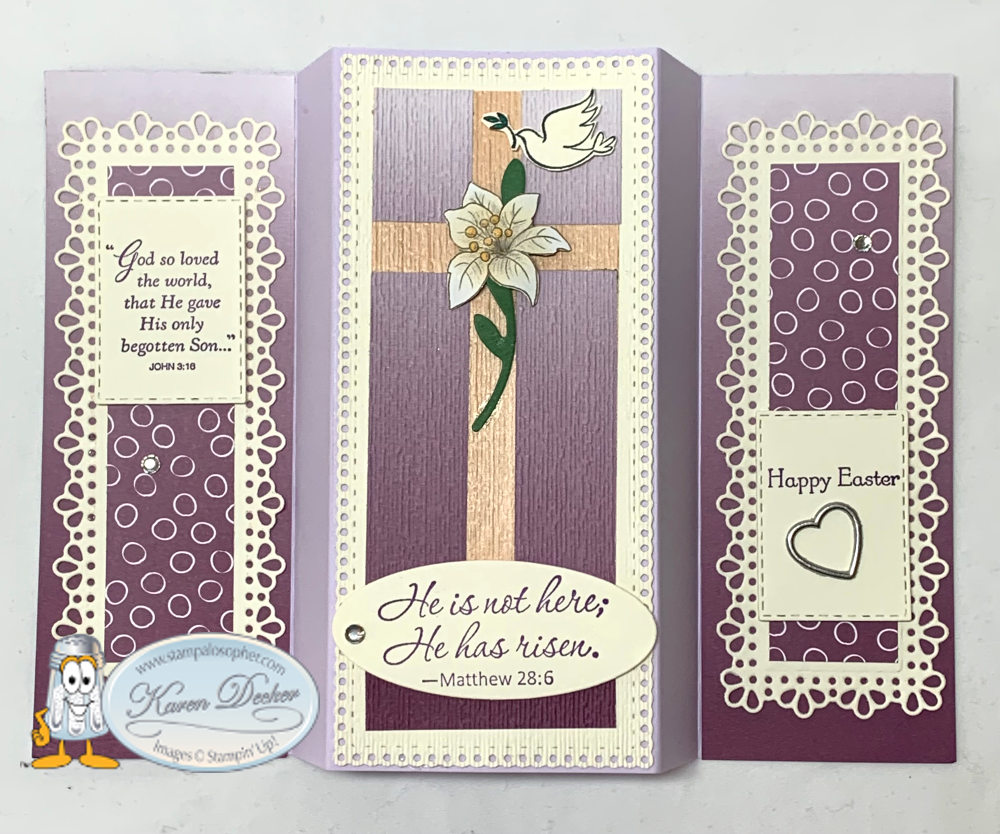
Where did you find a lily??

The lily is the inside petals of the Poinsettia Place DSP we had in the last mini catalog.

I used several retired and retiring products knowing the message was more important than product presentation.

The base is Purple Posy which will retire May 3 but the Ornate Layers Dies do not retire so that is good news.

Recipe:

Note:  DSP is an acronym for Designer Series Paper

  • Stamp Sets:  Easter Message, Teeny Tiny Wishes, His Grace.
  • Ink:  Gorgeous Grape, Memento Black.
  • Dies:  Ornate Layers, Stitched Rectangle Framelits, Detailed Bands (oval), Banner Blooms (stem).
  • Embossing Folder:  Tasteful Textile 3D or Subtle.
  • Base:  Purple Posy, 8 1/2 X 5 1/2, Scored at 2″, 3″, 5 1/2″ and 6 1/2″.  Note:  This is 3/8 inch more than a standard card but I found it was easy to fold our standard envelope just 3/8″ more to send the card.  This size allowed the card to have a nice background for the Ornate borders without the lacy edges hanging over.
  • Side Layers (X2):  Plain Oh So Ombre purple, 2 (minus a hair) X 5 1/2.  The score line creates the need for just a hair less than the 2″ side.  I used the darker at the bottom and cut 1/2″ off the dark bottom of the 6 X 6 DSP to start (you will use part of this piece later so don’t toss it).
  • Side Ornate Border (X2):  Very Vanilla, 2 X 5, Die cut with Ornate Border.
  • Inside Layer of Side Ornate Border (X2): Oh So Ombre circles on purple DSP, 1 X 4.
  • Top Ornate Border:  Very Vanilla, 5 3/4 X 2 3/4, Die Cut with Ornate Border.
  • Inside Layer of Top Ornate Border:  Plain Oh So Ombre Purple DSP,  3 5/8 X 1 1/2,  Cut this piece in half lengthwise (3/4″) for each side of cross and then place both halves in your paper cutter at the same time to cut 1″ off the lighter end so that you have two matching pieces that are 1 X 3/4 and two pieces that are 2 5/8 X 3/4.  Glue these 4 pieces to the edges of the wood tone paper leaving a 3/8″ cross.
  • Cross:  Natural Touch Specialty Paper, 1 7/8 X 4, glue this to the Ornate Border.
  • Base of cross:  Plain Oh So Ombre, 1/2 X 1 7/8, Use a piece of the dark end that you cut off, glue this piece to the Ornate Border leaving the same border as the top.
  • Once all your pieces are glued to the Very Vanilla Ornate Border, run the layer through an embossing folder.  I used Tasteful Textiles for this one but switched to the Subtle 3D embossing folder for the others I made to make the texture more — well — subtle!  Glue this directly to the middle.
  • Greetings:  Very Vanilla Strip, 1 3/4 X 8 1/2,  stamp the dove and John 3:16 from His Grace stamp set, He Is Not Here from Easter Message Stamp Set, and Happy Easter from Teeny Tiny wishes on the vanilla strip.  Fussy cut the dove, and use the Stitched Rectangle to cut the two side greetings and the oval from the Detailed Bands dies to cut He is Not Here.
  • Lily:  Poinsettia Place DSP, fussy cut the inside petals of one of the poinsettias or cut one of the small poinsettias in the paper and add an extra petal since lilies have six petals.
  • Greenery:  Garden Green, 1 1/2 X 2, Die cut two stems using the solid stem in Banner Blooms.  Attach to the back of the lily and then pop up the lily in the middle of the cross.
  • Dove:  Very Vanilla, fussy cut from the strip shown at greetings,  color the branch green and pop up above cross.
  • Embellshments:  Heart Charm, use Tombow on the flat side and let it sit to get good and tacky then attach.  I also added three rhinestones here and there.

The three greetings, the lily, and the dove are all popped up with dimensionals, all the other pieces are glued down.  Try not to get glue on the sides of the ornate borders so they look a bit lacy.  I put Tombow glue in the middle back of the ornate pieces and then use a scrap piece of cardstock to spread the Tombow glue just to the edge of the middles.

How did something that looks so simple turn into so many words?

I know, Sal, but I like to add all the little tips that can help someone else make the card; especially knowing that I am that someone and might want to make half a dozen more.

Let’s look at some swaps.

Jo Brooks used Mountain Air and His Grace stamp sets with the Majestic Mountains dies, the Cross of Hope Dies and the Word Wishes dies.  I love how she sponged the background!

.


Sharon Fincham used the Wreath Builder dies for her Easter card swap, the dies make perfectly shaped eggs!


Lucille’s swap is the cutest little bunny!

Joy Meadow’s swap card looks quite springy with the Hydrangea Hill Designer Series Paper.  She said this fun fold is quite easy to make; we will have to try it someday.

Jo Brook’s March swap was an adorable St. Patrick’s Day card using the Word Wishes Dies and a fun gnome/leprechaun!


Lori Moore’s swap uses the Pretty Perennials stamp set in the JJ mini.   The set has the big ‘happy’ word and then little words you can use with it- ‘birthday’, ‘mail’, ‘for you’, ‘you make me’, ‘sending lots of’.

Suzi Walker used the Pretty Perennials set, as well, with the matching Perennial Petals Dies.  The DSP on the white is embossed with the Tasteful Textile 3D Embossing Folder.  I am longing for spring flowers like these:

Sharon Fincham did an amazing card with a fun pop up center.  She used the ‘Hey Girlfriend’ stamp set in the JJ mini:

.

Great job everyone!  All the cards are beautiful and such an inspiration.

And now do we get to see the Mystery cards you all made yesterday? 

Well, Sal, I think I will start a new post so we don’t overwhelm our readers.

Thank you for spending some time with me and some of my club members today.  Would you like to join a club or create one for you and your friends.  Our club rotation starts again in May and we would love to have you join.  Contact me by text at 303-815-0838 or email [email protected].

The hostess code for today and April is: DJRYFBKM

The retired list has been posted and the best way to see what is still available is to go to my online store – click on little Sal in the computer – and click on specials.  The list is already outdated with things that have sold out so best to just head to the store!

Have a wonderful day and a blessed Easter!

SAL,  sharing a love of Jesus

Karen

Oh So Ombre Starburst Card and Mystery Card #9

Hello Stamping Friends,

Current Hostess Code:  TMARBUUM  Use this code if your order is less than $150.

This month has flown by and February is almost upon us — whoo hoo time for valentines!!

You have valentine cards done?

Well, not for this post, Sal.  This post will highlight the swap cards and the Mystery Card #9.  For those who are new to the blog, each month we have two events- one Facebook Live event on the second Tuesday of each month and one Zoom event on the last Tuesday of each month.  Accordingly, the schedule for February is:

-February 9,  Facebook Live at 9:30 on http://facebook.com/stampalosopher/videos

-February 23, Zoom Mystery Card Event at 9:30 (Request an invite by submitting your email)

My event calendar shows the monthly Paper Pumpkin kit as a Facebook Live for the third Tuesday of the month but since the delivery times are so slow right now I haven’t received my kit in time to have the event.

.  Why don’t you do a YouTube live whenever you get the kit?

That is a possibility!  Especially with the January kit which has some beautiful valentine cards!  Stay tuned!

My swap card for this month is a Happy New Year! card and I used products from all three catalogs!

  1. From the Annual Catalog:  Stitched Stars Dies, Playful Alphabet Dies for the numbers, Word Wishes Dies
  2. From the Mini JJ Catalog:  Pearlescent Specialty Paper
  3. From the Sale A Bration brochure:  Oh So Ombre Paper

Recipe:

Base:  Either – Blackberry Bliss/Rococo Rose/Granny Apple Green/ Bermuda Bay, 8 1/2″X5 1/2″ scored at 4 1/4″

Starburst Base:  Whisper White, 5 1/4″X4″, Mark the center bottom at 2 5/8″ to show the starting point of your strips

Starburst Strips:  Oh So Ombre Designer Series Paper (DSP), 1 1/2″ X 6″,  make sure your strips are cut to go vertically light to dark or dark to light.  Cut each strip diagonally. Line the opposite corners in the track of the paper trimmer and cut. You will use 13 cut strips. Make a pile of 6 light to dark pieces and 6 dark to light pieces and use the 13th piece for the middle

Using liquid glue cover your Whisper White base. I used a sponge to spread Tombow so it didn’t have clumps of glue.

Place your 13th diagonal half with the point at the 2 5/8″ mark on your now ‘gluey’ piece of Whisper White. Work from that center piece alternating light and dark points.  Work quickly so you can slide each piece tightly to the previous one before the glue gets hard to work with.

When done, turn the base over and burnish the back to make sure all the glue spreads evenly and the pieces are tight to base.

Now cut all those starburst pieces to the size of the base using the back of the base as a guide.  Scissors work fine because you have the base to guide your cuts.

Note:  The Oh So Ombre paper is 6″X6″ so you have 4 strips on each sheet.  Each strip is cut diagonally making 8 strips per sheet of DSP so you need two sheets to make 13 strips.  Do not cut the last 1 1/2″ strip diagonally – cut it in half horizontally to give you a nice 3/4″ strip for the inside of your card.  You will have one starburst strip left over.

Star Top, Numbers and Scrolly at the bottom:  Pearlescent Specialty Paper, 4 1/2″ X 4″.  Use the double back adhesive paper just slightly less than that size and adhere it to the Specialty Paper, Die Cut your images, remove the five stars for the inside,  and then place the die cut images on a piece of scrap cardstock and run them back through the Cut and Emboss machine to flatten the little dots that show up in the cuts and to adhere the images tightly to the adhesive sheet.   Use a hat pin to remove the adhesive sheet backing from your die cut images by sticking it through the adhesive baking in the middle of a wide part.  The stars and the scrolly are from the Stitched Stars Dies, the numbers are from the Playful Alphabet Dies; both are in the Annual Catalog.  The Pearlescent paper is in the Mini JJ catalog.

Inside Happy New Year:   Oh So Ombre Designer Series Paper,  1 1/4″ X 6″, Apply double back adhesive sheet to the back and then cut using Word Wishes Dies, trim off the ‘s’ on ‘years’ since you are not using the ‘day’ die.  The stars are from the star cut out we made for the top.  The Oh So Ombre paper doesn’t show the little dots from the die like the pearlescent paper so I didn’t need to run it back through the machine to flatten but you do need to burnish the pieces well to adhere them to the cardstock.

.  What does ‘burnish’ mean?

Good question, Sal.  I do use that term often.  It is a technical way of saying ‘rub’.  Sometimes we use our fingers and sometimes we use the bone folder.  Most often the term is used when we score a piece of cardstock and want the fold on the score line to be nice and crisp and lay down flat.

Let’s look at this month’s Mystery Card, shall we?

Mystery Card Challenge #9.pdf

Base:  Granny Apple Green

I used the Sale-A-Bration Flower & Field Designer Series Paper which is free with a $50 purchase.

I punched and layered two large daisies in Whisper White, one small daisy in Pool Party and one in Whisper White.  Both the small and large punch are in the Annual Catalog.

The bee is from the Dandy Garden DSP in the Mini JJ Catalog, die cut with the Dandy Wishes Die.

The ribbon is the Ornate Garden Ribbon Combo Pack in the Annual Catalog (AC).

The jewel on the little heart is the “Flowers For Every Season Gem” in the AC.

The greeting is from the Many Messages bundle in the JJ catalog, page 35.  What an awesome set of greetings all cut out at once with the die!

Definitely to ‘die’ for!!!

Great pun, Sal!  Let’s look at the cards the others made.  We sure missed those who couldn’t be with us on the Zoom!

Beautiful cards!  Though the construction was basic, the mystery was in the different designer series paper that each chose!

We have fun, even virtually!  If you are needing supplies I would be honored to be your demonstrator and bring you ‘a pinch of creativity to spice up your crafting world’!

You can order online by clicking little Sal in the computer.

Use host code:  TMARBUUM   if your order is less than $150 or a club order.

I love to hear from you!

Snowman Theater Card

Hello Stamping Friends,

Thank you to all who patiently watched the Tuesday Facebook Live that had about 4 technical glitches.  Sigh…..   I did subscribe to some new streaming software so next Tuesday will rock!

There are two videos since it didn’t refresh after one of the crashes.  Also, the videos wouldn’t go to full screen so when you view the videos there is an extra screen in the background. Look below that screen for the scrolling bar so you can scroll past the parts where I am battling the software.

But this is your tenth video shouldn’t it be getting better and easier?!

Good point, but every time Facebook changes something I have to figure out how to do what I used to do or perhaps I click on something new and mess things up!  Who knows!

Video 1:

Video 2:

.   

Let’s take a look at still pictures in case the video made you dizzy!

This is how your recipients will see the card out of the envelope-curtains closed:

.  

Drum roll for the snowman – don’t you wish we could make him sing!

.

I refer to the mechanism as a “C Fold”:

.  

And I called the strips on the back of the front – suspenders!  The curtains of your mechanism slide through the suspenders.

The back of the card with room to sign your name:


A close up of the curtain and the background trees before we add the snowman:

.

Mr. Snowman up close:


Note the slots on the sides where you will insert the I-beam:

.  

.  

The I-beam is folded like this on only one side to slide through the slot. It is then opened up to make a stop:

The Blue Version:

.   

I will include this picture because it shows one of the beautiful So Many Snowflakes Dies cut once with the solid color and then again with the Designer Series Paper:

.  

Recipe:

Supplies:

  • Snowflake Wishes Stamp Set (bundle with the dies for 10% savings)
  • So Many Snowflakes Dies, page 37 of the mini
  • Snowflake Splendor Designer Series Paper (DSP) page 37 of the mini
  • Winter Snow Embossing Folder for the curtains, page 37 of the mini
  • Rectangle Stitched Die, 4th largest
  • Smallest of the stitched shapes circle or a 1 3/8 inch circle punch for the finger holes
  • Blue Adhesive Backed Gems, page 37 of the mini
  • Word Wishes Dies for Merry Christmas, page 183 of the Annual Catalog
  • Snowman Builder Punch, page 167 of the Annual Catalog
  • Pine Tree Punch, page 166 of the Annual Catalog
  • Garden Gateway Dies for the little red bird, page 181 of the Annual Catalog
  • Coastal Cabana Ink and sponge dauber, Whisper White ink
  • Stampin’ Blends:  Dark Pumpkin Pie, Dark Basic Black, Dark Soft Suede
  • Snowflake Sequins, page 64 of the mini catalog
  • Pearl or Rhinestone jewels colored black with Stampin’ Blend
  • Fine Tip Glue to cover the snowman and then glitter if you like

Cuts:

  • Base:  Coastal Cabana, 81/4 X 11;  cut 1/4″ off a full 8 1/2 X 11 sheet then cut that sheet at 5 1/2 and 4 1/4.  You will have( two) 5 1/2 X 4 1/4 pieces for the front and back and (two) 5 1/2 X 4 pieces for the C-fold mechanism.
  • Score the two 5 1/2 X 4 pieces at 1 1/4 and 2 3/4 on the long side then burnish your folds to make a C – fold.
  • I-Beam: Coastal Cabana, 1 1/4 X 4 1/4;  Place horizontally at the 1/2″ line on the Stampin’ Trimmer and make a 1/4″ long cut down from the top and 1/4″ cut up from bottom. Turn and do the other end.  Then lay the I-Beam vertically on the Stampin’ Trimmer at the 1/4″ line and cut from 1/2″ to 3 3/4″.  Repeat on the other side.
  • Suspenders:  Coastal Cabana, 5 3/4 X 5/8 scored 3/4 inch on each side; these are glued to the back of the front on each side as shown above
  • Front:  DSP, color A, 5 1/2 X 4 1/4
  • Back of Stage:  DSP, color B,  2 7/8 X 4 1/4
  • Back sides of Stage, glued over the mechanism:  DSP color B (make 2), 1 1/4 X 4 1/4
  • Sides of Stage:  DSP, color B, (make 2) 1 1/2 X 4, glue on mechanism before cutting I-Beam slots
  • I-Beam Strip:  DSP color B, 3 1/4 X 3/4
  • Greeting Frame:  DSP color A, 4 1/2 X 2 3/4, corner rounded on top right and bottom left
  • Inside of the Greeting Frame:  DSP color B, 4 X 2 1/4
  • Merry Christmas Die Cuts:  Whisper White, 4 1/2 X 1 1/4, use slightly smaller adhesive sheet backing before cutting.  You could also use the cut our from the front rectangle.
  • Optional curtain: color as desired;   4 X 2 3/4 embossed with Winter Snow Embossing Folder.   I embossed the long portion of the mechanism C-fold with the Winter Snow Embossing folder and then drug the Whisper White ink across the snowflakes for contrast

Glue the front base and the front DSP, color A, together, placing liquid glue only on the outer edge.  Do not get glue on the inside.  (They should be the same size 5 1/2 X 4 1/4).  Place the 4th largest rectangle stitched die 3/4″ from each edge and cut. The cut out is 2 3/4″ X 4″  Use the DSP cut out to punch three trees for the background with the Pine Tree punch:

If you prefer the words to match the base, cut a piece of double back adhesive sheet (page 162 of the Annual Catalog) just a little bit smaller than the rectangle cut out – 2 1/2 X 3 3/4 and glue to the rectangle stitched Coastal Cabana you just cut out.  Then place the Merry Christmas dies from Word Wishes dies on the other side of the Coastal Cabana and cut.

For the side slits for placement of the I Beam:  First glue the DSP stage sides on the middle section of each mechanism.  Stand the mechanisms up in their C shape so that you see the smallest side is to the back, the middle faces inward, and the curtain goes to the front.  Scroll back up to the picture that shows the C Fold.  This is important so you make both slits at the bottom of the stage.  Place the long curtain portion at the 3 1/2″ mark on your Stampin’ Trimmer.  Double check that your mechanism’s score lines are at the 3/4″ mark to the right and 3/4″ mark to the left of the middle section where you are cutting.  Start your cut up 1/2″ from the bottom of the mechanism and cut 1″.  Now carefully move the piece 1/16 of an inch to the left and cut again 1/2″ from the bottom, cutting up 1″.  Use your scissors to cut the little 1/16 portions out to make a nice slit.

The video next Tuesday will be a theater card with the Peaceful Nativity silhouettes.  I will show the construction of the I-Beam and the I-Beam slits in that video.  A picture is worth a thousand words and I think I just gave you enough of both!  I hope you will make many versions of this card.  It is really fun!

Here is the Nativity version of the Theater card:

It uses the ‘Brightly Gleaming Designer Series Paper’ and copper foil cut outs with the ‘Nativity Dies’.   You do not make an I beam for this card so that you can see the palm trees and sheep on one side and the palm tree and donkey on the other.  The theater curtains are embossed with the ‘Dainty Diamonds’ embossing folder and then versa mark is rubbed across the panels and copper embossing powder applied and heated.

Our hostess code is :  BX2TBPDE with Cindy as our hostess.

Join me on my Facebook page at 9:30 AM for Take A Break Tuesday, the second Tuesday of each month!  Facebook.com/stampalosopher/videos

SAL,    (Sharing A Lot)

Karen


Welcome to my blog!

Sal Window to Products

Subscribe to Blog via Email

Enter your email address to subscribe to this blog and receive notifications of new posts by email.

Join 163 other subscribers

Categories