
Home » Posts tagged 'Vertical Greetings'
Tag Archives: Vertical Greetings
Graduation Card to celebrate Joshua
Congratulations to our grandson, Joshua Decker, on his High School Graduation!


 .
.
 .
.  .
.  .
.  .
. We are so proud of Joshua!
For his card, I used the colors on the graduation announcement to make the front of the card. There was just a touch of green on the Eaton Eagle so I bordered the circle with a little green. The banner is silver but to get the stamped images on the sides to show in the picture I had to turn it a bit sideways and the banner looks gold!
Recipe for Joshua’s graduation card:
The card uses several stamp sets:
- Clearly Whimsy Stamps Collection – Graduation- DA1173
- You Did It on the circle
- Diploma on the left
- Inside (one stamp)
- Vertical Greetings for Congrats on right side
- Reflected In Nature for the Eagle on the top left
- Day By Day Numbers for the 2023 on the bottom right
- Make A Difference for Joshua’s name
Heather taught us how to use the Tailored Tag Punch to make the graduation cap (mortarboard cap) by punching once and then hold the punched image with a sticky note and punch a second time. Punch just the side of the punch for the base of the cap.
The circles are made with dies from the retired circle set with the 5th largest die in Granny Apple Green and the 4th largest die in Basic White embossed with the confetti embossing folder.
The Banner Die is the 5th in the retired banner die set.
- Base: Thick Basic White, 5 1/2 X 8 1/2, scored at 4 1/4
- Layer 1 (X2): Night of Navy, 4 X 5 1/4
- Banner: Silver Foil, 2 1/2 X 4 1/4 die cut then embossed with the Star embossing folder
- Granny Apple Green: Die cut for a border with 5th largest circle
- Basic White: 3 3/4 X 5, die cut with 4th largest circle and emboss with confetti embossing folder
- Cap: Black Foil, 2 X 3, cut with Tailored Tag Punch
- Inside Layer: Basic White, 3 3/4 X 5, stamp and color
- Embellishments: Navy Twine made into a tassel secured with a black brad, 3 Swarovski crystals
 Did you use Copic markers to color the inside?
Yes, Sal, but I failed to write down which colors I used. Next time.
The design inspiration comes from the card Heather Guitreau made at our shoebox event:
 .
.  .
.
Lovely cards, Heather!
Thank you for stopping by my blog for…
A pinch of creativity to spice up your crafting world!
Karen
Under The Sea Thank You
When you see something you like, do you analyze and over analyze and then find out it is gone when you go back to get it? That would be me- usually. This time I actually ordered from an ad that popped up on Facebook and I am delighted with this die I purchased through inloveartshop.com. Take a look see:

 .
. 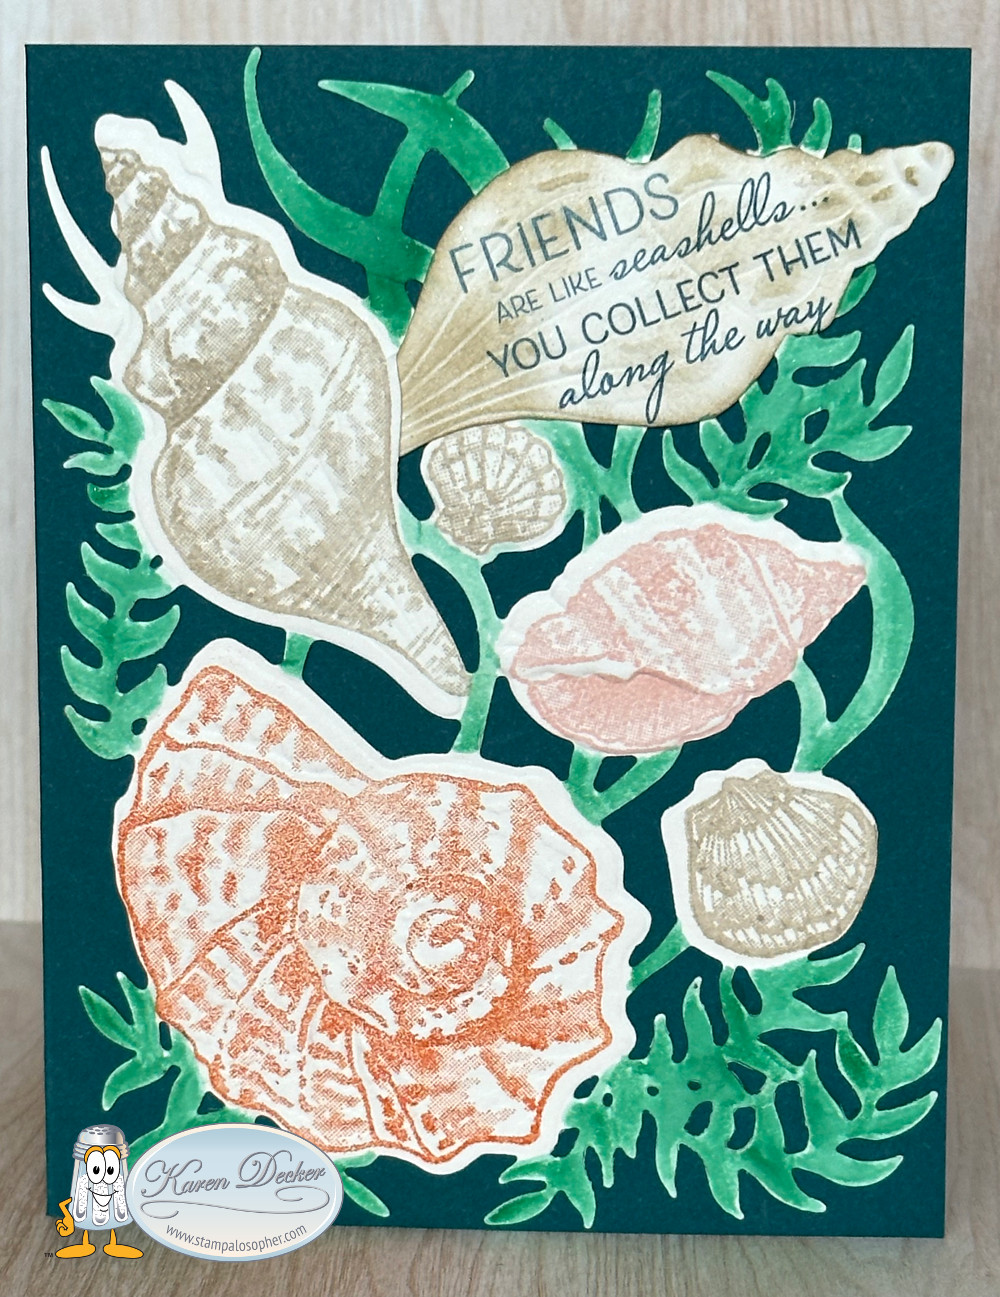
You are looking at a base of Pretty Peacock, with a die cut fancy layer of Just Jade and cut outs from a sea themed 6 X 6 retired DSP (designer series paper) from Stampin’ Up! and embellishments of Sea Glass. The right front side has a strip of the DSP with a greeting from the Veritcal Greetings Stampin’ Up! set. The inside left has a strip of the DSP and a stamp from Happy Hedgehogs. The right side uses the Stampin’ Up! Friends are Like Seashells stamp set with the Seaside Seashells Die and hybrid Embossing Folder. The die does the cutting as the folder embosses in one run through the Big Shot. I cut an extra shell and stamped a greeting on it, adhering it amongst the other shells.
Let’s take another look at the Kokorosa die. It comes with all the pieces attached with little bitty bits of the metal. You need one of the little metal cutters to cut them apart – or a husband like my Paul who cut them apart and then used his grinder to make sure there were no sharp edges. He is so handy and can fix just about anything! Thanks, Paul.
BUT- before you cut the dies apart you want to run your cardstock through to cut out all the pieces. There are layering pieces and inside pieces; those little layering pieces give you perfect placement for the inside pieces.
 I am scratching my head – that didn’t make sense.
Okay, Sal, let’s try some pictures.
This is the die set after Paul so carefully removed the metal connecting pieces.

I die cut it with the Just Jade before Paul cut the dies apart and I had the outer background piece that you see in the top picture and then lots of puzzle pieces-
-a piece for each of the outside borders, and then a piece for each inside die cut.
 .
. 
You could do puzzle piecing and use a different color for the border pieces and then die cut your inside pieces from another color, but I just layered the main background die cut piece on the base of Pretty Peacock and then die cut different scenes from the DSP. What saved me much fiddling, in getting the inside DSP pieces perfectly lined up, was placing the border pieces in the cut out section and then adhering the DSP inside the border. I didn’t even need to glue the border pieces temporarily; the main background cutout kept the border in place, then I removed the border and had a perfectly aligned piece of DSP. I saved those border pieces to use each time I make a card with these dies.
Notice – look back at the first picture – the main background piece in Just Jade fits nicely top to bottom but does not go equally to the edges left to right. In the future I would adhere the background piece close to the left side and either cut off the right side front base, or do as I did here but with a larger strip of DSP for the vertical greeting.
Now that I have taken my Stampin’ Up! blinders off and have allowed myself to use other companies products, it is like a whole new world of crafting.
Are you getting rid of all your Stampin’ Up! products?
No, indeed, Sal! Stampin’ Up! has some amazing products like what I have used on this card, but I am purging to eliminate stamps that I don’t see me using in the future.
Thank you to everyone who has been purchasing items from my stamp stash. Check out the Bake Sale tab here on the blog to see what is left. I listed 67 sets on Saturday and have sold over half of them. Several are still pending payment so I won’t remove them from the BAKE SALE until I receive payment. We call that NIL in the online shopping world. NIL means Next In Line so if someone doesn’t pay the NIL person gets notified. It works really well. People change their mind or find a better deal and then the NIL has a chance to purchase your set.
SAL, Smile A Little and Share A Lovely find
Karen

Beauty Abounds And Butterfly Beauty
Hello Stamping Friends,
I have some fun cards today using the Butterfly Beauty Thinlits and the Beauty Abounds Stamp Set. These two sets carry into the new catalog but if you get them now you will get a 10% bundle discount, #150617. See them on page 13 of the Occasions catalog.
Before we get into the club card I want to show you The Vertical Greetings stamp set that I used for the Thank You notes. It is being retired:
 I have used this set more times than I can count. In today’s thank you cards I didn’t want to cover up the beautiful butterflies but there was just enough room to do a vertical greeting.
Let’s start with the card I did for my card class:

The little ‘hello’ in the Beauty Abounds stamp set fit right between the butterflies. I stamped the hello in Versa Mark ink and embossed it with black embossing powder and then punched it out. I held the butterflies in place- without adhering them- to determine where to place the hello, being careful that the butterflies didn’t go outside the card.
Note: the double sided adhesive sheets are being retired, #144106, so stock up now. I used a sheet to adhere the top layer of the butterfly to the bottom layer. I put a 5 1/2″ X 4 1/4″ piece of the adhesive on the back of the Gorgeous Grape cardstock of the same size before running it through the Big Shot. After you cut out the butterflies and pull off the adhesive backing sheet, save it! It is shiny and beautiful. I used it on the thank you cards you will see in a minute.

There is a large stamp in the Beauty Abounds set with six bokeh dots and a smaller one with four bokeh dots. I used both and stamped them with Highland Heather. I stamped the dots with Gorgeous Grape. It is amazing how SU can make stamps that get several different shades of color with just one stamp. I didn’t have to do any masking or coloring- it was all in the stamp!

It was a little tedious to put dimensionals on all the butterflies but so worth the effort! These are the small dimensionals with a strip cut from the edge of the dimensionals sheet to put in the middle.
On the inside I stamped another set of bokeh dots in Highland Heather and two of the little butterflies from the same Beauty Abounds set in Gorgeous Grape.

Dimensions & Supplies:
Ink: Versa Mark, Gorgeous Grape, Highland Heather, Black Embossing Powder
Stamps & Dies: Beauty Abounds & Butterfly Beauty Thinlits
Card Base: Gorgeous Grape, 5 1/2″ X 8 1/2″ scored at 4 1/4″
Second Layer- make 2: Highland Heather, 5 3/8″ X 4 1/8″
Butterfly Outside Layer: Gorgeous Grape, 5 1/2″ X 4 1/4″
Adhesive Sheet: 5 1/2″ X 4 1/4″ – adhere the whole sheet to the back of the Gorgeous Grape
Butterfly Bottom Layer: Highland Heather, 5 1/2″ X 4 1/4″
Whisper White Layer: 3 7/8″ X 5 1/8″
Whisper White Scrap for punching the ‘hello’ greeting
Bling: Five black Faceted Dots (#146910- retiring)

The little butterflies have thinlits to cut them out and Stampin’ Up! has heard our frustrations with the time it takes when we want multiples of a cutout so they are making dies with several duplicates to save us time:

Lots of little butterflies we can run through the Big Shot!
After the card class I had leftover cutouts as well as the adhesive sheet backings and I wanted to use them for my thank you cards. I chose Flirty Flamingo for another cutout and black for some of the backings. From a past catalog I had purchased Calypso Coral embossing powder and it matched the Flirty Flamingo card stock so I used it and ‘Vertical Greetings’ to emboss the thank you on the purple layers. (I showed that set first since I really don’t want you to miss having it in your collection.) I colored the wings with the clear Wink of Stella and adhered Iridescent Sequins, # 144212, for even more sparkle.

In this card I stamped the wing cutouts with the little dot stamp and then did a bit of paper piecing to make the wings.


I wish you could see how the Wink of Stella makes it look like black glimmer paper was used! The Share What You Love Artisan Pearls were used and they, too, are retiring, #146927.


Which one is your favorite? I would love to see what you come up with!
SAL, Showing A Lot of butterflies today
Karen
Click on little SAL to shop. Tuesday club members use hostess code TQJWVPRX; Saturday club members use DP7XS3NC. Not a member? Choose either code if your order is under $150 and our hostess will get the credit.

Welcome to my blog!

Sal Window to Products


