
Home » Posts tagged 'Tri Fold Card'
Tag Archives: Tri Fold Card
Hand Drawn Blooms and Prized Peony
Hello Stamping Friends,
Today’s Facebook Live event was successful!! For those of you who have done this for a long time I’m sure you are shaking your head but it was my third Facebook Live and the second one crashed and had to be abandoned. So two successful events feels rather nice!
Club members received two card kits for this month’s club and we joined together with a Facebook Live followed by a Zoom meeting. We created an Easel card with the Hand Drawn Blooms bundle and a Tri-Fold card with the Prized Peony bundle.
What you still need is the specific recipe for each card.
Easel Card with Rainbow Glimmer Paper:
Color #1, Daffodil Delight and Melon Mambo

Color #2, Granny Apple Green and Bermuda Bay

The Banner Blooms Die was used to cut the beautiful bouquet from the Rainbow Glimmer Paper. Since the paper is multi colored the cards were different depending on where the cut was made.
Recipe:
- Base: 4 1/4 X 11 scored at 5 1/2 and 2 3/4
- Layer 1: 5 3/8 X 4 1/8 Make 2 and Corner Round the top of one
- Layer 2: Shimmer White, 4 X 5 1/4 , Corner Round the top
- Easel Holder: Shimmer White, 4 X 1
- Scrap of Shimmer White on which to stamp the words to put on the banner 3 X 1 1/2
- Rainbow Glimmer Paper: 6 X 4, cut one bouquet and one butterfly
- Twine: 10″
- Jewels to embellish: 3
- Ink: Bermuda Bay or Melon Mambo
- Stamp Set: Hand-Drawn Blooms
- Die Set: Banner Blooms
 Gosh, you didn’t post for a month and now you made a video! When do I get to be in the video?
Patience, Sal, I have been working with an animator and soon you will be joining the videos.
Prized Peony Tri-Fold Card:
I just received my mini catalog preorder and added a stamped image to my wedding card using the Little Treats Stamp set:

Isn’t that just the perfect addition?
Here is the original one I did in the Facebook Live Video:


Recipe:
- Base: Whisper White 12″ X 6″
To cut your tri-fold follow these step by step instructions:
- Place the base on the Stampin’ Up! Cutter the long way – (vertically) on 2″ mark- and cut from the 2″ to the 10″ mark on the cutter
- Move the base to the 4″ mark on cutter and cut from 2″ to 10″
- Turn the base the short way-(horizontal) and place it at the 2″ mark of the cutter and score from 0″ to 2″, lift the scoring blade and move to the 4″ mark on the cutter and score from 4″ to 6″
- Move the base to the 4″ mark on cutter and score from 0″ to 6″- top to bottom
- Turn the base to the other side and place it at the 2″ mark of the cutter and score from 0″ to 2″, lift the scoring blade and move to the 4″ mark on the cutter and score from 4″ to 6″
- Move the base to the 4″ mark on cutter and score from 0″ to 6″- top to bottom
Front Base Layer: Whisper White 5 1/8 X 3 5/8
Layer #1 all in Basic Gray:
- (1) 5 X 3 1/2 for front base
- (2) 5 7/8 X 1 7/8
- (3) 3 7/8 X 1 7/8
- (5) 1 7/8 X 1 7/8
Layer #2 in Designer Series Paper (Note: two of the top layers are whisper white)
- (1) 4 7/8 X 3 3/8 for front base
- (2) 5 3/4 X 1 3/4
- (2) 3 3/4 X 1 3/4
- (4) 1 3/4 X 1 3/4
Whisper White – all three pieces are embossed at the bottom with the Peony Edge Die
- (1) 2 1/4 X 4 1/4 Front Banner
- (1) 3 3/4 X 1 3/4 for stamping greeting
- (1) 1 3/4 X 1 3/4 for stamping peony
Envelope Punch Board – Whisper White Envelope Paper 8 1/4 X 8 1/4 with 3 3/8 score line starting point
Envelope Decor – Designer Series Paper 6 X 3 1/2, glue to flap and then fussy cut to fit
Ribbon – 1/4″ Gray Granite Shimmer Ribbon- 10″ for knot, 12″ for bow
Elegant Faceted Jems – 3
Peony (4) – Petal Pink 8 1/2 X 3 , die cut the four parts, each piece slides into the next largest piece matching up the notches. Use a bone folder to curl the edges and then sponge with Blushing Bride for a darker contrast.
Stamin (1) – Scrap of Daffodil Delight at least 1″ square
Leaves (3)- Garden Green large sections 2 X 3, die cut one of each size
Leaf accent (3)- Granny Apple Green 2 X 3, die cut one of each size

I used a glue dot to attach each piece at the notch and then added dimensionals in between the layers.
Here is the base with the gray granite layer and the DSP layers, the white part of the base is where you will glue the front base so it does not need a gray layer:

This shows the front base added and the die cutting at the bottom of each edge of the white pieces:

Obviously, you want to stamp the white pieces before you adhere.

I stamped the greeting in Basic Gray and then colored the back of the peony stamp with Stampin’ Write Markers – Petal Pink, Daffodil Delight, Garden Green and Granny Apple Green.
Note: Do not use Stampin’ Blends – they will stain your stamp.

Prized Peony Suite Card
Here is a card I made using every single one of the Prized Peony Suite products for a thank you card. I am casing Mary Deatherage of Stampsnlingers with this one:


Recipe:
- Base: Gray Granite 4 1/4 X 11 scored at 5 1/2
- Front Base: Gray Granite 4 1/4 X 5 1/2 Embossed with the Dainty Diamonds Embossing Folder; it might need shaved a hair on the edges if it stretches
- Front Mat: Petal Pink 2 7/8 X 5 1/2
- Cross Panel Mat: Petal Pink 2 1/8 X 4 1/4
- Inside Mat: Petal Pink 4″ X 5 1/4″
- Front Vertical Top: Peony Garden Designer Series Paper (DSP) 2 3/4 X 5 1/2 colored with Stampin’ Blends Petal Pink and Granny Apple Green. Don’t panic as you color the DSP flowers pink, as they look an ugly dark pink from the grey on the back of the DSP showing through. Once it dries it is a pretty petal pink!
- Front Horizontal Panel Top: Peony Garden DSP 2 X 4 1/4
- Inside Liner Top: Whisper White 3 7/8 X 5 1/8
- Sentiment: Whisper White Scrap stamped with Hand Drawn Blooms and fussy cut
- Ribbon – 1/4″ Gray Granite Shimmer Ribbon- 4″, glued underneath peony with glue dot
- Elegant Faceted Jems – 3
- Peony (4) – Petal Pink 8 1/2 X 3 , die cut the four parts, each piece slides into the next largest piece matching up the notches. Use a bone folder to curl the edges and then sponge with Blushing Bride for a darker contrast.
- Stamin (1) – Scrap of Daffodil Delight at least 1″ square
- Leaves (3)- Garden Green large sections 2 X 3, die cut one of each size
- Leaf accent (3)- Granny Apple Green 2 X 3, die cut one of each size
There you have it folks, recipes, pictures, a video and everything you need to create some beautiful cards!
SAL, Such A Lot (of pieces)
Karen

Vibrant Vases Tri-fold card
Good morning, Stamping Friends,
It probably won’t be morning by the time you get this post in your mailbox but currently it is still morning in Karen’s World!

Don’t you mean Stampalosopher? Karen’s World was your accounting firm.
Yes, indeed, it is a Stampalosopher World! Today I have one of two cards to show you that I created for a stint as a guest presenter in Grand Junction. The first was inspired by Joy Meadows and the very lovely card she sent for my birthday. Thank you, Joy!


Do you see how the front right hand flap is exactly the same size as the left side white layer with the same size black border? So cool! The white flaps inside and out are 3″ X 3 1/2″ with a black border of 3 1/8″ X 3 5/8″. The paper is from the SAB (Sale A Bration) Botanical Butterfly DSP (Designer Series Paper). One side had butterflies and the other had black and white designs like the dots Joy used here. I hope you stocked up on this paper during SAB! Her base is 9 7/8″ X 5 1/2″ scored at 4 1/8″ and 8 3/8″ . This leaves a right hand flap of 1 1/2″. The butterfly is from the Butterfly Gala stamp set which is still current and has a punch to match. See page 46 of the Annual Catalog.

But Karen, you can’t use retired Designer Series Paper!
I know, Sal, so I chose to use the Vibrant Vases and the Pressed Petals DSP with an accent color of Blueberry Bushel, one of the 2018-2020 In Colors that I will definitely need to stock up on before it retires next June.
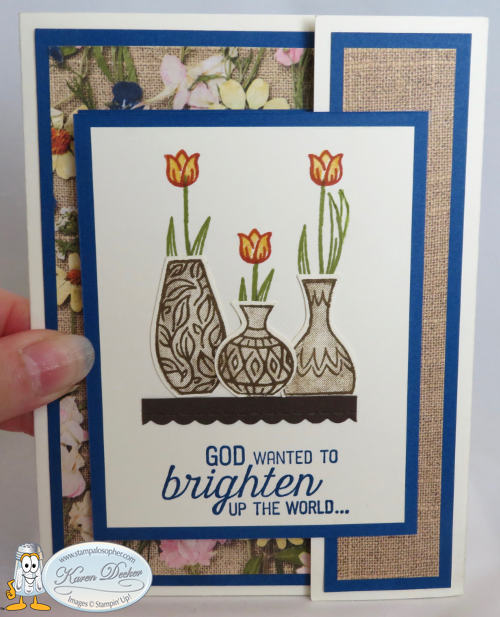


Don’t you love the Pressed Petals DSP with the Blueberry Bushel? There is even a sheet of the DSP with plain burlap that I used for the right side little panel to coordinate with the background of the pressed petals.

And the Pressed Petals is part of the current “Buy 3 packs of DSP and Get One Free”!
That’s right, Sal, thanks for the input!
I used the Flourishing Phrases stamp set for the sentiments on the flap and the left side of the card and left the inside blank for a birthday, congratulations or just thinking of you sentiment. I needed a little larger flap than what Joy used for the butterflies so the measurements won’t be the same. The goal was to have the outside vases a bit plain with the inside vase truly “vibrant” to match the sentiments. The Vibrant Vases stamp set is a two-step stamp set with outline stamps for the vases and then a stamp-to-color for each vase and it even has a punch to match! Check out page 61 of the Annual Catalog. The yellowed images show what images are punchable. (Is that a word?)

I stamped the outside vases with the border stamps in Soft Suede and then stamped again with the stamp-to-color stamps after stamping off to lighten the image. I used the “H” acrylic block and spaced out the three vases and stamped with the outline stamps on a 6 X 3 piece of Whisper White. I then placed the (clean) stamp-to-color stamps on top of the images and took another “H” acrylic block and pressed it down on the stamps to attach them to the blocks in the perfect position. The stamparatus would have worked better but it was in use for the other card.

You could order a second one. I could help, page 184, #146276.
Thanks Sal. That might be a good idea for the next time. To make the inside vase truly “vibrant”, I stamped it in Blueberry Bushel, colored in the diamonds with Cajun Craze and Daffodil Delight regular markers and then took my Versa Mark ink and inked the entire image. I applied “Clear Embossing Powder” and then heated it to make the vase look like glass.
Stamp the greenery and flowers directly on the Very Vanilla card stock pieces – the flap for the outside and the Pretty Label punched piece for the left hand side. Adhere the vases directly to the paper since they are punched out and look 3D without dimensionals. I adhered the two larger vases close enough together so that I could adhere the middle little vase slightly on top of the larger ones and all three would fit on the 2″ shelf that was cut from Early Espresso card stock to a final size of 2″ X 1/4″ with the “Be Mine” stitched framelits. Hint: Start with a larger piece of Early Espresso and cut the scallop edge with the framelit and then place it in the Stampin’ Trimmer to cut to the 1/4″ shelf size. I cut a piece longer than the desired 2″ so I could cut exactly 1/2 of a scallop at each edge of the shelf.
She told me she was a “recovering perfectionist”! Maybe she needs more therapy. SHHHH……
Did you say something, Sal?
The shelf is adhered with the top of the shelf 1 1/4″ from the bottom of the Very Vanilla layer and 3/8″ over from the left and right sides. Stamp the greeting in Blueberry Bushel under the shelf.
It can be tricky to stamp the greenery at the right spot for the vases so stamp your vases and punch them out then trim off the bottom white edge of the vases. Punches generally leave a little edge all the way around the image just like what we teach in fussing cutting. You want the vases to sit directly on the shelf so trim off that bottom edge.
Temporarily place your vases where you want them on the shelf and use a pencil to lightly outline the top of each vase. Now make three more light pencil marks where you want your stem to attach to the tulip. The tulip is 3/8″. Vary the heights of the three tulips. Use a sticky note to mask the shelf and where the vases will be and stamp the stem and greenery in Old Olive. Then stamp the tulips in Cajun Craze and stamp-to-color in Daffodil Delight. I had a shadow on one of my leaves so I just hand drew another leaf to utilize the shadow.
Sheri always called that “Design Opportunity”!
That she did! And that it is! We sometimes use tiny butterflies or hearts to cover our shadows and it adds beauty to the card. I just ordered erasers from Amazon that are supposed to remove ink without damaging the paper. I will let you know if they work.
A Stitched Labels Die is used for the little greeting that says “so he made you” and the fancy die in that same set is used for the DSP cutout on the left side. The Pretty Label punch is used for the vase and flowers on the left side. This is one of those times when you want to punch first and then stamp so you can align the flowers and vase on the punched piece. Use the same procedure of placing the vase temporarily on the piece, lightly draw the top of the vase, mask with a sticky note and stamp the flowers with Memento Black ink, then adhere the vase, color the flowers in Daffodil Delight and the greenery in Garden Green. Adhere rhinestones colored with Cajun Craze Stampin’ Blends. Sponge the edge of the Pretty Label punched piece and the little rectangle greeting with Blueberry Bushel and pop up both pieces with dimensionals.
Summary:
Stamp sets: Vibrant Vases, Flourishing Phrases
Inks: Blueberry Bushel, Soft Suede, Old Olive, Cajun Craze, Daffodil Delight, Tuxedo Memento Black
Markers: Blueberry Bushel, Garden Green, Daffodil Delight
Stampin’ Blends: Cajun Craze to color rhinestones
Framelits/Dies: Be Mine, Stitched Labels
Punches: Vases Builder, Pretty Label
Embellishments: Four rhinestones colored with Cajun Craze
Card Base: Thick Very Vanilla 9 7/8″ X 5 1/2″ Scored at 4 1/8″ and 8 5/16″ ; Fold in the little right side first and then fold in the left side over the middle.
First Layer on left side and middle: Blueberry Bushel (make 2) 3 7/8″ X 5 1/4″ , Cut out the middle of the inside one. I used a retired rectangular framelit that I use to save paper when I am layering. A stitched rectangle framelit would work as well.
Second Layer on left side and middle: Pressed Petals DSP (make 2) 3 5/8″ X 5″ ; Cut out the center of the inside DSP layer with the Stitched Shapes Die- the fancy one. Use the cut out for the left side behind the Pretty Label punched piece.
Third Layer on left side and the flap for the front: Blueberry Bushel (make 2) 3 1/8″ X 4″. The left side 3rd layer is adhered 1/2″ down from the edge of the DSP and 1/4″ over from the edge of the DSP.
Fourth Layer on left side and the front flap: Very Vanilla (make 2) 2 7/8″ X 3 3/4″
Little Right side first layer: Blueberry Bushel, 1 1/4″ X 5 1/4″.
Little Right side second layer: DSP in plain burlap 1″ X 5″
The Blueberry Bushel Front Flap is adhered 1/2″ down from the burlap DSP on the little right side to exactly match the left side. This is done last! I put two pieces of tear and tape at the far right of the flap and then matched up the flap to the card’s left side and pressed it in place.
Shelf: Early Espresso, 4″ X 4″ Cut to 2″ X 1/4″ with the Be Mine Scalloped framelit and the Stampin’ Trimmer
Vases: Very Vanilla, Use the leftover from cutting the base or a 6″ X 3″
Punched Label: Very Vanilla 2″ X 2 3/4″
Left side greeting and the left side vase: 1 1/2″ X 3 3/4″ , you need it large enough to be able to hold it as you punch the vase. Stamp the greeting on the same piece and cut with the Little Stitched Labels Framelit.
I remember you looking at that little Die and saying it was too little to use for anything.
I did say that! Amazing isn’t it?! I am glad I have that set. I used two of the Dies on this card. I love the one I call the “fancy” Stitched Label Die!


Okay Sal, I am through with this post and it is your turn to guide folks to the store where they can shop to their hearts content! Don’t forget to check the Clearance Rack, friends, before you place your order, there are many Christmas sets available at great prices. I have a post coming up from our first Christmas card Stamp-A-Stack called Clearance Rack meets Stamp-A-Stack. Stay tuned!
SAL, Stamp A Lot, Smile A Little, Share A Love
Karen


Welcome to my blog!

Sal Window to Products


