
Home » Posts tagged 'Timeless Tidings'
Tag Archives: Timeless Tidings
Christmas Card Stamp A Stack
Hello Stamping Friends,
It is Friday! Hopefully you had a great week and are looking forward to a restful or fun filled weekend.
Here are cards from a Paper Pumpkin:

I did change the greeting. It comes from the very versatile Itty Bitty Christmas stamp set in the Holiday catalog.
NOEL Double Time Stamping:
Casing Mary Detharage at stampsnlingers.com:


Recipe:
- Stamp Sets: ‘Joy & Noel’, ‘Timeless Tidings’
- Ink: Memento Black
- Tools: Oval Stitched Shape Framelit and Oval die (retired) 3rd smallest in set or oval 1/8″ smaller than Stitched Shape Oval
- Stampin’ Blends: Real Red, Shaded Spruce
- Base: Real Red, 5 1/2 X 8 1/2 Scored at 4 1/4
- Layer: Basic Black, 4 X 5 1/8 -make 2
- Top: Whisper White, 3 7/8 X 5 – make 2
- Embellishment: 3 gold metallic pearls
Using the largest Stitched Shape Oval, cut out a piece from the middle of the black layer. Set aside.
Center the small oval framelit on the white top layer and cut the oval then return the oval to the layer and stamp the Noel. I used the Stamparatus so I could stamp until I got a really dark black image on the letters.
Color. I used the light Shaded Spruce for the stems and small leaves around the berries, both dark and light Shaded Spruce on the large leaves and Real Red dark and light for the berries.
Adhere the colored oval to the black stitched shape oval with snail and then pop up the ovals on the white layer.
Add gold metallic pearls.
The inside greeting, Merry Christmas and holly branch are from Timeless Tidings.
This card is a case of the catalog using the other stamp in the set:

Beautiful Baubles:
This card is a case of www.sandjunecrafts.com who cased June Keingstaer:


Recipe:
- Ink: Pacific Point and Versa Mark with silver embossing powder
- Stamps: Beautiful Baubles, Timeless Tidings
- Tools: Detailed Bands Dies, Aqua Painter, Gray Marker, Wink of Stella
- Base: Silver Foil Edged Cards & Envelopes (#147900)
- Layer: Pacific Point 5 1/4 X 4
- Top: Shimmery Whisper White 5 X 3 3/4
- Inside: Silver Foil Strip 4 1/4 X 1/4 and Pacific Point Strip 4 1/4 X 1/4
- Greeting: Shimmery White 2 X 3 and 2 ovals cut from Silver Foil using the Detailed Bands Dies. Deck the Halls is in Beautiful Baubles, the inside greetings are in Timeless Tidings
Start by creating two masks of the bauble on sticky notes. Stamp the left bauble in Versa Mark, mask it and then stamp the bow and string. Remove the mask and emboss with silver embossing powder. Mask that bauble and stamp the middle baubles and the right side bauble, bows and string. Emboss with silver. Use the Aqua Painter and dip in the Pacific Point and water color the baubles. Color the inside of the top little holder thingy gray and apply wink of stella. Add rhinestones.
Stamp the greeting, cut with the Detailed Bands Oval Die and attach to two silver ovals cut with the same die. Sponge the edge with Pacific Point. Use glue dots to attach to the foil and then dimensionals to attach to the top of the card.
Apply strips to the inside left and stamp the greeting. The card stock in the set is thick so you don’t really need another layer. The catalog also has gold foil cards and envelopes. Check out page168 of the Annual Catalog 2019-2020.
Note: I will add the catalog year in the future posts since I have gone back to reference posts from years ago and the page number is not the same. In the catalog section of my blog I have kept all the pdfs of catalogs since I started blogging so you can go to that section and find the catalog I reference. You can look at the date of the post to figure out which catalog but I will be more helpful in the future. Do you have other suggestions that would make my blog more user friendly?
Christmas Tree Special Fold:
Cased from Rachel Tessman at StampYourArtOut.com:


This is a Step Panel Card and folds to fit in a standard envelope.
Recipe:
- Ink: Shaded Spruce, Versa Mark and white embossing powder
- Stamp Set: Snow Is Glistening
- Tools: Snowfall Thinlits, 1 3/8″ circle punch and 1 1/4″ circle punch
- Base: Shaded Spruce 4 1/4 X 8 1/2; Score at 1/2, 1 1/2, 3, 4
- Step: Shaded Spruce 2 1/2 X 4 1/4; Score at 1/2 and 1 1/2
- Tree: Shaded Spruce 4 X 2 1/2
- Greeting and the snowflake background at the top of tree: Whisper White 1 3/4 X 4
- Back of the greeting and snowflake on top of the tree: Dazzling Diamonds Glimmer Paper: 1 3/4 X 2 3/4
- Designer Series Paper: 4 X 2 7/8
- Embellishments: Three rhinestones for the snowflakes and 14″ Silver Metallic Edge Ribbon
Fold each score line and use your bone folder to make nice folds on the base and the step. It is critical at this point to get a feel for where the base and the step are attached so you identify the bottom of each. Don’t attach until after you have stamped but you need to know the bottom.
Adhere the Designer Series Paper.
Stamp the tree and the bottom of the step and the base and white emboss. Use the trimmer to cut the tree leaving a tiny edge of green. This will be mounted last and the ribbon will be tied through the step and over the bottom of the tree which hides the seam.
Apply Tear and Tape to the 1/2″ fold on the base, it seems to be the front since stamping but it will be folded back to attach. Critical – don’t guess where it is attached- remove the top of the tear and tape, fold the 1/2″ flap over and then fold the card base flat to correctly attach the 1/2″. Do the same with the step- don’t guess where it is attached. Adhere it to the bottom of the base and then remove the back of the Tear and Tape on the 1/2″ fold and fold the step and base flat to get perfect placement of the step.
Stamp your greeting. Joy is in the Snow Is Glistening stamp set. Punch with the 1 1/4 punch. (Attach to the Dazzling Diamonds with glue dots), then pop up on the base with dimensionals. Die cut two snowflakes from the Snowfall Thinlits (one for the front of the tree and one for the back).
Punch a circle of Dazzling Diamonds glimmer paper with the 1 3/8 punch and die cut a dazzling diamond snowflake for the top of the tree. Add a rhinestone!
The back Whisper White piece is a rectangle with the 4 1/4 going vertical and the 4 on the horizontal. It seems square so you have to look carefully for a nice border placement. Die cut a large snowflake and a smaller snowflake in the corners, poke out all the little pieces and set aside for a minute. After cutting your snowflakes it is easy to see where the greeting will fit. Stamp the greeting, adhere the layer to the base and then place the snowflakes back in their cutout. Add rhinestones to the snowflake.
Tie the ribbon through the base right at the top so it covers where your tree is attached.
You just made a step card!
SAL, Stamp A Lot of Christmas cards
Karen

Christmas Stamp A Stack
Hello Stamping Friends,
October Stamp A Stack:
Here are pictures of the cards we made at the October Stamp A Stack. If you have questions leave your requests in the comment section.
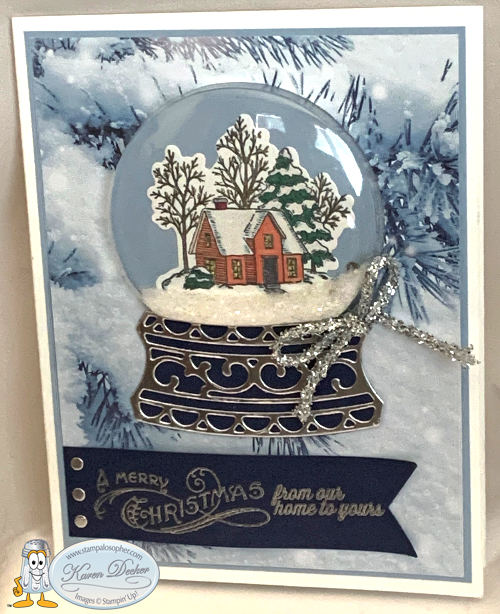
Still Scenes Snow Globe
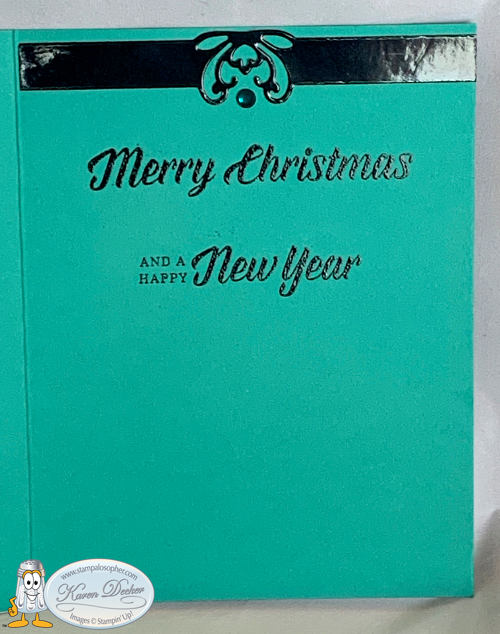
Still Scenes Snow Globe with Feels Like Frost Designer Series Paper on a layer of Seaside Spray and a cardbase of Thick Whisper White. The banner and base background are Night of Navy. The greetings are from the Bells and Boughs stamp set and the Farmhouse Christmas.


TIP: Make yourself a template out of cardstock and you can cut multiples quickly:

- Base: Whisper White 5 1/2 X 8 1/2 Scored at 4 1/4
- 1st Layer and inside: Make 2; Seaside Spray 5 1/4 X 4
- 2nd Layer: Frost DSP 5 1/8 X 3 7/8
- Inside Top Layer: Whisper White 5 1/8 X 3 7/8
- House: Whisper White 2 1/2 X 2 1/2, Stamp in Memento ink and color with Stampin’ Blends
- Snow Globe Base: Night of Navy 3 X 1 3/4
- Snow Globe Base top layer: Silver Foil 3 X 1 3/4, Tip: attach to adhesive sheet then run through Big Shot
- Banner: Night of Navy 1″ (minus a hair) X 4″ Punch with Banner Triple Punch
- Embellishments: 8″ ribbon and three silver foil punch dots punched with hand held punch
- Snow: A little bit of Ice Stampin’ Glitter with a few of the Snowflake Sequins
Shrinky Dink Cardinal on Seasonal Wreath
Seasonal Wreath 3D embossing folder with Shrinky Dink Cardinal from Toile Christmas stamp set & Christmas Cardinal Dies. Strips of Red Glimmer Paper are scotch taped to the back of the top layer and the entire top layer is popped up on a Thick Whisper White base.


- Base: Thick Whisper White 4 1/4 X 11 scored at 5 1/2
- Wreath: Whisper White, 3 15/16 (4″ minus a hair) X 5 1/2, emboss with Seasonal Wreath Embossing Folder
- Strips of Red Glimmer Paper: Make 2; 3/8 X 5 1/2; use scotch tape to adhere to the back of the embossed wreath
- Cardinal: Clear Shrinky Dink paper, 2 5/8 X 5; Stamp cardinal with Staz On ink and color the back with alcohol markers
- Banner: Whisper White 1 1/2 X 3 1/2 Stamp greeting with Real Red Ink
- Inside Frame: Red Glimmer Paper, 3 1/8 X 3 1/8, Use circle framelit to cut circle. The two Christmas Cardinal Scrolly dies can be cut from the inside of the red glimmer paper circle
- Inside top greeting: 2 3/4 X 2 3/4 cut with one size smaller circle. I used circles 5 & 6 in the retired circles.
- Branches: Whisper White 3 X 3, Cut two large and two small branches. Place 4 glue dots in the bottom middle of the wreath and layer: one large to right, one to left, one glimmer paper scrolly die to left, one scrolly die to right touching in the middle to look like one, one small branch to the left and one small branch right about the middle to cover all the glue dots. Use glue dots to place the cardinal above the branches so he looks like he is sitting on the red glimmer scrolly.
- Embellish the wreath with red glimmer dots.
Noble Peacock Foil Christmas
This card uses the Noble Peacock Specialty Designer Series Paper with Noble Peacock Foil Sheets cut with the Detailed Bands dies and layered on an oval of Bermuda Bay. The top layer of DSP is bordered with a strip of black foil paper and another black foil strip is cut out with one of the Detailed Bands dies for the inside. The Merry Christmas is a separate piece that is popped up with dimensionals. The card base is Bermuda Bay. The outside Merry Christmas is actually a sticker I picked up from a Krazy Creations craft booth several years ago. The inside greeting is from the “Timeless Tidings” stamp set.


For those who felt the colors were better for a birthday card, the “Band Together” stamp set that is bundled with the “Detailed Bands Dies” (page 121) has a perfect birthday greeting that fits perfectly on the cut out center and was easily embossed with black embossing powder to tie to the overall shiny look of the foils. The inside greeting is from the current “Country Home” stamp set.


- Base: Bermuda Bay 5 1/2 X 8 1/2, scored at 4 1/4
- 1st Layer: Peacock DSP 3 7/8 X 5 1/2
- Strip to border 1st Layer: Black Foil 1/2 X 5 1/2
- Strip at top of inside: Black Foil 1 X 5 1/2 , cut with Detailed Bands Die
- Greeting Layer 1: Bermuda Bay die cut oval 2 1/2 X 3 1/2
- Greeting Layer 2: Turquoise Peacock Foil die cut with Detailed Bands die, trim edges so it covers from the black to the right edge, adhere directly to oval
- Greeting Layer 3: The Detailed Bands Die gives a great cut out to stamp a greeting and pop up with dimensionals
- Embellish: I used 9″ of turquoise sequin ribbon and loops of black thread to adhere behind the oval before gluing the oval directly to the DSP. Two Noble Peacock Rhinestones completed the card.
K-Cup Thank You Gift
For a little thank you gift I made a K-cup holder sitting on top of a pumpkin spice latte mix, the little squiggle below the thank you is in the “A Big Thank You” stamp set:

- Long Strip: Pumpkin Pie, 2″ X 12″ Score at 5″ and 7″ ( Tip: score at 5″ and turn and score other side at 5″), punch each end with Scalloped Tag Topper Punch.
- Inside Box: Early Espresso 3 15/16 X 3 15/16 ( 4 X 4 minus a hair on each side)
- Score each side at 1” and then make tabs at every other corner by cutting 1″ from the corner to the score line. Cut the tabs at an angle to make them easier to adhere. Use Tear and Tape to adhere sides.
- DSP: Make 2: 1 3/4 X 4 1/4
- DSP: Make 2: 1 3/4 X 7/8 (sides of the box)
SAL, Stamp A Lot of Christmas Cards
Karen
Stamp A Stack Christmas Cards
Hello Stamping Friends,
My first of four Stamp A Stacks was yesterday and we used the Snowfall Thinlits and the Snow is Glistening stamp set to make this floating card I cased from ‘Stampin’ With Glittermum’ adding glitter enamel dots and a unique inside.

The Glitter Enamel Dots (#146934) page 197 in the annual catalog are perfect for the centers!

I made the inside a folded card for a ‘card inside a card’, stamping the greeting on the front, under the top panel, and then overstamping with the snowflake dots stamp in the set.
 The card opens and Holley Gerth’s snowflake poem ties in Jesus’ birth with snowflakes!

Snowflake Poem printable pdf file
Click the blue to download a printable pdf file with two poems. Print the file on 8 1/2 X 11 Whisper White cardstock and trim the left side 1/2″. Trim each poem to 5 1/4″ long and score at 4″. Your inside card should be 8″ X 5 1/4″.
- Base is Gorgeous Grape (Bermuda Bay): 7 1/4″ X 4 1/4″, Scored at 5 1/2″. I started by cutting the cardstock in half the long way 11″ X 4 1/4″ and then made the 7 1/4″ cut using the rest for two of the three panels needed.
- 3 panels in Gorgeous Grape (Bermuda Bay): 4 1/4″ X 1 3/4″, One panel will attach to the front of the window sheet and two panels will attach to the back of the front to cover the tape on the window sheet.
- Window Sheet: 4 1/4″ X 3″, place a piece of Tear and Tape on the top and on the bottom of the Window Sheet. Remove the backing from just the bottom tape on the Window Sheet and attach the Window Sheet to the back of a panel. Line up the panel even with the very bottom of the card, remove the top tape backing on the window sheet and fold the top of the card base over the window sheet. Adhere the other two panels to the back of the front covering the window sheet but being careful to keep the panels in line with the base of the card.
- 2 coordinating panel layers in Highland Heather (Coastal Cabana) : 4 X 1 1/2″ , adhere to front
- 2 top panel layers in Whisper White: 3 3/4″ X 1 1/4″, We will make our own Designer Series Paper. Using the little multiple snowflake stamp, stamp randomly in the darker ink, then stamp the larger single snowflake in the lighter ink and finish off with filling in any blanks with the tiny single snowflake in the lighter ink. Hint: place the two panels next to each other on your grid sheet to stamp them at the same time.
- 2 large snowflakes in Highland Heather (Coastal Cabana): 8 1/2″ X 3 1/2″, Cut two snowflakes with the largest thinlit and use Tombow liquid glue to adhere one snowflake to the front middle of the Window Sheet,; Tombow gives you the ability to adjust the snowflake to center it top and bottom. When you are satisfied with the placement, hold the snowflake in place for a bit since it won’t adhere immediately to the window sheet. Attach the second snowflake to the back of the window sheet lining it up with the front snowflake.
- 1 Sparkle snowflake: 2″ X 2″, use Sparkle Glimmer Paper and the medium thinlit to cut a sparkly snowflake. Use Tombow glue to dot the back of the snowflake – count to 10 and then adhere to the large snowflake. Waiting a few seconds keeps the glue from gushing out when you adhere your piece. Attach a matching Glitter Enamel Dot in the center.
- The center panel is Whisper White: 8″ X 5 1/4″ scored at 4″ for an inside card in a card or 4″ X 5 1/4″ for a flat inside.
Be sure you stamp your greeting and sign your name under the panels of the card not under the window sheet.
You may never need another snowflake stamp if you purchase this set with its various sizes. The thinlits even have an attached set of snowflakes for a fun flurry! Purchase by Friday, November 30!
The second card at my Stamp A Stack I will call Comfort & Joy cased somewhat from someone on Pinterest:


Timeless Tidings (#148936) is the stamp set I used for the greetings. It can be seen on page 33 of the Holiday catalog. The greetings are beautiful and I love the mixture of fonts in small and large sizes!
- Base – Call Me Clover: 8 1/2″ X 5 1/2″, score at 4 1/4″
- Top Layer – Whisper White: 4 1/4″ X 4 1/4″ embossed with the Seasonal Wreath Embossing Folder (#146833)
- Two strips of Silver Foil Paper: 4 3/8″ X 1/2″ (the extra 1/8 gives you ease in lining it up under the Whisper White layer- just clip off the excess). I used Tombow again on the back of the white layer and then laid it on the silver strip, top and bottom.
- Flowers: 3/4″ X 4″ Silver Foil,and 3/4″ X 4″ Sparkle glimmer paper. Cut six of each with the thinits from the Detailed Deer Thinlits Dies. There are three flower dies of the same size so you only have to run them twice on each paper strip to get six flowers. Adhere with glue dots offsetting slightly to leave a shadow of silver behind the sparkle flower. Add a red rhinestone (#146924) to the top pushing the rhinestone firmly into the glitter paper.
- Bow: 1/8″ Real Red Ribbon (#144631), 10″ trimmed as needed
The Stamparatus worked great for stamping the Merry Christmas with the green ink multiple times to get a dark image.
The third card I cased from Donna Ross at Stamped Sophisticates just changing out the greeting to use the Farmhouse Christmas stamp set greeting(#148478). It is on page 13 of the Holiday Catalog. The Farmhouse Framelits Dies that match the set (10% off if you bundle them) has a stitched banner framelit used here for the Merry Christmas cut out. The little gold bows are also in the Farmhouse framelit set.


It is so much prettier in real life with the All Is Bright Designer Series Paper (#147892) a beautiful, realistic print with deep green and bright red colors. I used the Timeless Tidings set again for the inside greeting which matched the font in the front greeting from Farmhouse Merry Christmas!
- Base – Garden Green: 5 1/2″ X 8 1/2″ scored at 4 1/4″
- First Layer and inside layer – Old Olive: 5 1/4″ X 4″ – make 2
- Second Layer Outside – All Is Bright Designer Series Paper: 5″ X 3 3/4″
- Inside Second Layer – Very Vanilla: 5″ X 3 3/4″, the Designer Series Paper strips will be glued to this
- Designer Series Paper Strips for inside: 5/8″ X 5″ (or use my trick of making it 5 1/8″ long and then clip the ends)
- Greeting – Very Vanilla: 6″ X 3″, Stamp the greeting once in Real Red, Clean, Stamp again in Garden Green. Cut out the Garden Green greeting with the 2 3/8″ Stitched Shapes circle framelit. Cut out the Merry Christmas in Real Red with the stitched banner in the Farmhouse Framelits.
- Gold Base of the greeting – gold foil paper: 3 3/4″ X 3 1/4″ , Cut out with the Stitched Labels Framelit(#146828) see on page 17 and on page 220 of the Annual Catalog. Pop up each piece of the greeting – the gold is popped up, then the circle is popped up and the banner is popped up.
- With the scrap gold foil you have left over, use the Farmhouse little bows framelit and cut out three gold bows. Adhere two to the greeting and one to the inside.
SAL, Save A Lot
Karen

Welcome to my blog!

Sal Window to Products


