
Home » Posts tagged 'Rectangle Stitched Dies'
Tag Archives: Rectangle Stitched Dies
For The Love of Fall
Hello Stamping Friends,
I do so love fall! However, I would really like fall to come before winter, yet yesterday and today we have had snow here in Castle Rock, CO, so it looks like winter.
 Maybe it is all those Christmas cards you are making that brought on winter.
Now Sal, let’s just call it coincidence and Colorado’s unpredictable weather, okay?
We have two fall cards for you today and a Facebook Live video if you prefer videos over words, though the recipes follow.


Someday I will teach Sal to push the ‘Go Live’ and ‘Start Streaming’ buttons so I can look at the camera. I have heard there is a way to edit the Facebook Lives and delete the first part so that is a skill I need to learn.
Before I post the recipes for the cards let’s take a moment to look at the Stampin’ Up! news for the month:
The Stampin’ Cut and Emboss machine is available for purchase!
Stampin’ Cut & Emboss Machine
This machine has a wide 6″ (15.2 cm) platform that works with all Stampin’ Up! dies and embossing folders. Includes 1 Base Plate (Plate 1), 1 Die Plate (Plate 2), 2 Cutting Plates (Plate 3), and 1 Specialty Plate (Plate 4). #149653, $120.
Here are four videos (less than two minutes each) to show you the details of the new machine:


Magnetic Cutting Plate
Thin, fully magnetic sheet with self-healing cutting surface. Magnetic Cutting Plate (Plate 5) holds dies securely in place, even nested dies. This slim, portable sheet replaces a Cutting Plate in your sandwich, making it even easier to take with you. Use with the Stampin’ Cut & Emboss Machine. #149656 $24
What a beautiful machine! The mini version of the machine is not available yet, but we hope soon. All the plates are available to purchase separately and the specialty plate works with our 3D embossing folders just like the blue plate we had in the past.
Paper Pumpkin for September- You must subscribe by tomorrow! Click on the image:

Name: Hello Pumpkin
Details:
- Kit contains enough supplies to create 20 cracker box treat packages.
- Each cracker box treat package can be customized to celebrate Halloween, Thanksgiving, the autumn season, or all three!
- Coordinating Colors: Bumblebee, Basic Black, Cajun Craze, Cinnamon Cider, Mossy Meadow, Old Olive, Pumpkin Pie, white
September’s kit is a must-have for those who love to celebrate all things spooky. But, for those who don’t enjoy the Halloween haunts, the multi-occasion stamp set combined with a variety of die-cut and reversible paper pieces offers many ways to customize your fall crafts!
The Hello Pumpkin Paper Pumpkin Kit includes enough supplies to create projects celebrating Halloween, Thanksgiving, and the autumn season. Make them all the same, or mix ‘n’ match!
While this kit was designed to offer a unique treat packaging experience to subscribers, the supplies can easily be used to create cards for any autumn occasion. Don’t worry—we’ll be sure to provide plenty of project inspiration to spark your creativity!
The Clearance Rack has been restocked:

Join our team of “Carin’ Crafters” and get more products!
- In addition to the regular starter kit (for $99 USD/$135 CAD, new recruits choose $125 USD/$165 CAD-worth of products) new recruit will also receive enough cardstock pieces to make 16 cards, a pack of Rhinestone Basic Jewels, the So Much Love stamp set, and the Queen Anne’s Lace stamp set—all for their first event.

There is so much going on in September, and I just attended Leader’s Summit so I have lots of ideas to make being a part of the team fun. I would love to have you JOIN NOW!
I want to see how you made that cool pumpkin!
Good plan, let’s get started with my favorite part – teaching!
Simply Thankful
I am casing a card that Rosanne Mulhern of Heartfelt Stampin’ made last year but changing the products to current products and using the Mini Curvy Keepsakes dies to make a pumpkin instead of the Apple Builder punch she used.

- Stamp Set: Country Home
- Punches: Medium Daisy Punch, 3/8″ Circle Punch for the Black Eyed Susan
Dies:
- Mini Curvy Keepsakes Box Dies for the pumpkin and its stem
- Gathered Leaves Dies for the five leaves in different colors
- Banner Blooms Dies for the pumpkin vine
- Forever Flourishing Dies for the little crumb cake accents
- Rectangle Stitched Dies
Did you enter a challenge to see how many dies you could use on one card?
No, I am just stepping out of my comfort zone to make a collage type card. Wait ’til you see the wreath collage I made with the Forever Flourishing dies. Next post!
Recipe for Simply Thankful:
- Base: Basic Black, 5 1/2 X 8 1/2 scored at 4 1/4.
- Barnwood Layer: In Good Taste Designer Series Paper (DSP), 4 X 5 1/4.
- Black Layer: 3 1/2 X 4 3/4 cut with the Rectangle Stitched Die; TIP: use wax paper between the die and the cardstock. Emboss the greeting in white slightly to the right and then use Black Stampin Dimensionals to adhere.
- Pumpkin: Pumpkin Pie Cardstock 2 1/4 X 2, make 2 with the Mini Curvy Keepsakes Die using just the handle section not the slot section of the die. Before trimming down to size and making the bottom and top circular, lay one section 1/4″ over top of the second section and score a line following the curve of the section. Repeat on the other side. Score the line, color it with a Pumpkin Pie Marker and then sponge it. Do the same on the second section if you want to choose between the two sections for which one looks best for the top. Cut the bottom and top of each section to shape the pumpkin. Sponge all the edges of both sections and down the middle of the top section. Cut one section in half and glue each half behind the front section.
- Pumpkin Stem: Cinnamon Cider, 2 X 7/8, Cut with the handle of the Die. (This can be run at the same time as the pumpkin sections.) Cut in half, trim off excess and use a crumb cake marker to add a few lines.

- Pumpkin Vine: Garden Green, 1 X 2, make 2 with the Banner Blooms Dies.
- Medium Leaf: Cajun Craze, 2 X 2, the leaves are all cut with the Gathered Leaves Dies. Sponge the veins lightly and then the edges on all the leaves with their corresponding inks.
- Medium Leaf: Old Olive, 2 X 2, sponge
- Large Leaf: Daffodil Delight, 2 X 2, sponge
- Large Leaf: Merry Merlot, 2 X 2, sponge
- Small Leaf: Mango Melody, 1 1/2 X 1 1/2, sponge
- Black Eyed Susan: Mango Melody, 2 X 2 for each Medium Daisy Punch. You need six punched flowers so a 2 X 8 plus a 2 X 4 strip will work. Sponge the center with Mango Melody. Adhere two together with a glue dot.
- Inside of flowers: Early Espresso, 1 X 3, Punch with 3/8″ or 1/2″ circle punch. Adhere with a glue dot.
- Inside Layer: Mango Melody 4 X 5 1/4
- Bottom Strip on Inside: In Good Taste Designer Series Paper (DSP), 4 X 1/2.

Now the fun part of creating your collage! Start with the pieces on top of the pumpkin and work to the back. I used glue dots- lots of glue dots!
Other options for making a pumpkin are the Apple Builder Punch or using five circles or five ovals to layer together.
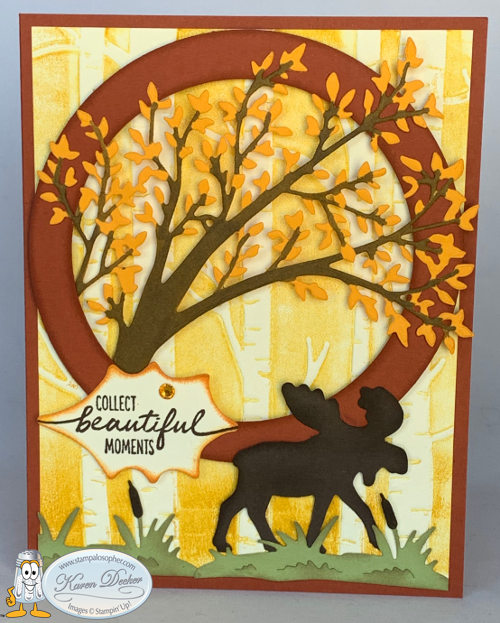
Beautiful Moments

- Stamp Set: Beautiful Moments
- Punch: Moose Punch
- Embossing Folder: Woodland
Dies:
- Circle Die for the frame
- Poinsettia Die for the oak leaf greeting
- Sweet Silhouettes Die for the tree
- Dockside Dies for the grass and cattails
Recipe for Beautiful Moments:
- Base: Cajun Craze, 5 1/2 X 8 1/2 scored at 4 1/4.
- Aspen Grove Layer: Very Vanilla, 4 X 5 1/4, Embossed with the Woodlands Folder after the folder is inked on the indent side with Crushed Curry. I turn the ink pad upside down and tap it on the folder.
- Tree: Mango Melody, 3 1/2 X 5, die cut with the Sweet Silhouette Tree Die. Tip: Use two folded up dryer sheets underneath your cardstock to make removing the little bits quite easy since they stick to the dryer sheet. The tree trunk and limbs are colored with the Dark Soft Suede Stampin’ Blend. The far left side of the tree has a limb that will need cut off so you can attach the trunk of the tree with a glue dot at the bottom left behind the circle frame. (I glued that little branch in the inside of the card as you see above.) Adjust the tree so that all the leaves will be inside the card borders. When you are completely done, place a small amount of Tombow glue on the silicon sheet and use a toothpick to add bits of glue to the leaves to attach to the circle.
- Circle Frame: Cajun Craze 4 1/2 X 4 1/2, Die cut with two layered circle dies to create the frame. Sponge the inside and outside of the frame with Cajun Craze and mount the tree at the bottom left behind the circle. Use Stampin’ Dimensionals to pop up the frame. You will need a dimensional at the thickest part of the trunk of the tree.
- Green grass and cattails: Pear Pizzaz, 2 1/2 X 3; die cut two grass sections from the Dockside Die. Color the cattails with Early Espresso and sponge the grass with Crumb Cake to give it that end of the summer look.
- Moose: Early Espresso, 2 1/4 X 2, punched with the moose punch and sponged on the edges.
- Greeting: Very Vanilla, 2 1/4 X 1 1/2 , die cut with the leaf in the Poinsettia Dies. Stamp with the “collect beautiful moments” from the Beautiful Moments stamp set, sponge the edge with pumpkin pie, then add an orange rhinestone. Glue to the circle but add a tiny dimensional to the left edge to attach to the aspen grove layer.
- Inside: Very Vanilla, 4 X 5 1/4, the little tree limb is glued to the inside corner .
Did I forget anything, Sal?
I sure hope not or you will have so many instructions you will lose your audience.
Paul, my DH, looks at these and says “another Karen card”. I keep telling him someday I will learn to make clean and simple cards but I always want to challenge myself. He suggested I call them Carin’ Cards to reflect a Caring Karen. He got a kiss for that! So I decided our team should be called Carin’ Crafters for the caring and sharing card makers that we are and yet a bit of a spoof on Karen vs. Carin’. What do you think?
Take a look around the new shop! We have new software to make the shopping experience better. I will be back soon to post the swaps and mystery cards we made in August.
SAL, Sighing A Lot as summer leaves us
Karen
Hostess code for September: SA9YHAC3

Silhouette Scenes & Heart Foil Tin Brownies
Hello Stamping Friends,
February hostess code: FPRJEPZJ
How was your Valentines Day?
Mine was phenomenal! My grandsons gave me chocolates and a card and flowers via their folks and Paul brought home chocolates and had my favorite flowers delivered – carnations! I was very spoiled and loved every minute!

I made Paul a card similar to the one on page 132 of the annual catalog.

I changed it up a bit by using the rectangle stitched framelits and a Blueberry Bushel layer on a Balmy Blue card base. I attached a double sided adhesive sheet on the back of White Velvet Sheets (retired), cut out the ‘forever’ using the Sweet Silhouettes Dies and adhered it to a piece of Bluberry Bushel. I cut around the word to make a nice background. Lately, I have been seeing a lot of words embossed in white embossing powder on black paper and then cut out around the words. I liked that look so I imitated it here.
Measurements:
Base: Balmy Blue 5 1/2 X 8 1/2 scored at 4 1/4
Layer 1: Blueberry Bushel 4 1/8 X 5 3/8 (make 2-one for the inside)
Layer 2: See A Silhouette Designer Series Paper 4 X 5 1/4
Together Greeting: Balmy Blue 2 X 1 1/2 cut with Rectangle Stitched Framelit to 1 11/16 X 1 3/16
Silhouette : Whisper White 3 3/4 X 2 1/4 cut with Rectangle Stitched Framelit to 3 9/16 X 2 3/16
Forever: White Velvet DSP 3 1/2 X 1 1/2
Background of Forever: Blueberry Bushel 3 1/2 X 1 1/2
For the inside I printed a poem I wrote on Whisper White cardstock and cut it to 7 3/4 X 5 1/4 scored at 3 15/16 (one hair less than 4 inches) and glued just the right side to a Blueberry Bushel layer.
And for my family and special neighbors I made brownies in the Heart Foil Tins ( page 9 of the mini catalog).

One brownie mix made all 10! I washed the tins really well and sprayed them with PAM no stick spray then cooked them at 350 degrees for 20 minutes. (18 minutes would have been better)
The tins have high-dome lids so you can decorate them as you wish. I used the German Chocolate Coconut Pecan Icing.

For the lid I used several of those fun supplies from the suite on page 9 of the mini. I layered:
- A Heart Doily (stamped on the back-see below)
- A punched out scallop from the From My Heart Specialty Designer Series Paper using the Heart Punch Pack
- A punched straight edge heart from the same DSP using the Heart Punch Pack
- A retired pink heart jewel
A little red bow at the front completed the project. I put two glue dots on the inside of the lid to hold it on better.

On the back of the doilies I stamped Happy Valentines Day from the retired ‘Valentine Love’ stamp set and used three glue dots to adhere the whole set of hearts to the lid. The lid is clear so the greeting shows through when they open up their goody.

If you don’t have food in the tin you can punch another heart for inside the lid. Also, the heart doilies fit perfectly in the bottom of the tin for further bling. The heart tins wash up to use again.
 What’s the point of posting valentines after the day has come and gone?
Ahh Sal, love is in the air everywhere and with anniversaries and birthdays we can change up the greetings and delight someone’s heart any time of year!
If you haven’t met your neighbors, try making a batch of brownies in heart tins with great big hello greetings and take them around as you introduce yourself.
SAL, Send A Love gift
Karen
Click on little Sal to be directed to my online store where you can order the products. If you don’t have a demonstrator I would love to earn your business.

Yummy Christmas Gingerbread House and Cuckoo For You
FPDMJ4X9
Hello Stamping Friends,
I missed posting our September club cards and one is a Christmas card! Now that it is getting down to the wire for Christmas cards you might be looking for the details to this card you made “way back when”!

I cased Bronwyn Eastley with a gingerbread house box card.
http://addinktivedesigns.com/product/yummy-christmas-box-card/
Things I recommend doing differently:
- add strips of window sheets to the back of each pop up
- Make two of each pop up to put front and back so the back is prettier
- cut that little point on the bottom middle front and back just a tiny bit – not cutting in to the black line – so the box sits squarely
- Use the Bronze Stampin’ Blend for the gingerbread man and the deer for a darker brown
- Use puff paint for the snow


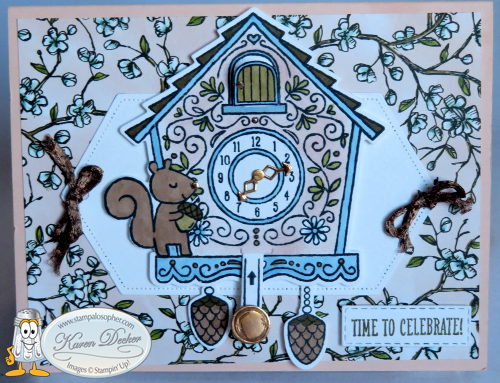
Cuckoo For You
With the ‘Yummy For Christmas’ and ‘Cuckoo For You’, we have two stamp sets that use the same set of dies!


Isn’t that so cool! The deer becomes a holly branch, the clock door becomes a gumdrop, the clock weight becomes a peppermint and the tree becomes a Christmas tree!
Christine Rohr posted a picture on Pinterest which used the Cuckoo For You and the Bird Ballad DSP. I cased and selectively edited it to come up with this card for club:

Push up on the little arrow and you see the little cuckoo bird!


Note: DSP means Designer Series Paper
- Base: Petal Pink 5 1/2 X 8 1/2 Scored at 4 1/4
- Layer 1: Bird Ballad DSP 5 1/4 X 4 Watch the direction on your DSP
- Strip of DSP for inside: 3/4 X 5 1/4
- Front Stitched Nested Label: Whisper White, 2nd largest label is 2 5/8 X 4 5/8 so start with 3 x 5 piece; emboss with the Subtle 3D embossing folder; then cut with the Stitched Nested Label. Use handheld hole punch to punch a hole on each side of the label for the ribbon. Mount the label 1″ down from top of base and 5/8″ from the sides of the base to the point of the Stitched Nested Label
- Ribbon: 1/4″ Copper Trim, 6″ , make two
- Clock and Parts: Whisper White 3 5/8 X 8 1/2; Stamp in Memento Tuxedo Black ink: clock, 2 pulls, 1 squirrel, 1 door; color with Stampin’ Blends: Old Olive on the vines, Bronze on the dots, roof-Dk Soft Suede, Clock Outline-Dk Balmy Blue, Pulls-Bronze & Dk Soft Suede, Squirrel – Bronze body, nut in Lt Suede, with a Dk Suede top, Door – Lt Suede, blue trim and be sure to cut off the white border of the door created when cutting with the framelit. Tip: When coloring with the alcohol markers in tiny areas just barely dot the area to color it. The ink spreads and you won’t be getting ink outside the lines.

- Mask the 2 flowers, the clock middle, the inside of door and sponge with Blushing Bride Ink.

- Clock Weight and clock hands: Copper Foil, 1 1/4 X 1 1/4. Stamp the clock weight in Versa Mark ink, emboss with copper powder and cut with the circle die. Cut the clock hands out of the foil and save the little pieces to use for the squirrel’s nose, the handle on the door, and the little dot right above the 12.
- Clock pull: left over from the Whisper White used for the clock and parts: cut one with the die. I used my Stamparatus to line up the lines with the arrows and the one word “cuckoo” so my stampers could easily stamp the images:

You stamp the arrow and lines image with the right side up and then stamp “cuckoo” on the back of the same piece. With the Stamparatus we could line up the one word “cuckoo” from the greeting “I’m Cuckoo About You” and didn’t even need to mask the edges. By using the grid sheet we can save it with the stamp set for the next time.
The odd looking die with a little heart on the top and the bottom is a piece that matches up with the hearts on the clock face to cut slots for the sliding mechanism in exactly the right places. There are YouTube videos using the two sliding mechanisms to make butterflies that “fly” and other fun tricks so the pieces are good for other applications.
Be careful to fold the score lines of the mechanism very straight so it slides nicely in the slots created by the second die. The slot is a little larger than the door -necessarily so- so that you can slide it in, but once it was in place, I cut two little strips of Whisper White and glued them to either side of the slot so the mechanism stayed straight.

Inside Layer: Whisper White 4 X 5 1/4 stamped in Soft Suede ink with the greetings in the “Special Celebrations” stamp set.
Front Greeting: Scrap of Whisper White run through the Big Shot part way with the Rectangle Stitched Framelit and then turned around and run through the other sider with the same Framelit to shorten it to just the right size for “Time To Celebrate”. I didn’t stop and made the whole Stitched Rectangle so I just ran it again to shorten it and then had a little piece left that was perfectly stitched that I used on this card:

My youngest granddaughter, Emma, was born on 9/24 at 7:12 AM. I moved the house over a bit, found some left over pink twine from a Paper Pumpkin, and stamped the date with one of the first photopolymer stamp sets made by Stampin’ Up!

The inside uses the “New Wonders” stamp set and a template of the ‘1’ cut out of cardstock and then sponged with Blushing Bride Ink. The fairies are colored to match the DSP with white and blue like the flowers and green like the vines. This card will be hard to top when birthday #2 comes around. My grandsons are turning 2 and 3 in the next few weeks and I will be working to make them something memorable. Do you think parents save hand made cards?
The next Christmas Stamp A Stacks are December 4th and 7th at my house at 9:30. RSVP by November 25- next Monday. Wow, where has the month gone?
SAL, Stamp A Lot
Karen


Welcome to my blog!

Sal Window to Products


