
Home » Posts tagged 'Poinsettia Dies'
Tag Archives: Poinsettia Dies
Cuppa Love Christmas Card
It’s freezing cold here in Colorado and a perfect time for a warm cup of tea!


 Your followers just left to go get a cuppa!
Maybe I should as well. We had snow yesterday, but today it is just clear and cold.
This card uses a lot of products. The focal point is from ‘Memory Box’. Memory Box is like a wholesale distributor, available to businesses not personal folks like me, so you have to find someone who sells their products. I purchased mine through Teaspoon of Fun.


There are two dies which cut out three images. At first I thought I had to cut out the ‘liquid’ in a separate cut and paper piece it in the cut but the second die cuts out the image to go behind the cup and the base of the teacup can be used as the ‘liquid’. I didn’t use the base in this card.
Ahhhh……. working smarter instead of harder.
For sure, Sal, and with creating numerous Christmas cards we need all the help we can get.
Last year your New Year’s resolution was to make Christmas cards each month. How did that go?
The usual! But maybe this year…….
Let me just list the crafting details in the recipe instead of explaining what I did and then putting in the recipe.
Recipe
- Base: Thick Basic White, 5 1/2 X 8 1/2, Score at 4 1/4
- Layer (X2): Early Espresso, 5 1/8 X 3 7/8
- Top (X2): Basic White, 5 X 3 3/4; emboss with ‘Snowflake Embossing Folder’, lightly sponge yellow around top of where the teacup will be placed
- Teacup:
- Basic White, 2 1/2 X 3, die cut main image
- Early Espresso ‘Liquid’, 3/4 X 2
- Real Red, 1 1/2 X 2, sponge the middle with white ink and cut out a snowflake in Basic White, 1 X 1, from Stampin’ Up! ‘Snowfall Thinlits Dies’ and adhere with a glue dot.
- Greenery:
- Pine Boughs, Garden Green, 3 X 2 1/2, die cut 2 with largest bough in ‘Christmas Staircase Thinlits Dies’; use one full bough on the left and just the two ends on the right. Tip: It is good to work backwards adhering the pieces on the front, starting with the greeting, then the sending and finally the teacup.
- Holly Leaf, Garden Green, 1 1/4 X 1 1/4, use the smallest poinsettia in the ‘Poinsettia Dies’ Stampin’ Up! set and cut off two of the petals to make a leaf. Adhere to the teacup and add a red jewel for a holly berry.
- Sending: Real Red, 1 5/8 X 3 3/4, apply double back adhesive sheet to the cardstock and then die cut with the Stampin’ Up! ‘Sending Dies’. I used the cut out for the ‘e’ in sending to dot the ‘i’ so it was larger.
- Greeting: Early Espresso, 2 1/2 X 3/4, punched with Stampin’ Up! ‘Word Window’ punch and stamped in Versa Mark with greeting from Stampin’ Up! ‘Poinsettia Petals’ and heat embossed with white embossing powder.
- Heart: Glitter Paper, 1 X 1, die cut with teacup die and paper pieced inside heart above the teacup.
- Inside Greetings:
- Verse is from Stampin’ Up! ‘Holly Berry Happiness’ stamped in Garden Green ink
- Merry Christmas is from Stampin’ Up! ‘Poinsettia Petals’ stamped in Real Red ink
- Flourish at the bottom is from Stampin’ Up! ‘Dashing Deer’ and colored with water color markers (NOT alcohol markers) in green, red, and brown to tie in all the colors. Color the back of your stamp, huff, then stamp.
Just in case you are frustrated with my Christmas card posts well past Christmas, think of how you can make this cup a Valentine card. Click on little Sal in the computer to see what Teaspoon of Fun shows on their site-(their site takes a few seconds to load so don’t think it isn’t linked).
SAL, Smile A Little
Karen

What do you call a lazy kangaroo?
Christmas Ornament/ Party Favor/Gift Tag

One of the projects we made last December at club was this ornament. It could be used as a party favor or a gift tag or……
It is a case of Sandra Roberts tag on sandrascraftstudio.com.
Recipe
There are six pairs of stars from the Stitched Stars Dies with an Evening Evergreen base and a smaller star die cut layer in the Painted Christmas DSP. The DSP is glued directly to the Evening Evergreen with Tombow adhesive and then the top two pairs are popped up using Stampin’ Dimensionals.
- Largest Star: Evening Evergreen, 5 1/2 X 6, die cut with stitched stars die
- Layer: Painted Christmas DSP, 4 X6, die cut with next smaller stitched stars die
- Note: After gluing on the DSP, punch a small hole for the ornament hanger, down far enough to be covered by the point of next star
- Next Star: Evening Evergreen, die cut with next smaller stitched stars die
- Layer: Painted Christmas DSP, die cut with next smaller stitched stars die
- Top Star: Evening Evergreen, die cut with stitched stars die
- Layer: Painted Christmas DSP, die cut with next smaller stitched stars die
- Gold Stems: Gold Foil, 2 1/2 X 2 1/4, Die Cut with Poinsettia die
- Leaves: Garden Green, 2 1/2 X 2, Merriest Frames Hybrid Embossing Folder and Die
- Poinsettias (X2): Real Red, 1 X 2, die cut with Merriest Frames Die
- Add one large gilded gem to the top
- Greeting: Basic White, 2 1/2 X 1 1/2 stamped with Merry Christmas from Curvy Christmas stamp set in Evening Evergreen. Die cut with Stitched Nested Label die and then sponge the edges with Evening Evergreen.
- Hanger: Red Twine, 12″ for hanger, separate 6″ for bow. Double the 12″ and push the loop through the punched hole from front to back then bring the ends through the loop at the back and tighten pushing the sides down around the point. Tie a double know with the ends. Tie a bow and mount with a glue dot on top of hanger.
That would be a good idea, Sal! I did that one year with a circular ornament that I put in a pocket at the front of the card. I made a longer hanger so it could loop to the inside of the card where I attached it lightly with a note saying the ornament could be removed.
 Are you going to make gift tags this year?
You know, Sal, I have trouble with spending time on gift tags since they are thrown away with the wrapping paper with hardly a second look and they are not recyclable since the name is written on the tag. They are pretty and I love getting them on gifts but I am just not into making them.
So followers, let me know if you make gift tags to dress up your packages each year.
Have a wonderful day and thank you for spending some of it with Sal and I.
Karen

Merriest Moments and Poinsettia Petals Center Panel Easel Cards
If you are opening this email in your mobile device, be sure and click on the header again to go to the full blog.
Hello Stamping Friends,
I don’t know when I have had as much fun with a stamp set as I had with Stampin’ Up!’s ‘Merriest Moments’! Usually I search and search for just the right card to teach at club and then I combine different ideas from different cards to come up with what I like. This time was different; I found so many cards that I loved. If you are still on the fence about which stamp set to buy to make your Christmas cards, I recommend the Merriest Moments bundle. It has a stamp set, a set of dies and a hybrid embossing folder. You could make dozens of Christmas cards without a hint of boredom.
Join me here on Youtube or in the written words as I show off this amazing set with the Poinsettia Petals set coming along for fun!

Thank you, Julianne Richards, for the inspiration to make these easel cards! Stampin With Julie Richards.com
Let’s start with the Poinsettia Petals-
 .
.  .
.
Recipe
- Stamps: Poinsettia Petals
- Tools: Poinsettia Dies, Ornate Layers Dies, Stitched Rectangle dies, Double Oval Punch, sponge daubers
- Ink: Shaded Spruce
- Base: Shaded Spruce, 5 1/2 X 8 1/2 scored at 4 1/4. Cut 1 1/2 inches from the score line to the front bottom edge on both the right and left sides. Cut 1″ off the middle flap front edge then score 2 1/4″ from the score line to the cut edge. Glue down the side flaps.
- Side Flaps: Expressions In Ink DSP, 4 1/8″ X 1 3/8″
- Ornate Layer: Shaded Spruce, 5 X 3 1/2, Use the 2nd largest Ornate Layer Die to cut. TIP: Place a dryer sheet folded in half under the cardstock before die cutting to hold all the little pieces. Also place a piece of copy paper 2 1/2 X 1 3/4 under the cardstock on top of the dryer sheet to prevent a film on the back of your die cut piece since it will be visible from back.
- Middle Greeting: Basic White, 2 3/4 X 4, Die cut with the fourth from smallest Stitched Rectangle die; I usually say stamp first then die cut but in this case it is better to see the actual corners for stamping
- Oval Greeting: Basic White, 1 1/2 X 3, stamp then punch with the double oval punch
- Stitched Rectangle, three leaves and leaves for tiny flower : Just Jade, 2 3/4 X 5 1/2; picture below; cut one large and two small leaves and one tiny flower to be the leaves behind the poinsettia. Sponge the edge with Shaded Spruce and they come alive!
- Poinsettias: Cherry Cobbler, 4 1/4 X 5 1/2, Die cut four smaller flowers, 4 tiny flowers and 2 circle tops; picture below. TIP: place double back adhesive tape under the cherry cobbler on the 2 circle tops so you can easily glue them to the gold centers; if you are really careful you can place the tape so it only covers 2/3 or so of the circle and then it is easy to pull off. Happened by serendipity for me. The poinsettias are layered with two same size flowers offset and then a tiny one on top with gold solid centers covered with the red center with holes. TIP: Roll the edges of the flowers toward the middle with a pencil and sponge the edges with Cherry Cobbler.
- Gold Sprigs and centers: Gold Foil, (X2) 1 1/2 X 2 1/2, Die cut one solid round center and one sprig. TIP: cut two separate foil pieces; running foil through the cut and emboss machine can show lines from the cutting pad. Cut one little ball off the sprig for the center of the tiny poinsettia
- Inside Greeting: Basic White, 2 X 2 3/4 (Or use the stitched rectangle in the Merriest Frames dies)
 .
.  .
. The Just Jade rectangle is a duplicate. If you have a scrap you won’t need the length shown on the right. You need two of the gold foils and don’t forget to back the tiny Cherry Cobbler circles with double back adhesive tape.
 The gold foil in the designer series paper and the gold sprigs make this card a wow!
I agree and last year we used the same tools for this card so the set is a great addition to a crafter’s stash! Click to see that post:
 .
. Now on to the Merriest Moments Bundle:

 .
. Don’t you just love those large greetings! Our cards today will use almost everyone of those stamps. So let’s start with the club card:
 .
. 
Merriest Moments Center Panel Easel Card
Recipe
- Stamps: Merriest Moments
- Tools: Merriest Frames Dies and Hybrid Embossing Folder, Stitched Rectangle dies,
- Ink: Shaded Spruce, Cherry Cobbler, Evening Evergreen, Versa Mark
- Base: Shaded Spruce, 5 1/2 X 8 1/2 scored at 4 1/4. Cut 1 1/2 inches from the score line to the front bottom edge on both the right and left sides. Cut 1″ off the middle flap front edge then score 2 1/4″ from the score line to the cut edge. Glue down the side flaps.
- Side Flaps: Expressions In Ink DSP, 4 1/8″ X 1 3/8″
- Gold Foil Layer: Gold Foil, 5 5/8 X 4 3/8; place the border die inside the embossing folder and you can cut and emboss the gold layer at the same time. Of course, in our instance we really just need to cut the layer using the border die from the gold foil but it is so cool to see how it looks embossed! Just playing….
- Detail Layer on the gold: Shaded Spruce, 5 1/2 X 4 1/4, Two steps – 1-cut with the detailed die, 2- place in embossing folder and emboss
- Front and Inside Greeting: Basic White (X2), 2 1/4 X 3; die cut with stitched rectangle in the Merriest Frames Dies
- Bottom Greeting and Easel: Just Jade, 2 3/4 X 1 1/2, Stamp ‘Joy’ with Versa Mark, apply gold embossing powder, heat
- Stamped Images: Basic White, 5 1/2 X 4 1/4; I set up the Stamparatus with all the geenery on one plate and all the flower and berry parts on a separate plate. Stamp the greenery in Evening Evergreen and the Flowers and Berries in Cherry Cobbler. With the stamparatus, I could stamp the Evening Evergreen more than once to get a darker color. Stamp one of each of the greeneries from the set, one large and one small flower, one flower middle and one set of berries.

I used a little extra spacing so we could be sure and die cut each stamped image.
Glue the layers, embellish with three of the In Color jewels and you have one more Christmas card ready to send.
Oh yes, Sal, just remember that many are duplicates of what is on pinterest and all I had to do was add my special touches with different embossing, different DSP and of course – an inside!
Card #1
Inspired by StampWithTami.com using the detail cut out and a separate piece of Night of Navy for the greeting
 .
.  .
. There is a separate full card front layer of Night of Navy that is embossed with the Wintry 3D boughs embossing folder. Don’t be afraid of this mini embossing folder. You can run it through twice to cover the front. I stamped the “Glory to the Newborn King” in versa mark, embossed with white, then fussy cut around the words.
Stamps: For Unto Us, Music From The Heart (retired – but I really wanted music notes)
Card #2
Red Velvet meets Merriest Moments inspired by Margi Stamps:
 .
.  .
.
The pictures don’t do justice to the simple beauty of this card. The outside is embossed on a separate layer of Basic White. Look at all the little snowflakes or stars around the embossed greenery. Love it! The greeting is stamped directly on the embossed front. Red Velvet Paper is on page 41 of the mini. I suggest stocking up.
I wanted to carry the idea of the frame to the middle so I cut a piece of basic white 3 1/4 X 2 1/2 expecting to trim off the edges but I loved the extra embossing around the frame and left it untrimmed.
The outside greeting is ‘Merriest Moments’ and inside is a greeting from the ‘Snowman Season’ stamp set with the Merry Christmas from ‘For Unto Us’. Together is the best place to build heartwarming memories!
Card #3
Jenny Hayward at A Stamping Journey inspired this partial die cut:
 .
.  .
.
I used the center ‘frame only’ idea and ‘Painted Christmas’ Designer Series Paper (DSP) with the detailed Merriest Moments die- cut first, then embossed and cut in half for a side partial die. There is an additional layer of Basic White added on the inside and a matching piece of DSP cut with the stitched rectangle in the set. I used the bough stamp in the Merriest Moments stamp set to do 2nd and 3rd generation stamping for the boughs. The inside greeting and the pinecone are in the ‘Perfectly Plaid’ stamp set. The boughs Wintry 3D embossing folder is used on the right edge.
Card #4
Another partial die cut layered on the side inspired by Jenny Hayward at A Stamping Journey:

 .
.
I used the ‘Snowflake Wishes’ stamp set for the outside greeting and inside snowflakes, The inside greeting is Merriest Moments and the side DSP is from the ‘Gingerbread and Peppermint’ DSP. The large snowflake comes from the set of 24 iridescent snowflakes called Wonderful Snowflakes. (see page 25 of the mini) One of the Stitched Rectangle Dies cut out the greeting perfectly!
Card #5
Inspired by Lori Pinto at Lolly Pop Papers & Ink:
 .
.  .
.
Similar to our easel card in its layering and yet exceptional in the use of Evening Evergreen for the background and Crumb Cake for a layer and the greeting. The greeting is a separate stitched rectangle cut and popped up on the detailed embossed layer.
A ‘Snowman Season’ greeting is used for the inside and Merry Christmas from ‘For Unto Us’. I wanted to bring the outside colors in so I cut Crumb Cake squares diagonally in half and layered them with a little larger diagonal cut square in Evening Evergreen.
Card #6
Here is a different use of the dies by Stamp It Up With Jamie. She cut out the middle and popped up the embossed detail with stampin’ dimensionals (lots) on DSP. I didn’t have the DSP she used so I came up with this using ‘Painted Christmas’ DSP:
 .
.  .
.
The greeting comes from the ‘Frosted Gingerbread’ stamp set. The pine cones are fussy cut from the DSP.
Card #7
Jenny Hayward at A Stamping Journey used vellum so I had to give that a try.
 .
. 
Isn’t it beautiful?! The inside greeting is from ‘Perfectly Plaid’ but everything else is ‘Merriest Moments’. The base is Fresh
Freesia as are the stamped flowers. The greenery is stamped in Soft Succulent and Evening Evergreen. I used three of the smallest In Color gems for the inside of the flower.
You know, it is a good thing they don’t limit you to the number of words you can use!
..or pictures, Sal, I would be in trouble!
So, Stamping Friends, you have 8 Merriest Moments cards for inspiration and 1 Poinsettia Petal card. Which would you use for your Christmas cards if you were to make just one version?? I would love to hear from you!
SAL, Sharing A Lot of Merriest Moments
Karen

Sights & Sounds of the Season
Hello Stamping Friends,
If you are viewing this post in your mobile device, click to open the email and then click again on the header to go to the website so the videos and links work.
Joy is our hostess this month and the hostess code is: 9YGY2BAX
We made a spur of the moment trip to Estes Park last weekend and it was so worth it, even though I am now far behind on my to do list.

The fall colors were exceptional and there had been a river site cancellation at Manor RV park just minutes before we called! Saturday was picture perfect!
 Did you put a pumpkin outside Jasper to decorate?
That would have been fun, Sal, but the neighboring RV had plenty of decorations to enjoy. (By the way, Sal is referring to Jasper, our motorhome, it’s a Jamboree, so of course, being a Stampin’ Up! demonstrator, we needed to have alliteration in the name just like all our Stampin’ Up! colors). Here’s Paul and Jasper on the river site.

So let’s get down to business!
 If we must…. sigh…
Yes, we must! Select Designer Series Papers are on sale- click on the image to view:

And we have a sneak peak of the November Paper Pumpkin- I see a gingerbread house stamp, I hope, and what looks like a house we can decorate and candies…. oh my!
Click on the Jolly Gingerbread image to join or visit page 71 of the Holiday catalog to get a prepaid subscription with the benefit of adding other supplies from your wish list! Use hostess code: 9YGY2BAX and our current hostess, Joy, will be on her way to earning free products.


Last year the Paper Pumpkin had tags and I made cards out of all the tags, click to view that post, and I have heard the sales of gift cards are expected to go up this year! I am certainly running out of ideas and may send a few myself.
FYI: There is a “Joy to the World” Facebook page for those of you who purchased October’s kit.
Event notice: If my kit arrives I will have a ‘Take A Break Tuesday’ Facebook Live next Tuesday, October 20, 9:30AM to look at the October Joy To The World kit and create cards.
Should I change my pumpkin to a snowman?
Oh no, Sal, not yet! But we do want to get a head start on Christmas Cards, so today’s post includes two cards representing Sights and Sounds of the Season. We love looking at poinsettias and hearing the silver bells!
Click here to view the Facebook Live:

Cherish The Season


This layout started with the picture in The Mini Catalog, page 33.
Recipe:
- ‘Cherish The Season’ stamp set
- ‘Sounds of the Season’ dies
- ‘Garden Gateway’ Dies for arch
- ‘Peony’ Dies Border
- ‘Toile Christmas’ stamp set for the greeting
- ‘Christmas Cardinal Dies’ to cut the banner
- Real Red Sheer Ribbon 10″
- Rhinestone Basic Jewels, 3 small, one large
- Inks: Garden Green, Versa Mark, Cherry Cobbler
- Clear Embossing Powder
- Base: Real Red, 4 1/4 X 11 scored at 5 1/2
- Front Sides: Designer Series Paper: Tis The Season, 1 X 5 1/2 (make 2)
- Middle Layer Background: Red Foil, 2 1/2 X 5 1/2
- Swag Base: Whisper White, 2 1/8 X 5 1/2; Die cut the top with the arch from Garden Gateway Dies, and die cut the bottom with the Peony edge die
- Pine Boughs: Garden Green, 1 1/2 X 6; Make 4 little and 4 large boughs
- Bells: Silver Foil, 2 1/4 X 4 1/2 Make one set of four bells and and an extra little bell for the inside; cut the 4 strips (all on one die) for the front four. Use Scotch Tape on the back of the two bells you will color before die cutting and then another piece after cutting. Color the holly leaves with Dk Shaded Spruce Stampin’ Blends and the berries with Lt Cherry Cobbler Stampin’ Blends – color twice for depth of color.

- Front Greeting: Whisper White, 4 1/4 X 1 1/4; stamp Christmas Wishes from Toile Christmas, first in Versa Mark and then in Cherry Cobbler. Sprinkle with clear embossing powder, then heat and cut it out with the Cardinal Die Set. Tip: with clear embossing powder, you have the ability to emboss in any ink color you have.
- Inside Layer: Whisper White, 3 3/4 X 5
- Strip on Inside: Tis the Season DSP, 1/2 X 5
- Stamp set for inside: For Unto Us stamped in Garden Green
In the video, I use Shaded Spruce for the back of the swag instead of the red foil, and I had another card made with Garden Green. Which color do you like the best?
I vote for the Red Foil but I like the greens as well and that would be cheaper!
Poinsettia Petals


Layout cased from Vincenza Montereale on Demonstrator Planning Place.
Recipe:
- ‘Poinsettia’ Dies
- ‘Poinsettia Petals’ stamp set
- ‘Ornate Layers’ Dies
- ‘Stitched Rectangles’ Dies
- Beaded Pearls
- Shimmer Paint
- Stampin’ Spritzer
- Ink: Balmy Blue, Versa Mark and White Embossing Powder
- Base: Thick Whisper White, 8 1/2 X 5 1/2, scored at 4 1/4
- Large Ornate Layer: Balmy Blue, 4 1/4 X 5 1/2
- Flocked Vellum Specialty Paper Layer: 5 X 3 5/8, cut with the 2nd largest stitched rectangle die
- Small Ornate Layer: Balmy Blue, 5 X 3 1/2 , cut both the ornate layer and the center cut out at the same time using the 3rd smallest rectangle die
- Blue Sprigs X2: Use Balmy Blue rectangle cut out from the previous step
- Poinsettia and white sprigs: Whisper White, 5 1/2 X 6 1/4; make two each of the medium poinsettia and two each of the medium large poinsettia and cut three sprigs in white
- Small poinsettia and the Leaf: Balmy Blue Glimmer Paper, 2 1/4 X 2 1/4, Die cut one small leaf and two small flowers.
- Inside Layer: Balmy Blue, 4 X 5 1/4
- Strip: Balmy Blue Glimmer Paper, 3/4 X 4
Thank you for spending some time with me here on the blog and thank you to those who created their club cards with a Facebook Live instead of meeting here at home. The positive side is that there is no waiting as we share the tools, so we accomplished in two hours what normally takes four hours at the house.
Would you like to be part of club? You can pay $5 for the club cards and be our guest! We swap with each other, those who can, and we meet by Zoom on the last Tuesday of the month to share our swap cards, visit with each other and do a Mystery Card challenge.
I would be honored to be your demonstrator and support you however I can as I bring “a pinch of creativity to spice up your crafting world!”
 That’s the part where I came in!
So true and let us all be SALs in this crazy world bringing Salt And Light to everyone we meet!
Virtual Hugs,
Karen
Click on Sal in the computer to go to the online shop and be sure and use the hostess code 9YGY2BAX if your order is under $150 (at $150 you earn the hostess dollars yourself).

For The Love of Fall
Hello Stamping Friends,
I do so love fall! However, I would really like fall to come before winter, yet yesterday and today we have had snow here in Castle Rock, CO, so it looks like winter.
Maybe it is all those Christmas cards you are making that brought on winter.
Now Sal, let’s just call it coincidence and Colorado’s unpredictable weather, okay?
We have two fall cards for you today and a Facebook Live video if you prefer videos over words, though the recipes follow.


Someday I will teach Sal to push the ‘Go Live’ and ‘Start Streaming’ buttons so I can look at the camera. I have heard there is a way to edit the Facebook Lives and delete the first part so that is a skill I need to learn.
Before I post the recipes for the cards let’s take a moment to look at the Stampin’ Up! news for the month:
The Stampin’ Cut and Emboss machine is available for purchase!
Stampin’ Cut & Emboss Machine
This machine has a wide 6″ (15.2 cm) platform that works with all Stampin’ Up! dies and embossing folders. Includes 1 Base Plate (Plate 1), 1 Die Plate (Plate 2), 2 Cutting Plates (Plate 3), and 1 Specialty Plate (Plate 4). #149653, $120.
Here are four videos (less than two minutes each) to show you the details of the new machine:


Magnetic Cutting Plate
Thin, fully magnetic sheet with self-healing cutting surface. Magnetic Cutting Plate (Plate 5) holds dies securely in place, even nested dies. This slim, portable sheet replaces a Cutting Plate in your sandwich, making it even easier to take with you. Use with the Stampin’ Cut & Emboss Machine. #149656 $24
What a beautiful machine! The mini version of the machine is not available yet, but we hope soon. All the plates are available to purchase separately and the specialty plate works with our 3D embossing folders just like the blue plate we had in the past.
Paper Pumpkin for September- You must subscribe by tomorrow! Click on the image:

Name: Hello Pumpkin
Details:
- Kit contains enough supplies to create 20 cracker box treat packages.
- Each cracker box treat package can be customized to celebrate Halloween, Thanksgiving, the autumn season, or all three!
- Coordinating Colors: Bumblebee, Basic Black, Cajun Craze, Cinnamon Cider, Mossy Meadow, Old Olive, Pumpkin Pie, white
September’s kit is a must-have for those who love to celebrate all things spooky. But, for those who don’t enjoy the Halloween haunts, the multi-occasion stamp set combined with a variety of die-cut and reversible paper pieces offers many ways to customize your fall crafts!
The Hello Pumpkin Paper Pumpkin Kit includes enough supplies to create projects celebrating Halloween, Thanksgiving, and the autumn season. Make them all the same, or mix ‘n’ match!
While this kit was designed to offer a unique treat packaging experience to subscribers, the supplies can easily be used to create cards for any autumn occasion. Don’t worry—we’ll be sure to provide plenty of project inspiration to spark your creativity!
The Clearance Rack has been restocked:

Join our team of “Carin’ Crafters” and get more products!
- In addition to the regular starter kit (for $99 USD/$135 CAD, new recruits choose $125 USD/$165 CAD-worth of products) new recruit will also receive enough cardstock pieces to make 16 cards, a pack of Rhinestone Basic Jewels, the So Much Love stamp set, and the Queen Anne’s Lace stamp set—all for their first event.

There is so much going on in September, and I just attended Leader’s Summit so I have lots of ideas to make being a part of the team fun. I would love to have you JOIN NOW!
I want to see how you made that cool pumpkin!
Good plan, let’s get started with my favorite part – teaching!
Simply Thankful
I am casing a card that Rosanne Mulhern of Heartfelt Stampin’ made last year but changing the products to current products and using the Mini Curvy Keepsakes dies to make a pumpkin instead of the Apple Builder punch she used.

- Stamp Set: Country Home
- Punches: Medium Daisy Punch, 3/8″ Circle Punch for the Black Eyed Susan
Dies:
- Mini Curvy Keepsakes Box Dies for the pumpkin and its stem
- Gathered Leaves Dies for the five leaves in different colors
- Banner Blooms Dies for the pumpkin vine
- Forever Flourishing Dies for the little crumb cake accents
- Rectangle Stitched Dies
Did you enter a challenge to see how many dies you could use on one card?
No, I am just stepping out of my comfort zone to make a collage type card. Wait ’til you see the wreath collage I made with the Forever Flourishing dies. Next post!
Recipe for Simply Thankful:
- Base: Basic Black, 5 1/2 X 8 1/2 scored at 4 1/4.
- Barnwood Layer: In Good Taste Designer Series Paper (DSP), 4 X 5 1/4.
- Black Layer: 3 1/2 X 4 3/4 cut with the Rectangle Stitched Die; TIP: use wax paper between the die and the cardstock. Emboss the greeting in white slightly to the right and then use Black Stampin Dimensionals to adhere.
- Pumpkin: Pumpkin Pie Cardstock 2 1/4 X 2, make 2 with the Mini Curvy Keepsakes Die using just the handle section not the slot section of the die. Before trimming down to size and making the bottom and top circular, lay one section 1/4″ over top of the second section and score a line following the curve of the section. Repeat on the other side. Score the line, color it with a Pumpkin Pie Marker and then sponge it. Do the same on the second section if you want to choose between the two sections for which one looks best for the top. Cut the bottom and top of each section to shape the pumpkin. Sponge all the edges of both sections and down the middle of the top section. Cut one section in half and glue each half behind the front section.
- Pumpkin Stem: Cinnamon Cider, 2 X 7/8, Cut with the handle of the Die. (This can be run at the same time as the pumpkin sections.) Cut in half, trim off excess and use a crumb cake marker to add a few lines.

- Pumpkin Vine: Garden Green, 1 X 2, make 2 with the Banner Blooms Dies.
- Medium Leaf: Cajun Craze, 2 X 2, the leaves are all cut with the Gathered Leaves Dies. Sponge the veins lightly and then the edges on all the leaves with their corresponding inks.
- Medium Leaf: Old Olive, 2 X 2, sponge
- Large Leaf: Daffodil Delight, 2 X 2, sponge
- Large Leaf: Merry Merlot, 2 X 2, sponge
- Small Leaf: Mango Melody, 1 1/2 X 1 1/2, sponge
- Black Eyed Susan: Mango Melody, 2 X 2 for each Medium Daisy Punch. You need six punched flowers so a 2 X 8 plus a 2 X 4 strip will work. Sponge the center with Mango Melody. Adhere two together with a glue dot.
- Inside of flowers: Early Espresso, 1 X 3, Punch with 3/8″ or 1/2″ circle punch. Adhere with a glue dot.
- Inside Layer: Mango Melody 4 X 5 1/4
- Bottom Strip on Inside: In Good Taste Designer Series Paper (DSP), 4 X 1/2.

Now the fun part of creating your collage! Start with the pieces on top of the pumpkin and work to the back. I used glue dots- lots of glue dots!
Other options for making a pumpkin are the Apple Builder Punch or using five circles or five ovals to layer together.
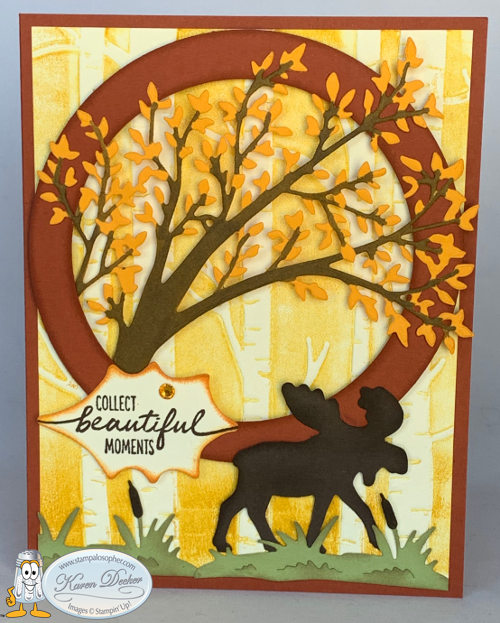
Beautiful Moments

- Stamp Set: Beautiful Moments
- Punch: Moose Punch
- Embossing Folder: Woodland
Dies:
- Circle Die for the frame
- Poinsettia Die for the oak leaf greeting
- Sweet Silhouettes Die for the tree
- Dockside Dies for the grass and cattails
Recipe for Beautiful Moments:
- Base: Cajun Craze, 5 1/2 X 8 1/2 scored at 4 1/4.
- Aspen Grove Layer: Very Vanilla, 4 X 5 1/4, Embossed with the Woodlands Folder after the folder is inked on the indent side with Crushed Curry. I turn the ink pad upside down and tap it on the folder.
- Tree: Mango Melody, 3 1/2 X 5, die cut with the Sweet Silhouette Tree Die. Tip: Use two folded up dryer sheets underneath your cardstock to make removing the little bits quite easy since they stick to the dryer sheet. The tree trunk and limbs are colored with the Dark Soft Suede Stampin’ Blend. The far left side of the tree has a limb that will need cut off so you can attach the trunk of the tree with a glue dot at the bottom left behind the circle frame. (I glued that little branch in the inside of the card as you see above.) Adjust the tree so that all the leaves will be inside the card borders. When you are completely done, place a small amount of Tombow glue on the silicon sheet and use a toothpick to add bits of glue to the leaves to attach to the circle.
- Circle Frame: Cajun Craze 4 1/2 X 4 1/2, Die cut with two layered circle dies to create the frame. Sponge the inside and outside of the frame with Cajun Craze and mount the tree at the bottom left behind the circle. Use Stampin’ Dimensionals to pop up the frame. You will need a dimensional at the thickest part of the trunk of the tree.
- Green grass and cattails: Pear Pizzaz, 2 1/2 X 3; die cut two grass sections from the Dockside Die. Color the cattails with Early Espresso and sponge the grass with Crumb Cake to give it that end of the summer look.
- Moose: Early Espresso, 2 1/4 X 2, punched with the moose punch and sponged on the edges.
- Greeting: Very Vanilla, 2 1/4 X 1 1/2 , die cut with the leaf in the Poinsettia Dies. Stamp with the “collect beautiful moments” from the Beautiful Moments stamp set, sponge the edge with pumpkin pie, then add an orange rhinestone. Glue to the circle but add a tiny dimensional to the left edge to attach to the aspen grove layer.
- Inside: Very Vanilla, 4 X 5 1/4, the little tree limb is glued to the inside corner .
Did I forget anything, Sal?
I sure hope not or you will have so many instructions you will lose your audience.
Paul, my DH, looks at these and says “another Karen card”. I keep telling him someday I will learn to make clean and simple cards but I always want to challenge myself. He suggested I call them Carin’ Cards to reflect a Caring Karen. He got a kiss for that! So I decided our team should be called Carin’ Crafters for the caring and sharing card makers that we are and yet a bit of a spoof on Karen vs. Carin’. What do you think?
Take a look around the new shop! We have new software to make the shopping experience better. I will be back soon to post the swaps and mystery cards we made in August.
SAL, Sighing A Lot as summer leaves us
Karen
Hostess code for September: SA9YHAC3
Welcome to my blog!

Sal Window to Products


