
Home » Posts tagged 'Medium Daisy Punch'
Tag Archives: Medium Daisy Punch
July 2021 Swaps
Hello Stamping Friends,
Hostess Code for August: WRQKTXMA with Joy as our hostess!
Announcement from the home office: The delayed products are back in stock and you can order them now!
If you are new to following blogs, be sure and click to open the blog post in your email and then click the title again to go to the main site. Sometimes the videos don’t even work if you don’t completely open the blog post by clicking twice.
Thank you for giving me some of your precious time as I share inspiration to bring a pinch of creativity to spice up your crafting world!
Today’s inspiration comes from the July swaps! Let’s look at the red, white and blue ones first! I love to decorate the house with cards for the season and now I have some to save forever and put on the end tables and shelves around July 4th. Do you decorate with cards?
Joy’s card feels like a 4th of July picnic with a plate of goodies on a red and white tablecloth amidst a garden of flowers! Love it! She used the ‘Encircled In Friendship’ stamp set and the ‘Encircled in Beauty’ dies with Basic White, Paper Blooms DSP, Berry Delightful DSP, Crinkled Seam Binding and Opal Rounds.

Jo’s card is another ‘save forever to decorate’ card. She used the ‘Ornamental Christmas’ framelits for the stars, the ‘All Around Wreath’ dies for a red and white layered wreath, the ‘Playful Alphabet’ dies for the lettering of July, and ‘Family Party’ for Happy 4th. Inside she used the ‘Celebrate You’ dies. She sponged with Pacific Point ink to get the shaded blue look on the base!


The inside of Sharon’s card was as decorated as the outside and both were beautiful! She used the’ American Celebration’ holiday stamps from Close To My Heart and a 4th of July block stamp for the inside. She used silver, white and aqua tinsel embossing powders with Carousel & silver sparkle embossing glitters. She has a silver star embellishment on the flag, a gold star brad on the fireworks, and blue and red stars from a roll of stickers for the inside. She used a Spots and Dots cuttlebug embossing folder and square dies from Hobby Lobby. Her cardstocks are Whisper White, Cherry Cobbler and blue.


Lori’s swap card would put a smile on anyone’s face! She made watermelons from the ‘Layering Circle dies’ and a ‘Tasteful Label Die’ for the sentiment. She also used ‘Create With Friends’ stamp set and a Close To My Heart ‘August Word Puzzle’ for sentiments. She used a small flower punch and the ‘Pattern Party’ hostess DSP with Whisper White, Polished Pink, Garden Green and Blushing Bride card stock.


Prepare to be wowed, awed and inspired by Ann’s fabulous diorama card! She used the ‘Mountain Air’ stamp set and ‘Majestic Mountain’ dies with a sentiment from Happy Trails by Simple Stories. Her cardstock is Old Olive, Crumb Cake, and Basic White with inks of Early Espresso, Shaded Spruce, Mossy Meadow, Balmy Blue, Pool Party and So Saffron.


My card is a ‘sort of’ case of one I saw Frenchie Martin post at Frenchie Stamps.com. I used her idea of the ‘Stitched Stars’ with the medium ‘Daisy Punch’ and ‘Daisy Punch’ to layer red, white and blue on top of the stars, but I cut the stars in half so they covered more of the card front and I added a different sentiment and ribbon. The dies cut out stars that I used on the top of a 1/2″ Basic White circle and on the inside red and white strips. Do you recognize that Stampin’ Up! red, white and blue ribbon? No? It is the 1/4″ ‘Quilted Ribbon’ in red and green and I used our ‘Dark Night of Navy Blends’ to color the green to make it blue! The sentiment is from the ‘Hey Birthday Chick’ stamp set stamped on a ‘Stitched So Sweetly Die’ with a sponged edge of real red.
 .
. 
Recipe for 4th of July Card:
- Base: Thick Basic White, 5 1/2 X 8 1/2 scored at 4 1/4
- Layer 1: Real Red, 5 1/4 X 4
- Layer 2: Basic White, 5 1/8 X 3 7/8
- Swirly Star: Night of Navy, 4 X 2, cut in half and adhere to red daisy then adhere to card front
- Daisy:
- Real Red 2 1/2 X 2 1/2 punched with larger daisy punch
- Basic White 2 1/2 X 2 1/2 punched with larger daisy punch
- Night of Navy 2 X 2 punched with medium daisy punch
- Circle on top of daisy: Basic White, scrap, with 1/2″ punch layered with a small star cut out from the die
- Greeting: Basic White, 2 1/2 X 2, Stitched So Sweetly Die, stamped in Night of Navy, sponged with Real Red
- Stamp Set: Hey Birthday Chick
- Inks: Night of Navy for sentiment and Real Red for sponging
- Dies: Stitched Stars Dies, Stitched So Sweetly
- Punches: Daisy Punch, Medium Daisy Punch and 1/2″ circle punch
- Ribbon: 1/4″ Quilted Ribbon, 6 1/2″ with the green stripe colored with a Dk Night of Navy Stampin’ Blend
- Inside strips:
- Real Red 4 X 1/2
- Basic White 3 7/8 X 3/8
- 3 Night of Navy stars from the die cut outs used for the swirly stars on front
- Embellishments: 3 holiday red rhinestones
I am so blessed to have found these dear stamping friends!
 Didn’t some of them actually find you?
Yes, Sal, that is true! Through mutual friends and the online search for a demonstrator, we all came together.
We would love to have more of you join our circle of stampers so give me a shout out if you are interested in club or holding a workshop or attending events. 303-815-0838. If you would like to join my team of Carin’ Crafters we have a special offer during Sale A Bration and you can pick out a bundle of your choice to add to your starter kit. Check the details out HERE in my previous blog post!
Hostess Code for August: WRQKTXMA with Joy as our hostess! Click on Sal in the computer to go to the store.
SAL, Smile A Little
Karen
June Mystery Card #14, June Swaps and more
Hello Stamping Friends,
Hostess Code: ZBP7XPBT

For 24 hours only 12:00 AM to 11:59 PM on tomorrow June 24 you can get free shipping on orders $50 and more. Running out of Basic White cardstock, glue dots, stampin dimensionals, …… ?? Order now and if your order totals $50 or more you won’t pay the shipping. Of course the JJ (Jan-June) mini has some amazing items that are retiring and some are even up to 50% off. You can order all you want and not pay the shipping. Click in the Last Chance Box to visit the store and see what is left:

And remember, Stampin’ Up! has a new line of kits and as they sell out, new ones are added so check back often to:

Wow – there is a lot going on!
Yes, Sal, and it just gets better! July 1 Stampin’ Up! will have a sale on select Designer Series Papers (DSP), and in August the new mini catalog and second Sale A Bration (SAB) promotion go live! If you ordered from me this past year, or are a member of club, you will receive both the mini catalog and the SAB brochure in your mailbox! Or contact me if you would like the catalogs and I will send you one. Email: [email protected] or text to 303-815-0838
Let’s look at Mystery Card Challenge #14:
Mystery Card Challenge #14 printable pdf file

Whoo hoo – it’s a Faux Pinwheel Card!!
Well, the true pinwheel cards are made with triangles and one edge folds in to the middle for a fancy fold. Our’s lies flat.
I made one just to make sure the dimensions worked:
 .
. 
I used the Dandy Garden DSP (retiring in 7 days-just saying). The greeting and the inside vine are from Very Versailles and I embossed the front with the Ornate Floral Embossing Folder. I used a 3/4″ circle punch for a scrap embossed piece. Can you guess where the stitched shape for the greeting comes from? No? Well, it is one of the shapes that you die cut with the Messages die. I cut several for use with other greetings like this one! I had truly overlooked this greeting in the Very Versailles set. I love scrolly images and this one is so nice!
Here is the second faux pinwheel card that I made during the Zoom as I instructed others how to construct the card:


I used the True Love DSP which is also retiring with the JJ Mini Catalog. The greeting is from Many Messages which was introduced in the JJ Mini Catalog and carries over to the new Annual Catalog – but wait — it has a second set of greetings in the new catalog:
 .
. Think how nice it would be to have all those shapes cut out blank or stamped to use!
Check out Ann’s bright and pretty faux pinwheel using DSP from Sale A Bration and the Tasteful Textile 3D Embossing Folder. The greeting is another in the Many Messages stamp set.

Sharon’s Pinwheel is unique with amazing trinkets and an embossing folder with anchors!

Jo’s pinwheel card uses the birds from a previous DSP and pool party for a soft subtle look! Her greeting is one I know I will use often; it comes from the Welcoming Window stamp set.

Joy’s card uses black and white DSP from the hostess Pattern Party DSP with a pop of yellow to brighten it up! She embossed the yellow with the Ornate Floral embossing folder

Such fun cards! Thank you Ann, Sharon, Jo and Joy for participating. Send me a picture if you make one yourself and I can add it to this collection of Faux Pinwheel Cards.
June 2021 Swaps
I made my June swap using the Curvy Dies and the Quite Curvy Stamp Set. If I were in charge this set would carry over for years like the Lovely As A Tree set that was in for many years. But it isn’t; it retires June 30 with the JJ Mini. The dies are on sale for 50% off and you would get free shipping tomorrow- ju..
So sorry, I do repeat myself! This card is a case of one that Jenny Moore of Stamping Moments made except I changed the flowers and the DSP. The DSP is from the hostess Pattern Party paper in Misty Moonlight layered on a Just Jade base with a bridge fold design. The yellow flowers and inside greeting are from Hand Drawn Blooms and the daisy is the medium daisy punch.


Recipe for Curvy Bridge Fold Swap Card
- Base: Just Jade, 8 1/2 X 5 1/2, Score at 2 1/8 on each end of the 8 1/2 side
- Right hand side Layer: Pattern Party DSP, 5 1/4 X 1 7/8
- Inside Layer: Basic White, 5 1/4 X 4
- Curvy Cut Left Layer: Basic White, 3 1/2 X 5 1/4, die is placed about 1″ from right hand side with flourish facing left
- Vine, bird, & 2 medium daisy punches: Basic White, 4 1/4 X 5 1/2, stamp then die cut the vine and bird
- Yellow Flowers: Bumblebee, 3 X4, stamp six with Memento Ink and flower in Hand Drawn Blooms; cut the middle out of three of the six and layer on top of the other six with a folded glue dot, ( when you roll a glue dot on itself to use, you get a slight pop up a little less than the depth of a Stampin’ Dimensional.
- Branches of leaves: Just Jade, 3 X 2 1/2, Cut three full branches with the Curvy die and one partial branch for the right hand flower
- Greeting: Misty Moonlight, 3 1/4 X 1 3/4 die cut with a Tasteful Label Die
- Bling on flowers: Ephemera pack sequins
- Faux Felt for Middle of Daisy: Use a scrap of Bumblebee and use a bone folder over and over to distress the cardstock and break the fibers until you can pull apart the two layers of the cardstock. Voila – faux felt.
- Stamp sets: Quite Curvy, Hand Drawn Blooms
- Ink: Versa Mark with white embossing powder for front greeting, Misty Moonlight for inside greeting
- Dies: Curvy Dies, Banner Bloom Dies (yellow flowers) Tasteful Labels Dies
- Punch: Medium Daisy Punch
- Stampin’ Blends: Light and Dark Shaded Spruce for vine and Light and Dark Seaside Spray for birds
Jo’s swap card was so delightful! She used the Dressed To Impress stamp set with a Melon Mambo ‘compact’ on a layer of diamond embossed Basic White on a Basic White base. For the mirror she used silver foil and she used the Layering Circle Dies to cut the folded Melon Mambo, and then sparkled it up with Bright Enamel Shapes.

 .
. Ann used the Back On Your Feet stamp set with Paper Blooms DSP and Old Olive cardstock embossed with the Checks and Dots embossing folder on a Basic Black base. She die cut the scalloped square with the Layering Square die and Crumb Cake card stock. The greeting uses the Double Oval Punch. She has Opal Rounds and Black Matte Dots for bling. She colored the turtle with Old Olive and Soft Suede blends- for a truly perfect ‘blend’ of colors.

Joy made an arrow fun fold card for a striking card-pun intended. She even made specially sized envelopes to mail them. Wow! She used the Expressions in Ink DSP, Artistically Inked Stamps & Dies, Soft Succulent Ink, and Pale Papaya Cardstock. I love that large die cut and the gold foil in the DSP. This card took my breath away!
 .
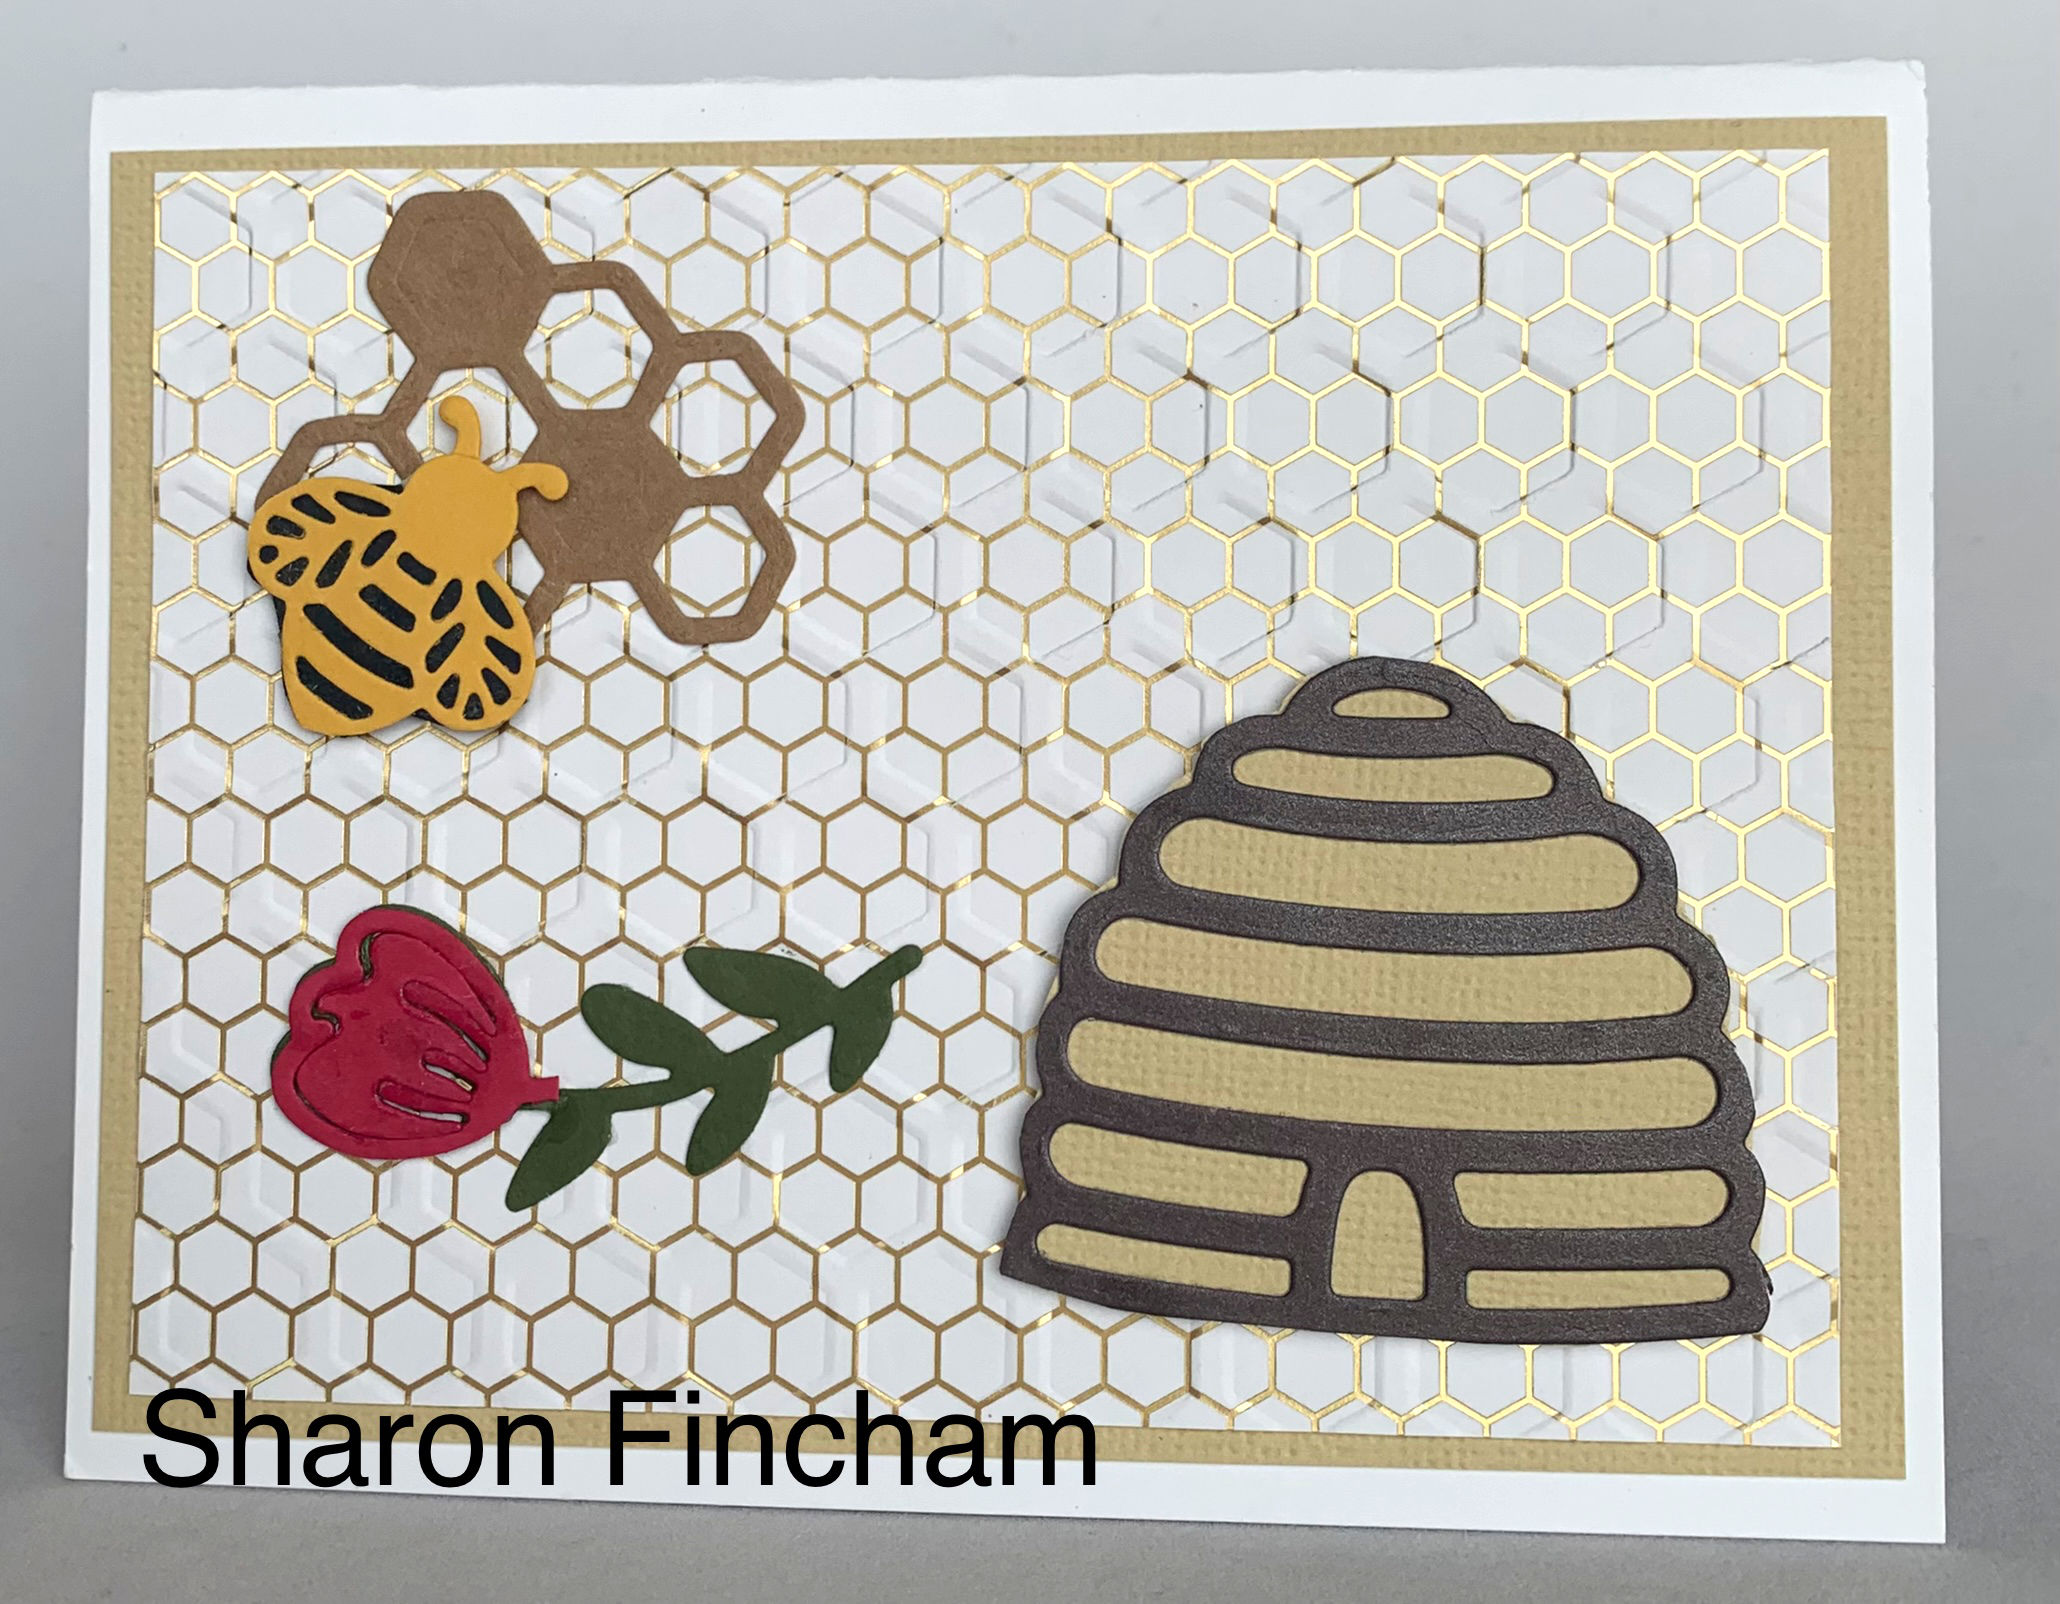
. Sharon’s card uses the Honey Bee stamp set and the Hey Girlfriend stamp set with the Honey Bee DSP and a Honeycomb embossing folder and Bumble Bee dies. So darn cute!!


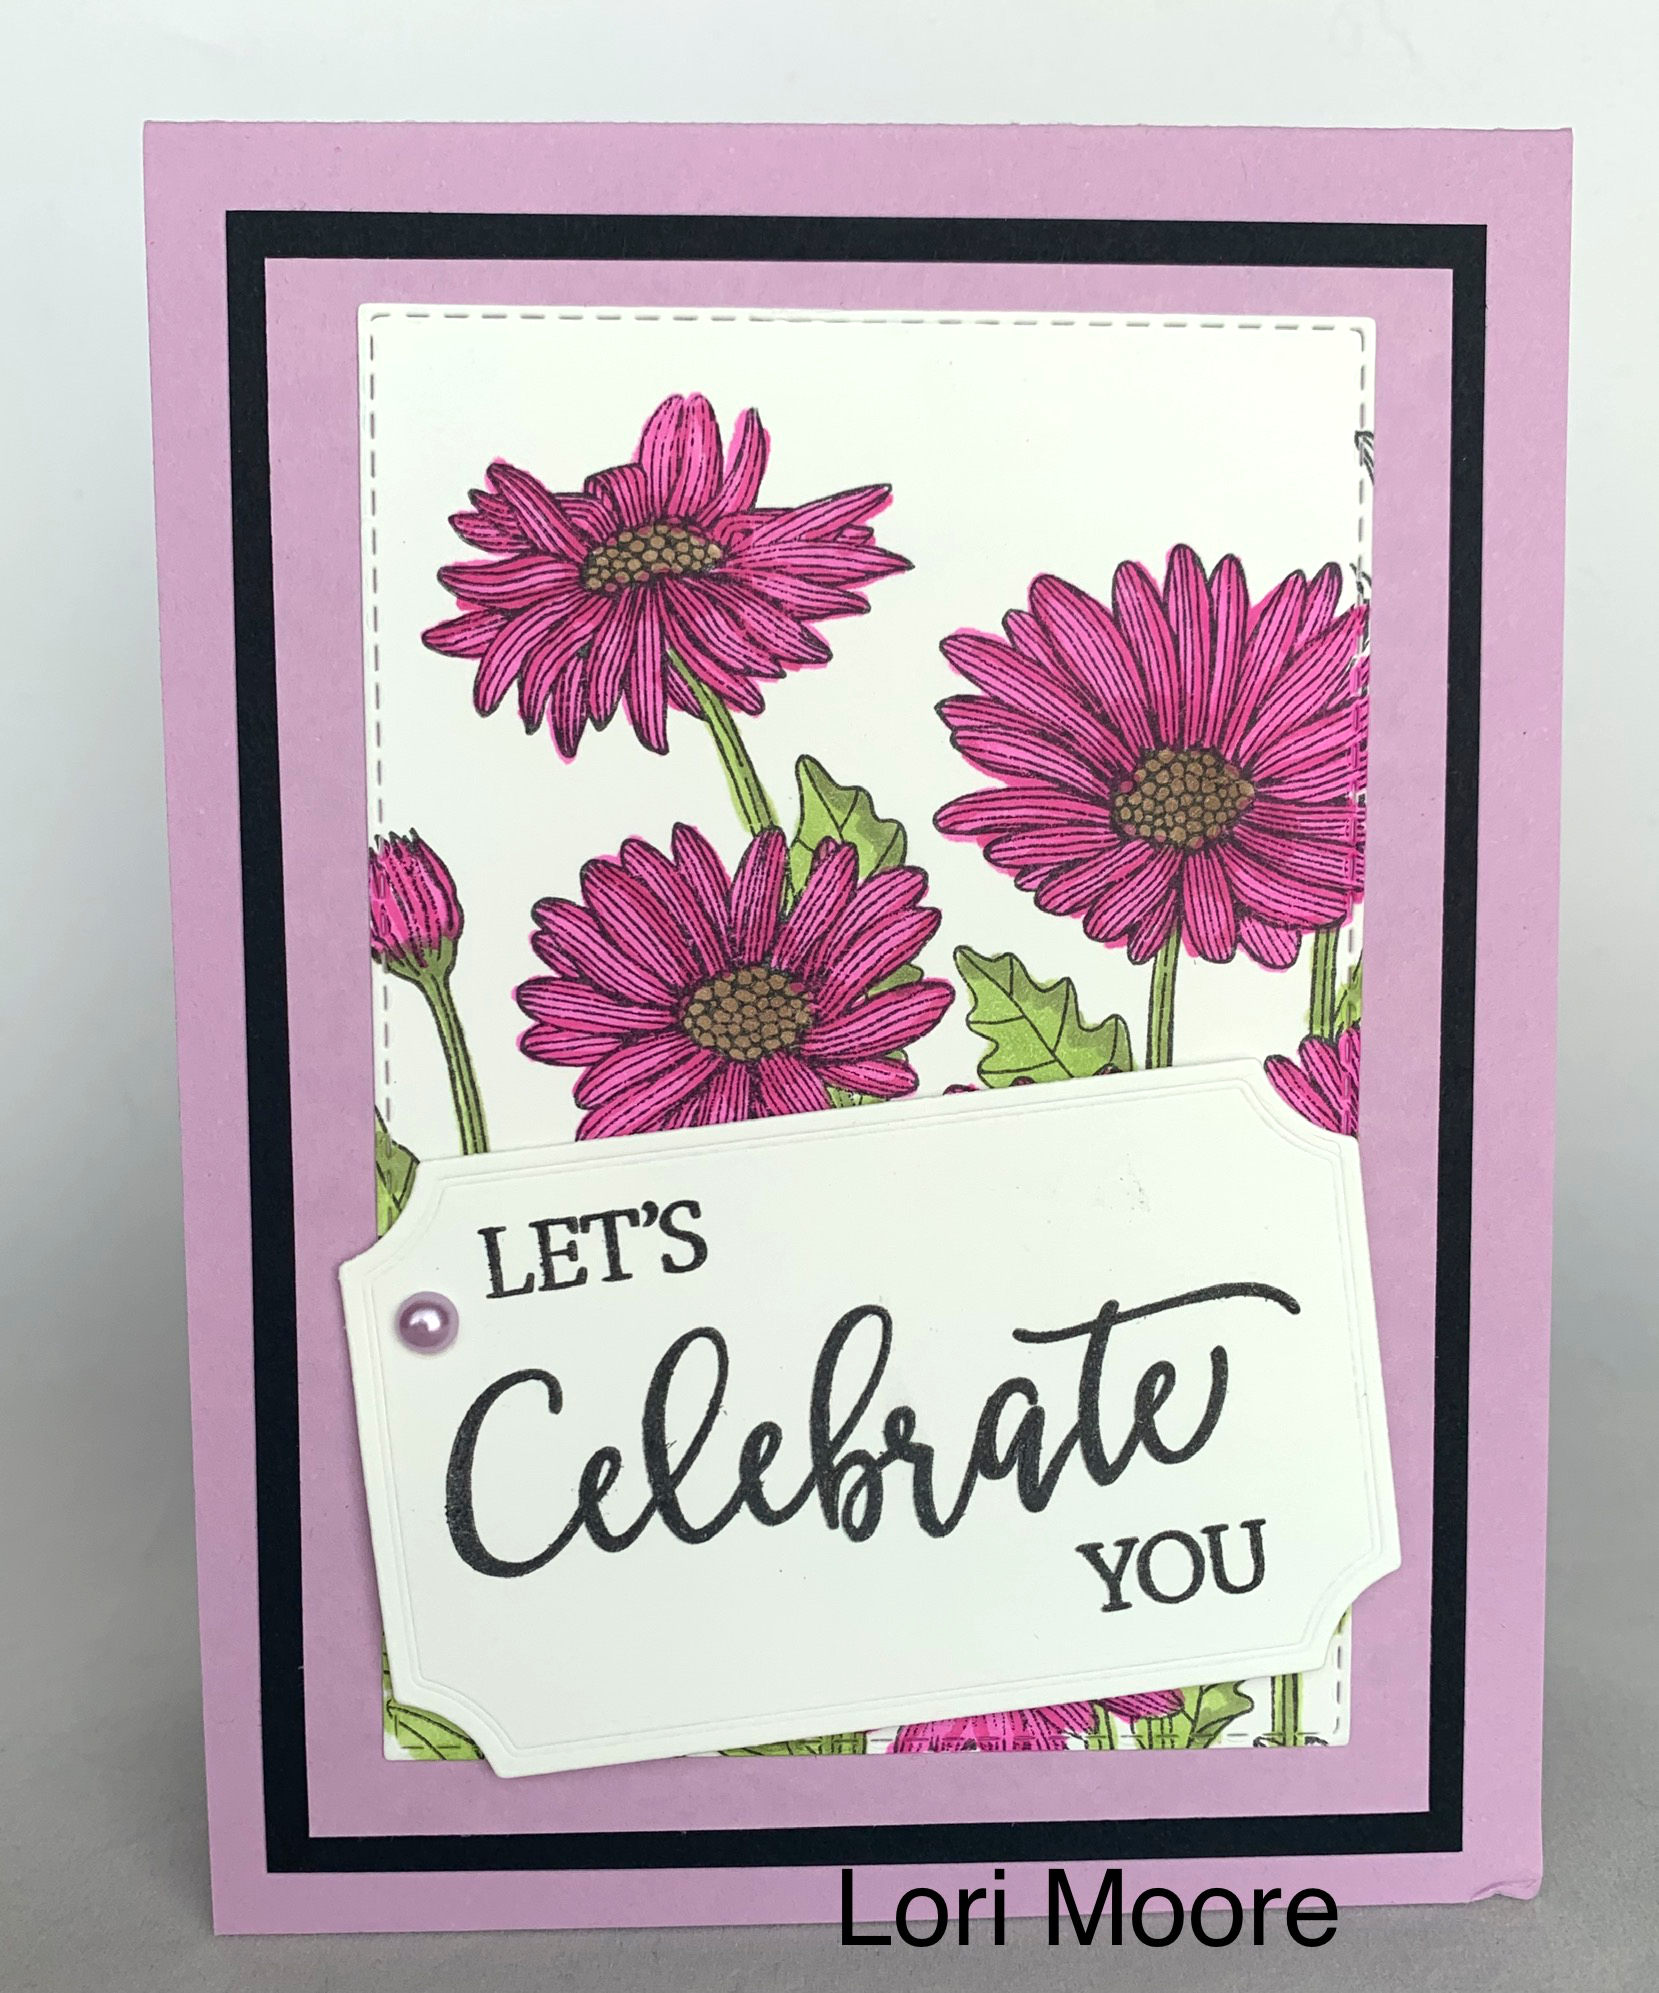
Lori’s card is another beautifully colored card using the Daisy Garden stamp set, the Create With Friends outside sentiment and the Best Year stamp set for the inside sentiment. Her layers are Fresh Freesia, Basic Balck and Whisper White with the top layer cut with the Rectangle Stitched Framelit Die. She colored with Magenta Madness, Mossy Meadow, Bronze and Granny Apple Green Blender Pens. Gorgeous card! I love black as an accent and daisies – ahh be still my heart.


It is a good thing that our cards aren’t in a contest. It would be impossible to pick a winner!
I had three other cards that I wanted to show you just for fun.
Sharon was in a seaside mood and made this additional card:

Joy was using more black and white and made a beautiful card:

And Lucille gave me this thank you card after spending a weekend with me as her house was being shown:

Amazingly talented stampers- each and every one!
That is it for today! Tomorrow Stampin’ Up! will let demonstrators know what DSP will be 15% off starting July 1 so stay tuned.
July we will be traveling to Glacier National Park for a long vacation so there will be no event on my standard second Tuesday of the month but we are swapping in July and I will have those cards at the end of the month.
You told everyone you would be posting the cards from the pansy product class. Yes?
I did say that and yes, I will post those sometime soon!
In the meantime, stock up with free shipping and check out the retiring items.
Hostess Code: ZBP7XPBT
SAL, Still A Lot of items in the sales
Karen

For The Love of Fall
Hello Stamping Friends,
I do so love fall! However, I would really like fall to come before winter, yet yesterday and today we have had snow here in Castle Rock, CO, so it looks like winter.
 Maybe it is all those Christmas cards you are making that brought on winter.
Now Sal, let’s just call it coincidence and Colorado’s unpredictable weather, okay?
We have two fall cards for you today and a Facebook Live video if you prefer videos over words, though the recipes follow.


Someday I will teach Sal to push the ‘Go Live’ and ‘Start Streaming’ buttons so I can look at the camera. I have heard there is a way to edit the Facebook Lives and delete the first part so that is a skill I need to learn.
Before I post the recipes for the cards let’s take a moment to look at the Stampin’ Up! news for the month:
The Stampin’ Cut and Emboss machine is available for purchase!
Stampin’ Cut & Emboss Machine
This machine has a wide 6″ (15.2 cm) platform that works with all Stampin’ Up! dies and embossing folders. Includes 1 Base Plate (Plate 1), 1 Die Plate (Plate 2), 2 Cutting Plates (Plate 3), and 1 Specialty Plate (Plate 4). #149653, $120.
Here are four videos (less than two minutes each) to show you the details of the new machine:


Magnetic Cutting Plate
Thin, fully magnetic sheet with self-healing cutting surface. Magnetic Cutting Plate (Plate 5) holds dies securely in place, even nested dies. This slim, portable sheet replaces a Cutting Plate in your sandwich, making it even easier to take with you. Use with the Stampin’ Cut & Emboss Machine. #149656 $24
What a beautiful machine! The mini version of the machine is not available yet, but we hope soon. All the plates are available to purchase separately and the specialty plate works with our 3D embossing folders just like the blue plate we had in the past.
Paper Pumpkin for September- You must subscribe by tomorrow! Click on the image:

Name: Hello Pumpkin
Details:
- Kit contains enough supplies to create 20 cracker box treat packages.
- Each cracker box treat package can be customized to celebrate Halloween, Thanksgiving, the autumn season, or all three!
- Coordinating Colors: Bumblebee, Basic Black, Cajun Craze, Cinnamon Cider, Mossy Meadow, Old Olive, Pumpkin Pie, white
September’s kit is a must-have for those who love to celebrate all things spooky. But, for those who don’t enjoy the Halloween haunts, the multi-occasion stamp set combined with a variety of die-cut and reversible paper pieces offers many ways to customize your fall crafts!
The Hello Pumpkin Paper Pumpkin Kit includes enough supplies to create projects celebrating Halloween, Thanksgiving, and the autumn season. Make them all the same, or mix ‘n’ match!
While this kit was designed to offer a unique treat packaging experience to subscribers, the supplies can easily be used to create cards for any autumn occasion. Don’t worry—we’ll be sure to provide plenty of project inspiration to spark your creativity!
The Clearance Rack has been restocked:

Join our team of “Carin’ Crafters” and get more products!
- In addition to the regular starter kit (for $99 USD/$135 CAD, new recruits choose $125 USD/$165 CAD-worth of products) new recruit will also receive enough cardstock pieces to make 16 cards, a pack of Rhinestone Basic Jewels, the So Much Love stamp set, and the Queen Anne’s Lace stamp set—all for their first event.

There is so much going on in September, and I just attended Leader’s Summit so I have lots of ideas to make being a part of the team fun. I would love to have you JOIN NOW!
I want to see how you made that cool pumpkin!
Good plan, let’s get started with my favorite part – teaching!
Simply Thankful
I am casing a card that Rosanne Mulhern of Heartfelt Stampin’ made last year but changing the products to current products and using the Mini Curvy Keepsakes dies to make a pumpkin instead of the Apple Builder punch she used.

- Stamp Set: Country Home
- Punches: Medium Daisy Punch, 3/8″ Circle Punch for the Black Eyed Susan
Dies:
- Mini Curvy Keepsakes Box Dies for the pumpkin and its stem
- Gathered Leaves Dies for the five leaves in different colors
- Banner Blooms Dies for the pumpkin vine
- Forever Flourishing Dies for the little crumb cake accents
- Rectangle Stitched Dies
Did you enter a challenge to see how many dies you could use on one card?
No, I am just stepping out of my comfort zone to make a collage type card. Wait ’til you see the wreath collage I made with the Forever Flourishing dies. Next post!
Recipe for Simply Thankful:
- Base: Basic Black, 5 1/2 X 8 1/2 scored at 4 1/4.
- Barnwood Layer: In Good Taste Designer Series Paper (DSP), 4 X 5 1/4.
- Black Layer: 3 1/2 X 4 3/4 cut with the Rectangle Stitched Die; TIP: use wax paper between the die and the cardstock. Emboss the greeting in white slightly to the right and then use Black Stampin Dimensionals to adhere.
- Pumpkin: Pumpkin Pie Cardstock 2 1/4 X 2, make 2 with the Mini Curvy Keepsakes Die using just the handle section not the slot section of the die. Before trimming down to size and making the bottom and top circular, lay one section 1/4″ over top of the second section and score a line following the curve of the section. Repeat on the other side. Score the line, color it with a Pumpkin Pie Marker and then sponge it. Do the same on the second section if you want to choose between the two sections for which one looks best for the top. Cut the bottom and top of each section to shape the pumpkin. Sponge all the edges of both sections and down the middle of the top section. Cut one section in half and glue each half behind the front section.
- Pumpkin Stem: Cinnamon Cider, 2 X 7/8, Cut with the handle of the Die. (This can be run at the same time as the pumpkin sections.) Cut in half, trim off excess and use a crumb cake marker to add a few lines.

- Pumpkin Vine: Garden Green, 1 X 2, make 2 with the Banner Blooms Dies.
- Medium Leaf: Cajun Craze, 2 X 2, the leaves are all cut with the Gathered Leaves Dies. Sponge the veins lightly and then the edges on all the leaves with their corresponding inks.
- Medium Leaf: Old Olive, 2 X 2, sponge
- Large Leaf: Daffodil Delight, 2 X 2, sponge
- Large Leaf: Merry Merlot, 2 X 2, sponge
- Small Leaf: Mango Melody, 1 1/2 X 1 1/2, sponge
- Black Eyed Susan: Mango Melody, 2 X 2 for each Medium Daisy Punch. You need six punched flowers so a 2 X 8 plus a 2 X 4 strip will work. Sponge the center with Mango Melody. Adhere two together with a glue dot.
- Inside of flowers: Early Espresso, 1 X 3, Punch with 3/8″ or 1/2″ circle punch. Adhere with a glue dot.
- Inside Layer: Mango Melody 4 X 5 1/4
- Bottom Strip on Inside: In Good Taste Designer Series Paper (DSP), 4 X 1/2.

Now the fun part of creating your collage! Start with the pieces on top of the pumpkin and work to the back. I used glue dots- lots of glue dots!
Other options for making a pumpkin are the Apple Builder Punch or using five circles or five ovals to layer together.
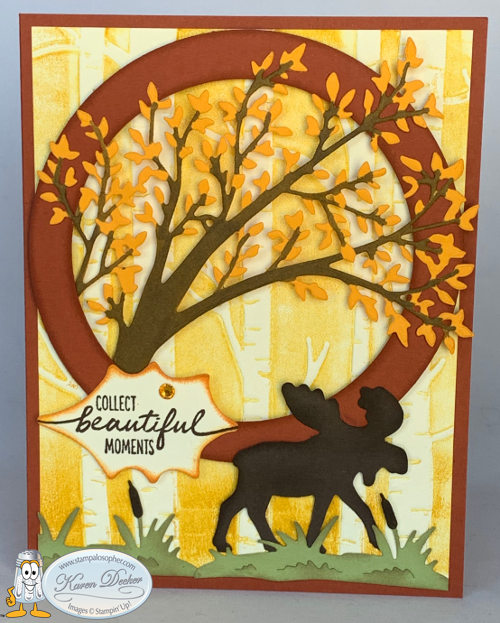
Beautiful Moments

- Stamp Set: Beautiful Moments
- Punch: Moose Punch
- Embossing Folder: Woodland
Dies:
- Circle Die for the frame
- Poinsettia Die for the oak leaf greeting
- Sweet Silhouettes Die for the tree
- Dockside Dies for the grass and cattails
Recipe for Beautiful Moments:
- Base: Cajun Craze, 5 1/2 X 8 1/2 scored at 4 1/4.
- Aspen Grove Layer: Very Vanilla, 4 X 5 1/4, Embossed with the Woodlands Folder after the folder is inked on the indent side with Crushed Curry. I turn the ink pad upside down and tap it on the folder.
- Tree: Mango Melody, 3 1/2 X 5, die cut with the Sweet Silhouette Tree Die. Tip: Use two folded up dryer sheets underneath your cardstock to make removing the little bits quite easy since they stick to the dryer sheet. The tree trunk and limbs are colored with the Dark Soft Suede Stampin’ Blend. The far left side of the tree has a limb that will need cut off so you can attach the trunk of the tree with a glue dot at the bottom left behind the circle frame. (I glued that little branch in the inside of the card as you see above.) Adjust the tree so that all the leaves will be inside the card borders. When you are completely done, place a small amount of Tombow glue on the silicon sheet and use a toothpick to add bits of glue to the leaves to attach to the circle.
- Circle Frame: Cajun Craze 4 1/2 X 4 1/2, Die cut with two layered circle dies to create the frame. Sponge the inside and outside of the frame with Cajun Craze and mount the tree at the bottom left behind the circle. Use Stampin’ Dimensionals to pop up the frame. You will need a dimensional at the thickest part of the trunk of the tree.
- Green grass and cattails: Pear Pizzaz, 2 1/2 X 3; die cut two grass sections from the Dockside Die. Color the cattails with Early Espresso and sponge the grass with Crumb Cake to give it that end of the summer look.
- Moose: Early Espresso, 2 1/4 X 2, punched with the moose punch and sponged on the edges.
- Greeting: Very Vanilla, 2 1/4 X 1 1/2 , die cut with the leaf in the Poinsettia Dies. Stamp with the “collect beautiful moments” from the Beautiful Moments stamp set, sponge the edge with pumpkin pie, then add an orange rhinestone. Glue to the circle but add a tiny dimensional to the left edge to attach to the aspen grove layer.
- Inside: Very Vanilla, 4 X 5 1/4, the little tree limb is glued to the inside corner .
Did I forget anything, Sal?
I sure hope not or you will have so many instructions you will lose your audience.
Paul, my DH, looks at these and says “another Karen card”. I keep telling him someday I will learn to make clean and simple cards but I always want to challenge myself. He suggested I call them Carin’ Cards to reflect a Caring Karen. He got a kiss for that! So I decided our team should be called Carin’ Crafters for the caring and sharing card makers that we are and yet a bit of a spoof on Karen vs. Carin’. What do you think?
Take a look around the new shop! We have new software to make the shopping experience better. I will be back soon to post the swaps and mystery cards we made in August.
SAL, Sighing A Lot as summer leaves us
Karen
Hostess code for September: SA9YHAC3

Welcome to my blog!

Sal Window to Products


