
Home » Posts tagged 'Christmas Cardinal Dies'
Tag Archives: Christmas Cardinal Dies
Sights & Sounds of the Season
Hello Stamping Friends,
If you are viewing this post in your mobile device, click to open the email and then click again on the header to go to the website so the videos and links work.
Joy is our hostess this month and the hostess code is: 9YGY2BAX
We made a spur of the moment trip to Estes Park last weekend and it was so worth it, even though I am now far behind on my to do list.

The fall colors were exceptional and there had been a river site cancellation at Manor RV park just minutes before we called! Saturday was picture perfect!
 Did you put a pumpkin outside Jasper to decorate?
That would have been fun, Sal, but the neighboring RV had plenty of decorations to enjoy. (By the way, Sal is referring to Jasper, our motorhome, it’s a Jamboree, so of course, being a Stampin’ Up! demonstrator, we needed to have alliteration in the name just like all our Stampin’ Up! colors). Here’s Paul and Jasper on the river site.

So let’s get down to business!
 If we must…. sigh…
Yes, we must! Select Designer Series Papers are on sale- click on the image to view:

And we have a sneak peak of the November Paper Pumpkin- I see a gingerbread house stamp, I hope, and what looks like a house we can decorate and candies…. oh my!
Click on the Jolly Gingerbread image to join or visit page 71 of the Holiday catalog to get a prepaid subscription with the benefit of adding other supplies from your wish list! Use hostess code: 9YGY2BAX and our current hostess, Joy, will be on her way to earning free products.


Last year the Paper Pumpkin had tags and I made cards out of all the tags, click to view that post, and I have heard the sales of gift cards are expected to go up this year! I am certainly running out of ideas and may send a few myself.
FYI: There is a “Joy to the World” Facebook page for those of you who purchased October’s kit.
Event notice: If my kit arrives I will have a ‘Take A Break Tuesday’ Facebook Live next Tuesday, October 20, 9:30AM to look at the October Joy To The World kit and create cards.
Should I change my pumpkin to a snowman?
Oh no, Sal, not yet! But we do want to get a head start on Christmas Cards, so today’s post includes two cards representing Sights and Sounds of the Season. We love looking at poinsettias and hearing the silver bells!
Click here to view the Facebook Live:

Cherish The Season


This layout started with the picture in The Mini Catalog, page 33.
Recipe:
- ‘Cherish The Season’ stamp set
- ‘Sounds of the Season’ dies
- ‘Garden Gateway’ Dies for arch
- ‘Peony’ Dies Border
- ‘Toile Christmas’ stamp set for the greeting
- ‘Christmas Cardinal Dies’ to cut the banner
- Real Red Sheer Ribbon 10″
- Rhinestone Basic Jewels, 3 small, one large
- Inks: Garden Green, Versa Mark, Cherry Cobbler
- Clear Embossing Powder
- Base: Real Red, 4 1/4 X 11 scored at 5 1/2
- Front Sides: Designer Series Paper: Tis The Season, 1 X 5 1/2 (make 2)
- Middle Layer Background: Red Foil, 2 1/2 X 5 1/2
- Swag Base: Whisper White, 2 1/8 X 5 1/2; Die cut the top with the arch from Garden Gateway Dies, and die cut the bottom with the Peony edge die
- Pine Boughs: Garden Green, 1 1/2 X 6; Make 4 little and 4 large boughs
- Bells: Silver Foil, 2 1/4 X 4 1/2 Make one set of four bells and and an extra little bell for the inside; cut the 4 strips (all on one die) for the front four. Use Scotch Tape on the back of the two bells you will color before die cutting and then another piece after cutting. Color the holly leaves with Dk Shaded Spruce Stampin’ Blends and the berries with Lt Cherry Cobbler Stampin’ Blends – color twice for depth of color.

- Front Greeting: Whisper White, 4 1/4 X 1 1/4; stamp Christmas Wishes from Toile Christmas, first in Versa Mark and then in Cherry Cobbler. Sprinkle with clear embossing powder, then heat and cut it out with the Cardinal Die Set. Tip: with clear embossing powder, you have the ability to emboss in any ink color you have.
- Inside Layer: Whisper White, 3 3/4 X 5
- Strip on Inside: Tis the Season DSP, 1/2 X 5
- Stamp set for inside: For Unto Us stamped in Garden Green
In the video, I use Shaded Spruce for the back of the swag instead of the red foil, and I had another card made with Garden Green. Which color do you like the best?
I vote for the Red Foil but I like the greens as well and that would be cheaper!
Poinsettia Petals


Layout cased from Vincenza Montereale on Demonstrator Planning Place.
Recipe:
- ‘Poinsettia’ Dies
- ‘Poinsettia Petals’ stamp set
- ‘Ornate Layers’ Dies
- ‘Stitched Rectangles’ Dies
- Beaded Pearls
- Shimmer Paint
- Stampin’ Spritzer
- Ink: Balmy Blue, Versa Mark and White Embossing Powder
- Base: Thick Whisper White, 8 1/2 X 5 1/2, scored at 4 1/4
- Large Ornate Layer: Balmy Blue, 4 1/4 X 5 1/2
- Flocked Vellum Specialty Paper Layer: 5 X 3 5/8, cut with the 2nd largest stitched rectangle die
- Small Ornate Layer: Balmy Blue, 5 X 3 1/2 , cut both the ornate layer and the center cut out at the same time using the 3rd smallest rectangle die
- Blue Sprigs X2: Use Balmy Blue rectangle cut out from the previous step
- Poinsettia and white sprigs: Whisper White, 5 1/2 X 6 1/4; make two each of the medium poinsettia and two each of the medium large poinsettia and cut three sprigs in white
- Small poinsettia and the Leaf: Balmy Blue Glimmer Paper, 2 1/4 X 2 1/4, Die cut one small leaf and two small flowers.
- Inside Layer: Balmy Blue, 4 X 5 1/4
- Strip: Balmy Blue Glimmer Paper, 3/4 X 4
Thank you for spending some time with me here on the blog and thank you to those who created their club cards with a Facebook Live instead of meeting here at home. The positive side is that there is no waiting as we share the tools, so we accomplished in two hours what normally takes four hours at the house.
Would you like to be part of club? You can pay $5 for the club cards and be our guest! We swap with each other, those who can, and we meet by Zoom on the last Tuesday of the month to share our swap cards, visit with each other and do a Mystery Card challenge.
I would be honored to be your demonstrator and support you however I can as I bring “a pinch of creativity to spice up your crafting world!”
 That’s the part where I came in!
So true and let us all be SALs in this crazy world bringing Salt And Light to everyone we meet!
Virtual Hugs,
Karen
Click on Sal in the computer to go to the online shop and be sure and use the hostess code 9YGY2BAX if your order is under $150 (at $150 you earn the hostess dollars yourself).

Christmas Stamp A Stack
Hello Stamping Friends,
October Stamp A Stack:
Here are pictures of the cards we made at the October Stamp A Stack. If you have questions leave your requests in the comment section.
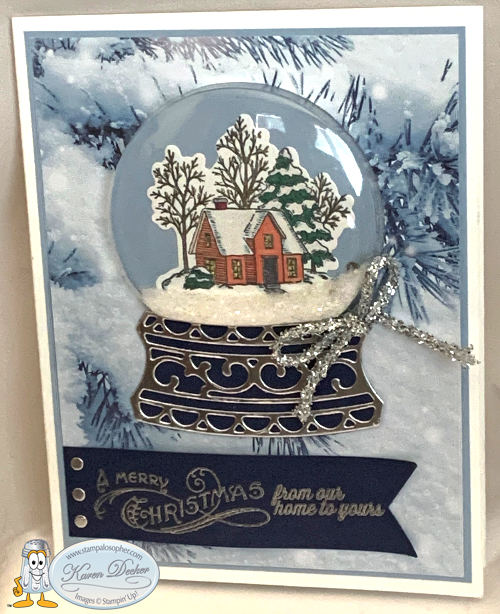
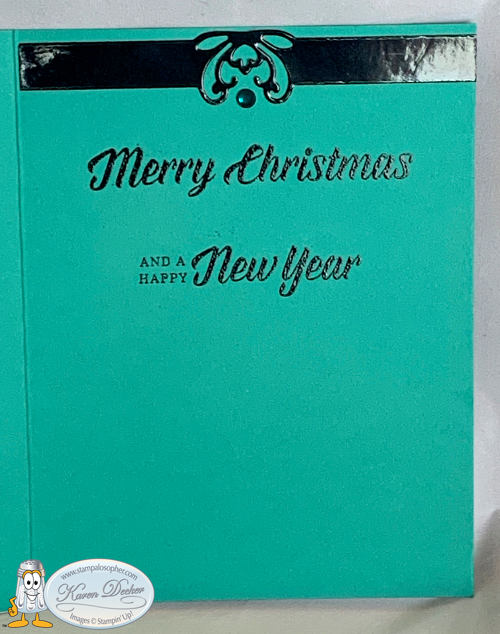
Still Scenes Snow Globe
Still Scenes Snow Globe with Feels Like Frost Designer Series Paper on a layer of Seaside Spray and a cardbase of Thick Whisper White. The banner and base background are Night of Navy. The greetings are from the Bells and Boughs stamp set and the Farmhouse Christmas.


TIP: Make yourself a template out of cardstock and you can cut multiples quickly:

- Base: Whisper White 5 1/2 X 8 1/2 Scored at 4 1/4
- 1st Layer and inside: Make 2; Seaside Spray 5 1/4 X 4
- 2nd Layer: Frost DSP 5 1/8 X 3 7/8
- Inside Top Layer: Whisper White 5 1/8 X 3 7/8
- House: Whisper White 2 1/2 X 2 1/2, Stamp in Memento ink and color with Stampin’ Blends
- Snow Globe Base: Night of Navy 3 X 1 3/4
- Snow Globe Base top layer: Silver Foil 3 X 1 3/4, Tip: attach to adhesive sheet then run through Big Shot
- Banner: Night of Navy 1″ (minus a hair) X 4″ Punch with Banner Triple Punch
- Embellishments: 8″ ribbon and three silver foil punch dots punched with hand held punch
- Snow: A little bit of Ice Stampin’ Glitter with a few of the Snowflake Sequins
Shrinky Dink Cardinal on Seasonal Wreath
Seasonal Wreath 3D embossing folder with Shrinky Dink Cardinal from Toile Christmas stamp set & Christmas Cardinal Dies. Strips of Red Glimmer Paper are scotch taped to the back of the top layer and the entire top layer is popped up on a Thick Whisper White base.


- Base: Thick Whisper White 4 1/4 X 11 scored at 5 1/2
- Wreath: Whisper White, 3 15/16 (4″ minus a hair) X 5 1/2, emboss with Seasonal Wreath Embossing Folder
- Strips of Red Glimmer Paper: Make 2; 3/8 X 5 1/2; use scotch tape to adhere to the back of the embossed wreath
- Cardinal: Clear Shrinky Dink paper, 2 5/8 X 5; Stamp cardinal with Staz On ink and color the back with alcohol markers
- Banner: Whisper White 1 1/2 X 3 1/2 Stamp greeting with Real Red Ink
- Inside Frame: Red Glimmer Paper, 3 1/8 X 3 1/8, Use circle framelit to cut circle. The two Christmas Cardinal Scrolly dies can be cut from the inside of the red glimmer paper circle
- Inside top greeting: 2 3/4 X 2 3/4 cut with one size smaller circle. I used circles 5 & 6 in the retired circles.
- Branches: Whisper White 3 X 3, Cut two large and two small branches. Place 4 glue dots in the bottom middle of the wreath and layer: one large to right, one to left, one glimmer paper scrolly die to left, one scrolly die to right touching in the middle to look like one, one small branch to the left and one small branch right about the middle to cover all the glue dots. Use glue dots to place the cardinal above the branches so he looks like he is sitting on the red glimmer scrolly.
- Embellish the wreath with red glimmer dots.
Noble Peacock Foil Christmas
This card uses the Noble Peacock Specialty Designer Series Paper with Noble Peacock Foil Sheets cut with the Detailed Bands dies and layered on an oval of Bermuda Bay. The top layer of DSP is bordered with a strip of black foil paper and another black foil strip is cut out with one of the Detailed Bands dies for the inside. The Merry Christmas is a separate piece that is popped up with dimensionals. The card base is Bermuda Bay. The outside Merry Christmas is actually a sticker I picked up from a Krazy Creations craft booth several years ago. The inside greeting is from the “Timeless Tidings” stamp set.


For those who felt the colors were better for a birthday card, the “Band Together” stamp set that is bundled with the “Detailed Bands Dies” (page 121) has a perfect birthday greeting that fits perfectly on the cut out center and was easily embossed with black embossing powder to tie to the overall shiny look of the foils. The inside greeting is from the current “Country Home” stamp set.


- Base: Bermuda Bay 5 1/2 X 8 1/2, scored at 4 1/4
- 1st Layer: Peacock DSP 3 7/8 X 5 1/2
- Strip to border 1st Layer: Black Foil 1/2 X 5 1/2
- Strip at top of inside: Black Foil 1 X 5 1/2 , cut with Detailed Bands Die
- Greeting Layer 1: Bermuda Bay die cut oval 2 1/2 X 3 1/2
- Greeting Layer 2: Turquoise Peacock Foil die cut with Detailed Bands die, trim edges so it covers from the black to the right edge, adhere directly to oval
- Greeting Layer 3: The Detailed Bands Die gives a great cut out to stamp a greeting and pop up with dimensionals
- Embellish: I used 9″ of turquoise sequin ribbon and loops of black thread to adhere behind the oval before gluing the oval directly to the DSP. Two Noble Peacock Rhinestones completed the card.
K-Cup Thank You Gift
For a little thank you gift I made a K-cup holder sitting on top of a pumpkin spice latte mix, the little squiggle below the thank you is in the “A Big Thank You” stamp set:

- Long Strip: Pumpkin Pie, 2″ X 12″ Score at 5″ and 7″ ( Tip: score at 5″ and turn and score other side at 5″), punch each end with Scalloped Tag Topper Punch.
- Inside Box: Early Espresso 3 15/16 X 3 15/16 ( 4 X 4 minus a hair on each side)
- Score each side at 1” and then make tabs at every other corner by cutting 1″ from the corner to the score line. Cut the tabs at an angle to make them easier to adhere. Use Tear and Tape to adhere sides.
- DSP: Make 2: 1 3/4 X 4 1/4
- DSP: Make 2: 1 3/4 X 7/8 (sides of the box)
SAL, Stamp A Lot of Christmas Cards
Karen

Welcome to my blog!

Sal Window to Products


