
Home » Posts tagged 'Be Mine Stitched Framelits'
Tag Archives: Be Mine Stitched Framelits
February Club Swaps
Hello Stamping Friends,
March’s hostess code is: A3VBV4QZ
Check out these beautiful swap cards made by the club members and come back tomorrow to see the Mystery Card #10 that is a fun part of being in club. Each month I make cards and deliver kits to the club members; then we gather on the second Tuesday of the month at 9:30 via Facebook Live to construct the kits. On the last Tuesday of the month we meet via Zoom to share our swap cards, chat a bit, and do a Mystery card challenge. I send the instructions for the card and then each person gathers the supplies and we put the cards together on the Zoom meeting. Each person chooses their own color of cardstock and designer series paper and it is so fun to see all the different cards made with the same set of measurements.
 Before you show and tell February, shouldn’t you tell them about March?
I almost forgot! We are ready to celebrate and get together again. Since March is a non-club month I am having my first in-house stamping event to stamp two cards with the Hey Birthday Chick bundle and two cards with the Butterfly Brilliance Bundle – (available to purchase March 2). Space is limited to four people but there are four sessions. Stampers will each be seated on one side of a large table so we are still distanced from each other. Cost is $15. Text me at 303-815-0838 if you are interested. I can take Paypal, Venmo, Cash or Check.
- Tuesday, March 9, 1:00 PM. —Full
- Wednesday, March 10, 10:00 AM. — Open
- Wednesday, March 10, 1:00 PM — Open
- Saturday, March 13, 10:00 AM —Full
How many of the members swapped?
We had six members swap and myself. Let’s start with Lori’s ‘Everything Is Rosy’ Gatefold Card. There was a ‘Rosy Suite’ that you could purchase last year and after it retired, the whole suite was in the clearance rack. I hope some of you were able to get this amazing set of products. The outside sentiment, flowers and Everything Is Rosy DSP are all from the suite. The inside sentiment is from the current ‘So Sentimental’ stamp set. Night of Navy is the base cardstock.


Next we have Jo’s card using the Flight of Fancy and Heartfelt stamp sets with gray for the base and a sponged white Layering Oval as well as Stitched Shapes and Be Mine Stitched Framelits. Inside has “so lucky to have a friend like you” in pink.

Suzi used the current JJ Mini Flowering Cactus Product Medley for her swap card on a layer of white card stock embossed with the Dainty Diamonds embossing folder. This medley has dies, twine, DSP-designer series paper, a lovely cactus stamp set and die-cut felt sheets. See page 9 of the JJ mini. There is also a refill kit!

Joy used the oh so beautiful heart from the Stitched Be Mine Dies which carried over to the Annual Catalog! If you were in club a couple years ago you will remember this beautiful DSP. Hopefully you have some in your stash.

Lucille’s card uses paper that is quite similar to our Forever Greenery DSP. The sentiment is from Stampin’ Up’s Quite Curvy Stamp set and the hearts are from her Framelits Heart Collection.
 .
. Sharon has outdone herself once again with the Wreath Builder Dies and the Arrange A Wreath stamp set. I didn’t notice that little heart with the love cut out until I saw her card. I had to go see those dies (pg. 173).
 .
. My card uses the ‘Floral Heart Dies’ In the JJ MIni page 12 and is a case of Kylie Bertucci with a bit different pink. The sentiment is from the ‘Always In My Hear’t coordinating stamp set. I die cut the floral heart in basic black and then cut another in Flirty Flamingo, popped the pink heart up with dimensionals over top of the black heart and then ‘paper pieced’ the little flowers with the Flirty Flamingo sections. The key is to use the double back adhesive on the card stock and a dryer sheet to keep the pieces together. Stay tuned for a future video on paper piecing.
 .
. Recipe
- Base: Basic Black, 11 X 4 1/4 scored at 5 1/2
- Layer: Basic White, 5 1/4 X 4
- Floral Heart: Basic Black, 4 1/2 X 4 1/4, place the cardstock on a piece of double back adhesive sheet 4 X4 1/4, die cut with the Floral Heart Die
- Pink Heart and Flowers: Flirty Flamingo, cut a full piece of the Floral Heart Die and paper piece on top of the black or Die cut the heart with a 2 1/2 X 2 1/2 piece of Flirty Flamingo and (2) 1 X 1 pieces cutting just the flower portion. Use double back adhesive on the flowers and die cut on top of a dryer sheet to keep the pieces together.
- Greeting: Basic Black, 1 X 2 1/2, stamp the greeting in Versa Mark ink and heat emboss with white embossing powder. Hint: stamp your greeting at the top corner of your rectangle then fussy cut the bottom and sides.
- Embellish: Various, I used black ribbon, pink ribbon, or black ribbon on a Flirty Flamingo strip and three rhinestones
 .
.
In the Floral Heart Dies is a cut out for just the flower so I cut it once in black and then again in Flirty Flamingo placing both on the adhesive sheets and a dryer sheet before cutting. The little hearts are in the coordinating ‘Always In My Heart’ stamp set. Purchased together, you would get a 10% discount. The Happy Valentines Day is from the ‘Heartfelt’ stamp set currently in the Annual catalog page 75. As catalogs retire, you can look at the date of the post and go to the catalog tab to find the catalog I refer to and see other examples.
Thank you for spending time with me today. Tomorrow we will look at Mystery Card #10 and the new Butterfly Brilliance Bundle that is being offered as a special in March.
SAL, Smile A Little – spring is coming!
Karen
Click on Sal in the computer to go to my online shop. March’s hostess code is: A3VBV4QZ

Vibrant Vases Tri-fold card
Good morning, Stamping Friends,
It probably won’t be morning by the time you get this post in your mailbox but currently it is still morning in Karen’s World!

Don’t you mean Stampalosopher? Karen’s World was your accounting firm.
Yes, indeed, it is a Stampalosopher World! Today I have one of two cards to show you that I created for a stint as a guest presenter in Grand Junction. The first was inspired by Joy Meadows and the very lovely card she sent for my birthday. Thank you, Joy!


Do you see how the front right hand flap is exactly the same size as the left side white layer with the same size black border? So cool! The white flaps inside and out are 3″ X 3 1/2″ with a black border of 3 1/8″ X 3 5/8″. The paper is from the SAB (Sale A Bration) Botanical Butterfly DSP (Designer Series Paper). One side had butterflies and the other had black and white designs like the dots Joy used here. I hope you stocked up on this paper during SAB! Her base is 9 7/8″ X 5 1/2″ scored at 4 1/8″ and 8 3/8″ . This leaves a right hand flap of 1 1/2″. The butterfly is from the Butterfly Gala stamp set which is still current and has a punch to match. See page 46 of the Annual Catalog.

But Karen, you can’t use retired Designer Series Paper!
I know, Sal, so I chose to use the Vibrant Vases and the Pressed Petals DSP with an accent color of Blueberry Bushel, one of the 2018-2020 In Colors that I will definitely need to stock up on before it retires next June.
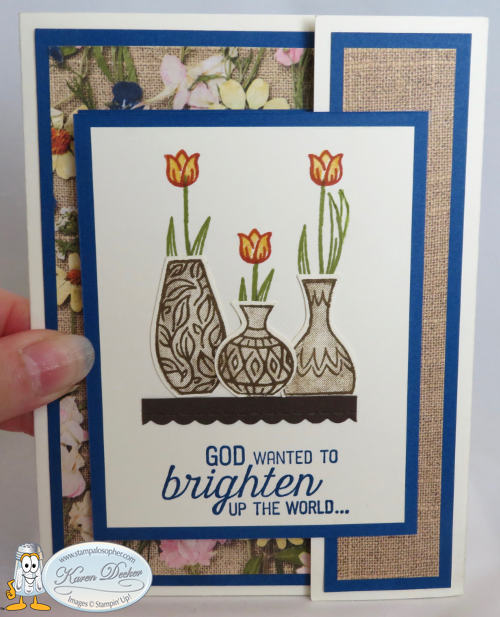


Don’t you love the Pressed Petals DSP with the Blueberry Bushel? There is even a sheet of the DSP with plain burlap that I used for the right side little panel to coordinate with the background of the pressed petals.

And the Pressed Petals is part of the current “Buy 3 packs of DSP and Get One Free”!
That’s right, Sal, thanks for the input!
I used the Flourishing Phrases stamp set for the sentiments on the flap and the left side of the card and left the inside blank for a birthday, congratulations or just thinking of you sentiment. I needed a little larger flap than what Joy used for the butterflies so the measurements won’t be the same. The goal was to have the outside vases a bit plain with the inside vase truly “vibrant” to match the sentiments. The Vibrant Vases stamp set is a two-step stamp set with outline stamps for the vases and then a stamp-to-color for each vase and it even has a punch to match! Check out page 61 of the Annual Catalog. The yellowed images show what images are punchable. (Is that a word?)

I stamped the outside vases with the border stamps in Soft Suede and then stamped again with the stamp-to-color stamps after stamping off to lighten the image. I used the “H” acrylic block and spaced out the three vases and stamped with the outline stamps on a 6 X 3 piece of Whisper White. I then placed the (clean) stamp-to-color stamps on top of the images and took another “H” acrylic block and pressed it down on the stamps to attach them to the blocks in the perfect position. The stamparatus would have worked better but it was in use for the other card.

You could order a second one. I could help, page 184, #146276.
Thanks Sal. That might be a good idea for the next time. To make the inside vase truly “vibrant”, I stamped it in Blueberry Bushel, colored in the diamonds with Cajun Craze and Daffodil Delight regular markers and then took my Versa Mark ink and inked the entire image. I applied “Clear Embossing Powder” and then heated it to make the vase look like glass.
Stamp the greenery and flowers directly on the Very Vanilla card stock pieces – the flap for the outside and the Pretty Label punched piece for the left hand side. Adhere the vases directly to the paper since they are punched out and look 3D without dimensionals. I adhered the two larger vases close enough together so that I could adhere the middle little vase slightly on top of the larger ones and all three would fit on the 2″ shelf that was cut from Early Espresso card stock to a final size of 2″ X 1/4″ with the “Be Mine” stitched framelits. Hint: Start with a larger piece of Early Espresso and cut the scallop edge with the framelit and then place it in the Stampin’ Trimmer to cut to the 1/4″ shelf size. I cut a piece longer than the desired 2″ so I could cut exactly 1/2 of a scallop at each edge of the shelf.
She told me she was a “recovering perfectionist”! Maybe she needs more therapy. SHHHH……
Did you say something, Sal?
The shelf is adhered with the top of the shelf 1 1/4″ from the bottom of the Very Vanilla layer and 3/8″ over from the left and right sides. Stamp the greeting in Blueberry Bushel under the shelf.
It can be tricky to stamp the greenery at the right spot for the vases so stamp your vases and punch them out then trim off the bottom white edge of the vases. Punches generally leave a little edge all the way around the image just like what we teach in fussing cutting. You want the vases to sit directly on the shelf so trim off that bottom edge.
Temporarily place your vases where you want them on the shelf and use a pencil to lightly outline the top of each vase. Now make three more light pencil marks where you want your stem to attach to the tulip. The tulip is 3/8″. Vary the heights of the three tulips. Use a sticky note to mask the shelf and where the vases will be and stamp the stem and greenery in Old Olive. Then stamp the tulips in Cajun Craze and stamp-to-color in Daffodil Delight. I had a shadow on one of my leaves so I just hand drew another leaf to utilize the shadow.
Sheri always called that “Design Opportunity”!
That she did! And that it is! We sometimes use tiny butterflies or hearts to cover our shadows and it adds beauty to the card. I just ordered erasers from Amazon that are supposed to remove ink without damaging the paper. I will let you know if they work.
A Stitched Labels Die is used for the little greeting that says “so he made you” and the fancy die in that same set is used for the DSP cutout on the left side. The Pretty Label punch is used for the vase and flowers on the left side. This is one of those times when you want to punch first and then stamp so you can align the flowers and vase on the punched piece. Use the same procedure of placing the vase temporarily on the piece, lightly draw the top of the vase, mask with a sticky note and stamp the flowers with Memento Black ink, then adhere the vase, color the flowers in Daffodil Delight and the greenery in Garden Green. Adhere rhinestones colored with Cajun Craze Stampin’ Blends. Sponge the edge of the Pretty Label punched piece and the little rectangle greeting with Blueberry Bushel and pop up both pieces with dimensionals.
Summary:
Stamp sets: Vibrant Vases, Flourishing Phrases
Inks: Blueberry Bushel, Soft Suede, Old Olive, Cajun Craze, Daffodil Delight, Tuxedo Memento Black
Markers: Blueberry Bushel, Garden Green, Daffodil Delight
Stampin’ Blends: Cajun Craze to color rhinestones
Framelits/Dies: Be Mine, Stitched Labels
Punches: Vases Builder, Pretty Label
Embellishments: Four rhinestones colored with Cajun Craze
Card Base: Thick Very Vanilla 9 7/8″ X 5 1/2″ Scored at 4 1/8″ and 8 5/16″ ; Fold in the little right side first and then fold in the left side over the middle.
First Layer on left side and middle: Blueberry Bushel (make 2) 3 7/8″ X 5 1/4″ , Cut out the middle of the inside one. I used a retired rectangular framelit that I use to save paper when I am layering. A stitched rectangle framelit would work as well.
Second Layer on left side and middle: Pressed Petals DSP (make 2) 3 5/8″ X 5″ ; Cut out the center of the inside DSP layer with the Stitched Shapes Die- the fancy one. Use the cut out for the left side behind the Pretty Label punched piece.
Third Layer on left side and the flap for the front: Blueberry Bushel (make 2) 3 1/8″ X 4″. The left side 3rd layer is adhered 1/2″ down from the edge of the DSP and 1/4″ over from the edge of the DSP.
Fourth Layer on left side and the front flap: Very Vanilla (make 2) 2 7/8″ X 3 3/4″
Little Right side first layer: Blueberry Bushel, 1 1/4″ X 5 1/4″.
Little Right side second layer: DSP in plain burlap 1″ X 5″
The Blueberry Bushel Front Flap is adhered 1/2″ down from the burlap DSP on the little right side to exactly match the left side. This is done last! I put two pieces of tear and tape at the far right of the flap and then matched up the flap to the card’s left side and pressed it in place.
Shelf: Early Espresso, 4″ X 4″ Cut to 2″ X 1/4″ with the Be Mine Scalloped framelit and the Stampin’ Trimmer
Vases: Very Vanilla, Use the leftover from cutting the base or a 6″ X 3″
Punched Label: Very Vanilla 2″ X 2 3/4″
Left side greeting and the left side vase: 1 1/2″ X 3 3/4″ , you need it large enough to be able to hold it as you punch the vase. Stamp the greeting on the same piece and cut with the Little Stitched Labels Framelit.
I remember you looking at that little Die and saying it was too little to use for anything.
I did say that! Amazing isn’t it?! I am glad I have that set. I used two of the Dies on this card. I love the one I call the “fancy” Stitched Label Die!


Okay Sal, I am through with this post and it is your turn to guide folks to the store where they can shop to their hearts content! Don’t forget to check the Clearance Rack, friends, before you place your order, there are many Christmas sets available at great prices. I have a post coming up from our first Christmas card Stamp-A-Stack called Clearance Rack meets Stamp-A-Stack. Stay tuned!
SAL, Stamp A Lot, Smile A Little, Share A Love
Karen


Bird House Fancy Fold
Hello Stamping Friends,
What a wonderful summer it has been as we traveled to Yellowstone and camped at the base of the Grand Tetons and then traveled to a wedding shower and traveled again for the wedding celebration and traveled to be the guest presenter at a Stamp A Stack. Whew….. it is good to be home. The yard is glad we are home as well.
Amid all the traveling I even had club here in Castle Rock!
I love most all things “bird” and fell in love with the Bird Ballad Designer Series Paper (DSP), so for club we made a Bird House fancy fold card. I made a second one for my husband so I will show both.

The card on the left uses current Stampin’ Up! products whereas the one on the right uses two punches for the roof that are retired.


The fold is a fun diagonal fold and I cut the inside whisper white layer to have a matching angle so I could use one of the larger birds on top of the heart. Here is a close up:

The roof has three layers of scallops cut from the ‘Stitched Labels’ framelits, a ‘Flourish Thinlit’ strip cut out and then cut right down the middle and mounted on two strips of blue mitered at the top to make the gables. Part of a flourish from the ‘Be Mine Stitched Framelits’ and a little heart from ‘Stitched Labels’ was used. A 1″ punched circle of soft suede is sponged and popped up behind the heart cut out. Sponging is added to give depth to the Soft Suede and a rhinestone is added for a little sparkle:

The dimensions will be below but let’s compare the other card and some of the differences on it:

Aren’t those birds just the cutest!! TIP: When fussy cutting your birds and flowers do not cut clear into the legs or the branches, just use Stampin’ Blends or markers that match the background and color the small areas to match. This keeps the cut out image stronger and it is not noticeable. I used soft suede between the legs of the bird that was over the circle and Balmy Blue for between the legs that were outside of the circle. Can you tell? Hmmm.. I think I will go back and color all the edges on the cut out bird on the first card instead of leaving a little white like I have trained myself to do in fussy cutting.
The gables are from the retired ‘Dotted Scallop Punch’ and the scallops are from a retired ‘Scallop Punch but – –
The ‘hello’ sign is still current in the ‘Barn Door’ stamp set and has framelits to cut it out in the ‘Sliding Door’ framelits. We have used this set multiple times so it is a must for a stamp collection. I stamped the sign once in Soft Suede and once in Flirty Flamingo and then cut out just the hello of the Flirty Flamingo and popped it up.
I used the ‘Crackle Paint’ stamp on both cards but on the second card I scored and folded the card and then ran it through the Big Shot with the current ‘Pinewood Planks 3D’ embossing folder.

What a different look! You could run the front and back through the Big Shot separately if you didn’t want the middle fold to have different directions on the wood look.
I did a straight cut on the top of the Whisper White inside layer instead of angles like the first card. Here is a close up:

TIP: With cards like these that don’t stand up nicely by themselves I like to make a CARD STAND 3 3/4″ X 2 1/2″ scored and folded 1/4″ on each end of the long end.
Dimensions and supplies used:
Card Base: 10 3/4″ X 3 3/4″ Score at 5 3/8″
-Mark 3 3/8″ from each end on both sides and score diagonally
-Make the birdhouse hole by laying the smallest of the Stitched Shapes Circle Framelits 1 1/16″ from the edge of the framelit to the edge of the bottom and the right and left sides. Cut and then sponge the edge with Balmy Blue.
-Mask the back of the card base and stamp the front with the Crackle Stamp in Balmy Blue. Run through the Big Shot with the Pinewood Planks embossing Folder if desired.
Roof: Soft Suede 3″ square cut in half.
-Roof Scallops: (3) Soft Suede 6″ X 1/2″ cut with the ‘Be Mine Stitched Framelit’ and then cut to 4 1/4″ X 1 1/4″ . I found it easier to cut it wide and then trim to 1/4″ wide by laying the large part of scallop at 3/8″ on the trimmer. Sponge the edges of each. Offset your rounded part of the scallop with the previous indent of the scallop as you layer them.
-Once the scallops are adhered you can cut the little heart using the ‘Stitched Labels’ tiny heart.
-Circle behind the heart: punch 1″ of Soft Suede and sponge it deeply then pop it up behind the heart.
Pop up the roof with Stampin’ Dimensionals on the card base.
Gables: (2) 1/4″ X 3 1/2″ Balmy Blue strips mitered for top. Tip: Lay the strips on top of each other and cut through both at the same time to have a nice mitered edge or make a 45 degree cut at each end by lining up at 1/2 of a square on the Stampin’ Trimmer.
Gable Decoration: (1) 5 1/4″ X 3/4″ Soft Suede cut with the ‘Flourish Thinlits Die’ and then cut straight down the middle to make one for each side. Glue the Soft Suede on the Balmy Blue strips and pop up the gables on the top of the roof with its scallops.
Scrap of Balmy Blue: Cut out the flourish from ‘Be Mine’ stitched framelits. It has five branches and I cut off the outer two so it fit at the top of the roof. Add a rhinestone.
Scrap of Whisper White 1 1/2″ X 1″ stamped in Flirty Flamingo with “Hello” from Fourishing Phrases and punched with a small oval punch -retired- but we have the layering ovals that would work great. Sponge the edge with your Flirty Flamingo.
Fussy cut your bird from the Bird Ballad DSP and mount with dimensionals.
Inside: Whisper White: 5″ X 3 1/2″. Lightly pencil mark 3 1/4″ from bottom of the right and left and mark the top middle at 1 3/4″ and then diagonally cut from the sides to the middle. Or make a 3 1/2″ X 3 1/4″ rectangle if you don’t want the angled top.
For the inside I used Flourishing Phrases for the greetings and created a mask to sponge the heart by cutting out of a sticky note the third largest of the scalloped hearts in the Be Mine stitched framelits dies. You could use printer paper if you don’t have a large sticky note just be sure to use washi tape to hold it in place while you sponge the heart to the desired color. I fussy cut another bird and flowers to go around the heart and positioned them so they wouldn’t show through the front entrance but you could have a bird peeking out of the entrance for fun as one of my club members chose to do. It was cute.
Embellish with rhinestones! Send to your favorite bird lover or to your lover as I did with the second one which uses the “I love our life together” from the ‘Meant To Be’ Stamp set.
Have fun!
SAL,
Karen

Tea Together Bendi Card
Hello Stamping Friends,
May is zooming along and April projects are yet to be posted. To those of you waiting anxiously for some directions, thank you for your patience, and to those still looking for Mother’s Day inspiration I have a card or two that just might work.
I have seen several ‘Bendi Cards’ on Pinterest and when I saw Sara Levin’s Tea Together Bendi card I wanted to try it. She has a video at theartfulinker.com.


For those whose beloved mothers have passed away, the ‘Tea Together’ stamp set has an additional stamp that says “Love is a warm cup of tea”. A perfect saying for all those dear friends with whom we share a cup of tea and a listening ear!
Stamp Set: Tea Together, Amazing Life (for the corners on the back)
Designer Series Paper (DSP): Petal Promenade, Floral Romance, and Gold Foil Sheet
Dies: Tea Time Framelits (Pot and Cup), In The Woods (curves on the bendi arms), Be Mine Stitched Framelits (hearts), Sunshine Wishes ( Love), Celebrate You ( You). The club ladies also used the Happy Birthday framelit for an alternative saying.
Ink: Versa Mark, Old Olive
Tools: Gold Embossing Powder, Spritzer with Frost White Paint (Wink of Stella does the same), Tufted Embossing Folder,
Embellishments: 6″ of gold and white 1/8″ Tea Room ribbon

Card Base: Blushing Bride, 5 1/2″ X 4 1/4″
Layer 1: Old Olive, 5 1/4″ X 4 1/8″ – note: this layer has a 1/8″ border on the top and sides but is flush to the bottom. Lay this piece landscape on the Stampin Trimmer at 1 1/2″ from the left and cut from 2″ to 3 5/8″ to make a tab for the bendi arm, then run through the Big Shot with the Tufted embossing folder. (Alternatively, you could make your large bendi arm with its tab and lay the tab 1 1/2″ from the left edge and place pencil marks on the old olive layer at the widest parts of the tab and then cut.)
Bendi Arms:
Old Olive, 5 1/2″ X 4 1/4″ , Score at 1/2″ in landscape then turn to portrait and cut at 2 1/2″. You now have an arm that is 2 1/2″ X 5 1/2″ and an arm that is 1 3/4″ X 5 1/2″. The large arm is at the right side of the front and the small arm is at the left.
Place tear and tape on the 1/2″ scored section on the side that will wrap around the tufted old olive layer. This will help you keep from mixing up the arms. Oops, I mixed them up in the picture! The small arm goes to the left!

Score 3/8″ on the unscored side of the arms. Make a tab out of the 3/8″ scored edge by marking lightly with a pencil 1/2″ from the top and 1/2″ from the bottom of each arm. Fussy cut a tab on each arm by cutting a slight diagonal from the pencil mark to the edge of the arm. The larger arm will have a 1 1/2″ tab and the smaller arm will have a 3/4″ tab.
DSP for Bendi Arms: Petal Promenade 4 1/2 + 1/16″ (4 9/16″) X 1 3/4″ Small Arm, 4 1/2 + 1/16″ (4 9/16″) X 2 1/2″ for Large Arm. I know, I know, crazy measurements but we don’t want a green border where the small arm goes in to the large arm.
Cut both the DSP and the Bendi Arms at the same time to have a matching curve – the framelit will handle two layers. I used the curved die from the ‘In The Woods’ framelit set. Or fussy cut, making sure the curve on the small, left hand arm goes up at the right side where you will attach the teapot. If it is cut too narrow at the right side you won’t have room for the teapot above the cup. (yep-made that mistake!) Slide the DSP flush to the bottom of each arm giving you a border at the top and adhere. This picture shows the backside of the teapot and how important it is to curve up the bendi arm to give room to attach the teapot.

You have already made the slit for the large arm to slide into the Old Olive layer, now you need to make a slit in the large arm for the small arm to slide into. Lay the large arm on your stampin’ Trimmer at 2 1/2″ from the right edge (this includes the 1/2″ scored for the fold). Cut a slit from 1 1/4″ to 2″.

Work your two bendi arms into a curve with your fingers to break down the paper fibers so the arms curve easily.
Adhere the arms to the Old Olive layer. (Earlier you put tear and tape on the side that wraps around).
Now adhere the entire front to the Blushing Bride back. I used Tear and Tape for strength. Remember you do not have a bottom border, it is flush.
Teapot and Cup: Floral Romance DSP, 3 1/2″ X 12″ ; Stamp two pots and two cups with Old Olive ink. Cut with the framelits and then stamp with Versa Mark and gold emboss a large flower on the teapot and the small buds on the cups. I gold embossed both cups and both teapots so I could choose the best for the top. Spritz the cups and teapots or paint with Wink of Stella.

Teapot: Top layer has handle, base, lid cut off. Pop up on whole teapot with dimensionals.
Teacup: Top layer has handle, base, back of cup cut off. Pop up on the whole cup with dimensionals.
Both the teacup and the teapot are mounted on the small arm. Start by adhering the teacup 3/4″ from the left on the small bendi arm with glue dots. Now lay your bendi arms flat and mount the teapot on the top right edge of the arm tilting it to make sure no part goes outside the Blushing Bride layer so that it fits inside the envelope. Use a glue dot to put the hearts between the two layers of the tea cup and pull the tea cup handle in front of the teapot. The hearts are behind the teapot. Both the hearts and the teapot “float” with very little adhesive. Note the Dimensionals on the very bottom of the back of the teapot.

Embellish: Gold Foil, 2 1/2″ X 4″ Cut – love (Sunshine Wishes Framelit), – you (Celebrate You Framelit), and 9 hearts (on right hand side of Be Mine Stitched framelit). One of the punched out hearts was put between the words with a little bow underneath. The 9 open hearts are placed between the two layers of the cup to look like steam.

Embellish the back of the Blushing Bride with an Old Olive strip 7/8″ X 5 1/2″ and a Petal Promenade DSP strip 3/4″ X 5 1/2″. Use the corner stamps from the Amazing Life stamp set to make a nice corner with gold foil accent.
This special fold card is worth all the work when your mother or friend is astonished by your creation!!

I would love to hear from you! Leave a comment below. I will be back with another card tomorrow.
SAL, Share A Love
Karen

Happy Valentines Day
Hello Stamping Friends and Happy Valentines Day!!
(Hostess code for Terri’s kit party February 23 at 10:00am : MKATNKJV)
(Hostess code for Joy’s online party: FCGZVMVE)
I hope you have wonderful plans to celebrate all the loves of your life next week. How about celebrating our “LOVE” of stamping?
At club last month I gave the stampers a card base with a special trifold and then had lots of the new designer paper, the new stamp sets and dies offered in the Occasions catalog and the free foil paper from Sale A Bration available for them to use and design their own Valentine! The results were amazing!
I cut and stamped the Meant To Be stamps with the Be Mine Stitched Framelits Dies so we could see all the wonderful things we could make. The All My Love Designer Series Paper (DSP) even has one side with hearts that exactly match the framelits. Can you tell which ones are from the DSP and which ones are stamped? What a great bundle this is for many occasions. Check out page 6 of the Occasions catalog.

The card bases were a fun trifold layered with DSP from All My Love Designer Paper.


- Card Base: 11″ X 5 1/2″; Score at 1 1/4″ then 4″ then 6 3/4″
- DSP (X2) for front flaps: 1″ X 5 1/4″
- Coordinating DSP for next flap: 2 1/2″ X 5 1/4″
- Whisper White Message Panel: 2 1/2″ X 5 1/4″ (If Whisper White is your base, cut a coordinating DSP first with these measurements and then make a Whisper White Panel that is 2 1/4″ X 5″
- DSP Panel on the right side matching DSP of the front panels: 4″ X 5 1/4″
Now the fun begins! Check out these beautiful valentines my club ladies created:
Valentine 1 by Joy:

 The greeting is from Amazing Life on page 28 of the Occasions catalog item # 148750.
Valentine 2 by Jo:

 The Grapefruit Grove foil (free with a $50 order) is quite unique-especially when trying to photograph a project. See page 12 of the Sale A Bration brochure.
Valentine 3 by Terri:

Terri used the Lovely Lipstick foil. I missed the closed version of her card.
Valentine 4 by Lucille:


I love how she mounted the foil on a white background and used the little flourish and a heart in the middle!
Valentine #5 by —-:


How creative to pull in the color of the DSP with ribbon and to layer a DSP heart on a white heart!
Valentine #6 by Sharon:


The little Heart Epoxy Droplets pick up the color of the shiny foil beautifully. See page 5, item # 148583. The little flowers she used are the Frosted Flower Embellishments on page 11, item #148782.
Valentine #7 by LIsa:


Check out the embossed heart embellished with a flourish and the top little stamped heart holds the front flap down.
Valentine #8 by Christine:


I love how Christine placed the red outline of the heart so it perfectly matched her front white heart.
Valentine 9 by —–:


The white on the DSP is lovely and there is a plethora of hearts from the one framelit!
Valentine 10 by —-


Look at how she used the Crumb Cake to stamp the greeting and the heart so everything coordinates!
Help me with names dear stamping friends. Send me a comment with which numbered Valentine is yours and I will update the post. After all, it will be sort of a scrapbook for us.
Next post I will share the Shrinky Dink fun that we had for our club technique as well as the new Sale A Bration free products that will be available February 15 and the coordinating products we can purchase March 1 to go with many of the free stamp sets.
SAL,
Karen
Flashback Fun:
This is the Christmas card we made in 2017 with the same folds:

The DSP used here is retired but the stamp set and framelits are still available!! See page 102 of the Annual Catalog for the Ready For Christmas stamp set and the Christmas Staircase thinlits dies on page 216. There is a little Dachshund in this set so it was a must have for me! Check out the other trifold card we made with this set at the card buffet:


I think I started down a rabbit trail, one trifold leading to another and then to another! Thank you for stopping by!
I have a couple people interested in doing a monthly or bimonthly Christmas Card Stamp A Stack starting now so we have lots of cards made by November. Leave me a comment if you are interested.
Shop online and get a free Sale A Bration product for each $50 or $100 spent! Click on SAL and he will take you to the online site.

Welcome to my blog!

Sal Window to Products


