
Home » 3-D (Page 2)
Category Archives: 3-D
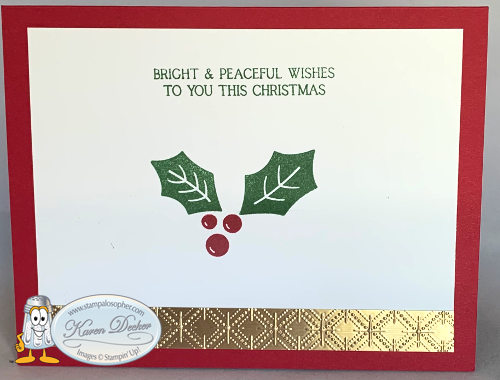
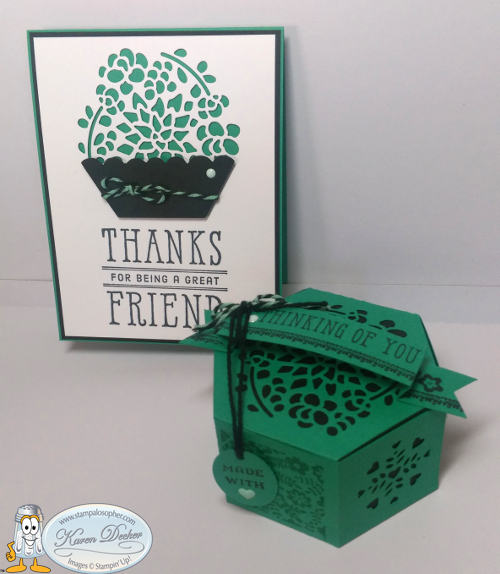
Dove of Hope Ornament & Gift Box
Hello Stamping Friends and Followers,
Remember to click on the header if you are reading this is in your mobile device so you access the full blog where the videos work.
December hostess code is: F3ZE2UD2
Yesterday was a delightful time with virtual stamping and a virtual party!! I host a Christmas party each year for my club members to thank them for their faithful support. I opted for a Zoom party this year and it was fun! The theme was Snowmen and I was able to find snowmen gift bags and snowmen boxes and a snowman mug, and snowmen plates and napkins and kitchen towels and a snowman buddy to keep them company. So if anyone is looking for a way to connect this Christmas season, read on for a few ideas and CASE (copy and share everything) what you can. Leave me a comment if this helped and add your ideas for others to read.
Christmas Party Bag:

- Snowman Bag
- Snowman Buddy to sit beside you
- Dryer Sheets (just because everyone needs these for cutting out the intricate dies and cleaning up glitter)
- Snowman round box filled with cotton balls for the game
- Sleep Mask and plastic spoon on top to blindfold yourself for the cotton ball game
- Hot Chocolate holder with a candy cane and snowman Ghirdellis (tradition)
- Microwave popcorn holder
- Snowman mug, plates, napkin, and cleanup towel
- Chex Mix and Honey Roasted Nuts
- Christmas Feud Game Cards packaged with two plain white face masks to stamp
- Christmas Song Bingo Card with packet of buttons for bingo markers, and craft supplies-red and green sparkly pipe cleaners, bells and ribbon to make a pipe cleaner ornament. I saw this on Pinterest.
I purchased and downloaded the Christmas song Bingo cards on Etsy and used Spotify on my phone to create a playlist for the songs that were on the Bingo cards.
I purchased the Christmas Feud cards from Etsy.
The plain white face masks were at the Dollar Store as were many of the other items. It was amazing to see what these creative crafters did to decorate their face masks. Give a creative person a blank canvas and just watch them go to work!
Masks were scored on basis of : Participation, something with the snowman theme, image was recognizable, someone said oohhh or ahhhh, it made us laugh.
The round boxes were filled with cotton balls and the party goers were instructed to use the sleep mask (Walmart) to blindfold themselves, place the top of the plastic spoon in their mouth and see how many cotton balls they could dish out of the round box and place in the lid in two minutes. Points were given for each cotton ball that made it to the lid.
Three rounds of Bingo were played with scores of 3 points for the first bingo, 2 points for the second bingo(s), 1 point(s) for the third bingo(s).
Family Feud was scored as per the game cards.
I kept a running list of scores and then the person with the lowest score got to choose from the first white elephant gift, then up the line to the top score with each person able to keep or steal.
Here are some close ups just for fun:


Recipe for a hot chocolate holder:
- Pacific Point, 8 1/2 X 5 1/2 Scored lightly at 4 1/4 and then diagonally from 1 3/4 at top to 2 1/2 at side. The front is stamped randomly with the tiny snowflake stamp from the Snowflake Wishes stamp set in Whisper White. Use tear and tape to glue the diagonal to the inside and to glue the bottom and side of the holder.
- Bottom Strip: Snowflake Splendor Designer Series Paper, 1 1/2 X 4 1/4.
- Whisper White: 5 1/2 X 4 1/4, die cut three snowflakes from So Many Snowflakes Dies. Stamp in Pacific Point ink the outer ring of the greeting with the Warm Hugs stamp set as well as the greeting from the Warm Hugs set. They are both die cut with the Warm Wraps Dies and glued together. The coffee mug can be stamped right through the circle, stamped again to color the mug and then the steam is stamped in smoky slate.
- Small Rhinestones were added to the center of the snowflakes and two on the greeting.
- Insert bow wrapped candy cane and hot chocolate. The ribbon I used is retired.
My darling Paul made all of the hot chocolate holders after I gave him a prototype so I could make snowmen popcorn holders. Thank you, my love.
Look at the different plaids on these snowmen!

I loved choosing scarf and hat band colors from the exceptional, gorgeous, amazing Plaid Tidings 6 X 6 paper. The paper will be retiring on January 4. It is in the mini on page 57 and is $11.50 for 48 sheets. Item #153527.
Recipe:
- Base: Whisper White, 5 1/2 X 8 1/2, scored at 2 1/8 and 6 1/4. Check your popcorn before scoring!
- Nose: Pumpkin Pie, one petal of the Large Daisy Punch
- Eyes: Stamp directly on base with the largest of the Sweetest Time holly berries. Use a sticky note and punch two circles and you can have perfect alignment each time and no masking:

 It looks like you were trying to make an eyebrow and not doing too well.
No, Sal, that is just the other two berries on the holly berry stamp. I chose that stamp because it has the little white semicircle to add twinkle to the eye. I usually use my white marker but this looked better and saved an extra step. I found that if I started with the eyes I could line the sticky note up exactly where I wanted the hat brim which helped me glue the brim on straight. The top of the hat then lined up perfectly at the back on the white base so I could glue it on quickly. Back to the recipe:
- Mouth, Black Marker and a 2 1/2 inch circle template to draw around. Be careful and replace it once in a while or the black ink will build up and get ink on your snowman. Yep- found that out the hard way!
- Hat Brim: Basic Black, 4 1/2 X 1 1/2
- Hat Top: Basic Black, 2 3/4 X 3, this gives you 7/8 inch on each side of brim
- Hat Band: Plaid Tidings Designer Series Paper (DSP), 1/2 X 2 3/4
- Scarf: Matching Plaid Tidings DSP, 5/8 X 5 1/2 (X2), make little cuts at the ends for fringe
- Back: Matching Plaid Tidings DSP, 1 X 5 1/2, Note- put adhesive on the white base on the right hand fold, attach the strip, place adhesive on the left hand side of whisper white base and then place popcorn in the holder and fold the right over the left. I found the popcorn bags weren’t all consistently filled so I had to flatten them as best I could before putting them in their holder. This one got an extra little strip because my glue went outside the band. I also had to glue a matching strip over the back of the scarf since I ran my glue clear to the end of the scarf.

If you just add a couple glue dots to hold the popcorn bag, the recipient shouldn’t have to ruin the holder and it can be regifted.
 but I like it with extra matching DSP on the back of the scarf.
It does match nicely and if you have the time it is great! If you are scrambling three days before a party-maybe not an option, but definitely better than trying to get the glue off the back of the scarf! Where’s your snowman, Sal?
Yes, but I will have to get you one of the face masks the ladies made!
Dove Ornament and Gift Box
My goal is to be consistent with ‘Take A Break Tuesday’ facebook live at 9:30 on the second Tuesday of each month. Check it out-


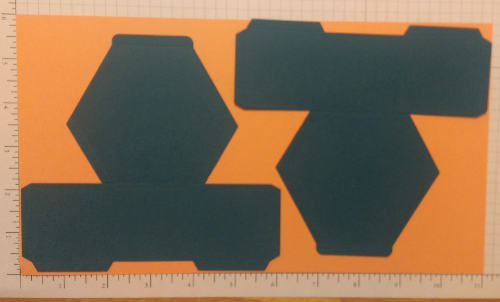
Mini Paper Pumpkin Gift Box:
Recipe:
- Mini Paper Pumpkin Box from Annual Catalog page 152, #153069, $7.50 for 10
- Mats (border) for box: Copper Foil Sheet, Top= 3 5/8 X 5 3/8, Short Side= 7/8 X 3 5/8 (X2), Long Side=7/8 X 5 5/8 (X2)
- Designer Series Paper: Brightly Gleaming, Top=3 1/2 X 5 1/4, Short Side= 3/4 X 3 1/2 (X2), Long Side=3/4 X 5 1/2 (X2)
- Greeting on Box Top: Whisper White, 4 3/4 X 3 1/2, Die cut with Celebration Labels Dies, third largest
- Inside Heart: Whisper White, 3 X 3, punched with heart punch or die
- Memento Black Ink, Old Olive Ink and a sponge dauber

I cut out the copper layer for the inside of the box from the copper rectangle mat we used on the top and die cut it with the third largest Celebration die. I also cut out the Designer Series Paper for the inside using the 4th largest Celebration die and the rectangle I cut for the top of the box. No need to waste that beautiful paper that will be hidden by the Whisper White top layer!
If you still have some of the retired copper embossing powder from the previous catalog you could emboss the “peace, love, joy” and the inside greeting in copper for a nice touch!
Dove Ornament
I found this ornament on Pinterest made by Andrea Sargent of Valley Inspiration with Andrea. Thank you, Andrea!
Recipe:
- Dove: Whisper White, 3 3/4 X 5 1/2, die cut two detailed wings and one body
- Dove: Vellum, 3 3/4 X 5 1/2, die cut two plain wings, one body and one of the small plain tail pieces
- Olive Branch: Old Olive, 1 1/2 X 1 1/2, die cut with small olive branch die
- Gold Hoop: Page 156 of Annual Catalog
- Gold Cording: 11″, page 31 of the Mini Catalog
- Glue dots, Tombow liquid glue and mini dimensionals. The vellum is glued to the whisper white with liquid glue in just the areas that are solid, the peace branch is glued to the beak with liquid glue, the wings are then mounted with mini dimensionals to the body and the dove is then attached to the hoop with glue dots at the tail, the branch and the front wing only, making sure the glue dots are stretched and rolled to not have any excess between the dove and the hoop.
- Fold the gold cording in half and loop it over the hoop and then tie it in a knot at the top, cutting off the excess.
 And with Christmas only 16 days away, do you think anyone will make any of these?
Sal, these would all be perfect for Christmas craft fairs next year and those projects must be started months ahead of time. Consider me ahead of things instead of a procrastinator!
I know.
Have a wonderful day ladies and click on over to the online store where you can see what products from the mini are on sale and which are discounted – some 50%!
The Clearance Rack has also been refreshed with new products so check those out. They go quickly!
December hostess code is: F3ZE2UD2
SAL, Sing A Lot of Christmas carols
Karen

August Club Cards using Sweetest Time Bundle
Hello Stamping Friends,
August Hostess Code: HKVNWPPX
The Facebook Live on Tuesday morning, August 11, worked! The internet stayed stable and we were able to create three Christmas cards and a Little Treat Box to introduce goodies in the new catalog! Club members and guests had kits for all four projects with instructions on what size of greeting they would need to add to each project since the kits cannot include any stamped images per the home office. The new Winter Snow Embossing Folder and a roll of Metallic Mesh Ribbon from the new catalog were prizes that will go to the lucky winners!
Christmas – are you kidding me? Four projects – are you nuts?
No, but it is new catalog launch time and, besides, everyone who participated now has three cards to start their Christmas card list, and a little treat box which would make a great name plate for their holiday table. Here is a collage of the products:

I will follow the order of projects from the Facebook Live video and start with the little treat box:
1) Little Treat Box
There are so many ways to construct this little box. The typical way is on the right with both flaps coming up on each side to meet at the top. The left shows a little treat box with the front flap folded to the inside so the other side of the designer series paper (DSP) shows. I die cut three little ornaments from the same DSP and I used one of the Medallion dies to make a matching paper ribbon. The middle box is my favorite. Instead of folding the flap to the inside, I cut the flap off and glued it to the back of the little box.
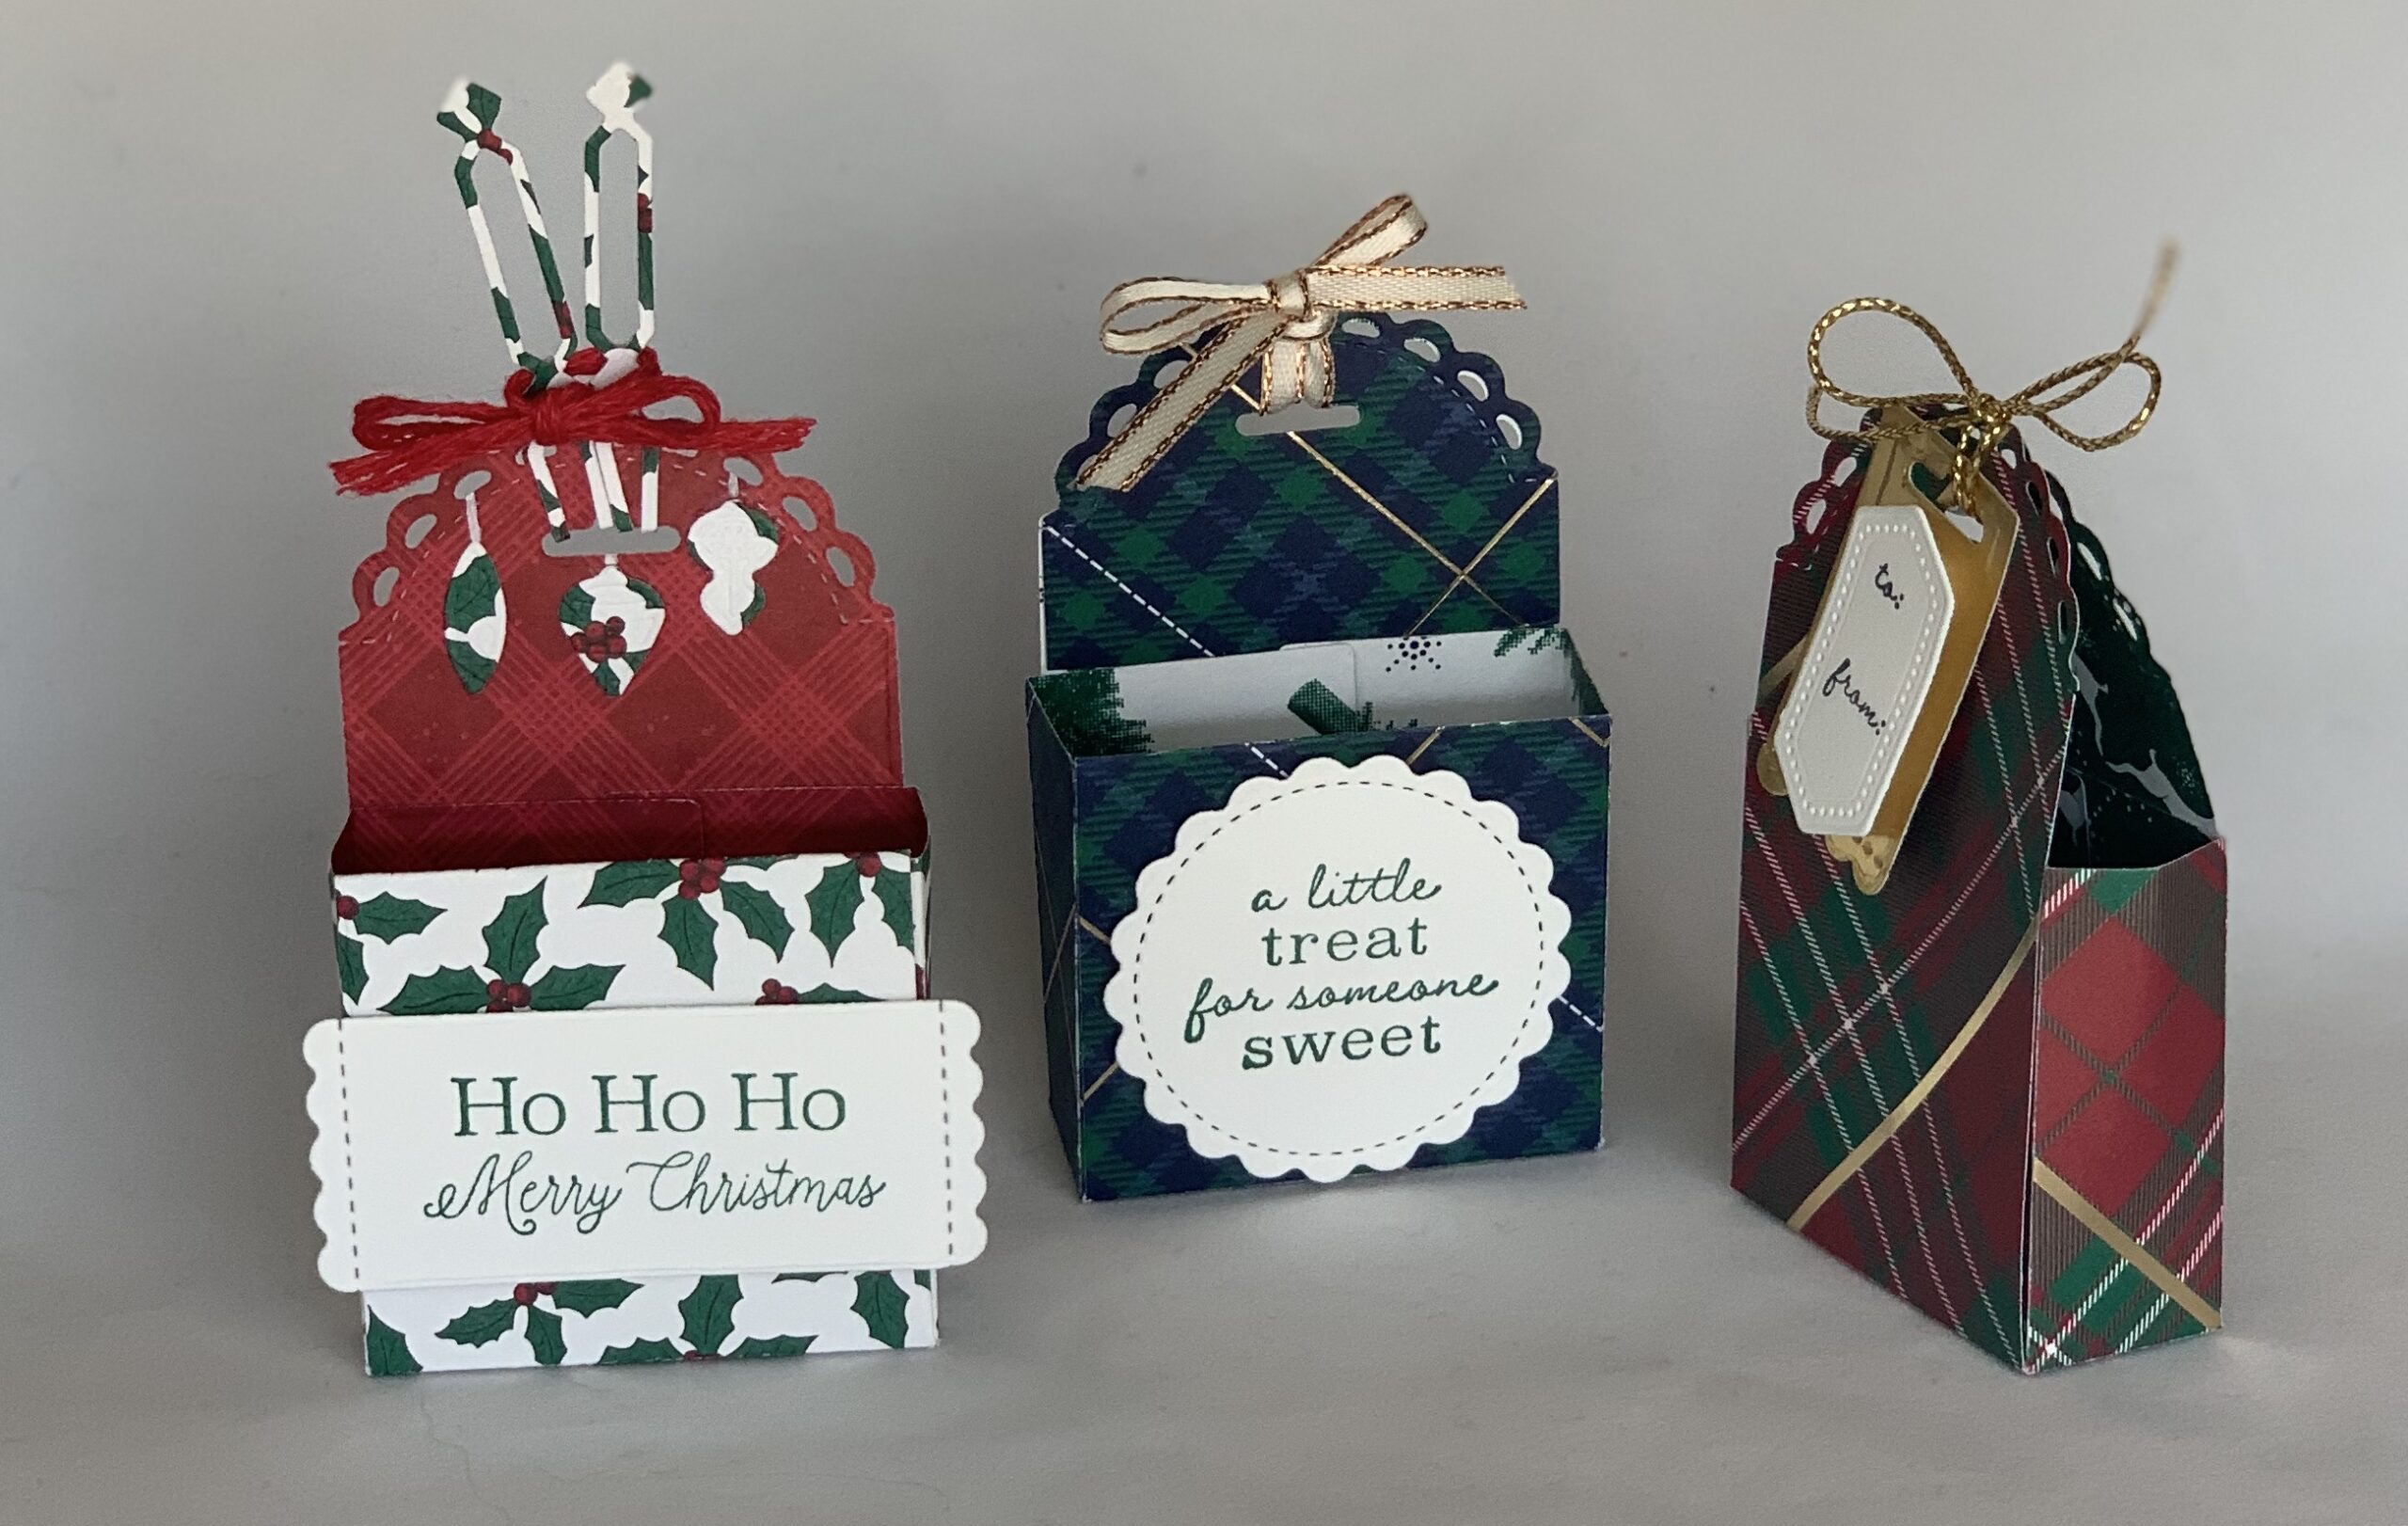
The die works perfectly on a 6 X 6 piece of DSP.

And look at all the dies that are in the Little Treat Box Dies!
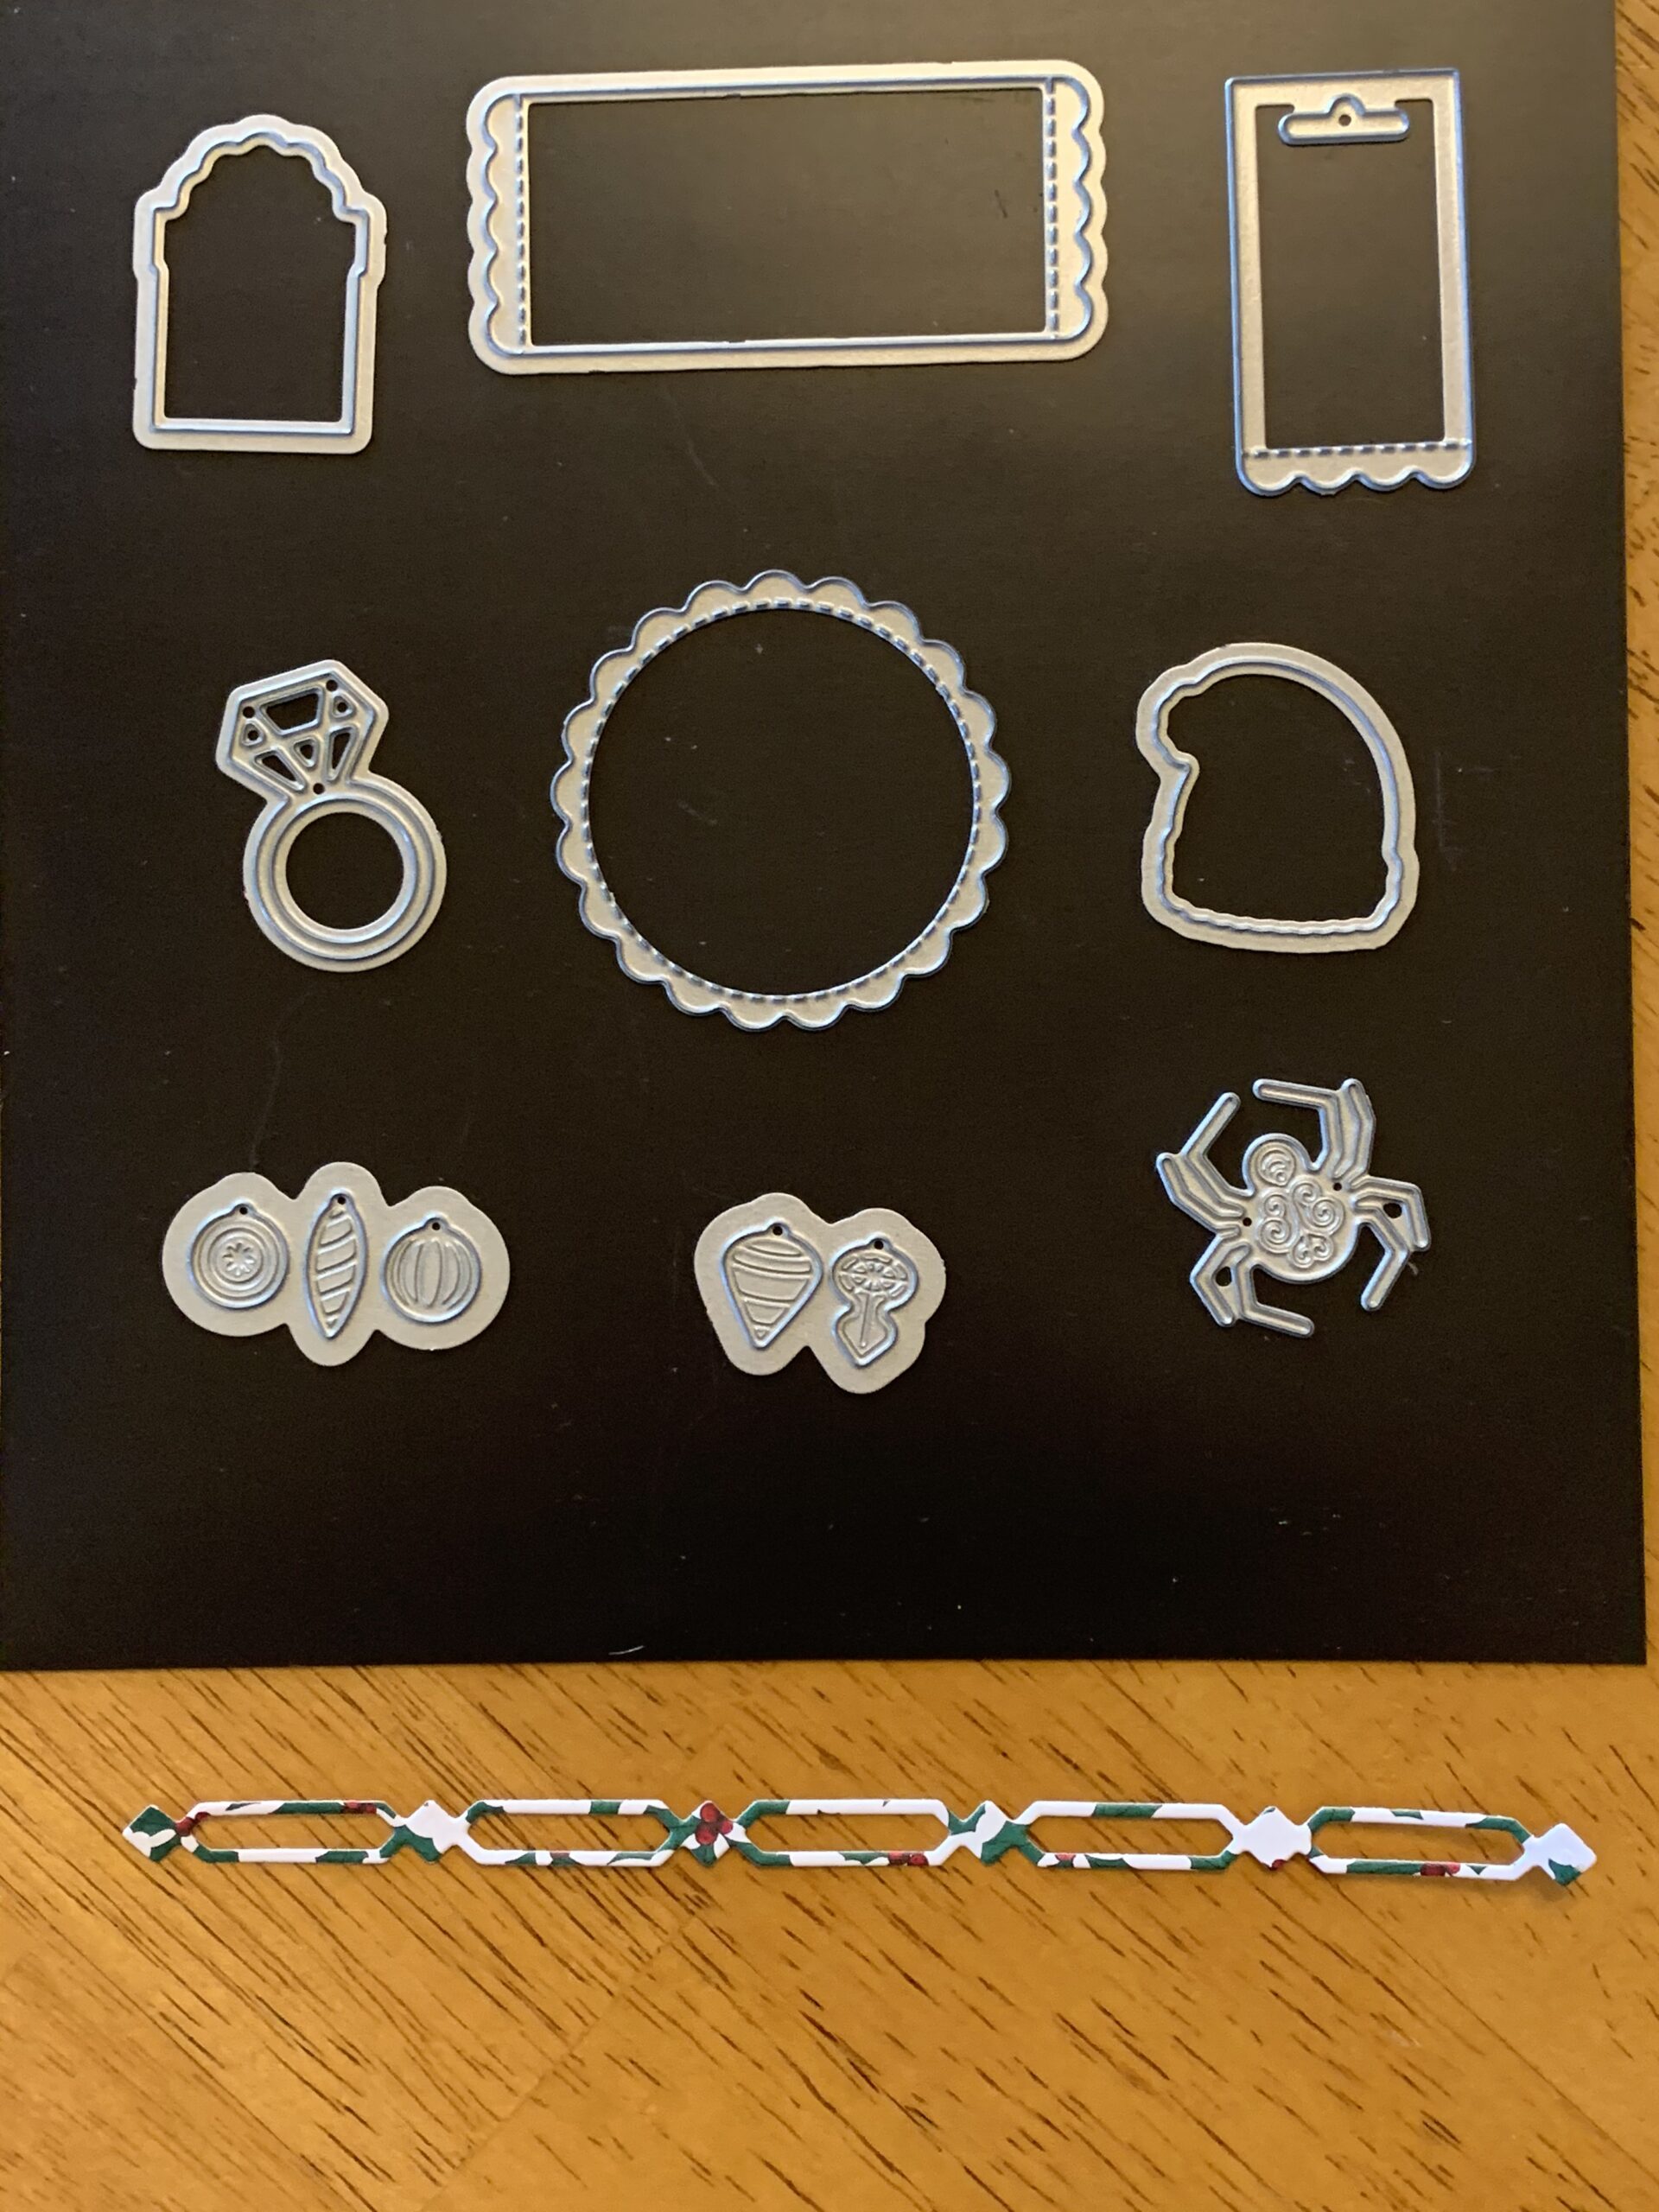
Wait – what is that thing at the bottom?
That, Sal, is a cut out using the Medallion Die Set from the annual catalog. It is perfect to run through the holes at the top of the box to hold it together or just to decorate it as I have done on the one above at the left. Here are examples of some of the fun little stamps in the Little Treats stamp set and a silver foil die cut ring and spider.

Wouldn’t the stamps make great decorations for the flap of an envelope?
I still think the best utilization of the little box is for a name plate at a holiday meal with the box filled with after dinner butter mints. Yum!
There are several additional examples on page 70 of the new mini catalog.
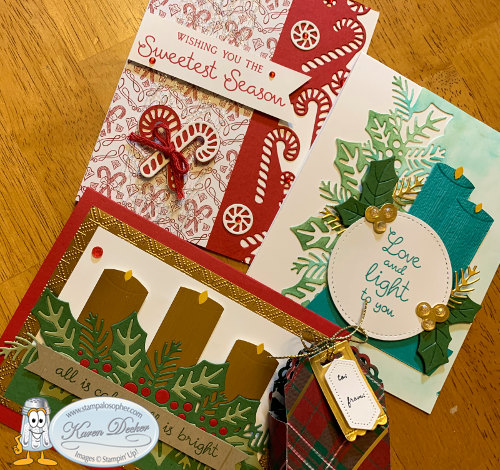
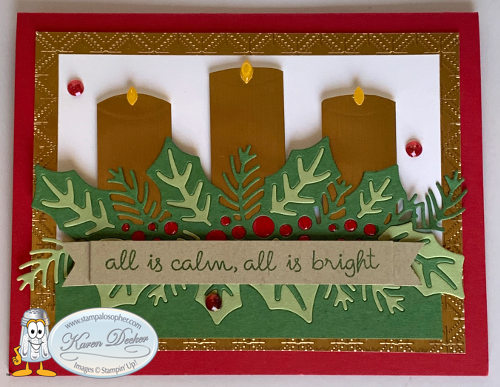
2) Gold Candles with Sweetest Borders Dies

This close up of the card shows the use of the Brushed Metallic Cardstock from page 45 of the new mini catalog. It also shows the use of the Fine Tip Glue Pen to add dimension to the berries and the candle flame. I stamped the candles from the Sweetest Time stamp set and then cut them out to use for a template for the curve at the top of the candle. I used an oval template to score a nice line at the top of the candles.
I cased the card from page 21 of the catalog except for the candles and the layer of Brushed Metallic Cardstock embossed with the Dainty Diamonds 3D folder. This is the card we did in the video.
This is another version with a little bit longer banner so I could fold it differently. After putting Fine Tip Glue on the berries in the first card, I moved the banner down on this one so I could see all of them.

Wow – the camera really reflected the brushed gold paper.
Which card do you prefer?
I choose the funny folded banner on the second one but the placement on the first one.
Thanks, Sal, that would look nice as well.
Tip: I used a folded dryer sheet under the cardstock as I cut out each color for the holly accents. This makes the paper piecing so easy when you separate the main die cut from the inside cuts. With a nice pair of tweezers you will be done in no time and you could make two cards with opposite die cuts for the greens, though you would have to run a second set of holly berries.
Tip: Mark the top of each of your die cuts so that the paper piecing is correct
The garden green is cut at the right and left sides to match the Whisper White layer after your paper piecing is complete.
I used scotch tape on the back to hold all the pieces in place.
Gold Candles Recipe
- Base: Real Red, 5 1/2 X 8 1/2 scored at 4 1/4
- First Layer: Brushed Gold, 5 X 3 3/4 embossed with Dainty Diamonds Embossing Folder
- Second Layer: Whisper White, 4 1/2 X 3 1/4
- Holly Leaves: Garden Green, 2 1/2 X 6 die cut on top of a folded dryer sheet- mark the top
- Holly Leaves Accent: Pear Pizzaz, 2 1/2 X 6 die cut on top of a folded dryer sheet-mark the top
- Holly Berries: Real Red, 3 1/2 X 1 die cut on top of a folded dryer sheet- mark the top
- Large Candle: Brushed Gold, 2 1/4 X 7/8 use template to round top and an oval to score the top
- Small Candles (2): 1 7/8 X 7/8 use template to round top and an oval to score the top
- Candle Flames: Daffodil Delight Scrap 1 X 1 punch outs from the Detailed Trio Punch
- Banner: Crumb Cake, 1/2″ X 6 1/2″ Scored 1″, 1 1/2″, 5″, 5 1/2″ ; Banner cut the ends to desired length
- Inside: Whisper White, 5 X 3 3/4
- Inside Accent: Brushed Gold embossed strip 5 (plus a hair) X 1/2″ (Embossing shrinks it a bit)
- Embellishments: 3 Red & Gold Wonderful Gems (pg 31)
- Inks: Garden Green and Real Red
- Stamps: Sweetest Time
- Dies: Sweetest Border Dies
The inside stamps and the front greeting are in the Sweetest Time stamp set and the stamp has the little white sparkle for the holly berries so we don’t have to add it. Love this!
3) Candy Cane Sweetest Borders Die
This project is a case (copy and share everything) from Deb Hoicks Crafty Cottage.

Candy Cane Card Recipe
- Base: Thick Whisper White, 5 1/2 X 8 1/2 Scored at 4 1/4
- Die Cut Layer: Real Red, 4 1/4 X 5 1/2, with 1 1/2 X 5 1/2 piece of double back adhesive placed at the right hand side before cutting with the Sweetest Border Die
- Designer Series Paper (DSP): ‘Tis The Season (pg. 31) 5 1/2 X 2 1/2
- Metallic Mesh Ribbon: 6 1/2″
- Candy Canes & Peppermints: Whisper White 2 X 3; Real Red 2 X 2
- Banner: Whisper White 1″ (minus a hair) X 3 1/4″
- Inside: Real Red Strip 3/4 X 5 1/2
- Inside Accent: Same DSP 1/2 X 5 1/2
- Real Red Braided Linen Trim 6″, make a little bow to place on top of the candy canes (not around them)
- Red Rhinestones: 6
- Ink: Real Red
- Stamps: Sweetest Time
- Dies: Sweetest Border Dies
4) Bermuda Bay Candles
This is a case of the catalog, page 73. I love that Stampin’ Up! gives us a pictured index at the back of the new mini and they use different examples in the index to give us even more ideas to use. The catalog candles are Coastal Cabana but I chose a deeper blue with Bermuda Bay. We can’t stamp images for kits so I made the candles from a Bermuda Bay cardstock embossed with the Subtle 3D embossing folder. The die cut is sponged with Bermuda Bay and Garden Green after stamping off to make it lighter.
Tip: Build your holly leaf and pine bough accents on Stampin’ Dimensionals (use the silicon pad so they don’t stick) then add them to the back of your circle. Having this all pieced together will help you know where to place the strip at the bottom, then put on more dimensionals on the left and right leaving the center open for the candles. Mount the circle with accents after you have glued on the bottom strip. The candles are mounted on dimensionals and slipped behind the circle. The candles are curved at the top with a template cut out from the stamped candle images. The curve is scored with an oval cut out. I used the Bermuda Bay marker to enhance the curve and then added the flames from the cut outs of the Detailed Trio Punch in Crushed Curry with a bit of Fine Tip Glue to make them glow.

I tried another version with a smaller circle on the front:

What’s your vote on this one, Sal?
Bermuda Bay Candle Recipe
- Base: Thick Whisper White, 4 1/4 X 11 scored at 5 1/2
- Top for die cutting: Whisper White, 4 1/4 X 5 1/2 cut with the left side of the die straight edge at 1 1/4 then sponged with Bermuda Bay and Garden Green -stamp off before sponging
- Circle: Whisper White, 3 X 3 Second largest in stitched shape circles; the small circle is the third largest
- Accent Strip under circle: Bermuda Bay, 5/8″ X 3″ Make two – one for the inside
- Holly Leaves: Garden Green, 2 1/2 X 2 1/2 Make two small and two large leaves
- Pine Boughs: Gold Foil, 7/8 X 7 1/2 Make 5 gold pine boughs and 2 holly berry die cuts;
- Candles: Bermuda Bay, Embossed with the Subtle Embossing Folder, 7/8 X 4, make one large candle 7/8 X 2 1/8 and one small candle 7/8 by 1 7/8, round the top & score the top with oval template
- Flames: Crushed Curry, 1 X 1, punched with the Detailed Trio Punch to give you nice cut outs, then add Fine Tip Glue to make it shine
- Embellishments: 6 Wonderful Gems (page 31) mounted on gold foil
- Ink: Bermuda Bay, Garden Green
- Stamps: Sweetest Time
- Dies: Sweetest Border Dies
I sure like your cardstock candles instead of stamped images.
Well, it is a creative challenge to find a way to make kits with no stamped images but we accomplished it and hopefully everyone enjoyed their kits!
August Hostess Code: HKVNWPPX
SAL, Sighing A Lot (to think of Christmas)
Karen
Sweetest Time Bundle
Hello Stamping Friends,
You are invited to a Facebook Live event tomorrow morning at 9:30. I will be using the Sweetest Time Bundle to CASE (copy and share everything) this bundle from the new mini catalog and to case a beautiful red and white candy cane card created by the very talented Deb Hoicks of Deb Hoicks Crafty Cottage.
Every year you make a red and white Christmas card of some kind.
That is true, Sal, and once again the mini catalog is full of amazing products, some of which I will be using tomorrow morning. Here is a sneak peak.
So join me tomorrow at 9:30 and spend the rest of your morning letting me bring a pinch of creativity to spice up your crating world! There will be a prize drawing for those commenting by 9:40 and another for those who are still with me at the end. Hint: Prize patrol will be something from the new mini catalog! The event is recorded and recipes will be posted here on the blog on Wednesday.
The link:
https://www.facebook.com/stampalosopher/live/
Contact me if you need a catalog or have questions about anything. [email protected]
SAL, See A Little of the new mini catalog then buy a lot to make a lot of Christmas cards!
Karen (Hostess code is HKVNWPPX)
Silhouette Scenes & Heart Foil Tin Brownies
Hello Stamping Friends,
February hostess code: FPRJEPZJ
How was your Valentines Day?
Mine was phenomenal! My grandsons gave me chocolates and a card and flowers via their folks and Paul brought home chocolates and had my favorite flowers delivered – carnations! I was very spoiled and loved every minute!

I made Paul a card similar to the one on page 132 of the annual catalog.

I changed it up a bit by using the rectangle stitched framelits and a Blueberry Bushel layer on a Balmy Blue card base. I attached a double sided adhesive sheet on the back of White Velvet Sheets (retired), cut out the ‘forever’ using the Sweet Silhouettes Dies and adhered it to a piece of Bluberry Bushel. I cut around the word to make a nice background. Lately, I have been seeing a lot of words embossed in white embossing powder on black paper and then cut out around the words. I liked that look so I imitated it here.
Measurements:
Base: Balmy Blue 5 1/2 X 8 1/2 scored at 4 1/4
Layer 1: Blueberry Bushel 4 1/8 X 5 3/8 (make 2-one for the inside)
Layer 2: See A Silhouette Designer Series Paper 4 X 5 1/4
Together Greeting: Balmy Blue 2 X 1 1/2 cut with Rectangle Stitched Framelit to 1 11/16 X 1 3/16
Silhouette : Whisper White 3 3/4 X 2 1/4 cut with Rectangle Stitched Framelit to 3 9/16 X 2 3/16
Forever: White Velvet DSP 3 1/2 X 1 1/2
Background of Forever: Blueberry Bushel 3 1/2 X 1 1/2
For the inside I printed a poem I wrote on Whisper White cardstock and cut it to 7 3/4 X 5 1/4 scored at 3 15/16 (one hair less than 4 inches) and glued just the right side to a Blueberry Bushel layer.
And for my family and special neighbors I made brownies in the Heart Foil Tins ( page 9 of the mini catalog).

One brownie mix made all 10! I washed the tins really well and sprayed them with PAM no stick spray then cooked them at 350 degrees for 20 minutes. (18 minutes would have been better)
The tins have high-dome lids so you can decorate them as you wish. I used the German Chocolate Coconut Pecan Icing.

For the lid I used several of those fun supplies from the suite on page 9 of the mini. I layered:
- A Heart Doily (stamped on the back-see below)
- A punched out scallop from the From My Heart Specialty Designer Series Paper using the Heart Punch Pack
- A punched straight edge heart from the same DSP using the Heart Punch Pack
- A retired pink heart jewel
A little red bow at the front completed the project. I put two glue dots on the inside of the lid to hold it on better.

On the back of the doilies I stamped Happy Valentines Day from the retired ‘Valentine Love’ stamp set and used three glue dots to adhere the whole set of hearts to the lid. The lid is clear so the greeting shows through when they open up their goody.

If you don’t have food in the tin you can punch another heart for inside the lid. Also, the heart doilies fit perfectly in the bottom of the tin for further bling. The heart tins wash up to use again.
 What’s the point of posting valentines after the day has come and gone?
Ahh Sal, love is in the air everywhere and with anniversaries and birthdays we can change up the greetings and delight someone’s heart any time of year!
If you haven’t met your neighbors, try making a batch of brownies in heart tins with great big hello greetings and take them around as you introduce yourself.
SAL, Send A Love gift
Karen
Click on little Sal to be directed to my online store where you can order the products. If you don’t have a demonstrator I would love to earn your business.

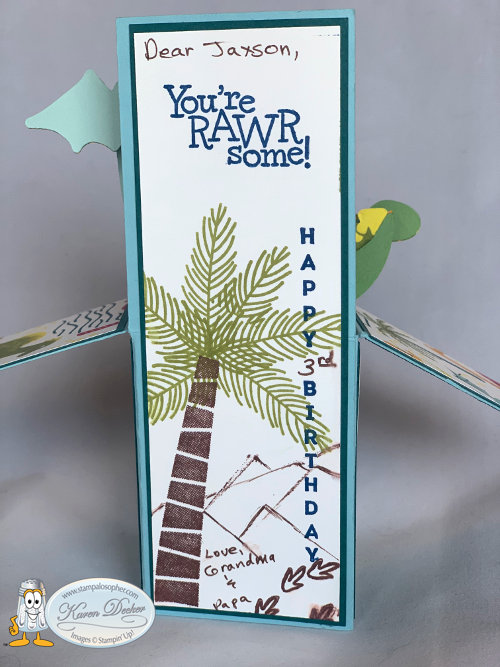
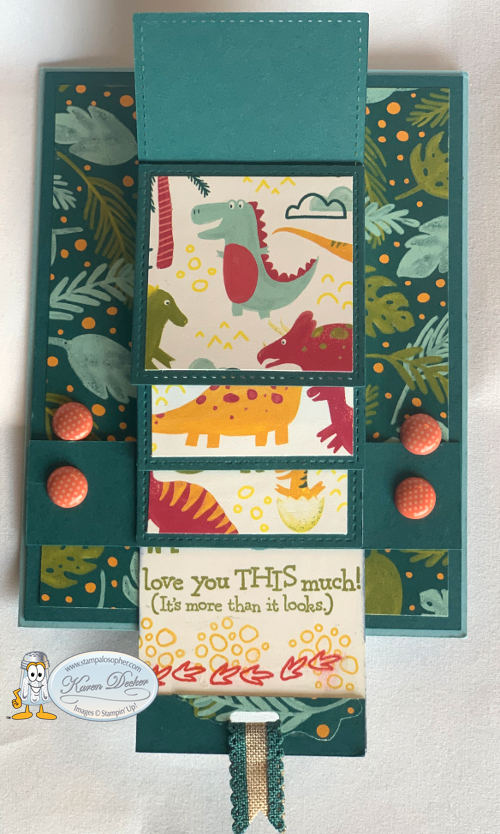
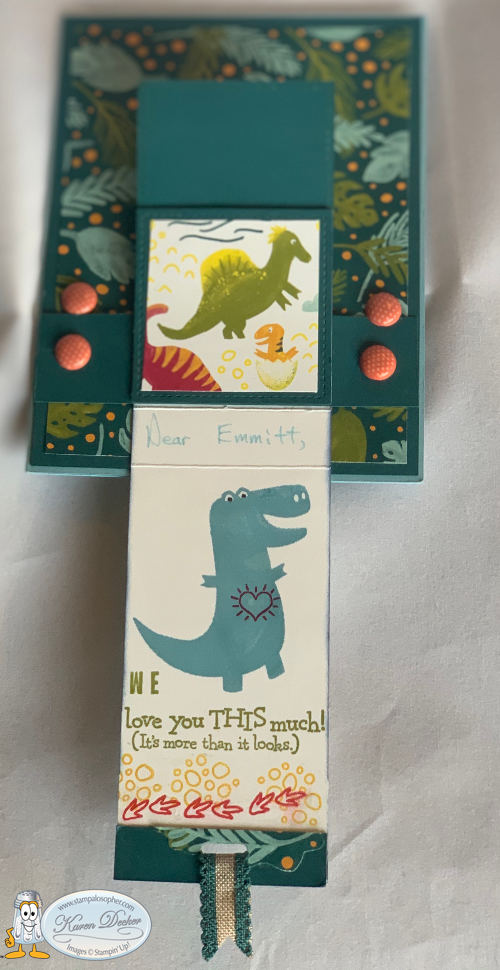
Dino Days Birthday Cards
Hello Stamping Friends,
Hopefully you are finding time during these windy winter days to have fun with your Sale A Bration products.
I made birthday cards for my grandsons Jaxson -now 3- and Emmitt -now 2! They are really into dinosaurs. I preferred the Mickey Mouse days but like my hubby says – they are boys and love to roar like a dinosaur and take dinosaur bites at dinner and attack Grandpa with a roar and a dino toy! What fun.
So it is Dino Days stamps and Dinoroar Designer Series Paper (DSP) with Dino Dies to cut out the dinosaurs on the DSP. See page 99 in the annual catalog:

I made a pop up box card and a waterfall card. The DSP is so ‘Rawrsome’ itself. It is mounted on a layer of Pretty Peacock and a card base of Balmy Blue. The pop up box card fits perfectly inside our standard envelopes.
Pop Up Box Card:

We cut out dinosaurs from the DSP and another dino of the same in a matching card stock to glue behind the DSP for strength. The dinosaurs were mounted on a strip of window sheet to secure them to the box base:
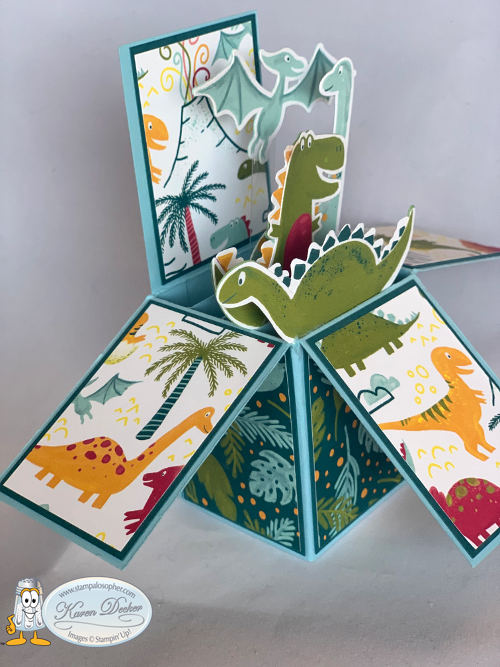
The back of the box lends itself to more stamping and I used the Vertical Greetings (retired) for the Happy Birthday and the Dino Days stamps for the greeting, palm tree, and dino tracks. I hand drew the mountains.
We cut out several additional dinosaurs and backed them with cardstock to stick in the pockets of the clothes we bought for their birthdays so they had dinosaurs to play since clothes are just not the preferred gift for toddlers.
Measurements: Click on the blue for all the instructions and examples of different boxes:
Box Card pdf
Waterfall Card:
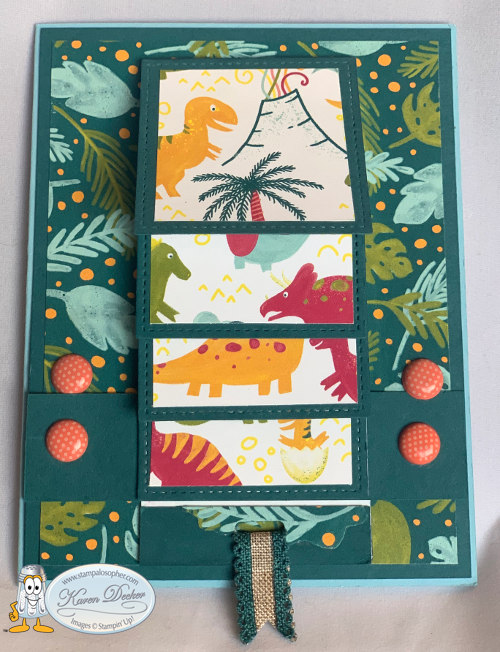

Waterfall Card pdf
The pdf is from a past waterfall card. The difference on this one is that I used two layers on top of the base and increased the size of the little panel layers by 1/8″ so I could use a square Stitched Shape Framelit. I started with a small square Stitched Shape Framelit with a Pretty Peacock layer but I thought it was too small for the outside so I used it on the inside of the card and switched to a larger square Stitched Shape Framelit and used it to cut the Pretty Peacock layers behind the DSP squares which I just cut to size. I was able to get more of the dinosaurs on the top layer with a bigger square.
Base: Balmy Blue 5 1/2 X 8 1/2 scored at 4 1/4
First Layer: Pretty Peacock 5 3/8 X 4 1/8 (make 2 so you have one for the inside)
Second Layer: Dinoroar Designer Series Paper (DSP) 5 1/8 X 3 7/8 (make one of whisper white for the inside)
Waterfall Strip: Whisper White 2 1/8 X 9 1/4; Scored at 3/4″ intervals, 2 1/8—-2 7/8—3 5/8—4 3/8 (1/8 more than the standard directions), Burnish your score lines well going in one direction so the strip looks like a candy cane.
Front Belt: 1″ X 4 1/4″; punch a hole for the brad 1/2″ over and 1/2″ up on both sides of the belt.
Peacock Squares layered on the strip like shingles: (4) 2 1/8 X 2 1/8
Top Squares of DSP: (4) 1 3/4 X 1 3/4
Ribbon: Pretty Peacock 1/2″ scalloped linen ribbon: 3″ run through a ribbon hole punched at the bottom of the waterfall and then glued together with glue dots.
Adhere the DSP full sized layer to the Peacock front layer – NOT the Balmy Blue Base yet – and then place your belt 1″ from the bottom of the Peacock layer and mark through your belts’ hole punches with a pencil- see above- to punch the two layers for adding the belt with brads. I added a tiny strip of tear and tape to the back of the belt between the hole and the edge of the belt just to secure it in place and then put the brad through the three layers. Now you can attach the layers to the Balmy Blue Base- I suggest tear and tape for extra strength.
When gluing the Peacock squares, put adhesive on the white 3/4″ sections of the white waterfall strip not on the back of the Peacock squares. You will attach the TOP only of the Peacock squares to the 3/4″ sections. Slide the waterfall strip under the belt. Put tear and tape on the belt just the width of the waterfall (2 1/8″) and attach the bottom 1″ of the waterfall to the belt.
Be careful as you stamp the large section of the belt so that you do not get it on the wrong side of the white waterfall strip.
Placing the belt an inch from the bottom is critical to making the card work. I didn’t read my own directions and just placed it where I liked it. That is why I have two sets of brads so I could cover up my mistake and place the belt correctly.
We will be doing another waterfall card in club this month so follow my blog to get that post and see another rendition using the Rustic Retreat stamp set. Just add your email at the top right of the blog where it says “subscribe”.
Thank you for stopping by. Have a wonderful day! Click on SAL in the computer to go to my store.
SAL, Stamp Away the Long winter days
Karen

Yummy Christmas Gingerbread House and Cuckoo For You
FPDMJ4X9
Hello Stamping Friends,
I missed posting our September club cards and one is a Christmas card! Now that it is getting down to the wire for Christmas cards you might be looking for the details to this card you made “way back when”!

I cased Bronwyn Eastley with a gingerbread house box card.
http://addinktivedesigns.com/product/yummy-christmas-box-card/
Things I recommend doing differently:
- add strips of window sheets to the back of each pop up
- Make two of each pop up to put front and back so the back is prettier
- cut that little point on the bottom middle front and back just a tiny bit – not cutting in to the black line – so the box sits squarely
- Use the Bronze Stampin’ Blend for the gingerbread man and the deer for a darker brown
- Use puff paint for the snow


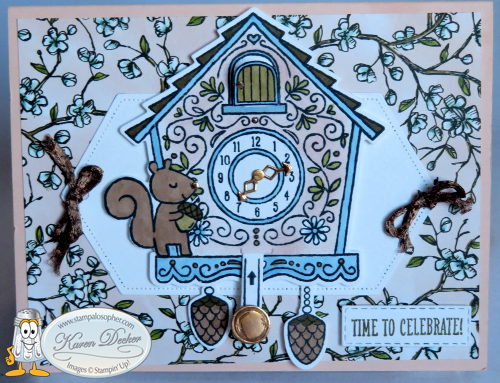
Cuckoo For You
With the ‘Yummy For Christmas’ and ‘Cuckoo For You’, we have two stamp sets that use the same set of dies!


Isn’t that so cool! The deer becomes a holly branch, the clock door becomes a gumdrop, the clock weight becomes a peppermint and the tree becomes a Christmas tree!
Christine Rohr posted a picture on Pinterest which used the Cuckoo For You and the Bird Ballad DSP. I cased and selectively edited it to come up with this card for club:

Push up on the little arrow and you see the little cuckoo bird!


Note: DSP means Designer Series Paper
- Base: Petal Pink 5 1/2 X 8 1/2 Scored at 4 1/4
- Layer 1: Bird Ballad DSP 5 1/4 X 4 Watch the direction on your DSP
- Strip of DSP for inside: 3/4 X 5 1/4
- Front Stitched Nested Label: Whisper White, 2nd largest label is 2 5/8 X 4 5/8 so start with 3 x 5 piece; emboss with the Subtle 3D embossing folder; then cut with the Stitched Nested Label. Use handheld hole punch to punch a hole on each side of the label for the ribbon. Mount the label 1″ down from top of base and 5/8″ from the sides of the base to the point of the Stitched Nested Label
- Ribbon: 1/4″ Copper Trim, 6″ , make two
- Clock and Parts: Whisper White 3 5/8 X 8 1/2; Stamp in Memento Tuxedo Black ink: clock, 2 pulls, 1 squirrel, 1 door; color with Stampin’ Blends: Old Olive on the vines, Bronze on the dots, roof-Dk Soft Suede, Clock Outline-Dk Balmy Blue, Pulls-Bronze & Dk Soft Suede, Squirrel – Bronze body, nut in Lt Suede, with a Dk Suede top, Door – Lt Suede, blue trim and be sure to cut off the white border of the door created when cutting with the framelit. Tip: When coloring with the alcohol markers in tiny areas just barely dot the area to color it. The ink spreads and you won’t be getting ink outside the lines.

- Mask the 2 flowers, the clock middle, the inside of door and sponge with Blushing Bride Ink.

- Clock Weight and clock hands: Copper Foil, 1 1/4 X 1 1/4. Stamp the clock weight in Versa Mark ink, emboss with copper powder and cut with the circle die. Cut the clock hands out of the foil and save the little pieces to use for the squirrel’s nose, the handle on the door, and the little dot right above the 12.
- Clock pull: left over from the Whisper White used for the clock and parts: cut one with the die. I used my Stamparatus to line up the lines with the arrows and the one word “cuckoo” so my stampers could easily stamp the images:

You stamp the arrow and lines image with the right side up and then stamp “cuckoo” on the back of the same piece. With the Stamparatus we could line up the one word “cuckoo” from the greeting “I’m Cuckoo About You” and didn’t even need to mask the edges. By using the grid sheet we can save it with the stamp set for the next time.
The odd looking die with a little heart on the top and the bottom is a piece that matches up with the hearts on the clock face to cut slots for the sliding mechanism in exactly the right places. There are YouTube videos using the two sliding mechanisms to make butterflies that “fly” and other fun tricks so the pieces are good for other applications.
Be careful to fold the score lines of the mechanism very straight so it slides nicely in the slots created by the second die. The slot is a little larger than the door -necessarily so- so that you can slide it in, but once it was in place, I cut two little strips of Whisper White and glued them to either side of the slot so the mechanism stayed straight.

Inside Layer: Whisper White 4 X 5 1/4 stamped in Soft Suede ink with the greetings in the “Special Celebrations” stamp set.
Front Greeting: Scrap of Whisper White run through the Big Shot part way with the Rectangle Stitched Framelit and then turned around and run through the other sider with the same Framelit to shorten it to just the right size for “Time To Celebrate”. I didn’t stop and made the whole Stitched Rectangle so I just ran it again to shorten it and then had a little piece left that was perfectly stitched that I used on this card:

My youngest granddaughter, Emma, was born on 9/24 at 7:12 AM. I moved the house over a bit, found some left over pink twine from a Paper Pumpkin, and stamped the date with one of the first photopolymer stamp sets made by Stampin’ Up!

The inside uses the “New Wonders” stamp set and a template of the ‘1’ cut out of cardstock and then sponged with Blushing Bride Ink. The fairies are colored to match the DSP with white and blue like the flowers and green like the vines. This card will be hard to top when birthday #2 comes around. My grandsons are turning 2 and 3 in the next few weeks and I will be working to make them something memorable. Do you think parents save hand made cards?
The next Christmas Stamp A Stacks are December 4th and 7th at my house at 9:30. RSVP by November 25- next Monday. Wow, where has the month gone?
SAL, Stamp A Lot
Karen


Dashing Deer Card and Detailed Deer Thinlits Luminary
 Happy Thanksgiving Stamping Friends,
May you have a wonderful time with family and friends and count your blessings many times over!
A quick reminder that the Stamp A Stacks are coming up:
- November 27, Tuesday, 9:30 – 12:00; and November 30, Friday 6:30 -9:00 Six cards each session $25
- December 4, Tuesday, 9:30 – 12:00; and December 7, Friday 6:30 – 9:00 Six cards each session $25
I need RSVPs as soon as you know your schedule since I will be traveling for Thanksgiving. There will be a Door Prize each session, Thank You gifts and Goodies of course!
At my very first Christmas workshop we made the luminary shown on page 9 of the Holiday catalog and the Dashing Deer white and gold Christmas card shown on page 8 – with a few changes of course. It is pretty in the day-time-
 or at night-

The Dollar Store had large battery operated candles that worked well. The catalog uses the Galvanized Metallic Paper (#147805) shown on page 43 of the Holiday catalog. I used a retired Naturals Cardstock but we have thick Very Vanilla Cardstock(#144237) that would work beautifully!
- 2 – Very Vanilla Thick cardstock 8 1/2″ X 8 1/2″; score both at 4″ and 8″, use a pencil and ruler to mark 3/4″ on all sides and cut out the window openings. With Soft Suede ink stamp the single flower from the set in the opposite corners of each side and then stamp 1/2 of the garland stamp on the short (horizontal) side and the whole garland on the long (vertical) side.
- 4 – Vellum 3 3/4″ X 8″ ; glue to each window opening
- Base – Very Vanilla Thick cardstock 5″ X 5″; score the base at 1/2″ each side, cut out corners
- 2 – Deer – Very Vanilla 4″ X 6″; Cut out with your flying Detailed Deer Thinlit. The catalog uses the corrugated Embossing Folder to stripe the deer (#148026). I used the retired Diagonal Stripe background stamp to stamp the deer using Soft Suede ink. Remember to turn one over before stamping so you have the deer going opposite ways. To mount, I used glue dots and a tiny bit of the Fine Tip Glue on the horns.
- 4 Branches – Early Espresso – the catalog uses the Night Owl Thinlits Dies, pg 41 (#147920), I used the Petals & More Thinlits (#145655) and cut off the end of the leaves so they looked like branches. Use two branches going opposite ways for the top and two for the bottom. This is the first layer of your corner garland.
- 4 Spruce Branches for the next layer – Garden green – Cut with the Christmas Staircase Thinlits (#144679)
- 2 Sprig Punches, (page 29, #148012) cut in half – Granny Apple Green – layer on the spruce branches
- 2 – 12″ lengths of Gold Metallic Thread; wrap around three fingers and attach to the sprigs with glue dots
- 6 – flowers cut with the Detailed Deer Thinlits – Cherry Cobbler – layered on the gold thread
- 18 – flower centers cut with a 1/16 hole punch using a 1/2″ X 2″ strip of Pineapple Punch cardstock. With our new Take Your Pick tool, (page 30 #144107) you can easily pick up the tiny pieces and place them on your project.
Now let’s make the Happiest Christmas Wishes card changing up a few things from the catalog:


On page 11 of the Holiday catalog there are Foil-Edged Cards and Envelopes in gold, #147901, and silver #147900. I used the gold for this card.
For embossing with our gold embossing powder remember these steps:
Step 1: tap with embossing buddy on whole area;
Step 2: Stamp in Versa Mark;
Step 3: Coat with gold embossing powder; Turn over and flick off excess; use paintbrush to remove any other excess
Step 4: Heat until glossy
- Gold Foil-Edged Card base, Use gold embossing powder and emboss the garland from the stamp set in gold embossing powder on the base with the middle of the stamp 1/2″ down on the white part of the base and 1/2″ up on the bottom white part of the base. You will measure 1/2″ from the white edge not the gold edge. Use a light pencil mark so you know where to place the middle of the garland.
- Swirls and Curls Embossing Folder (#147923) Layer, Whisper White, 3 3/4″ X 3 3/4″
- 2 Gold Glimmer Paper strips- 1/2″ X 4″ , adhere to the top and bottom of the embossed layer, snip the ends. I find it is better to make little strips like this a bit longer and then snip them off so they are sure to be the perfect size.
- Gold Foil Cardstock – 3″ X 3 1/2″, cut out 1 flying deer and three gold flowers with the Detailed Deer Thinlits and use the scrap to punch 3 centers for the flowers with a 1/16″ hole punch.
- Banner, Whisper White Cardstock, 3/4″ X 2 1/2″, punch end with banner punch or a square punch, emboss the greeting
- 3- Top of the flowers: Whisper White, 1″ X 2″, layer on top of gold, slightly offsetting one edge and then add punched circle middle
- Inside – Whisper White 3 3/4″ X 5″; Emboss the greeting and the small standing deer with gold embossing powder.
One last project for today: Gift Bags using our beautiful Designer Series Paper!

Jill Olsen has a video on YouTube from years ago and she updated it this year, click to watch:

After our event, Lucille typed up directions for us so you would be able to print out a file for reference. Thank you, Lucille!
Gift Bag Instructions pdf file (click to download)
 Stampin’ Up! will have a Black Friday sale so I will post the details as soon as I hear.
SAL, Sigh A Lot (as you sit back from the feast and marvel at your blessings)
Karen

Wedding Wishes Card & Mother’s Day Box
Hello Stamping Friends,
 It’s May in the Rockies! I think we started the fountain a little too early. No, that is not a real jack rabbit, but the garden statue sure shows up nicely in the snow! The sun melted every flake the next day and the lawn loved the moisture so we are thankful!
Thank you to those of you who ordered in April with the hostess code! Sharon did earn her Big Shot and if you missed her party with all the fun thank you gifts, I will be mailing you a thank you gift for your online order!
May’s hostess code is: 29SANZNQ It is the last month for the Occasions Catalog and the Annual Catalog and many items are already sold out. You can go to the online store and click on Retiring items on the left side to view images of the retiring items. The Clearance Rack has been stocked with other items as well so stop by there while you are visiting to see if anything is a must have! Online Store
Use the hostess code and receive a gift from me if your order is under $150! Order over $150 and you earn the hostess dollars!
Sharon’s party focused on the Floral Boutique Suite on pages 76-77 of the Annual Catalog. The bundle is still available at 10% off and the Designer Series Paper (DSP) is still available, though inventory is low. The Washi Tape and Baker’s Twine is sold out – so sorry.
For Sharon’s thank you gift I used the gift bag punch board and made a medium sized bag with the Floral Boutique DSP and then filled the bag with the Washi Tape and Baker’s Twine.
 Sharon had recently purchased the Pansy Punch, #130698, and the Flower Shop stamp set, #130942, so I made her a 3D flower using those products. I will explain how to make a pansy punch flower later in this post.
For her thank you card, I used the Detailed Floral Thinlits Dies with the Floral Phrases stamp set. The border stamp was a great way to enhance the greeting on the inside of the card:

 Would you like to host a party? I will plan something special for you as well!
Thank you card:
- Base: Thick Whisper White Card Stock 4 1/4″ X 11″ Scored at 5 1/2″
- Top Layer: Night of Navy 4″ X 5 1/4″ with thinlits positioned on each end and cut, then each end cut with the border thinlit.
We made two projects at the party, a wedding card and a mother’s day box using the Window Box thinlits on page 43 of the Occasions catalog. The bundle is still available and, though the Window Shopping Stamp set and Window Box Thinlits carry over to the new catalog, they won’t have the 10% discount.


 The little blue flower on the top of the box is from the Flourish Thinlits set #141478. It coordinates with the Flourishing Phrases stamp set which has greetings for many occasions. Check out page 49 of the Annual Catalog. The 3D flower is made using the pansy punch.
3D Flower:
- Using regular Whisper White card stock 2″ X 7″ punch four pansies
- Sponge the edges with Night of Navy ink
- Punch a hole in the center of each flower. I used a business hole punch and punched about three times to make a nice hole
- Using your bone folder curl the petals a bit for softer looking petals
- The 5 petal pansy becomes the base, the first layer
- Make a cut between two petals to the center hole and then glue one petal on top of the other; this is the second layer-4 petals
- Cut out one petal, save it for the center, and glue one petal on top of another to make the third layer-3 petals
- Cut out two petals, save them, and glue one petal on top of another to make the fourth layer – 2 petals
- Roll the two petals you cut out- 1 petal
- Roll the one petal to make a center
- Place a glob of hot glue on the Silicone Craft Sheet #127853 and quickly layer your flowers, the glue should come up through the holes in the middle of the flowers. (Some crafters layered the flowers first then placed them on the hot glue.)
Wedding Wishes Card:
- Detailed Floral Thinlits #141482
- Floral Phrases Stamp Set #141767 (Can be bundled for a 10% discount through May 31)
- Card Base: Thick Whisper White #140272 cardstock 5 1/2″ X 8 1/2″ Scored at 4 1/4″
- Night of Navy cardstock #100867 cut at 5 3/8″ X 4 3/16″ ( I call it 4 1/4″ (minus a hair))
- Use the smaller thinlit and the border thinlit and cut the right hand side of the Night of Navy
- Glue the cut piece to the card base flush to the left
- Using just the border thinlit, cut the card base to match the Night of Navy top
- Fussy cut along the fold line to make it a bit neater
- Cut an outside 2 1/4″ circle with the circle framelits and a 2 3/4″ X 2 3/4″ piece of Night of Navy
- Using a 2 1/4″ X 2 1/4″ piece of Whisper White stamp your greeting, then cut to make a 1 7/8″ circle with the Stitched Framelits specialty set #145372, the 2nd circle in from the center
- Cut a piece of the Floral Boutique Designer Series Paper at 4″ X 3 1/4″
- Layer the circles and then center them on the DSP and attach
- Wrap the DSP and circles tying a bow with 14″ Bakers Twine and then attach to the Night of Navy layer
- As you trim the Bakers Twine save a little bit and separate the strands to make little antennae for the butterfly
- Stamp a butterfly with the Papillion Potpourri stamp set #123759 and punch with the retiring Bitty Butterfly punch #129406
- I put one glue dot on to attach the antennae and then another to attach to the card
- The inside is the Standard Layers (click here) Night of Navy 5 1/4″ X 4″
- Whisper White top layer of 5″ X 3 3/4″
- Helpful Hint: Mount all three of the stamps on one block to get them nicely squared and then stamp the inside greeting
Imagine the different Designer Series Papers we could use to make this a birthday or graduation or………
Mother’s Day Window Box:
- Window Box Thinlits #142762
- Flourish Thinlits #141478 – use Night of Navy 2″ X 3 1/2″ and cut one flourish
- Pansy Punch #130698 – see instructions for flower above
- Thick Whisper White cardstock 11 X 6 (cut two box bases) See prior post instructions by clicking here
- Designer Series Paper; start with 3 3/4″ X 4″ and then cut just a top with Window Box Thinlit then cut off all the tabs; I had several to make so I used grid paper and made a template of just the top so I could quickly cut off the edges-store this template with your framelits for the future
- Every other side, three of the six sides, was made using #2 of the Stitched Shape square specialty framelits and a piece of DSP that was 2″ X 2″ (Note: #2 means the second one from the center)
- The other three sides used the # 2 Stitched Shape square and a 2″ X 2″ Night of Navy cardstock for the back border
- The top of the Night of Navy used a 1 7/8″ X 1 7/8″ piece of Whisper White and the heart cutout from the Window Box Thinlits layered with the retired #2 Regular Square Framelits Die. You layer both on the Whisper White and only need to cut once. The magnetic platform really helps with this cut!
- Before gluing all the pieces to the top of the lid, cut a 2″ piece of ribbon, fold it in half and glue it to the box lid. I used the retiring 5/8″ Organza #114319
- Cut a Delicate White Doilie # 141701 to fit the left edge of the top and attach your layers: the DSP, then Doilie, Flourish and finally the rose. I made an extra to store with the framelits for a template so future projects will take less time.
- I didn’t want to clutter the top with a greeting so I used the 2 1/2″ circle punch to punch a circle, sponged the edges and added a greeting. My Mother’s Day greeting comes from my stash of Paper Pumpkin stamp sets but the retiring Oh So Succulent stamp set on page 21 of the Occasions catalog #142992 and the That’s The Tag # 142755 retiring set on page 23 both have Mother’s Day greetings.
So now lets go find a beautiful piece of Navy satin and a lovely necklace, or perfume, or gift card to put in the box. Then let’s make a graduation box with a graduation cap instead of a rose what do you think?
SAL, Stamp A Lot this wonderful May month
Karen

Window Shopping Bundle!
 Hurry Stamping Friends,
Don’t let the Window Shopping Bundle get away! It is on page 43 of the Occasions catalog and is just the cutest! It might get carried over in the big catalog come June 1st, however when Stampin’ Up! introduces a product with matching Thinlits it is bundled with 10% savings but not when it is carried over to the next catalog. The bundle is $50.25 which will qualify you for a free Sale A Bration product.
Remember, purchase $50 of anything from any catalog and get one item from Sale A Bration for free. Three additional items were introduced February 21:


Check out the sample items made with these products:

Click on the brochure picture below to see all the other Sale A Bration products. But hurry the Card Tin is already sold out and product is only available while supplies last!

Thank you, Deana, for a wonderful party to introduce the Window Shopping bundle and the Sale A Bration products.
Our project at the party was either a Birthday Box with matching card which uses the Window Shopping stamp set:

or a Thinking of You box and matching card:
Notice the banners use the Delicate Details free stamp set from Sale A Bration:

The Emerald Envy box uses the third one down and the Dapper Denim box uses the second one down to be a bit more masculine. The flower and cupcake on the edges of the banner are part of the Window Box stamp set! The banner uses a 5 1/2″ X 7/8 inch piece of card stock and the little Thinlit from the set that scores and cuts the end! The video below will show that in detail.


For a thank you gift, I used the same Window Shopping Bundle and made a little St. Patrick’s Day basket.

Hmmm…. It did have chocolate in it at one time; at least the tea light and mints are still there for the picture. I used Cucumber Crush paper and the Mint Macaron ribbon which is still in the Clearance Rack. Why a tea light? Because the door prize was a tea light holder made with Watermelon Wonder card stock:
 To make the tealight you use two pieces of the main Thinlit just as you do for the box:
 Remember the middle heart is directional so punch your windows accordingly.
I demonstrated the basket pieces with the same color. You only need one piece of the main box Thinlit for the basket and one piece 8 1/2 X 3/4 for the handle:
 The Thinlit set makes a basket just perfect for a little Easter gift!

The regular box uses two Thinlit cutouts which fit nicely on a 6 X 11 piece of paper:
 The home office has a wonderful video for construction of the box so rather than recreate the wheel I will insert it here. If you are viewing this on your smartphone you may need to click on the little SAL image at the top of the post to go to the main blog where videos work.
Drum roll please: Presenting The Window Box Thinlit dies:

One more quick note – check the bottom of your Big Shot machine once in awhile. The bottom screws need to be kept tightened as well as the screw on the handle. The machine comes with a little tool to keep the handle tightened but you will need a phillips screw driver to tighten the bottom screws.

Cheerio but be back soon! (I just went to the high school’s performance of Oliver. It was exceptional and I can’t get the songs out of my mind- but who would want too?!)
SAL,
Karen (Click on SAL to go to the online store)
Valentine Treat Box
Hello Stampers,
Just in time for Valentine’s day, Priscilla Ivler posted a cute treat box. It is triangular with a sliding tray that holds five Hershey kisses! I made them for my last two events and they were a hit. Here is a picture followed by a printable PDF file for your files, and for the recipe box here on the blog should you ever want to find it quickly! Click on this blue link:
Treat Box Triangle PDF Instruction Sheet

Here are the supplies used. Just click to go directly to the online store.


Built for Free Using:My Stampin Blog

Welcome to my blog!

Sal Window to Products


