
Home » Birthday Generic (Page 2)
Category Archives: Birthday Generic
Paradise Palms for May Swaps, Sweet Songbirds Catalog Launch
Hello Stamping Friends,
 Let’s take a moment to remember those who gave their lives for their country!
Jo Brooks sent a swap card that is so perfect for the day:

 .
.  .
.
The little red star is attached to the left and fits inside the blue star creating an awesome hinge. Opening up the stars, Jo has inserted ‘A Soldier’s Poem’:

May we honor their sacrifice by protecting our freedoms as best we can!
Jo’s card uses many Stampin’ Up! Dies– Celebrate You, Basic Borders, Cross of Hope, Scalloped Contours, and Stitched Stars. What a great card for Memorial Day! Thank you, Jo!
I have so much to share I hardly know where to start. Grab a cuppa and settle in for some wonderful inspiration from my group of swappers and the projects at the catalog launch.
 You had better hurry! You have so much to share.
Catalog Launch Fun

Stampin’ Up!’s new annual catalog made its debut May 3rd and it was so hard to decide what to showcase. I love birds and wasn’t sure about the Sweet Songbirds stamp set until I saw a card made by Sue Vine of Miss Pinks Craft Spot with the bird in the air so I went with that idea and voila:
 .
. 
 .
.  .
.
There are two different sets of eyes- open or closed- and two different feet -standing or walking- and a punch to punch out our little songbird! Laura Mellinger of laurasworksofgheart.blogspot.com designed the little nest which was perfect for a party favor!
I used the Tea Boutique Cards and Envelopes with strips of the new Tahitian Tide, Parakeet Party and Sweet Sorbet card stock adhered to the white side which I made the front. The clouds are from the Give It A Whirl Dies! The clouds have stitched edges for a fun look and there are hearts and circles and rectangles, a must for your collection, even if you never make a whirly card like I did here.
 .
.  .
. All the attendees got to see the new In Colors up close and personal as they made their color chart:
 .
. Sweet Songbird In Flight Recipe
–Sweet Songbirds stamp set, Songbird Builder Punch
-Base, Tea Boutique Cards and Envelopes
-Basic White, 2 3/4″ X 4″; stamp the songbird and then punch out. Stamp and punch an extra belly to make the larger wing. Helpful Hint: Punch the songbird out of scrap to make a template for positioning the stamps on the Stamparatus. Save your template with the stamp set.
-Side Strips X2, 5 1/2″ X 3/8″ in one color for the songbird and one color to match your choice of card
-Basic White scraps, various sizes to die cut clouds with the Whirly Dies
-Baker’s Twine, 12″ and 3 Opal Round embellishments (There is Baker’s Twine to match the In Colors)
-Inks, Memento Black, Soft Suede, Old Olive, Tahitian Tide, Crushed Curry, Sweet Sorbet (Poppy Parade)
Sweet Songbird Favors
-Nest box, Soft Suede, 3X3, score at 1″ and 2″ on both sides, cut from one score line to the other on opposite sides 
-Nest, Soft Suede, 2 1/2 X 3, stamp two nests and fussy cut
-Bird, Tahitian Tide 2 X 2 1/4, punch – no stamping, Basic White scrap for belly, Daffodil Delight scrap for beak
-Sign, Basic White, 2 X 2, stamp the post full strength and then the rectangle after stamping off (2nd generation) so the greeting stamps nicely over top, stamp the notes in memento black and fussy cut
May Swaps
I chose the Paradise Palms stamp set and Palm Dies on a background of New Horizons Designer Series Paper (retiring June 30) with a Pale Papaya Base and Basic Black accents. The greeting and birds are from the retired Beautiful Moments stamp set. The coconuts are from the Pebbles Enamel Shapes . I added the setting sun and sponged a bit of extra colors in the sky.


I made a vertical book fold with the same palm tree design and a different piece from the same DSP for the inside of the card that looks like a beach with sea foam just coming in!
 .
.  .
.
Horizontal Paradise Palms Recipe
- Base, Pale Papaya, 8 1/2 X 5 1/2, score at 4 1/4
- Layer, Basic Black, 5 3/8 X 3 3/8; 1/16 reveal top and sides
- Top Layer, New Horizons DSP, 5 1/4 X 3 1/4
- Designer Strip, Basic Black, 3/4 X 5 1/2, die cut with Palms Die and center 1/8″ up from bottom and 1/8″ from black layer
- Palm Tree, Basic Black, 2 5/8 X 3 3/8, die cut with Palms Dies
- Greeting and birds, Memento Black Ink; stamp set – Collect Beautiful Moments
- Sun, use a sponge dauber to make a circle in Crushed Curry with a little extra sponged in the sky
- Embellish with Pebbles Enamel Shapes for coconuts and 3 In Color gems on DSP
- Inside Layer, Basic Black, 2 5/8 X 5 3/8
- Inside Top, New Horizons DSP, 2 1/2 X 5 1/4
- Inside Greeting, Memento Black, Paradise Palms Stamp set
Vertical Book Fold Paradise Palms Recipe
- Base, Pale Papaya, 8 1/2 X 5 1/2, score at 4 1/4; Turn 180 degrees and score at 3 3/8″ and 3 3/8 + 1/16, (7/16) for a decorative extra score line
- Layer (X2), Basic Black, 3 1/8 X 5 1/2, this will be flush with top and bottom with 1/16 reveal right and left
- DSP Top Layer (X2), New Horizons, 3 X 5 1/2; Hint: with 3″ in width you can make two from a 6 X 6 which is the goal if you are making multiples. Obviously, a different DSP used for inside.
- Designer Strip, Basic Black, 3/4 X 5 1/2, die cut with Palms Die and center 3/16″ from side and 3/16″ from black layer
- Palm Tree, Basic Black, 2 5/8 X 3 3/8, die cut with Palms Dies
- Grass, Basic Black, 3 1/2 X 1
- Greeting and birds, Memento Black Ink, Stamp set – Collect Beautiful Moments
- Sun, use a sponge dauber to make a circle in Crushed Curry with a little extra sponged in the sky
- Embellish with Pebbles Enamel Shapes for coconuts
- Inside Greeting, Memento Black, Paradise Palms Stamp set
 Do you crafters really measure to the 1/16 of an inch?
Well, Sal, we often just eyeball the placement but that doesn’t make for very good instructions.
Let’s look at the swaps from the rest of the group. We saw Jo Brooks’ swap up top so now let’s look at Sharon’s swap using a tea cup very similar to our new tea cup in the Tea Boutique Suite. She uses three layers for the butterfly- a Fresh Freesia base, a Blushing Bride die cut and then tops her butterfly with a vellum die cut and a unique oval gem.

Heather used the Flowering Fields DSP (retiring June 30) and a greeting from the Flowering Tulips stamp set in beautifully layered circles on a gold foil circle. The base is Poppy Parade and she used a corner rounder punch on opposing sides of the DSP for a unique look.

Ann’s swap used embossed strips of the new In Colors on a Crumb Cake base and the greeting from Biggest Wish stamped in Parakeet Party with the ‘happy’ stamped over in Starry Sky. The ribbon is the 1/8″ Metallic Woven ribbon in Orchid Oasis

Lucille Kearin used the DSP with butterflies (retired) and a fun ‘hi’ Die. She embellished with white ribbon and Paper Studio Flowers.

Joy’s card uses the new Nature’s Prints stamp set and Natural Prints Dies. She used the Gray Granite side of the Sun Prints DSP, the Layering Circles Dies, a doily and beautiful gems. You would love the sparkly Wink of Stella she used on the branch but the camera didn’t capture the sparkle. Her gems really sparkled!

You must see the other card she made using the Nature’s Prints Dies! I love the shape of the greeting and had to go look up the dies since I hadn’t even noticed that die. She used the new Fern 3D embossing folder on a base of Starry Sky and then sponged the top lightly with white craft stampin’ ink.

Lori Moore made a slimline card on a white base with Design A Daydream DSP for her first layer and then a layer of embossed Basic White, a layer of Blackberry Bliss with the top layer of Basic White stamped with the Art Gallery stamp set flower in Berry Burst and Rich Razzleberry. The leaves and ribbon are Soft Succulent. The greeting is from the Floral Gallery Dies.

Wow, you will have lots of samples to show at your next party!
So true! Thank you everyone for participating in our monthly swaps!
Hopefully, I will have some cards from the May Paper Pumpkin to show you soon.
Now, now, Sal, be kind! Though you make a good point and I think I even missed the April swaps.
Thank you for spending some time with me!
SAL, Sharing A Lot of inspiration
Karen

Triangle Corner Pop Up Card for Case The Creator (CTC) #3
Hello Stamping Friends,
Case The Creator Card Challenge
This month we cased Dawn Griffith’s Triangle Corner Pop Up Easel Card!
Yes, Dawn calls it a “Fancy, Schmancy Corner Fun Fold”! Her video is in the instructions.
Case The Creator #3 printable pdf file

I ordered the tiny magnets from Amazon:

 .
.  .
. 
The bicycle is hidden when you open up the easel so be careful with your design. I had a lot of fun with the bicycle! I used the long, tiny tulip die to create a basket of tulips! I will write my greeting under the ‘thank you’ since I went against protocol and made the bottom left another flower display instead of the place to write a note.
Heather made a fabulous graduation card with beautiful gold embossed paper and black! I love the diploma for the easel stand up!
 .
. 
Joy’s beautiful card uses the ‘Expressions In Ink’ designer series paper. We only have until May 2nd to get discontinuing items, like this DSP, from the annual catalog!
 .
.
Sharon’s uses the Tea Time stamp set and Tea Together dies- look at the little heart she put on the lid!

Sheri used the ‘Flowering Fields’ DSP and the ‘Simply Succulents’ stamp set for greetings:
. 
 .
.
Ann used the ‘You’re A Peach’ DSP and the ’Sweet As A Peach Bundle’. Those peaches even look fuzzy! The amazing “Dist ink tive” stamps! These are in the Annual catalog as well so order before May 2.

 .
.
Jo’s little rabbit made us all smile, and eggs from the Arrange A Wreath set and Wreath Builder Dies were perfect with the paper.
 .
.  .
.
They followed instructions and had a large place for a message.
Indeed! Isn’t it fun to see all the different creations from one set of instructions?!
SAL, Seeing April Leave
Karen
Click on little Sal in the computer to shop.
Ninja Turtle Birthday Cards & Gift Card Holder
Hello Stamping Friends,
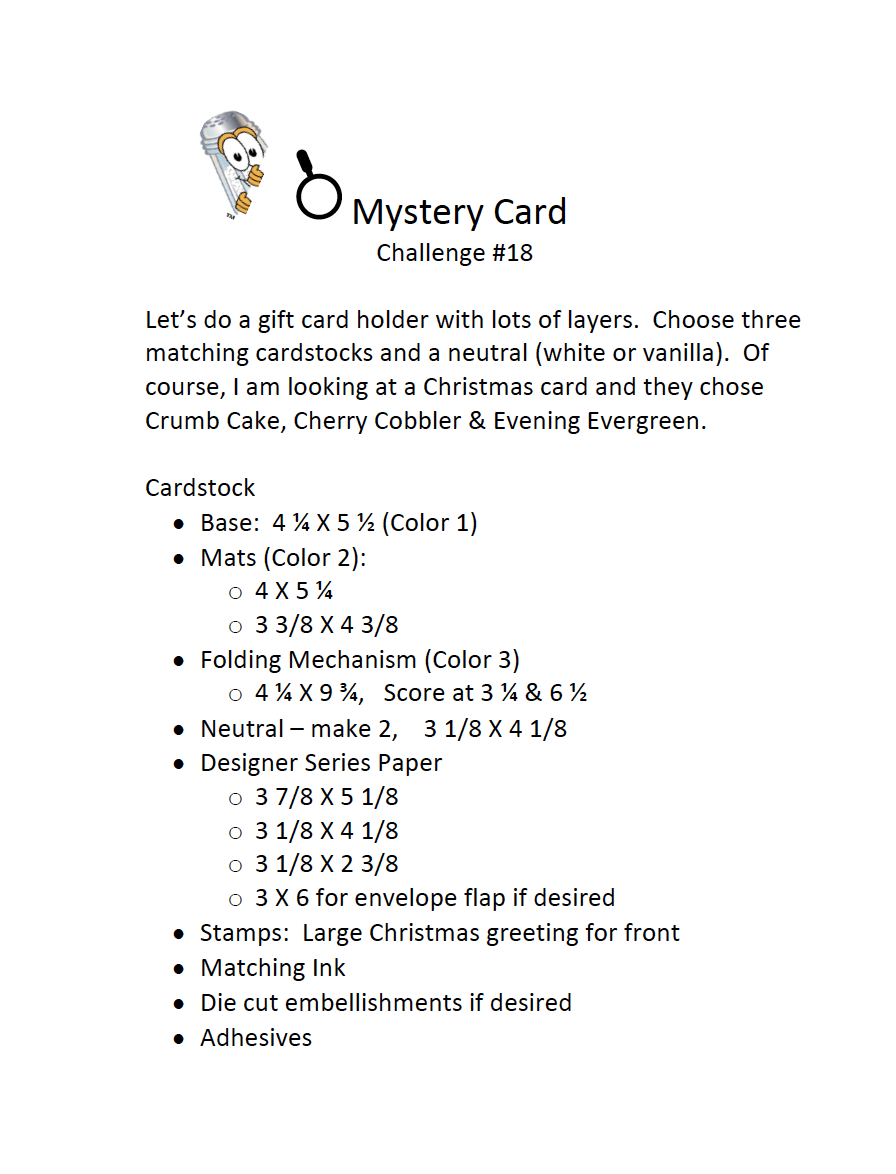
Would you like to look at December’s Mystery card?
What happened to January?
Ahh, January! Snowstorms caused us to cancel club twice but finally we had club on the last day of January. Obviously no days left for a Zoom meeting with a mystery card.
January 4th was my daughter Amber’s birthday and the 9th was Emmitt’s 4th birthday so we celebrated with a Ninja Turtle party! Paul had to be both grandpa and dad since dad was in Seattle.
 .
. 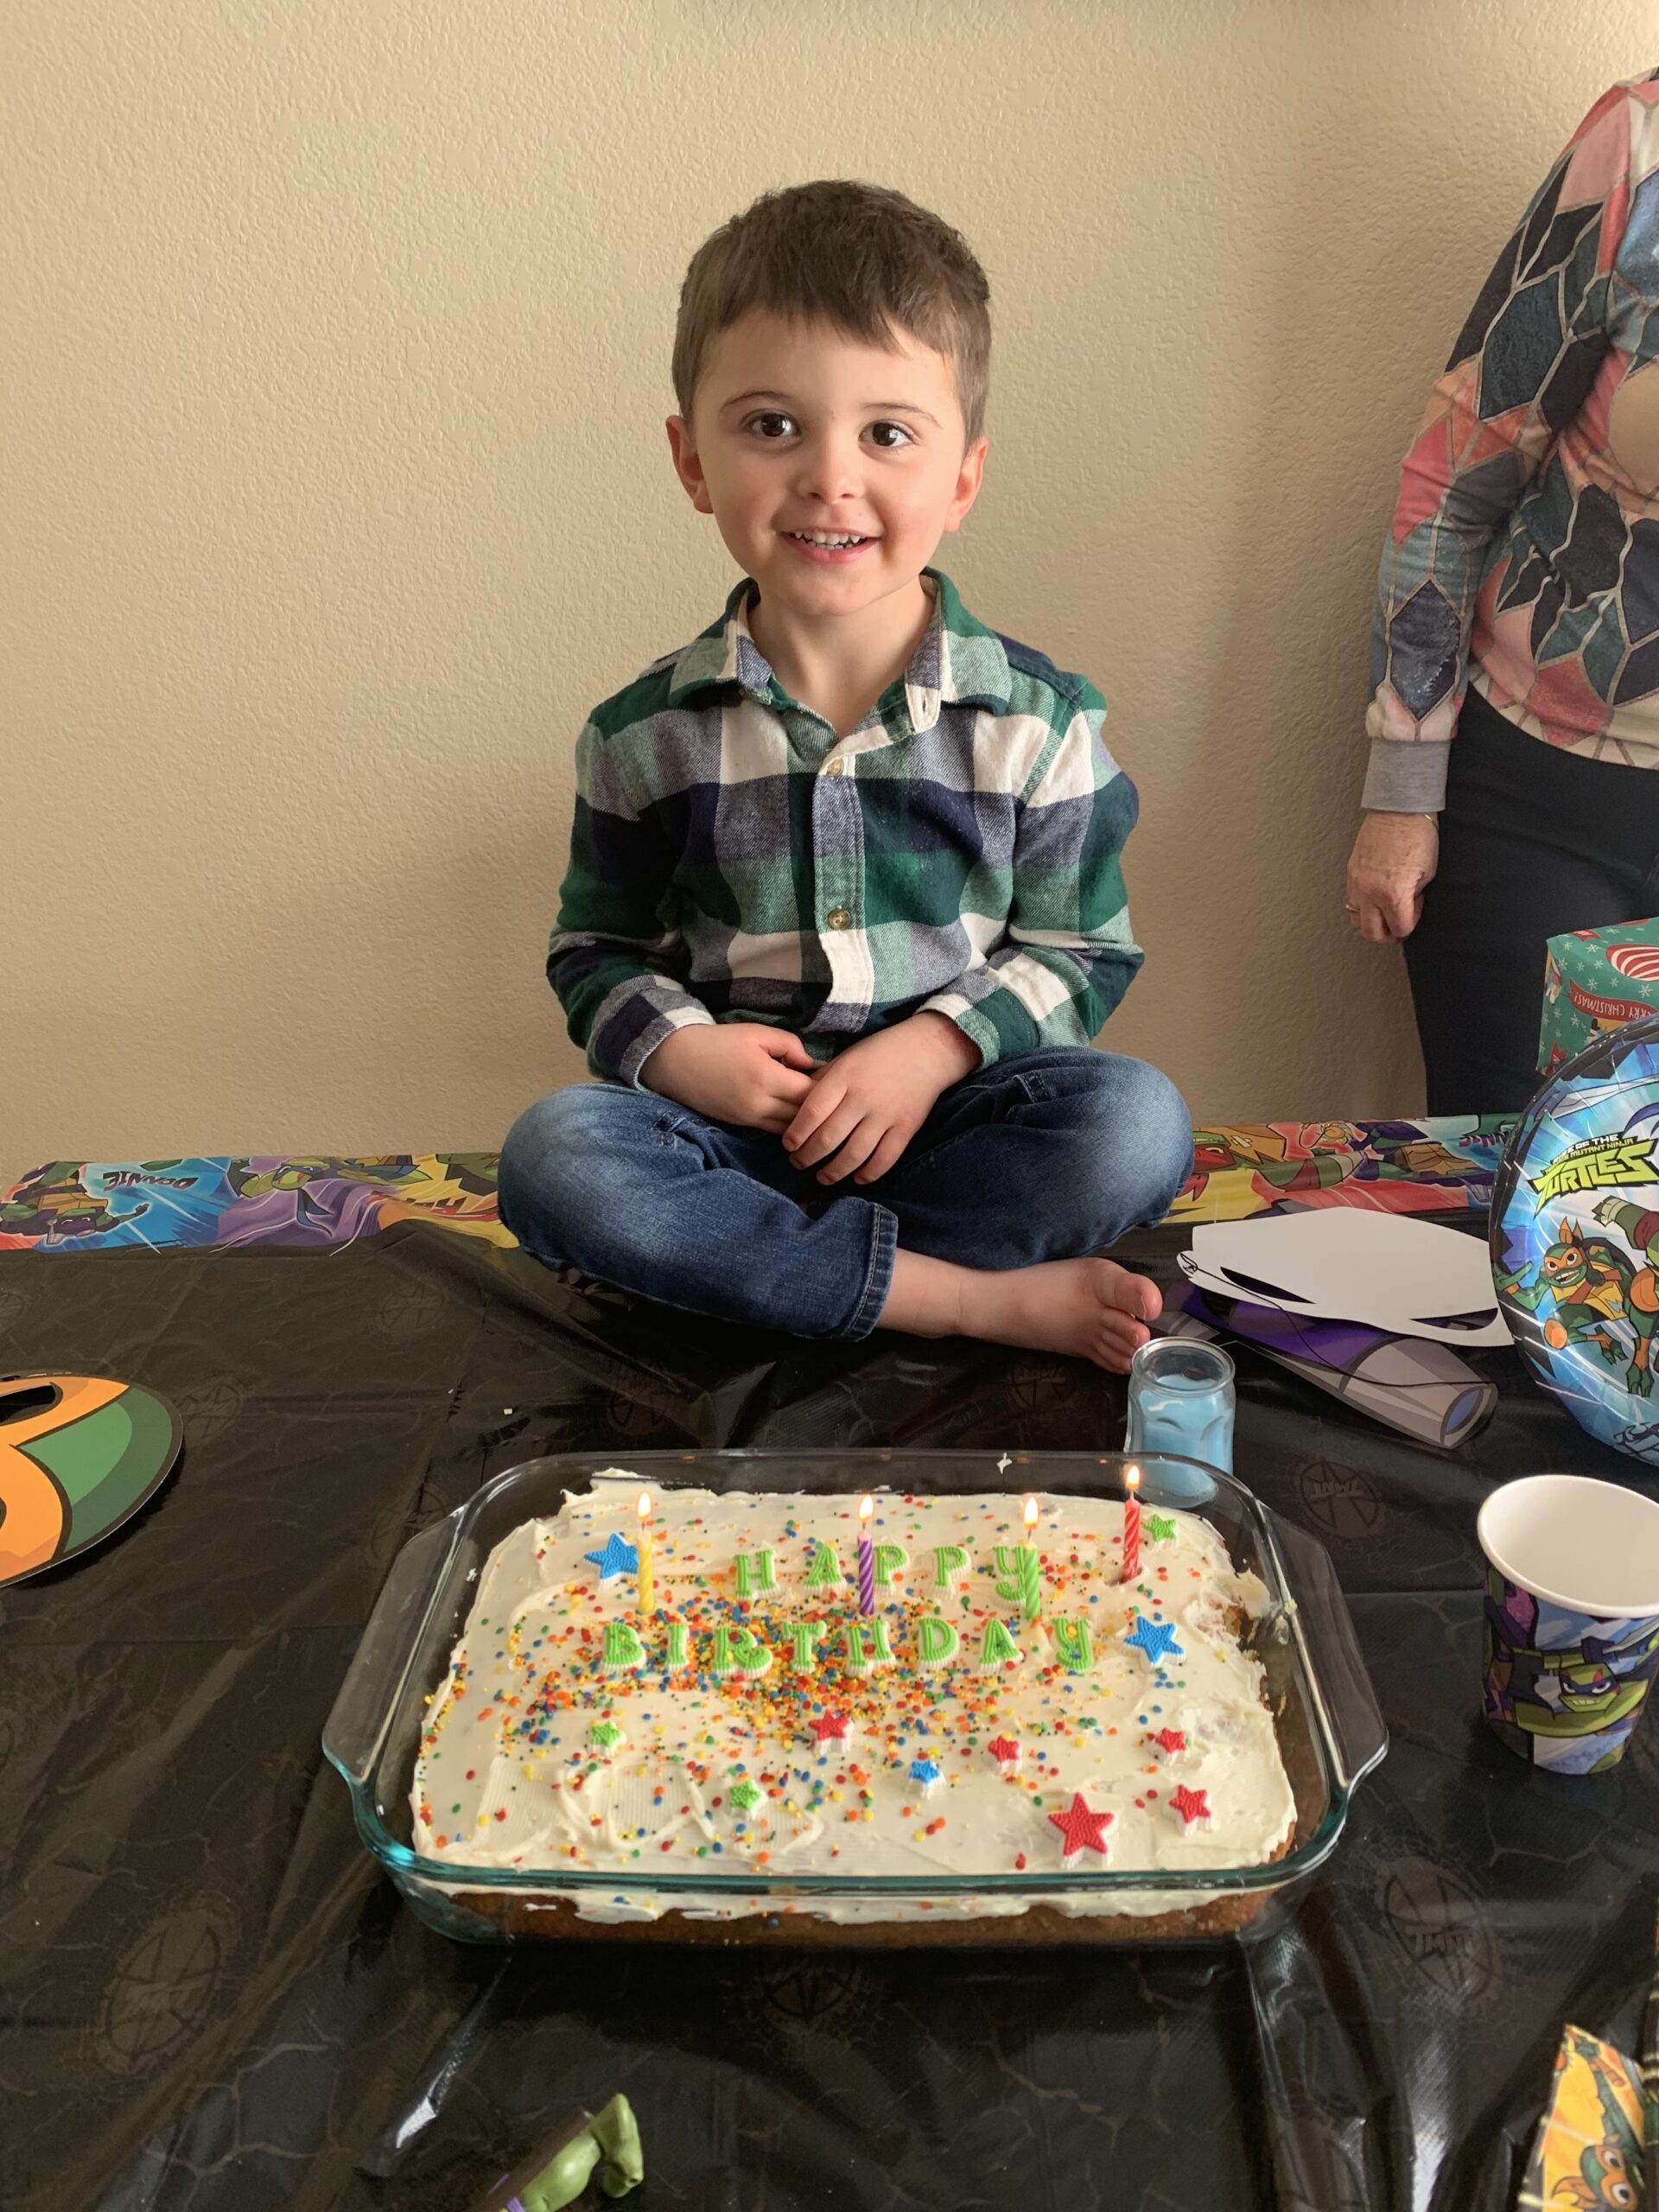
Of course, he had to have a Ninja turtle card:

The little dog looks just like Ruger don’t you think?! I used the ‘Back on Your Feet’ stamp set and the ‘Ready For Christmas’ stamp set and ‘Christmas Staircase’ dies. I cut the curves with the ‘Polar Bear Dies’ and punched out a balloon. The number ‘4’ was die cut with the ‘Playful Alphabet’ die. I hand drew the Ninja mask!
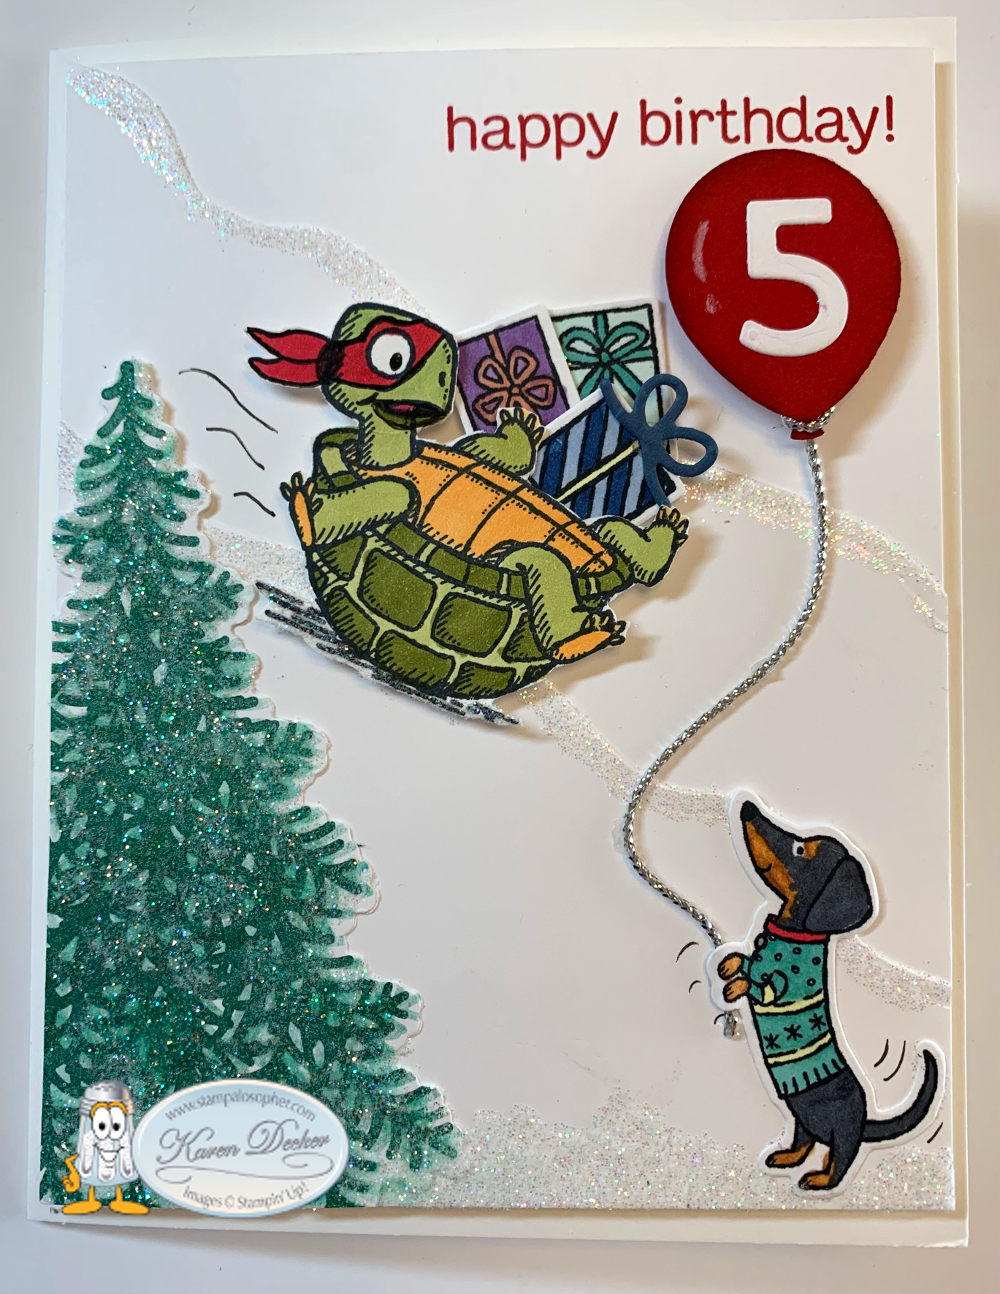
Jaxson’s birthday was just two weeks earlier so he received a Ninja in red – I think that is Michaelangelo and the blue is Donatello.

 .
. 
Then January 7th our fifth grandbaby decided to come early and was born to Stacia and Jonathan. Emma became a big sister! Josephine Jasmine Whitehead entered the world weighing 5 lbs 13 oz. She was named after Paul’s mom! She was born one day before her daddy’s birthday on the 8th! Very special in so many ways!
 .
.  .
. 
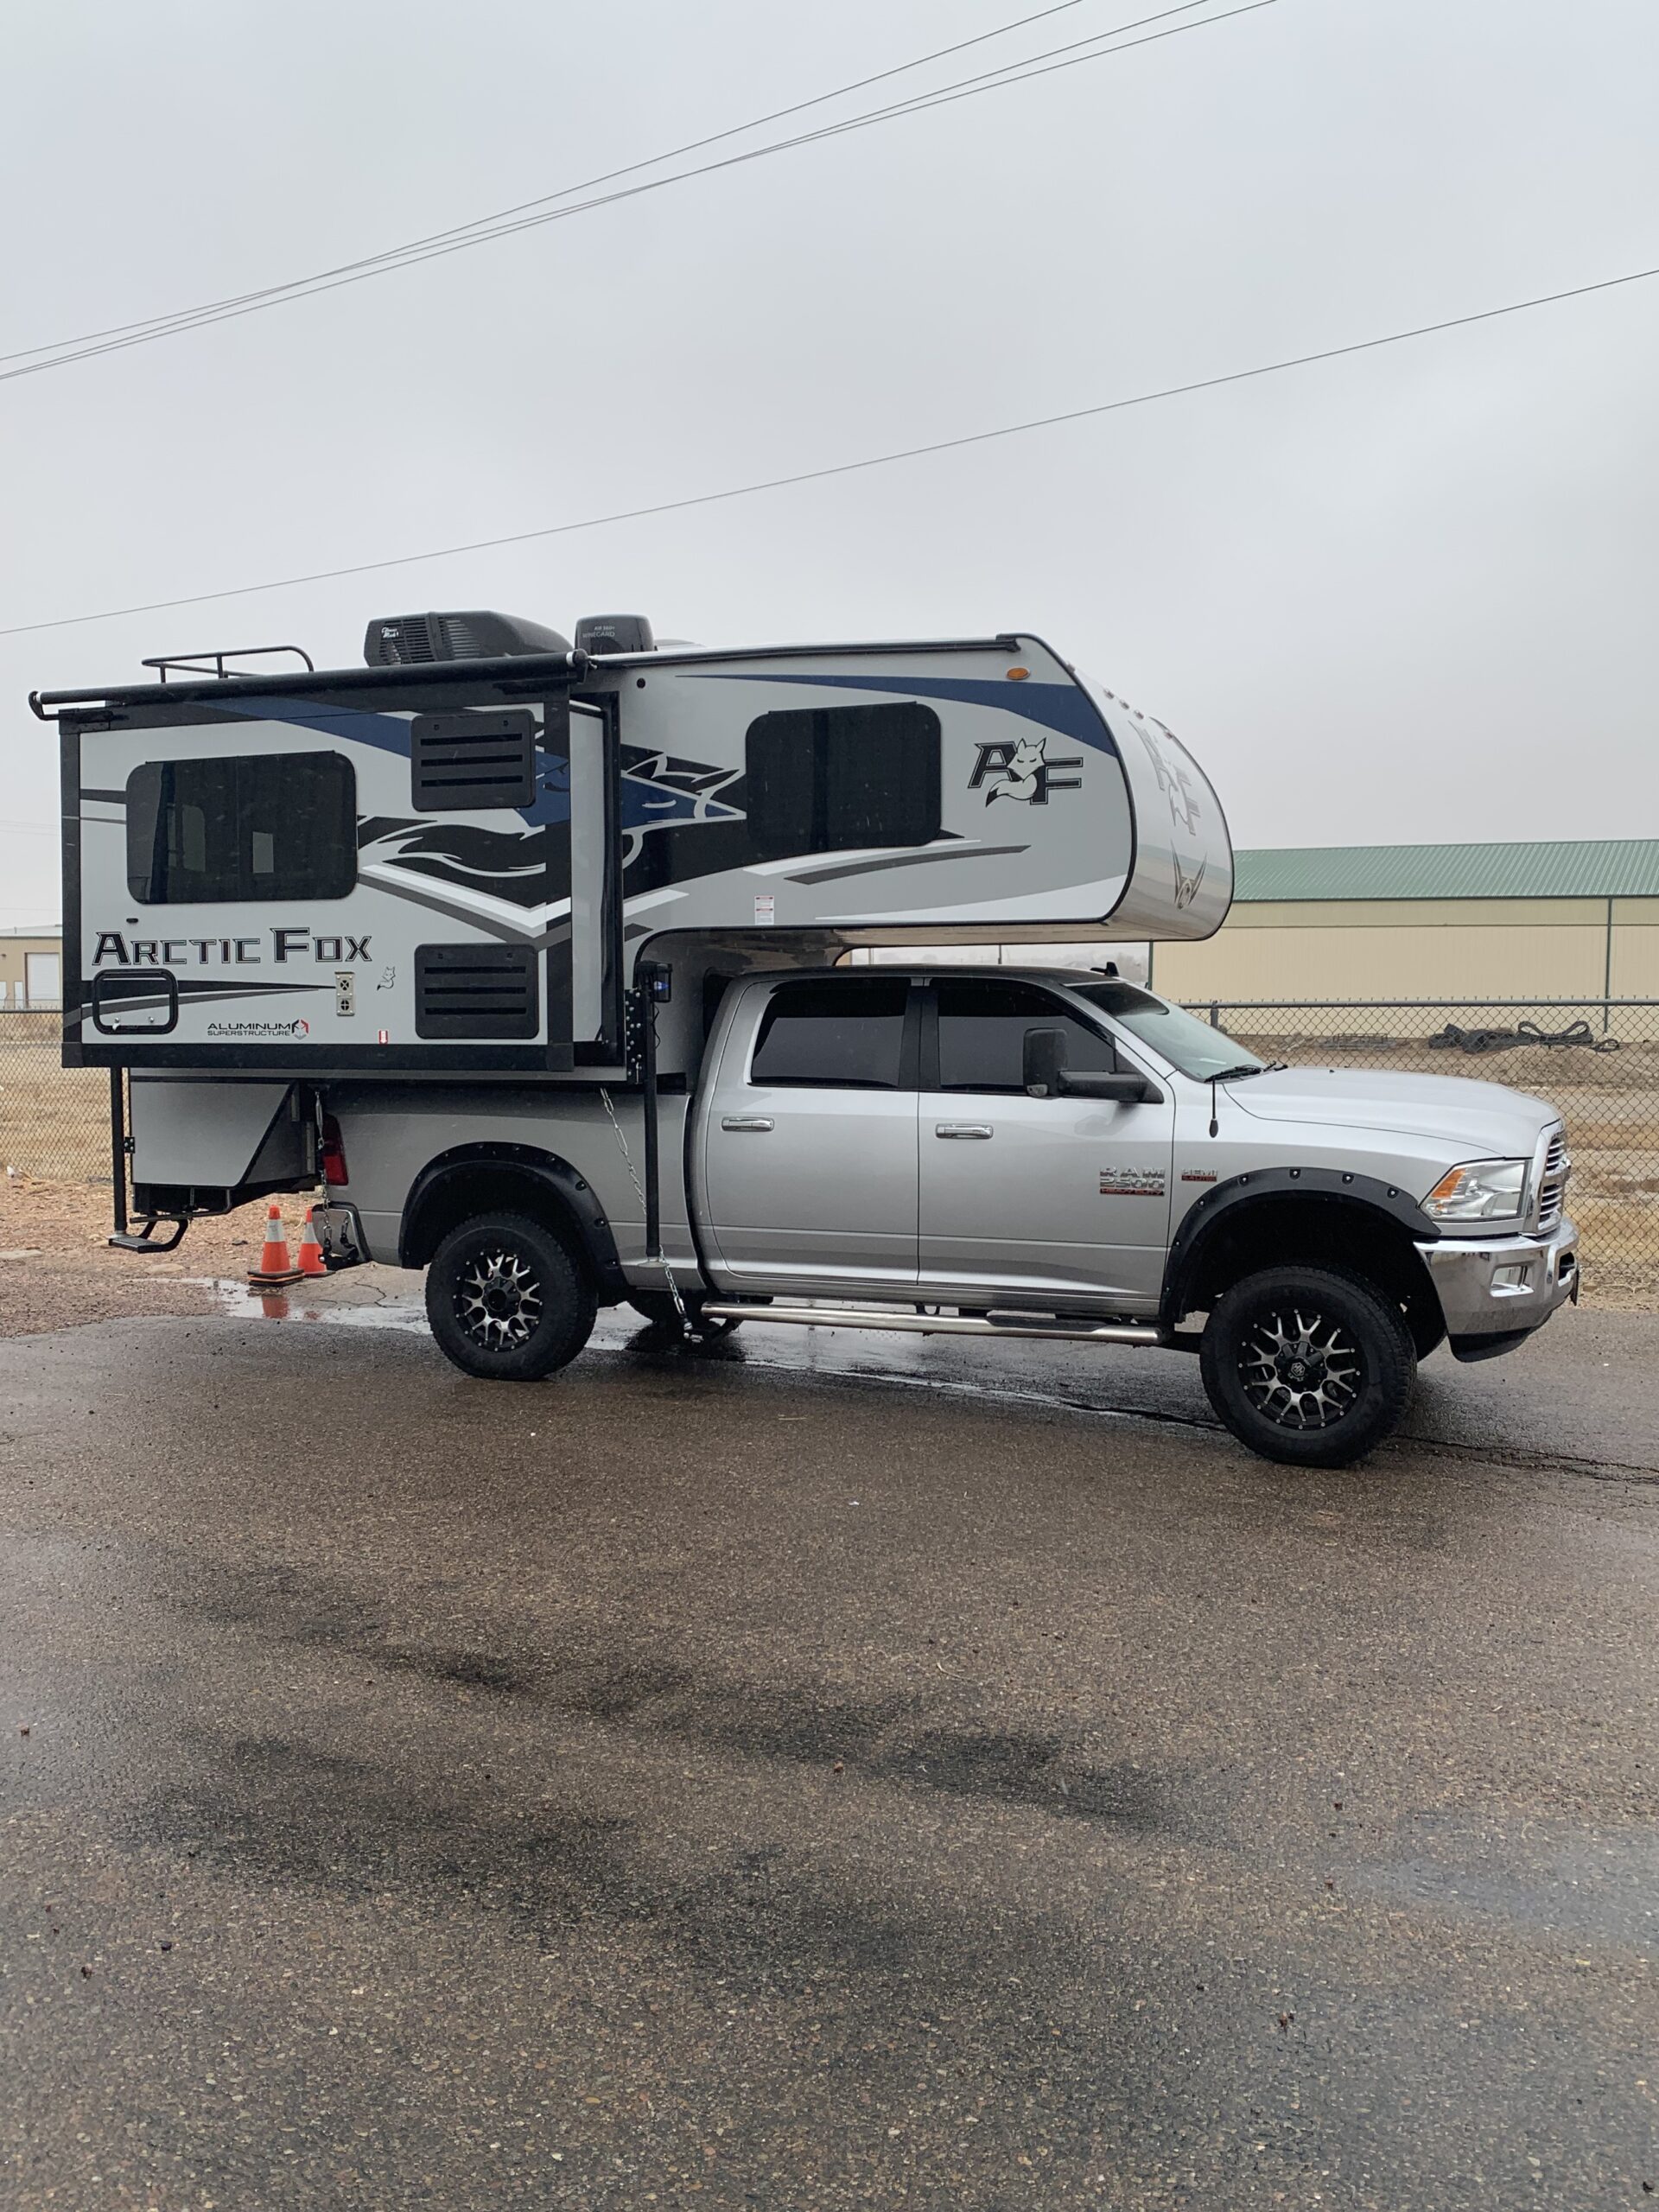
And if that wasn’t enough we had sold the motorhome after Christmas and in January Paul found a new truck and camper to make our travels better! It is an Arctic Fox 811. They sure make them better than the two cab over campers we owned in the past and it is a four season so we can take it to Steamboat to see the family!
 .
. 
Wow, that was quite the month! Now can we see the mystery card?
Mystery Card Challenge #18 printable pdf file- click on the blue

I needed several cards so I changed the front word die cuts to suit the situation:

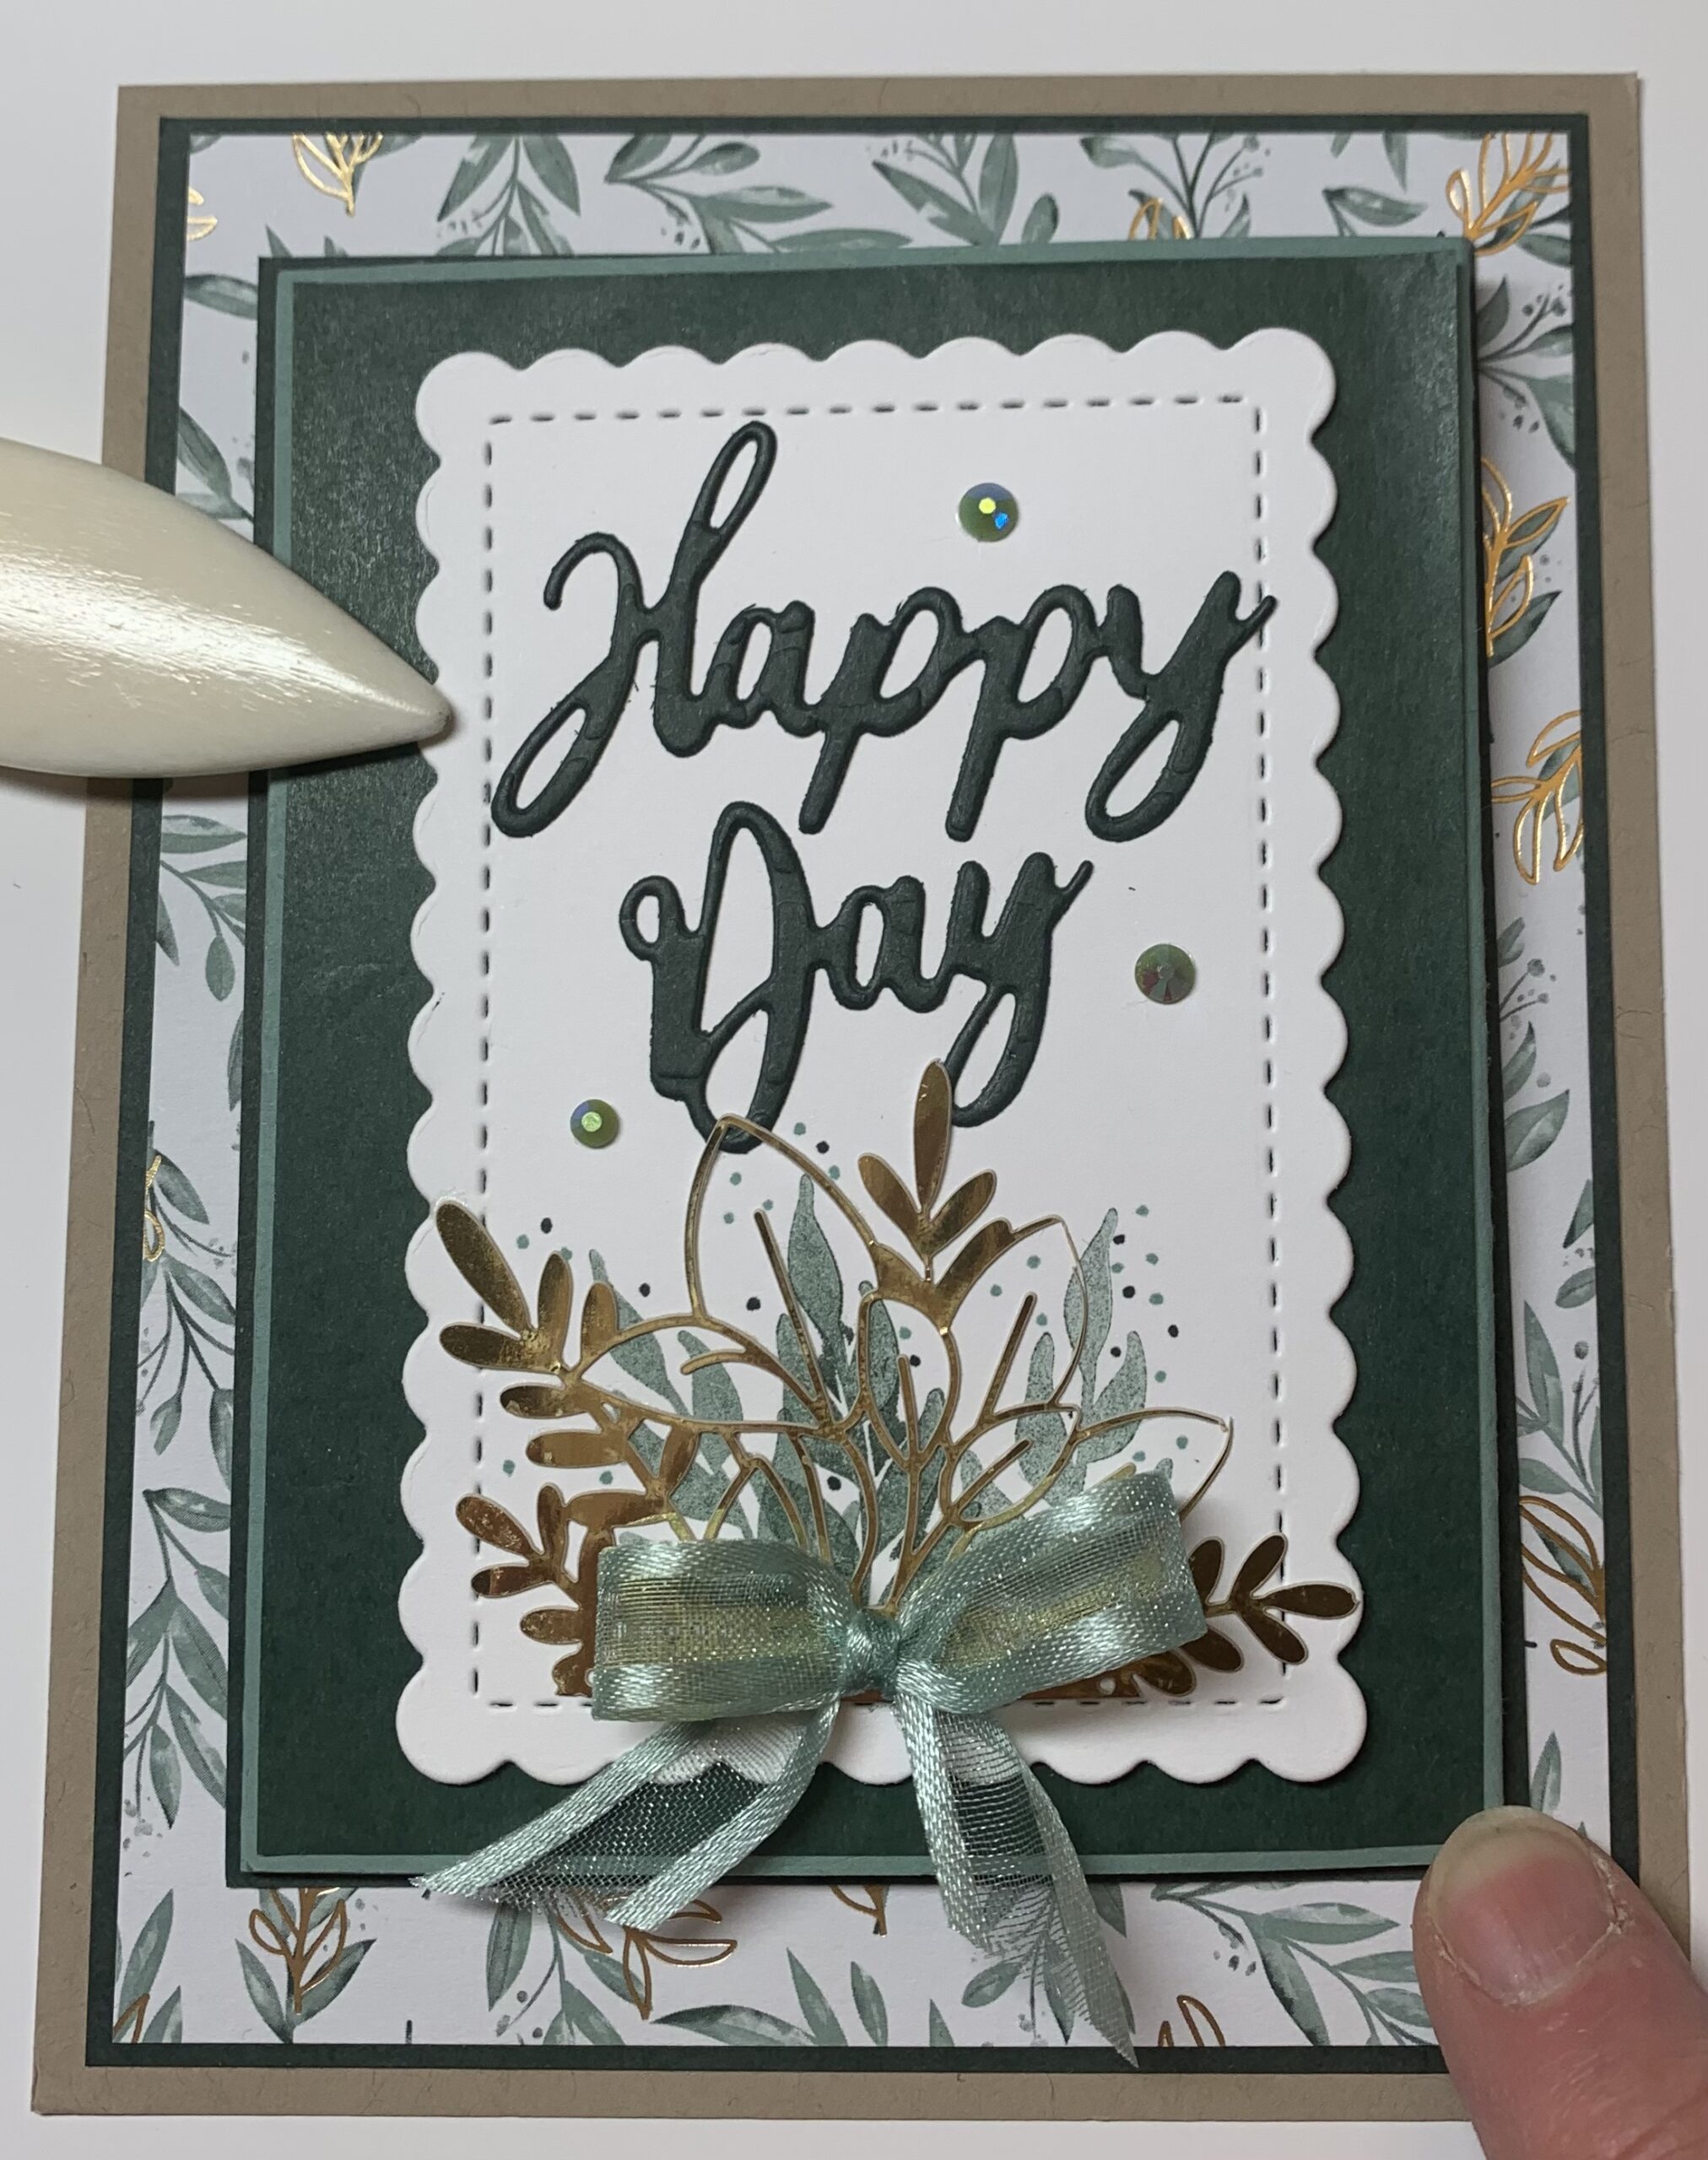

I used a Crumb Cake base with a layer of Evening Evergreen, the gorgeous Ever Eden DSP-Designer Series Paper, another layer of Evening Evergreen with a Soft Succulent layer and then the Basic White for the art work. The middle card has an extra layer of the Ever Eden cotton paper that is very like tissue and made a nice background with a bit of a different texture. The gold is from our laser cut gold DSP and layered on top of stamped greenery and cut out greenery from the Sparkle of the Season bundle. Happy New Year and Happy Day are from the Word Wishes dies. Happy Birthday is the retired Birthday die.

The front is a flap that opens and has a pocket for a gift card. The greeting is from the ‘Celebrating You’ set in the mini catalog.
Jo Brooks participated and made a birthday card with lots of cool balloons!!
.  .
.
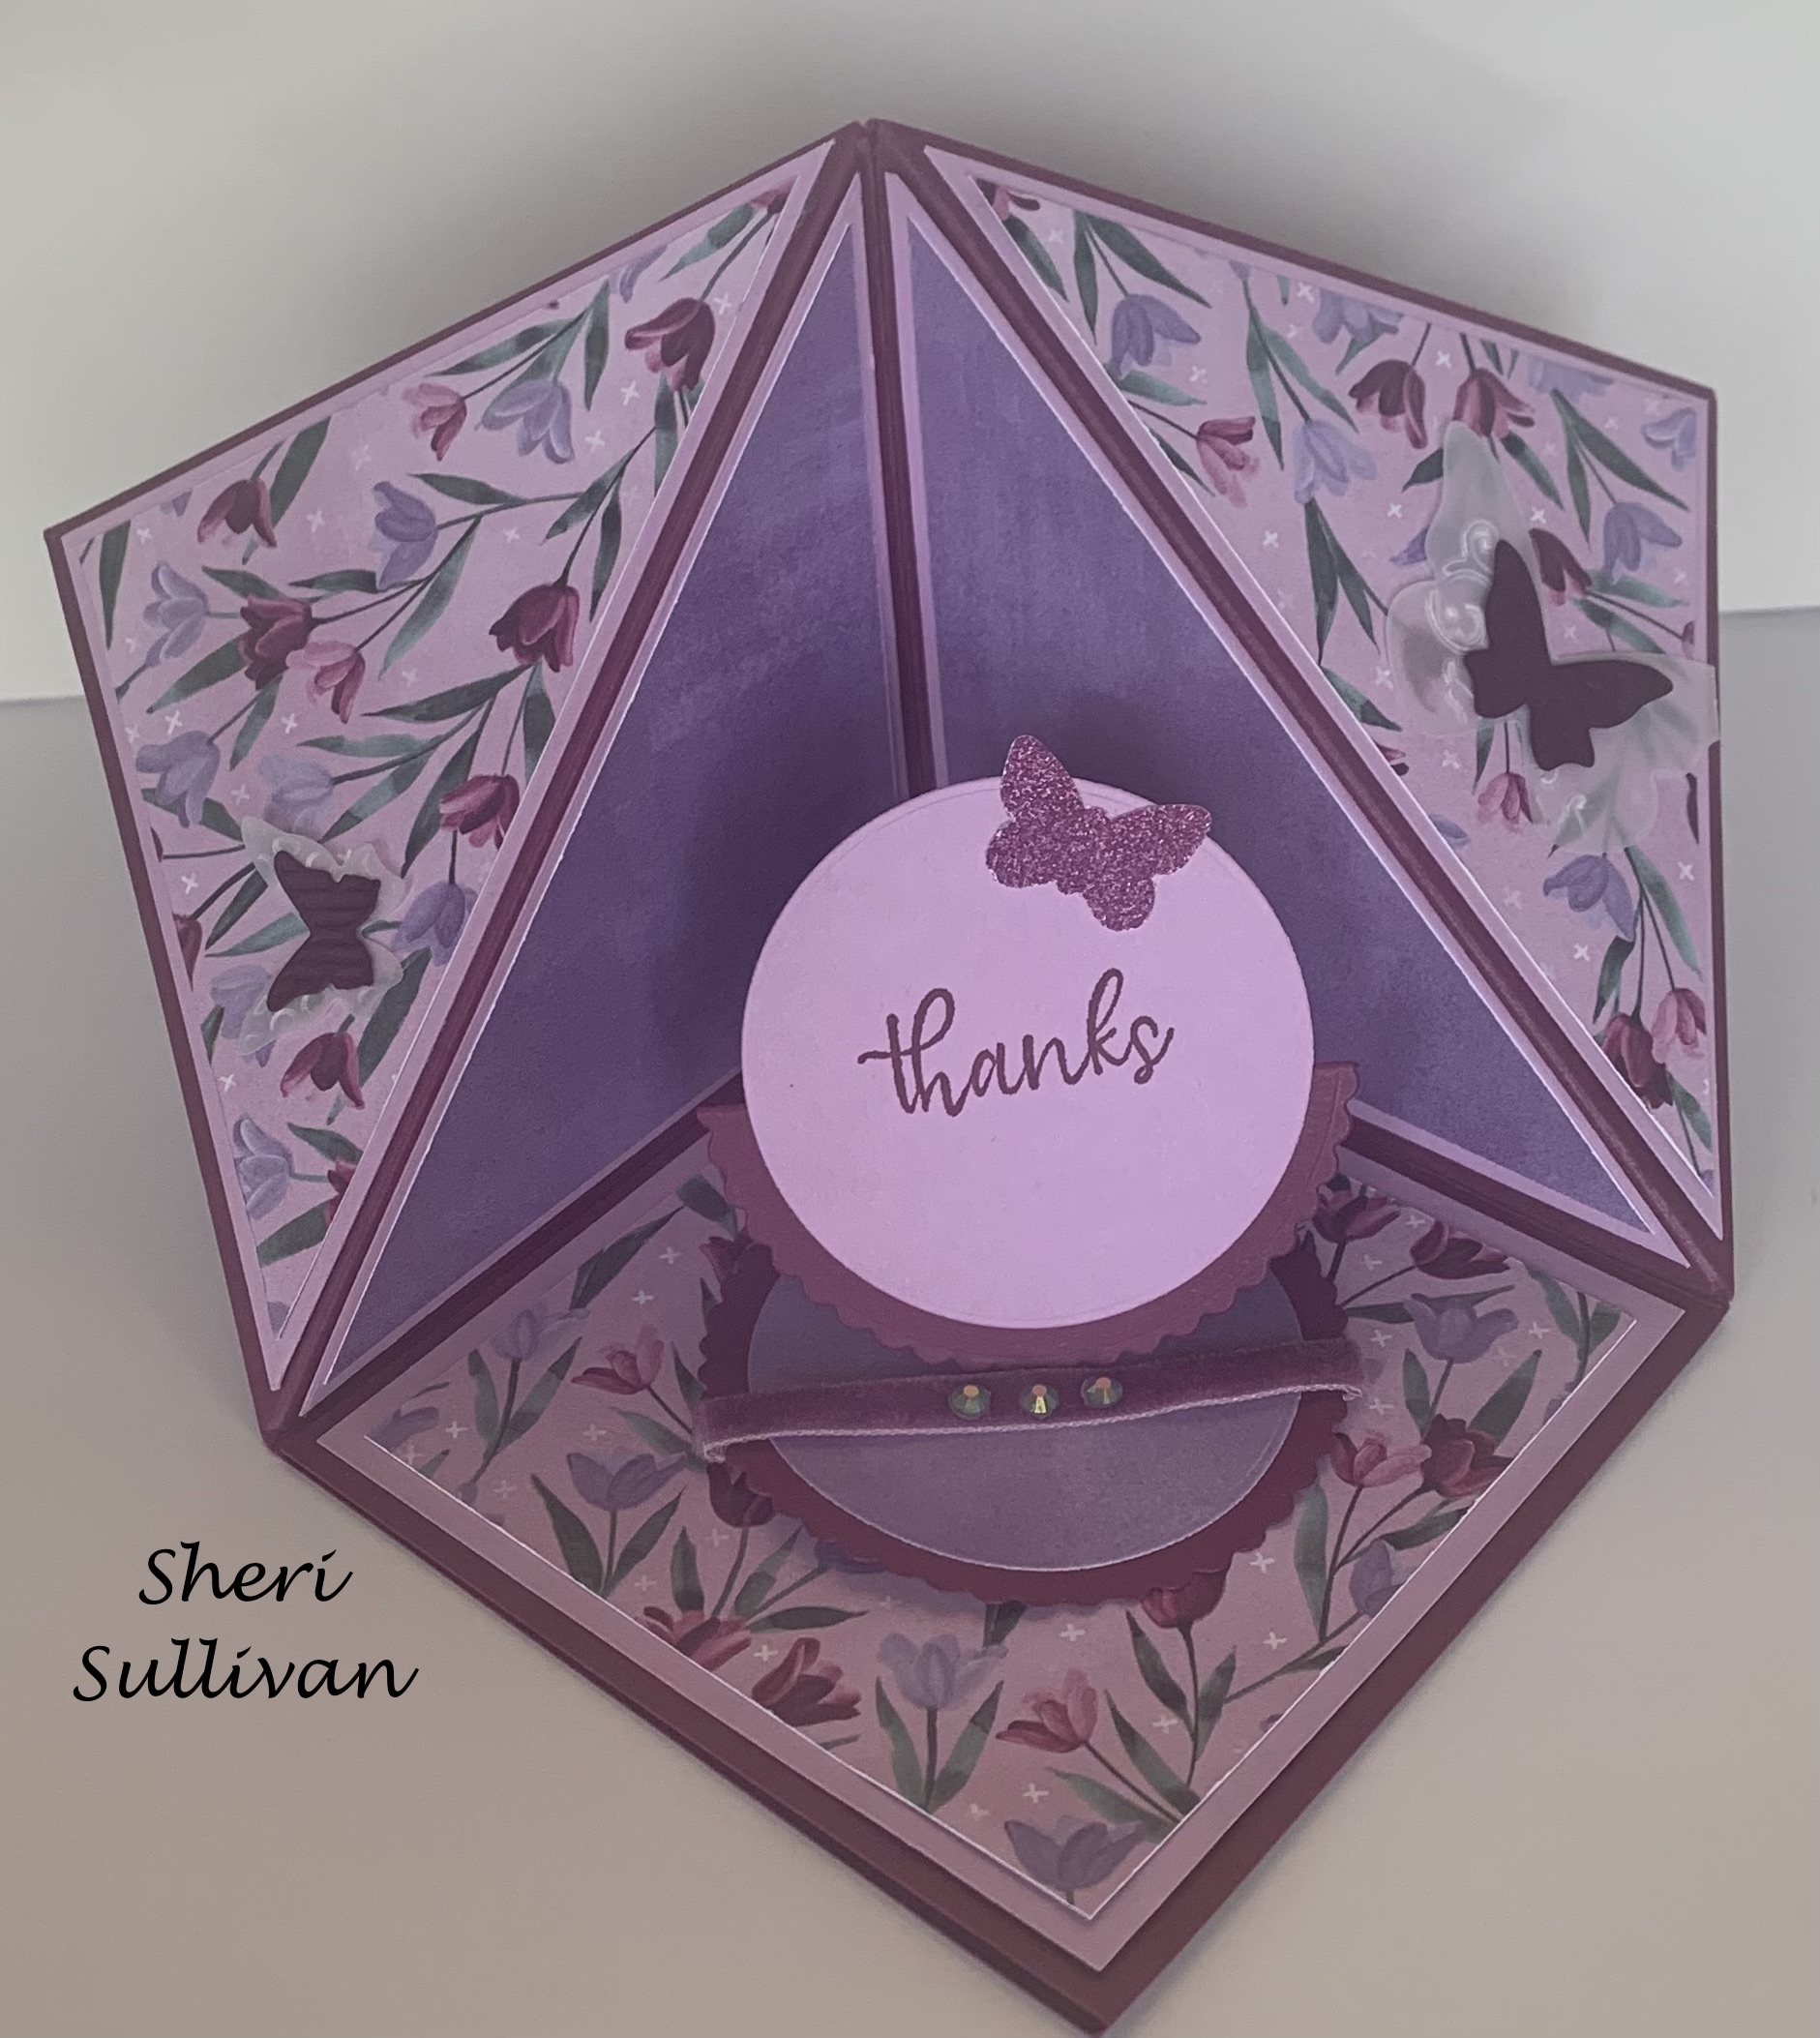
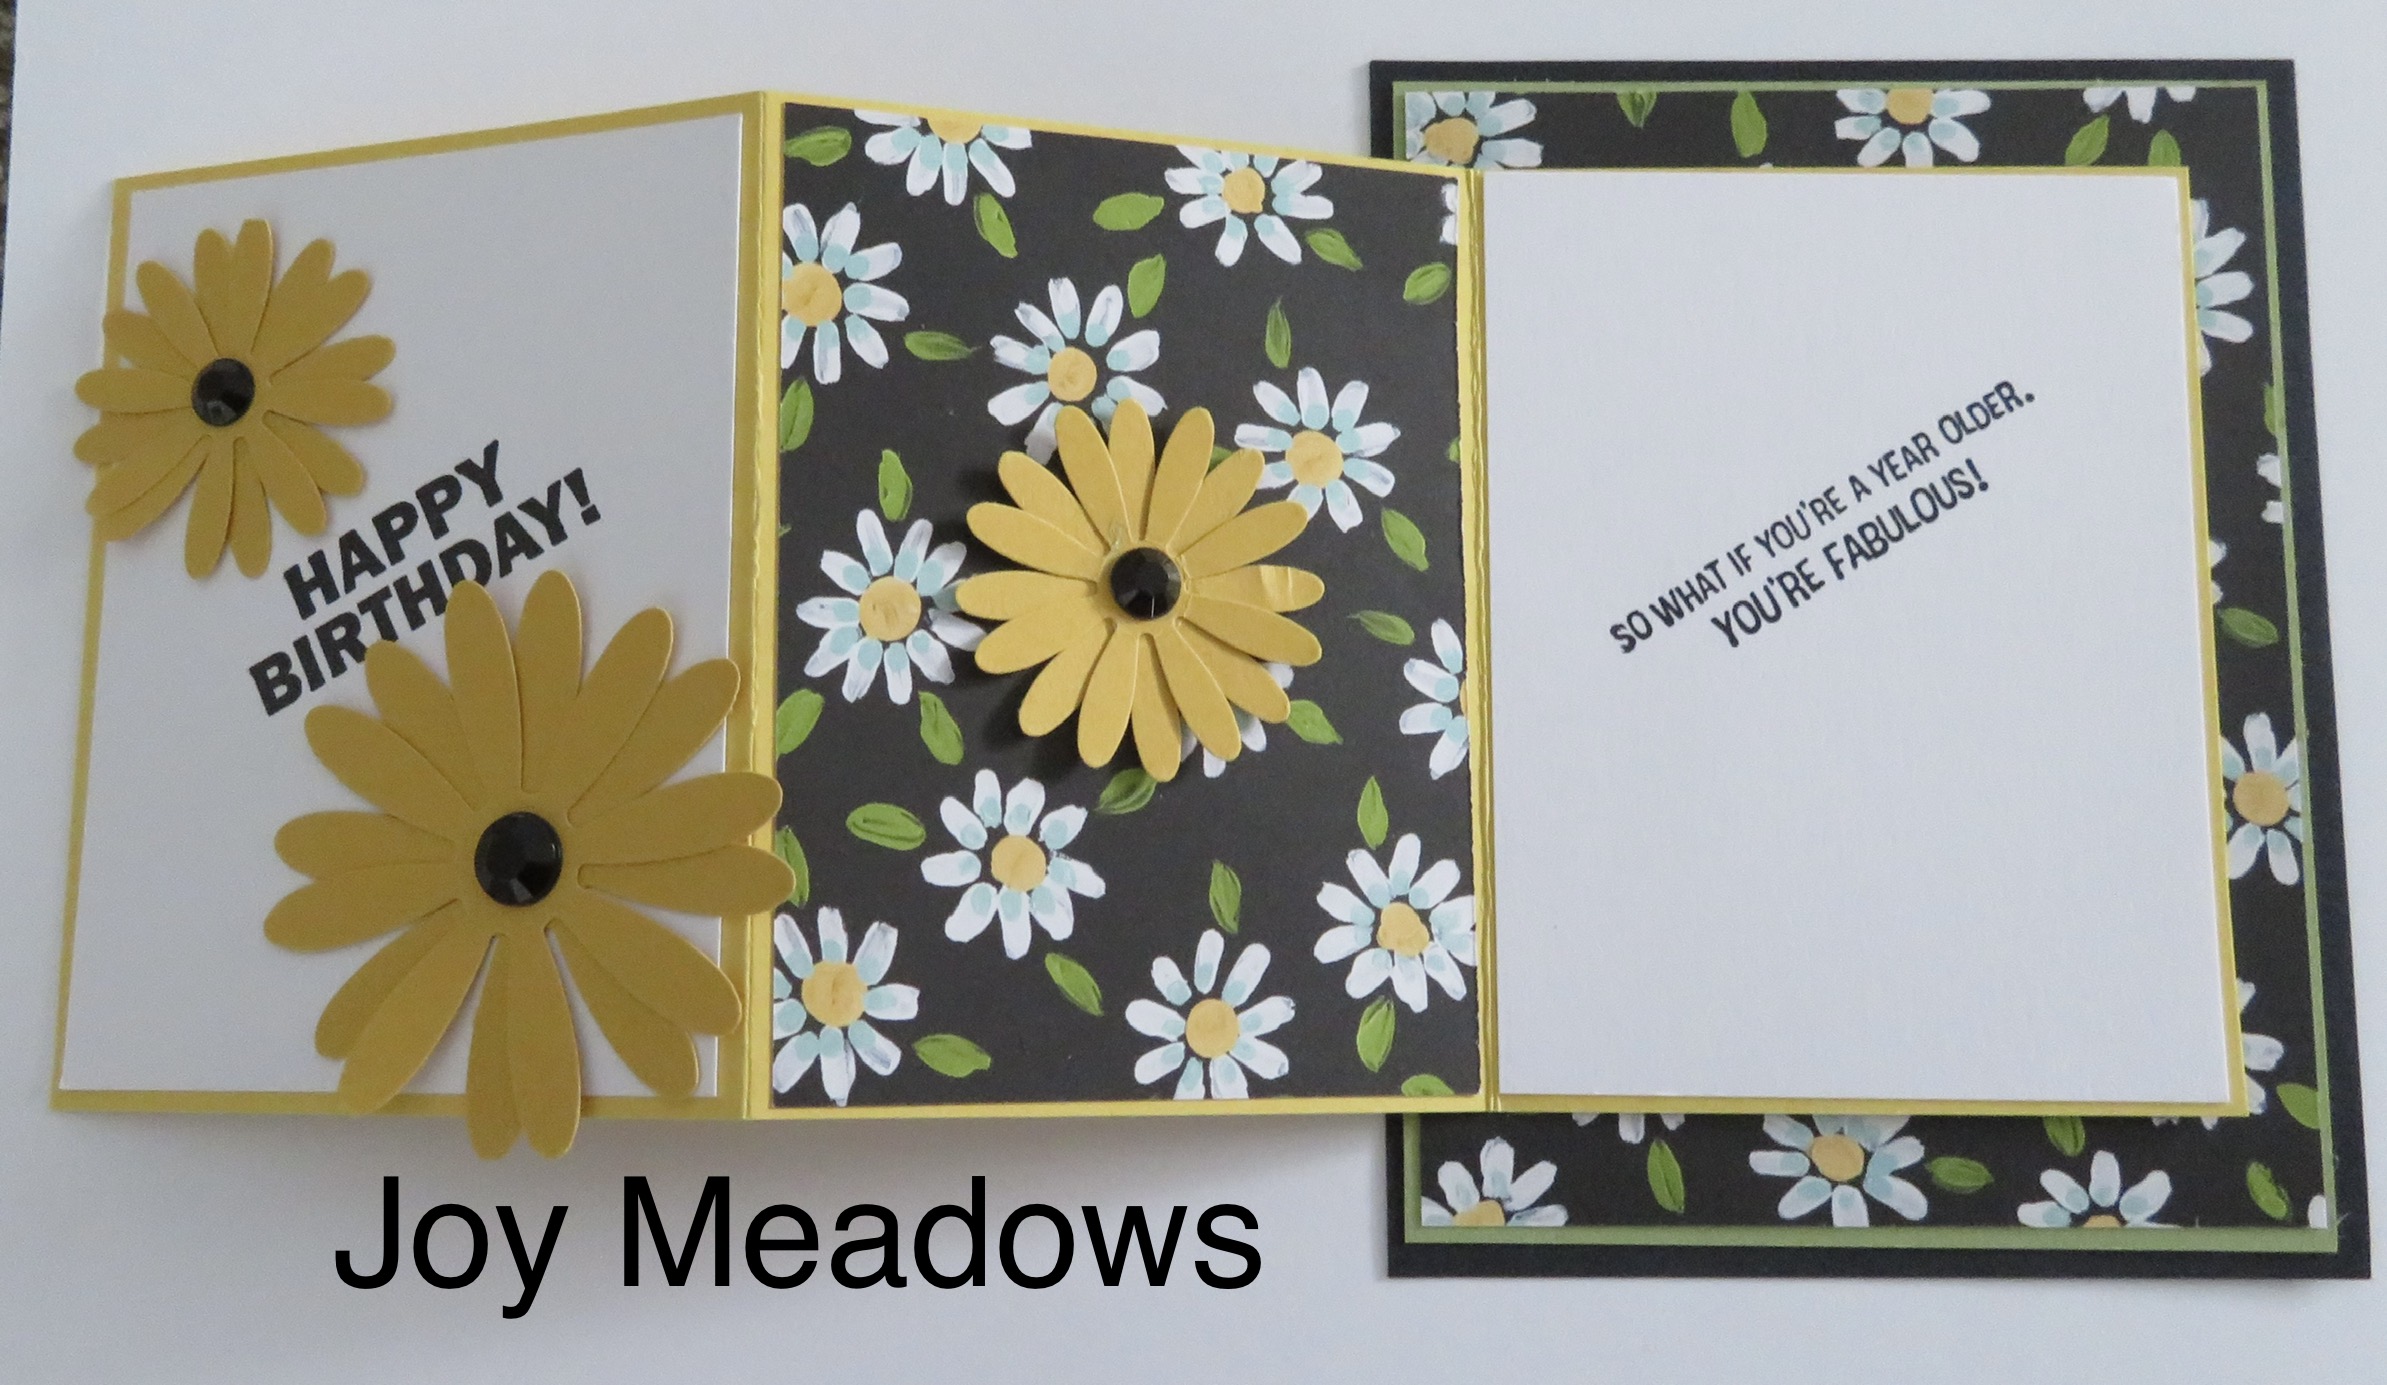
Joy Meadows also made a birthday card with a fun look of flowers and no need for a separate pocket!
 .
. Sharon Fincham made the card going vertically.
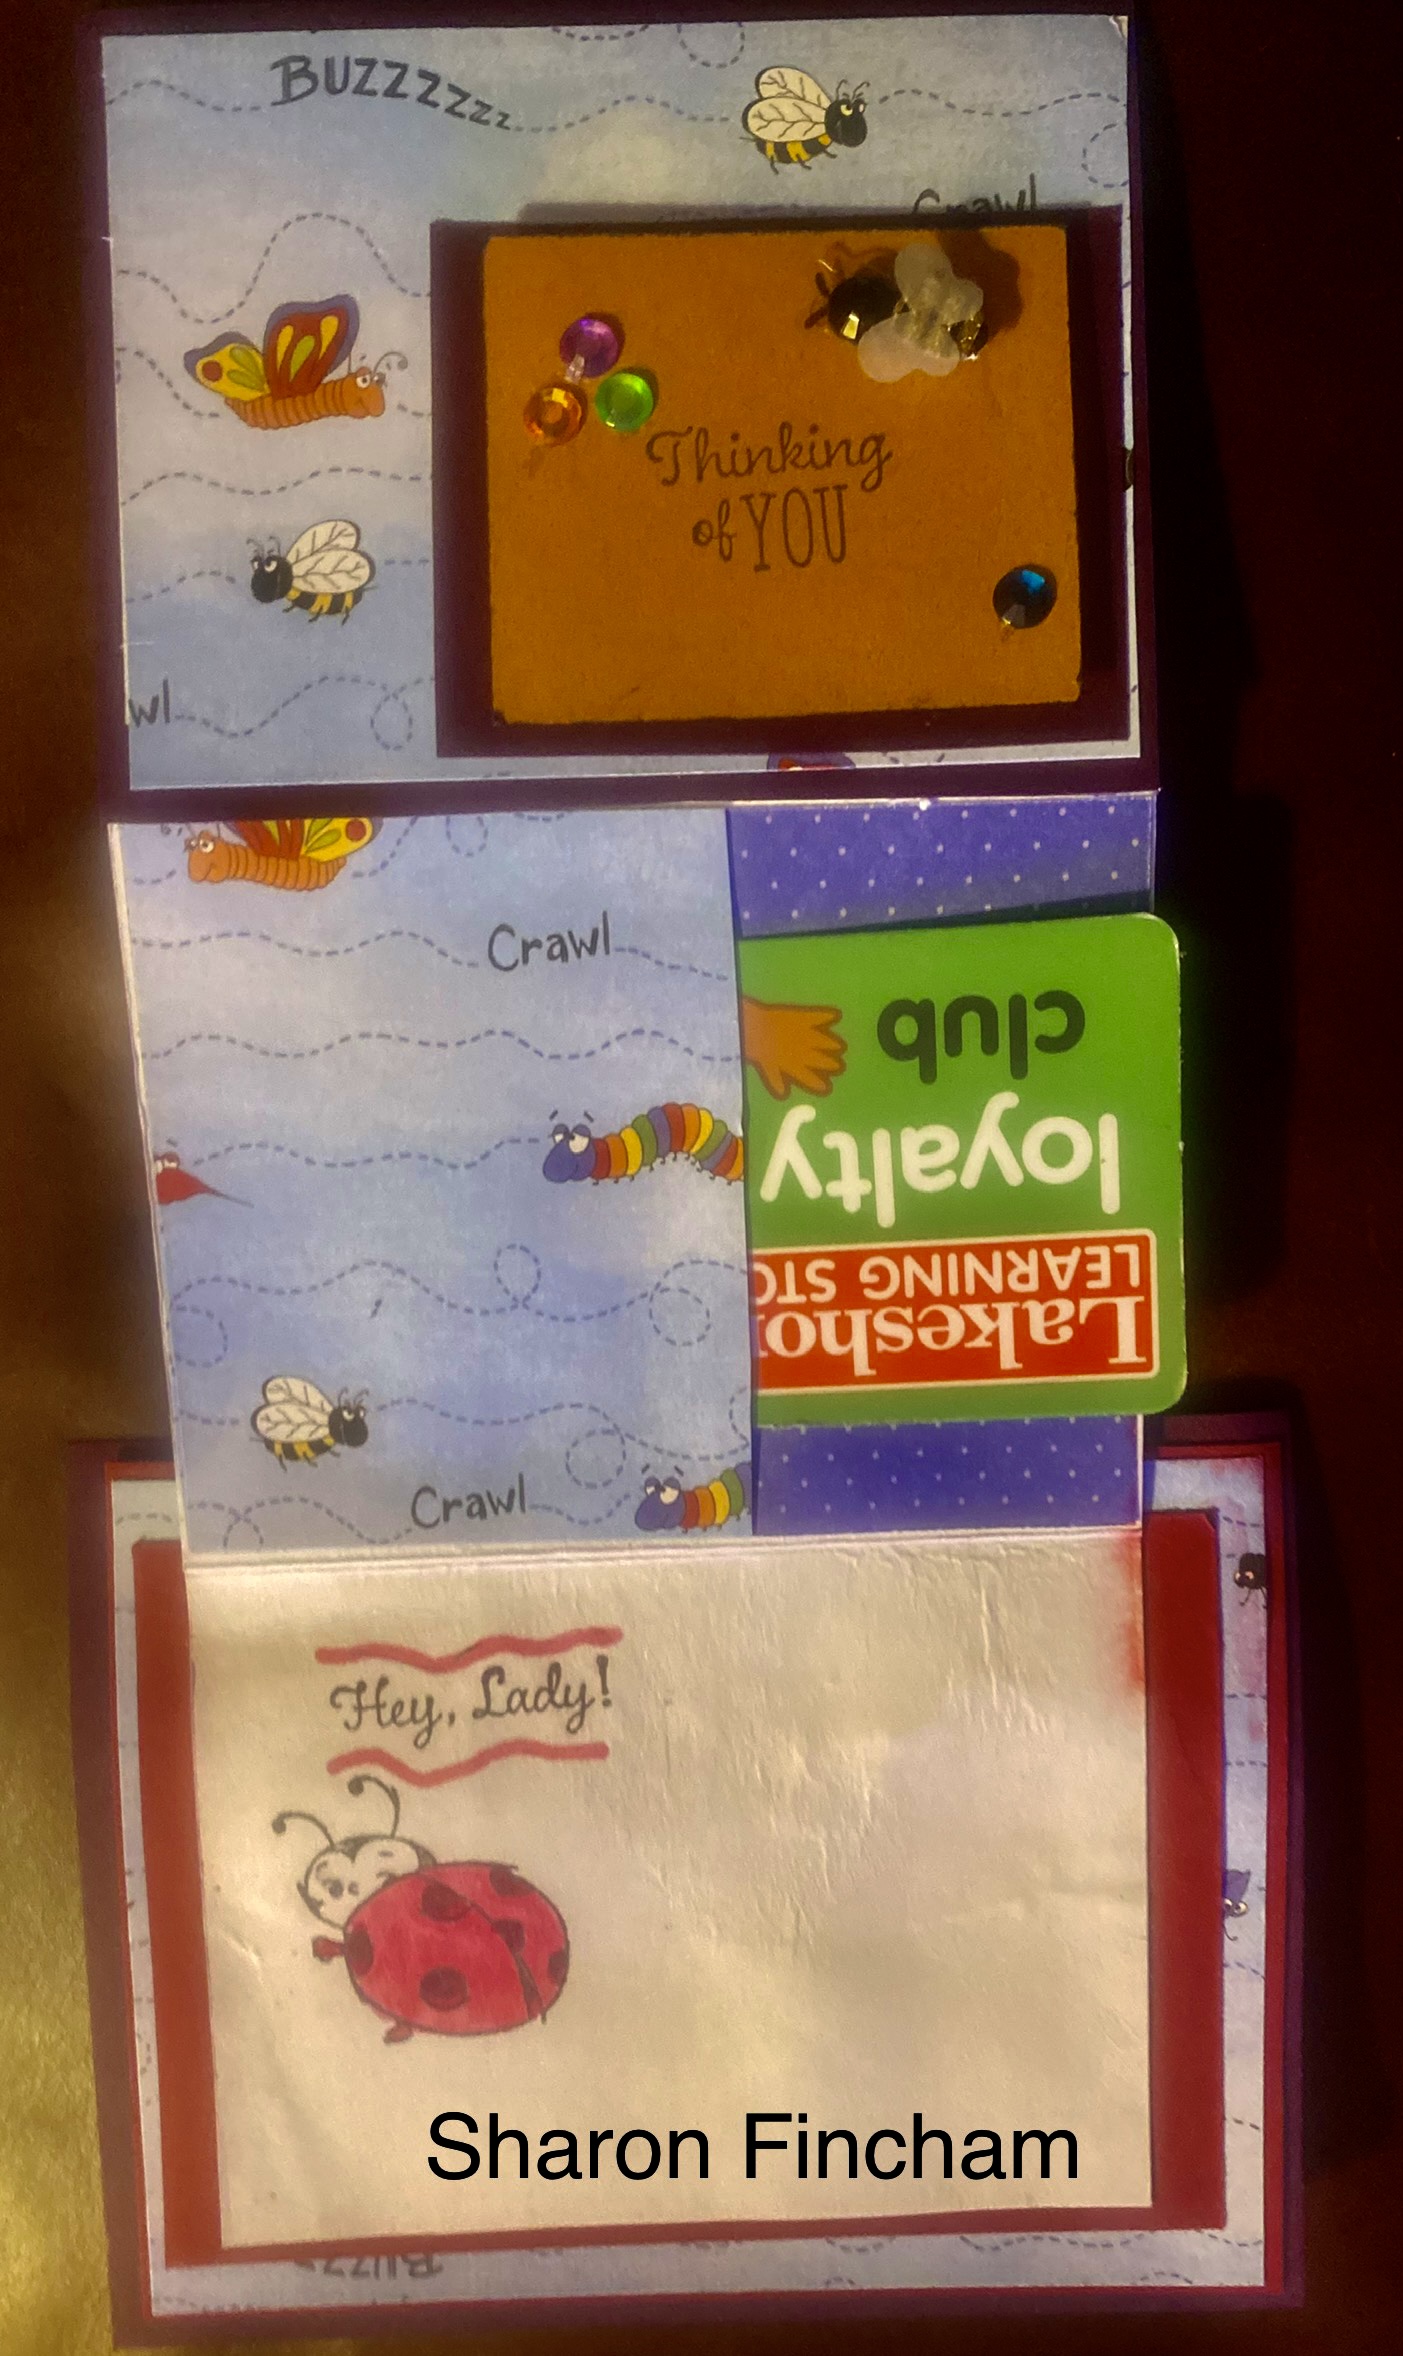 .
. Don’t you just love those little bugs!! Thank you ladies for participating!
SAL, Share A Love
Pinwheel Tower Cards
Hello Stamping Friends,
Remember to click the heading after you open your email to access the full blog.
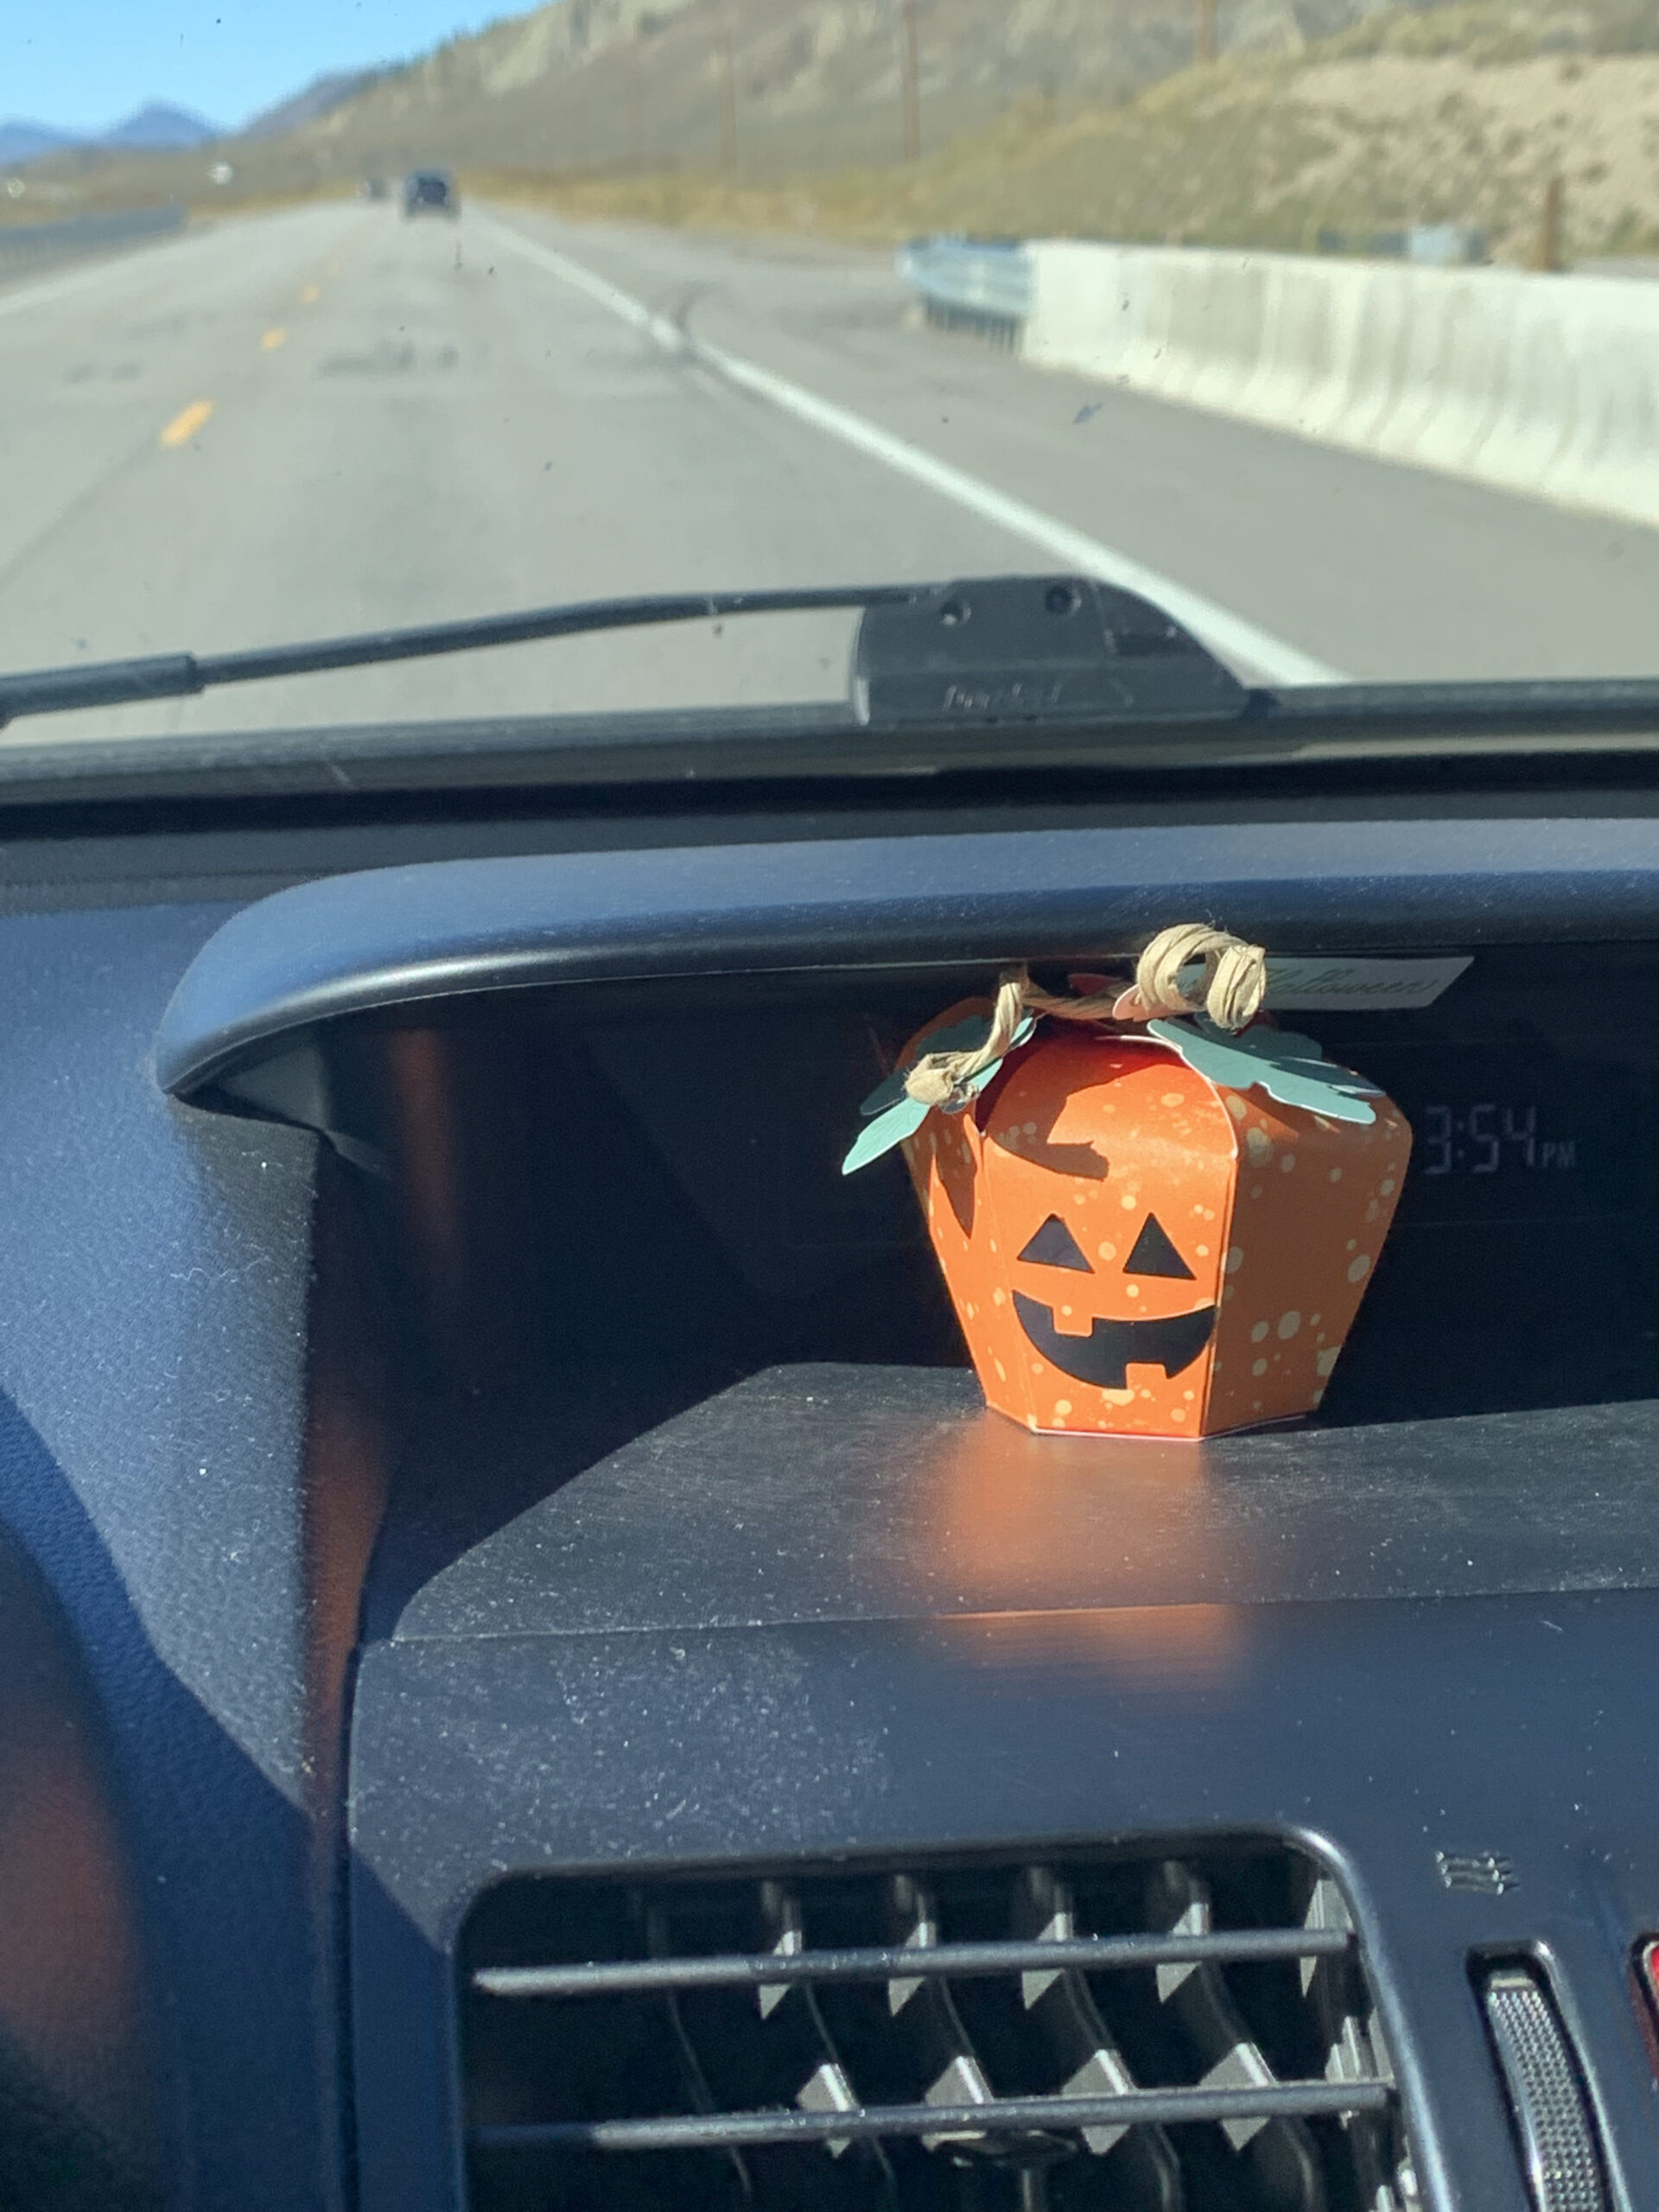
The little pumpkin sandwiched nicely in the dash of my car made little Emma in the back carseat giggle as we headed to Steamboat Springs. She helped with the construction!
Pinwheel Tower Card
These cards are the new rage on social media so I had an open house crafting day to gather together and make one. There were so many different versions online that I sent out three videos and the stampers picked the style of their choice and brought the kit components to the house. It was a fun morning!
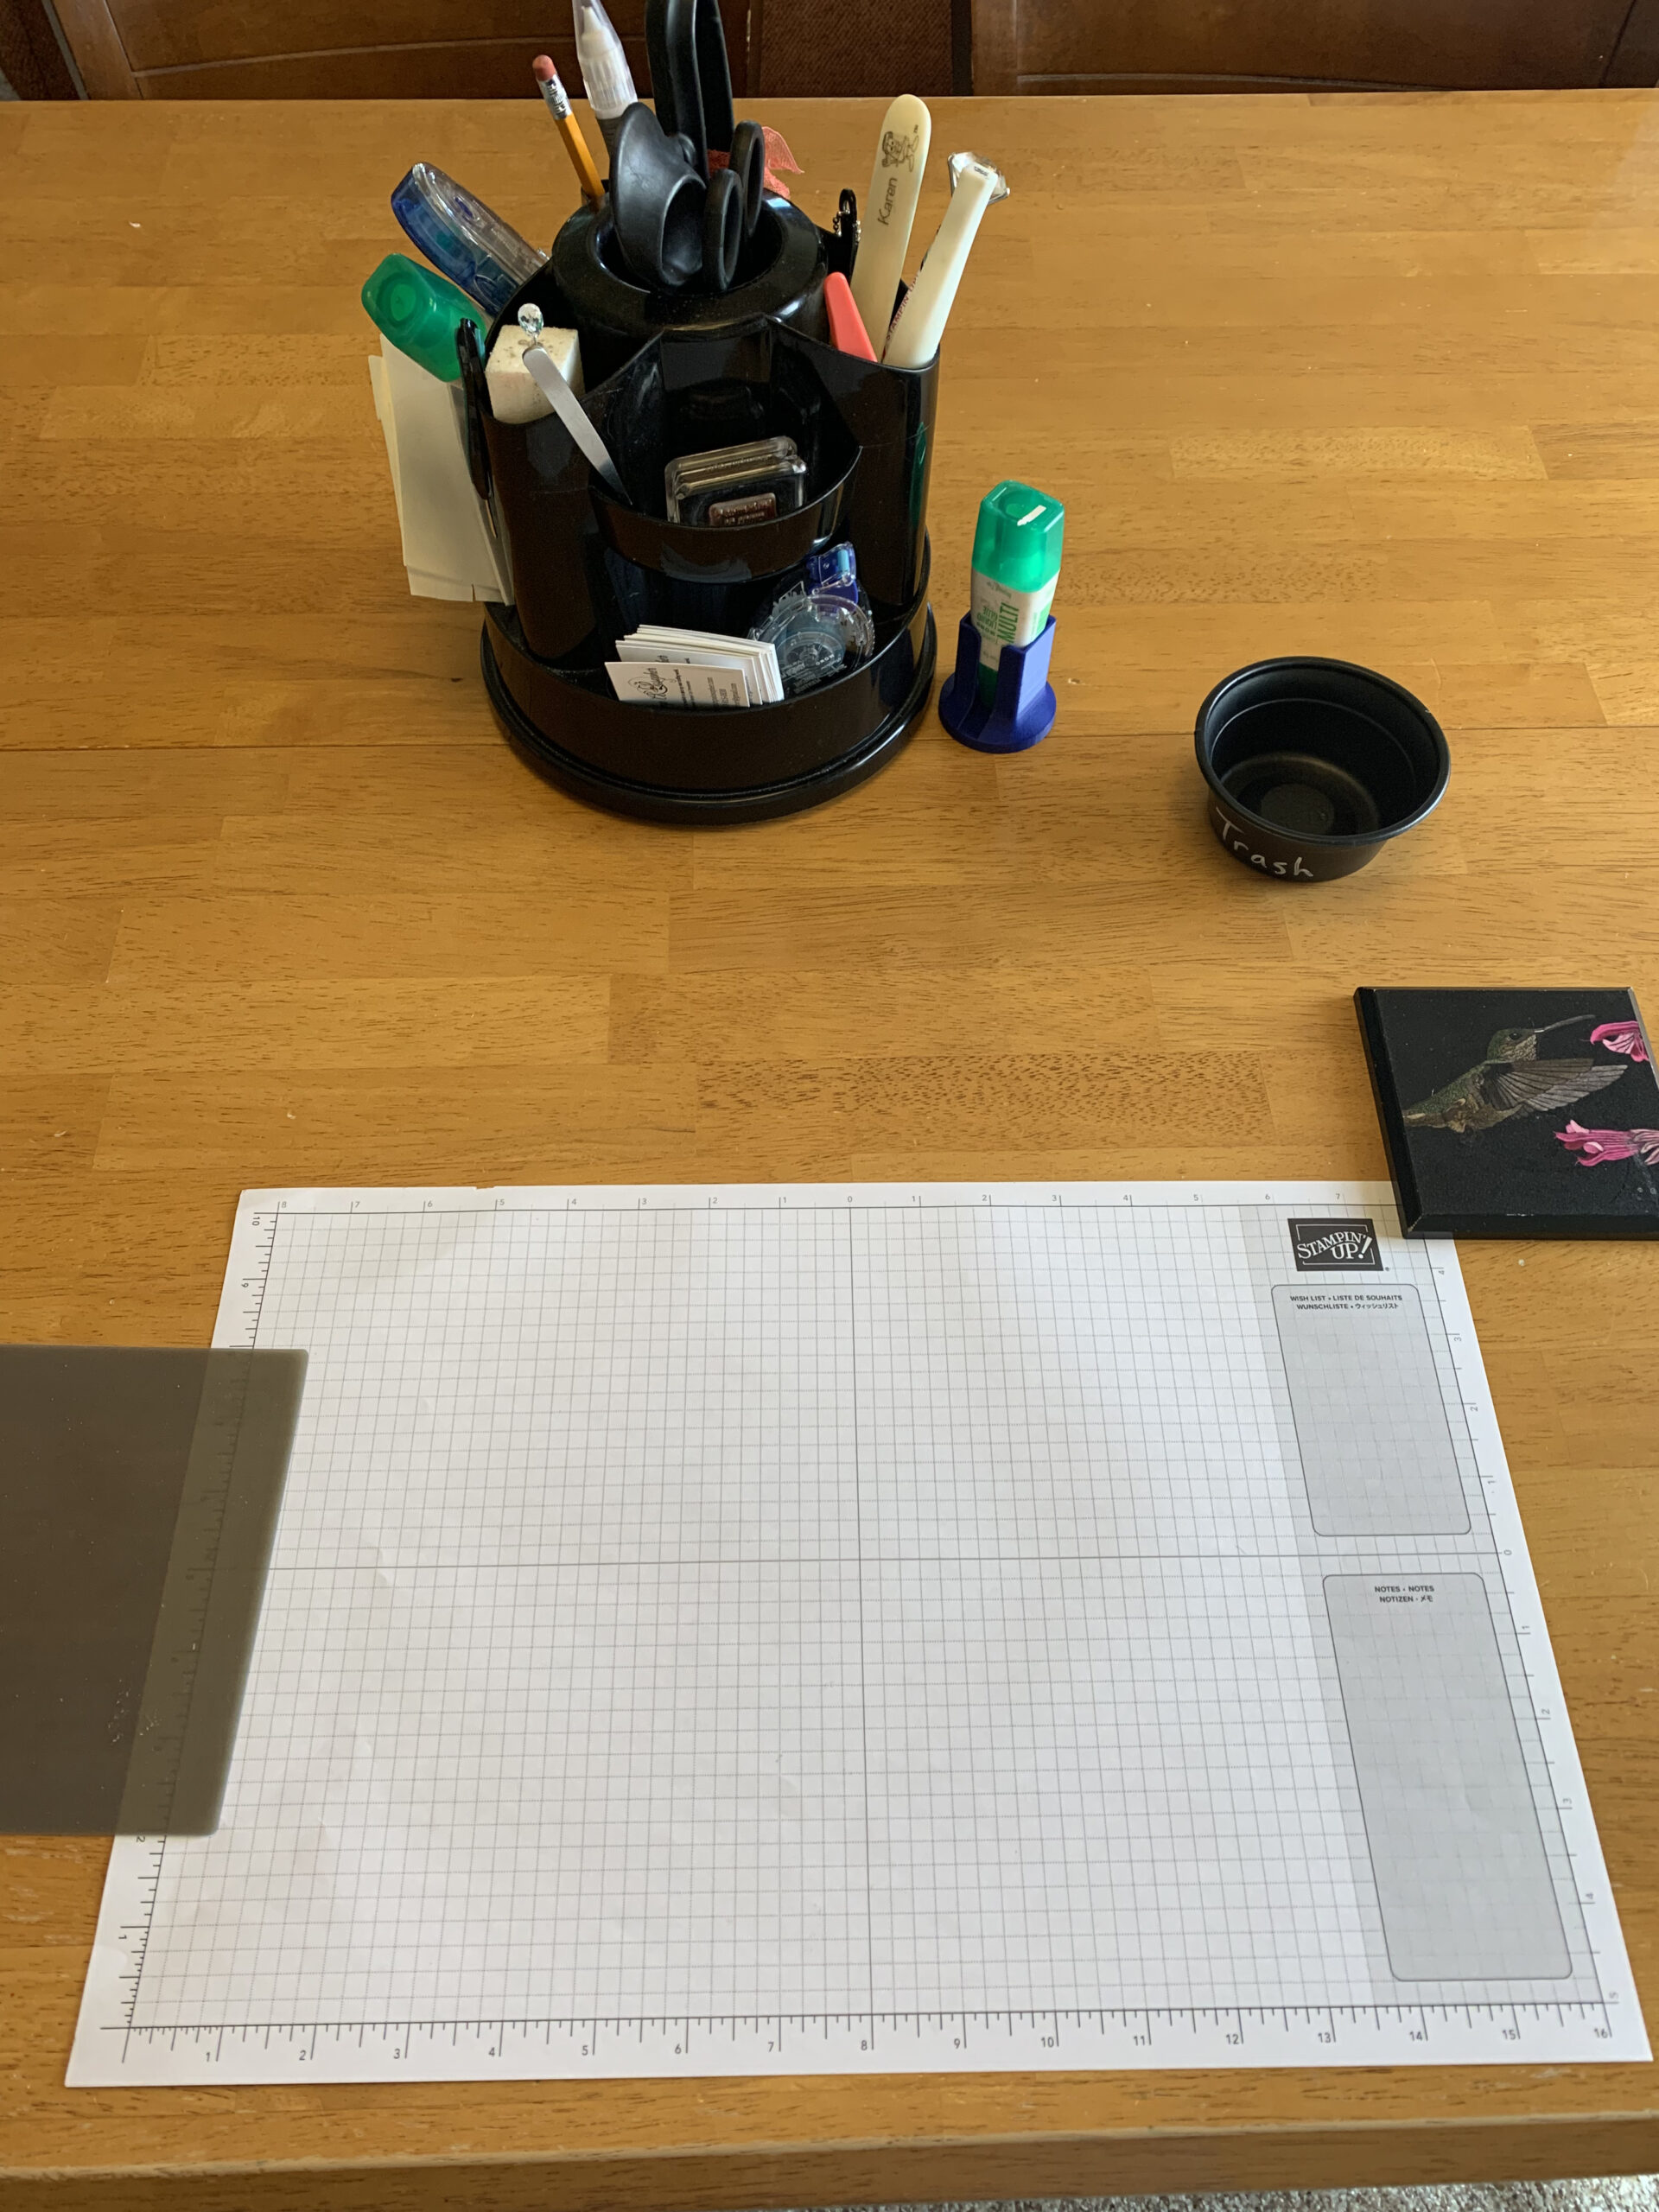
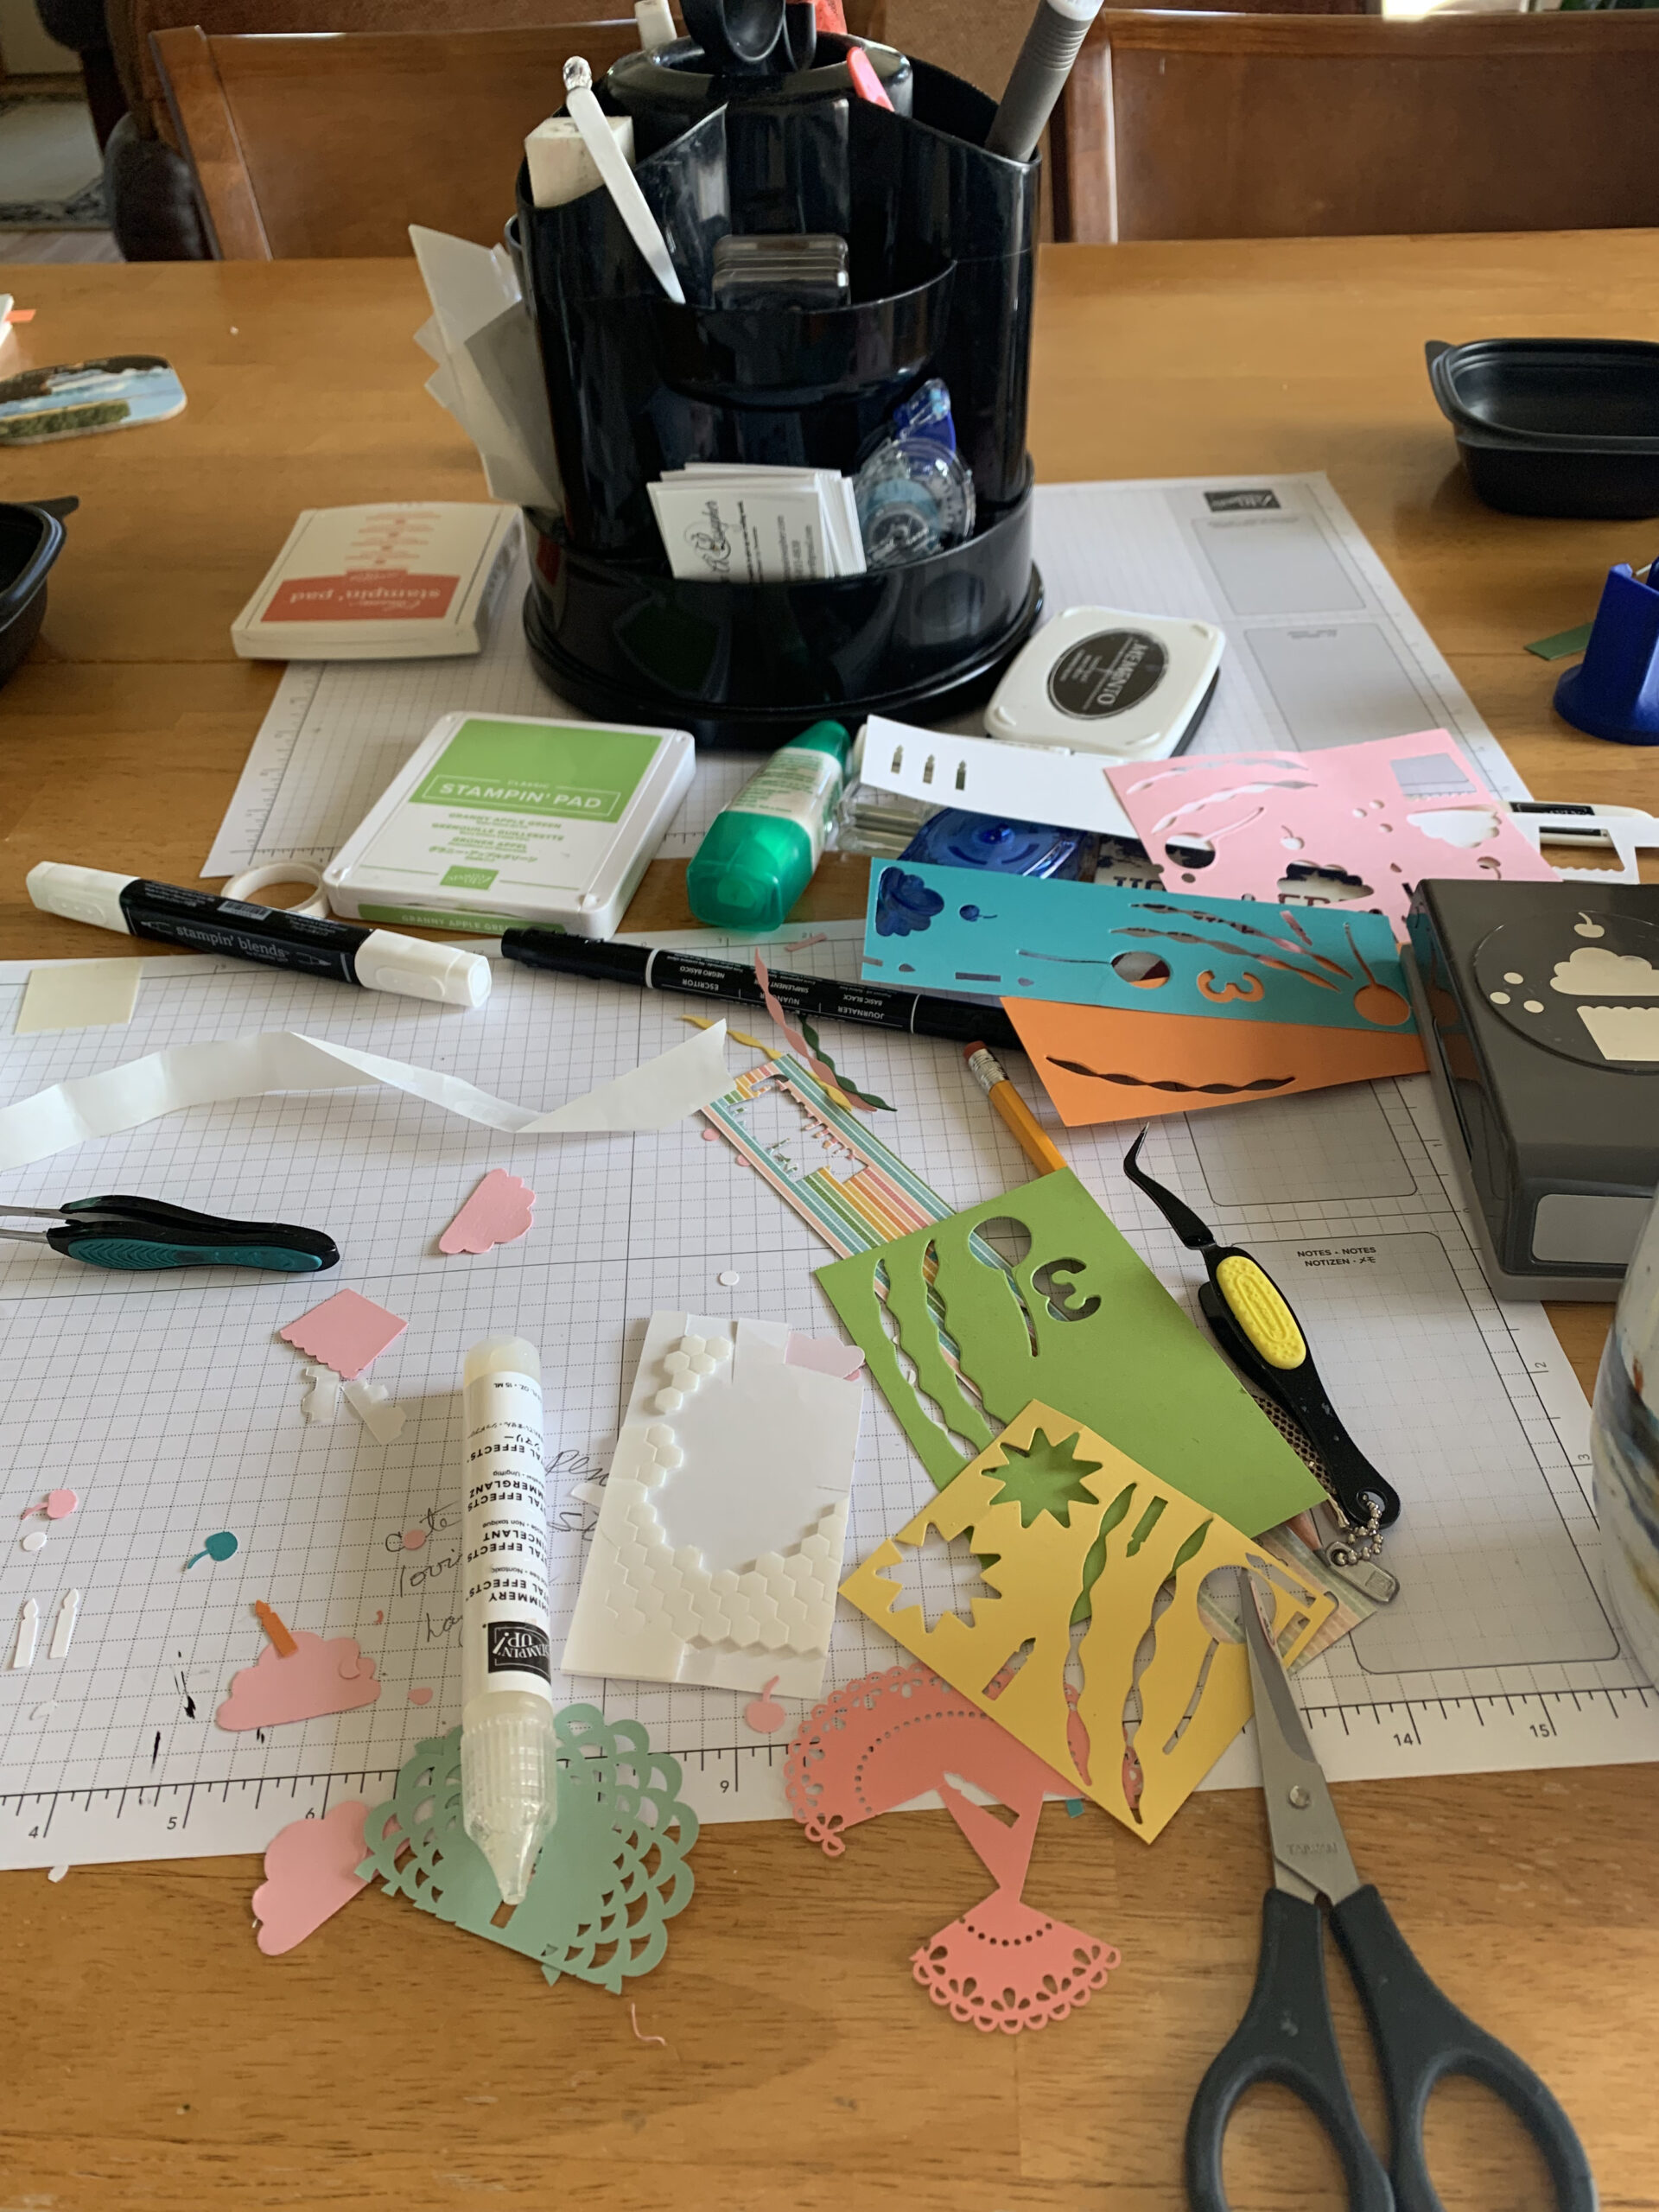
This is how my work table looked to start:
The card cuts here are those used by Meg Loven though all the colors are different:
Recipe:
- Tower Base: Granny Apple Green, 4 1/4 X 4 1/4; Score at 1″, 2″, 3″ and 4″. This leaves a little 1/4″ tab on which you will put a piece of tear and tape, then lay it flat on your work surface and bring the opposite side over and press it down on the tab. This works so much better than trying to hold it in your hands and match the sides.
- Panels (X4): Granny Apple Green, 4 1/4 X 2 3/4
- Borders (X4): Basic Black, 4 X 2 1/2
- Borders (X4): Basic Black, 4 X 1 1/2
- Layers for stamping (X4): Basic White, 3 3/4 X 2 1/4
- Layers for pretty (X4): Pattern Party DSP, 3 3/4 X 1 1/4
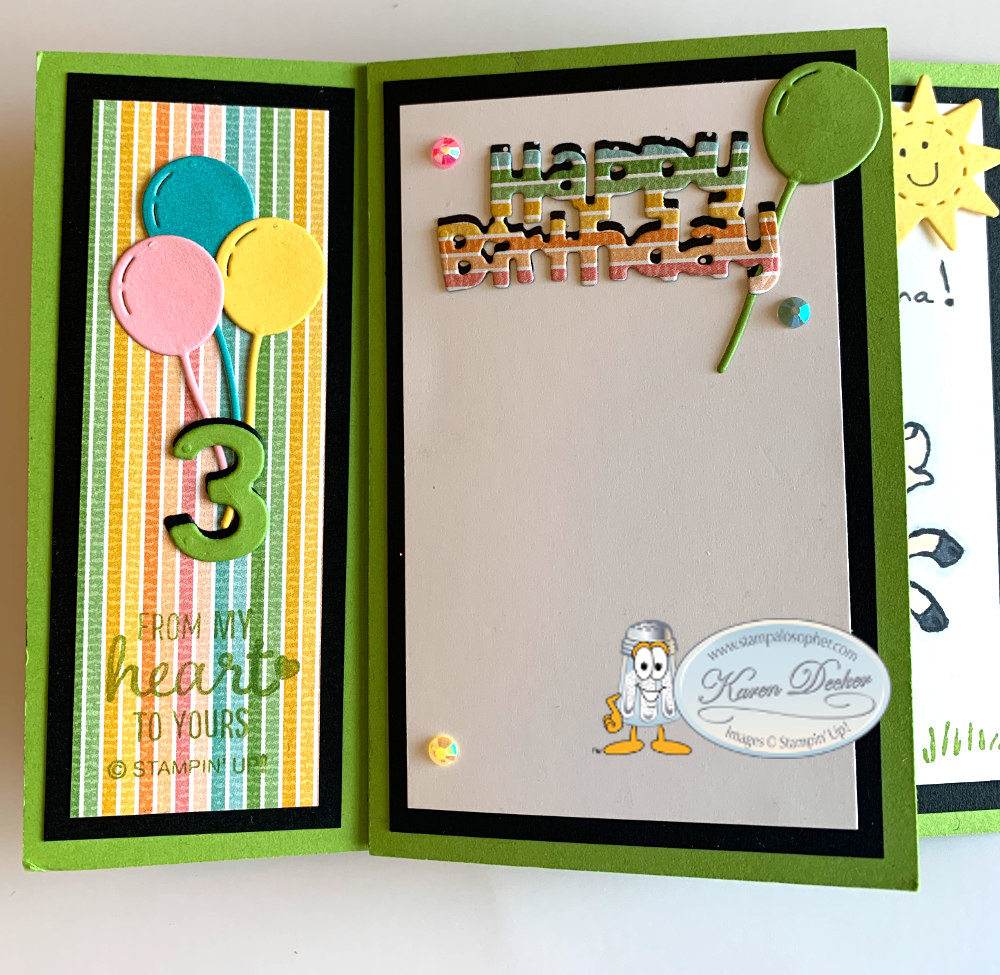
That’s really all there is for pieces and now comes the fun part of decorating! I used the Counting Sheep Stamp Set and Sheep Dies, (each are free during Sale A Bration (ends September 30) with a $50 order). Emma’s birthday is this month and she turns 3, so the three sheep were perfect! I used the streamers and bow tie from the Birthday Chick Dies and stamps from the Hey Birthday Chick stamp set.
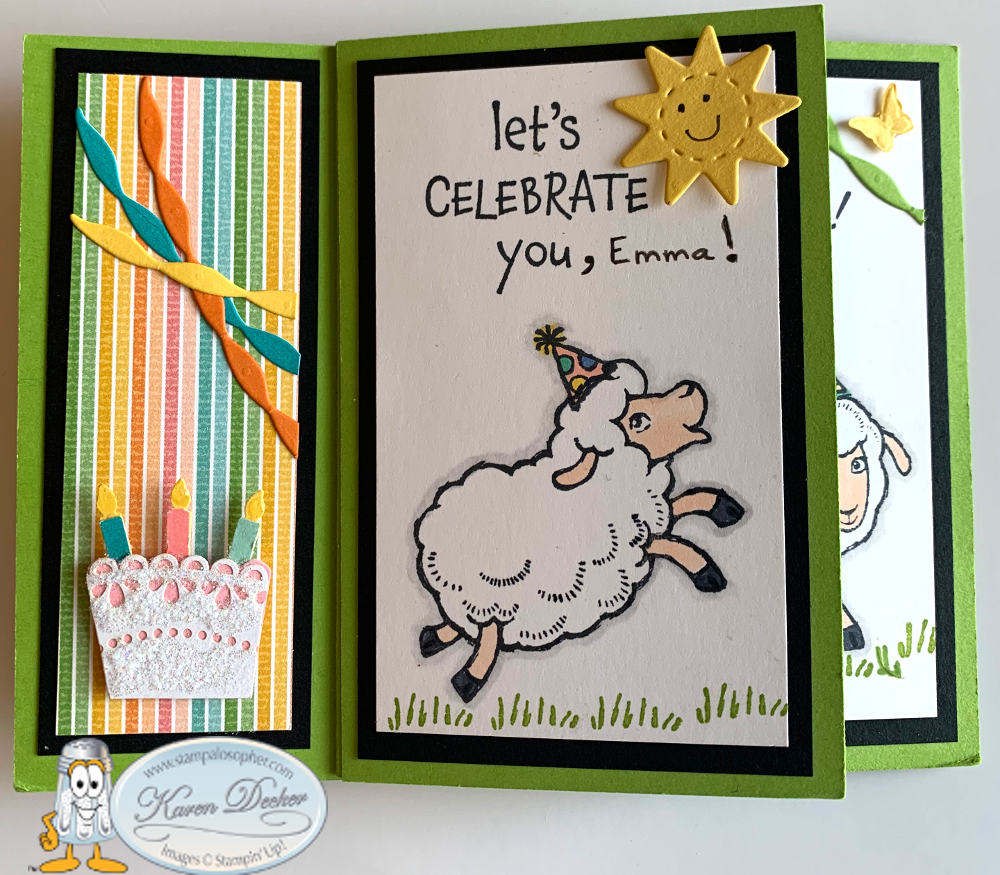
The sheep are all stamped directly on the Basic White, however, by outlining the image with a Light Smoky Slate Blend and then using the Color Lifter to soften the shadow you create a look of a whiter white. The candles are from a retired punch and the frosting is a piece of doily. The flames are made real with a drop of our Shimmery Crystal Effects.
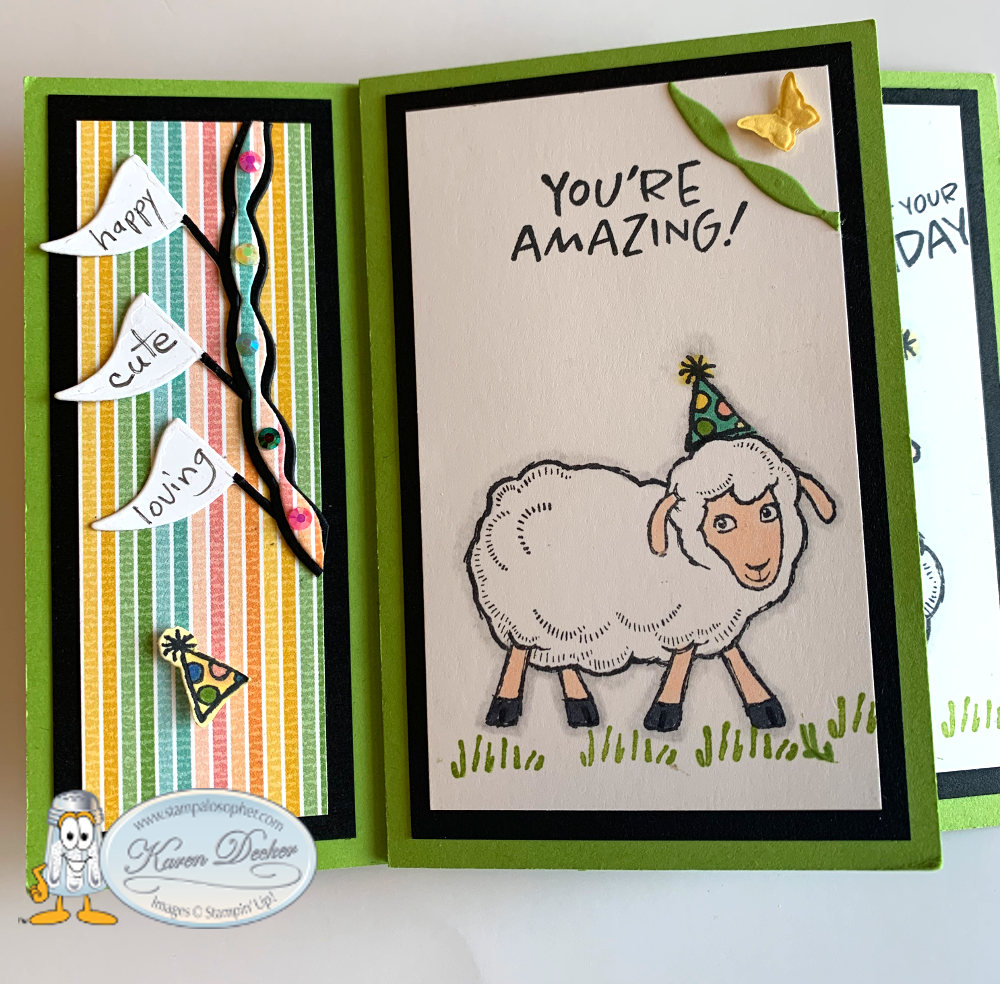
Even if you don’t need the sheep, the sheep dies have this cool pennant, the sun, the balloon, clouds and the birthday hat. The grass, the greeting and the birthday hat come from the Counting Sheep stamp set. The streamers are in the Birthday Chick die set.
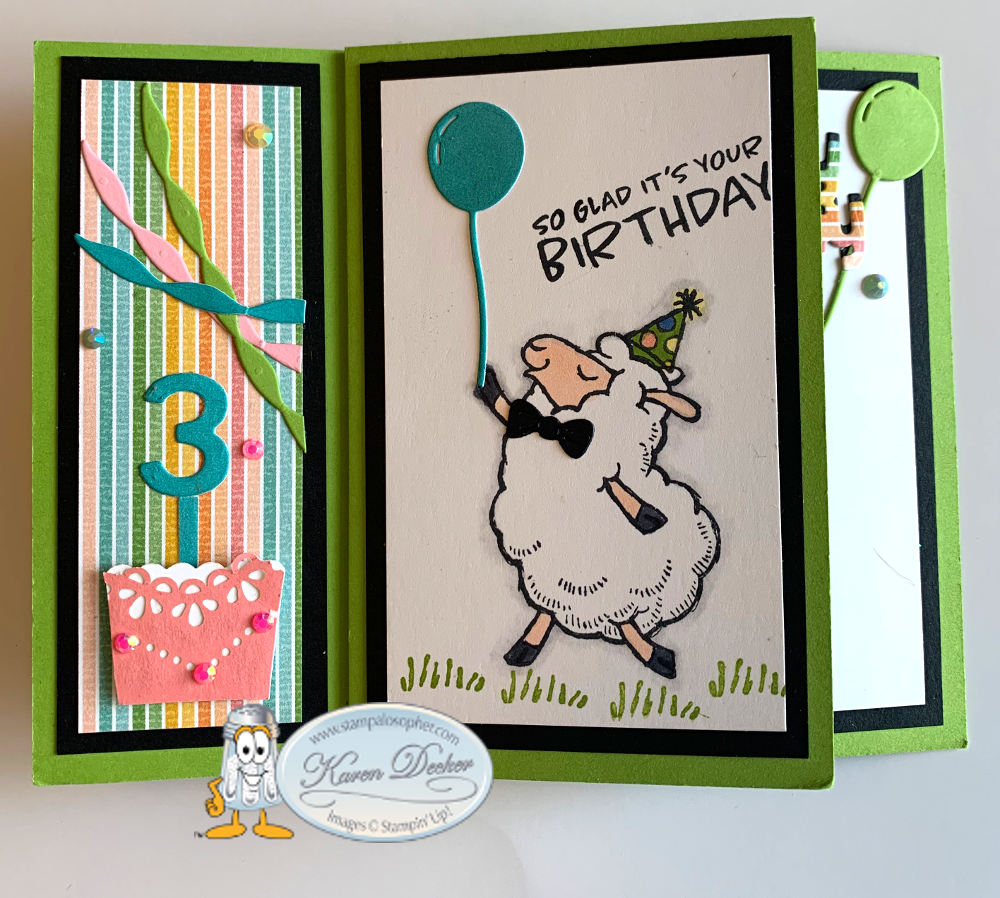
On this side I used a number 3 from the Playful Alphabet set, more Hey Chick streamers, a doily and a cute bow tie from the Birthday Chick Dies.

The Happy Birthday is another die in the Birthday Chick die set and the balloons are in the Sheep Dies. I cut the words once in basic black and once in the Pattern Party paper with horizontal stripes for a different look.
This is what the work table looks like at the end of making the card:
 Ugh — I thought all the skeletons and halloween decorations were scary but this is worse.
A normal day in the life of a crafter!
Let’s look at the cards made by the others. Thank you Stampers for your amazing creations and letting me share them!
Sharon Fincham’s Christmas Card:
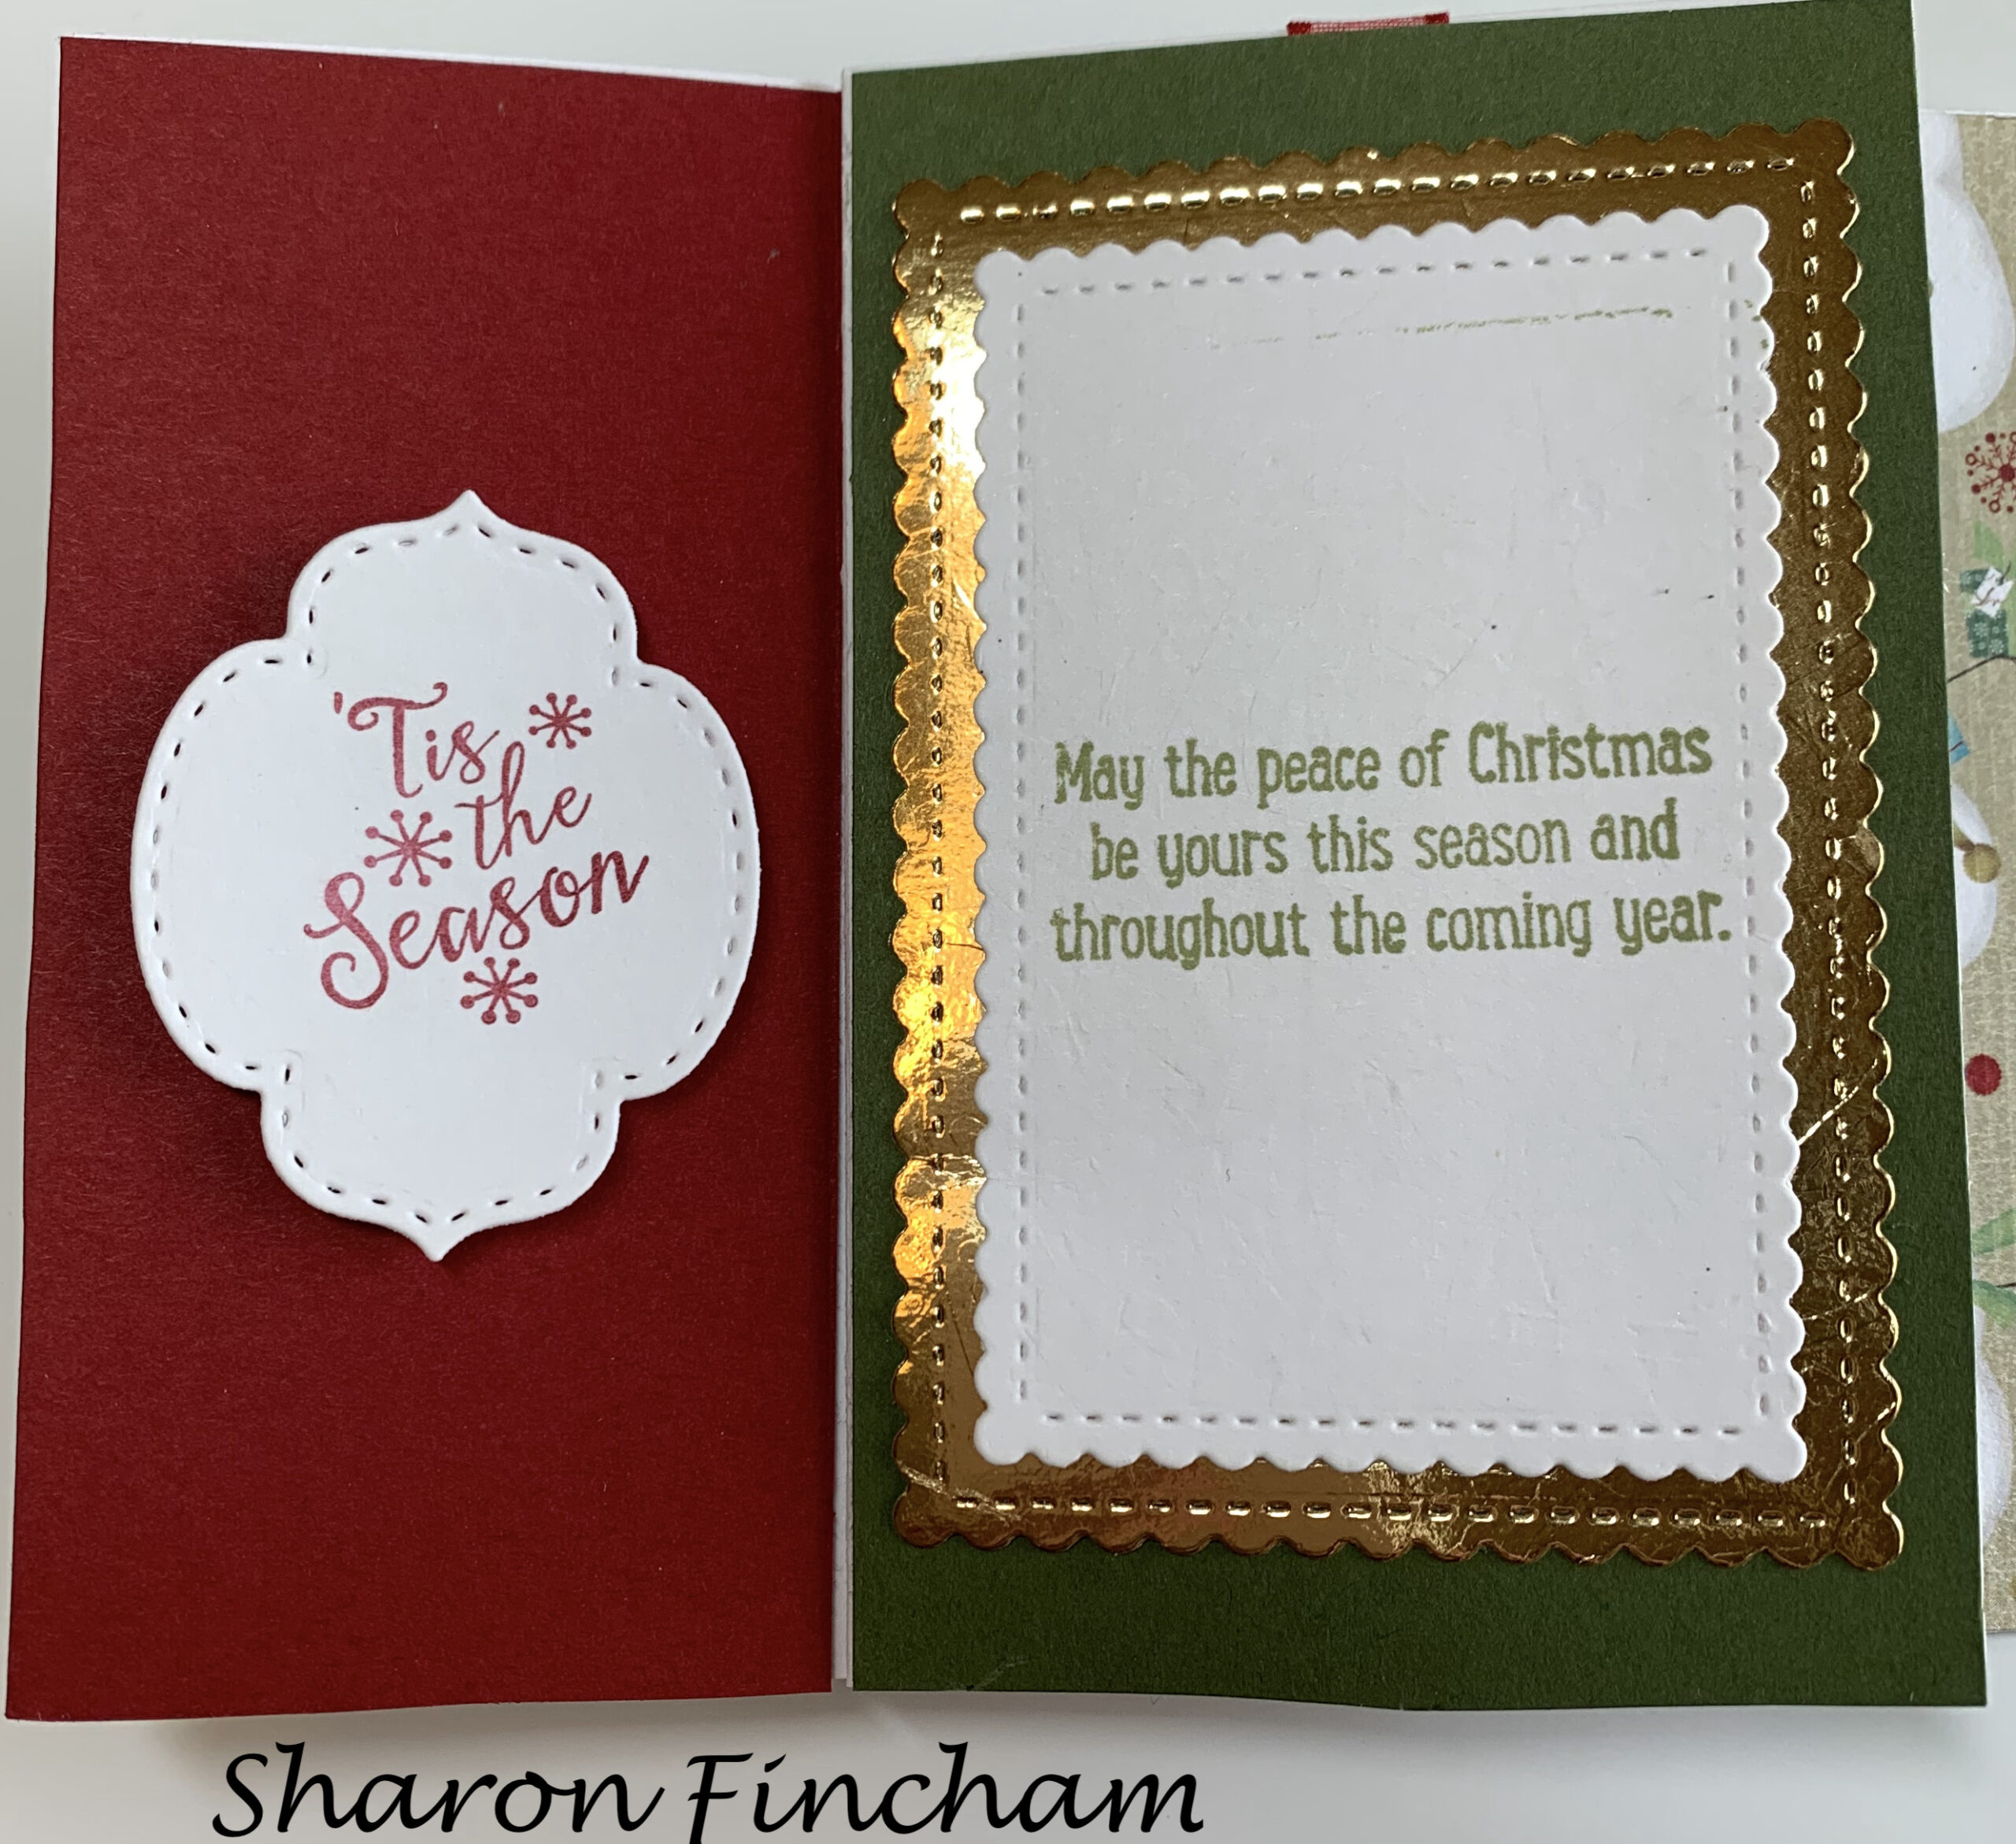
 .
.
Joy Meadows also made a Christmas card and used the Whimsy & Wonder Specialty Paper and the Christmas Trees Dies. The sparkly gold is the Sale A Bration Be Dazzling specialty paper:
 .
.  .
.
 .
. 
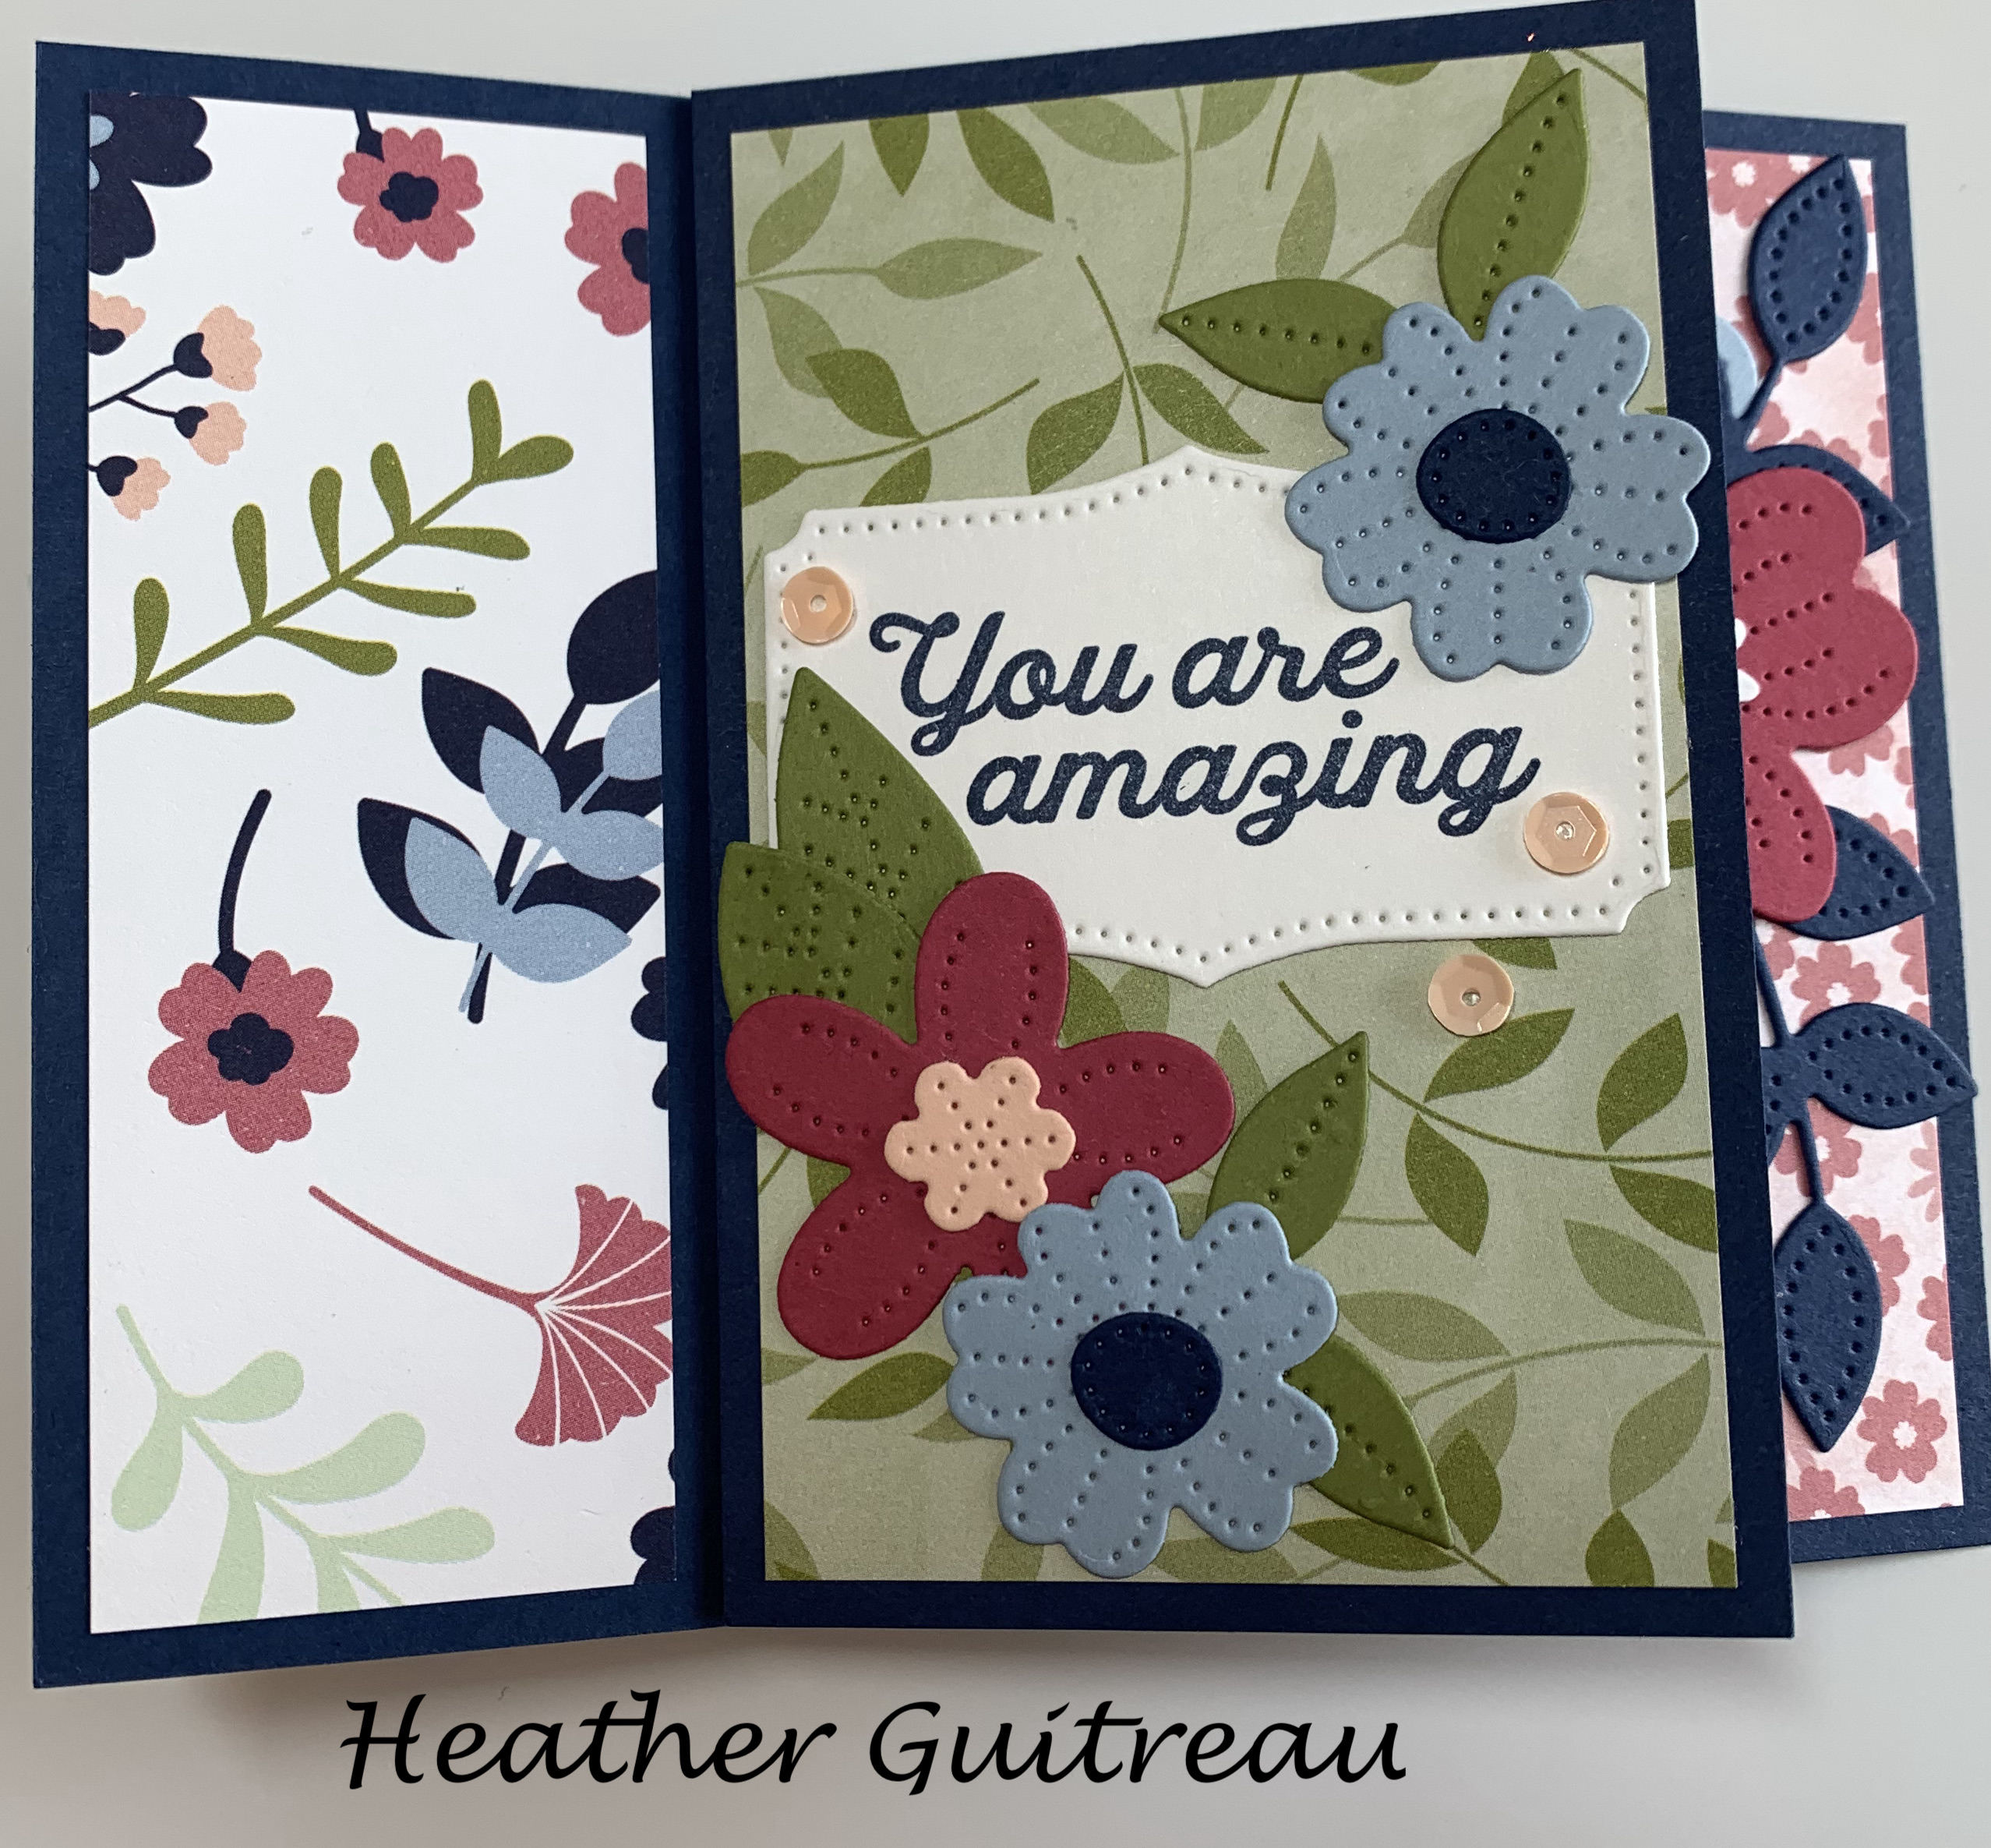
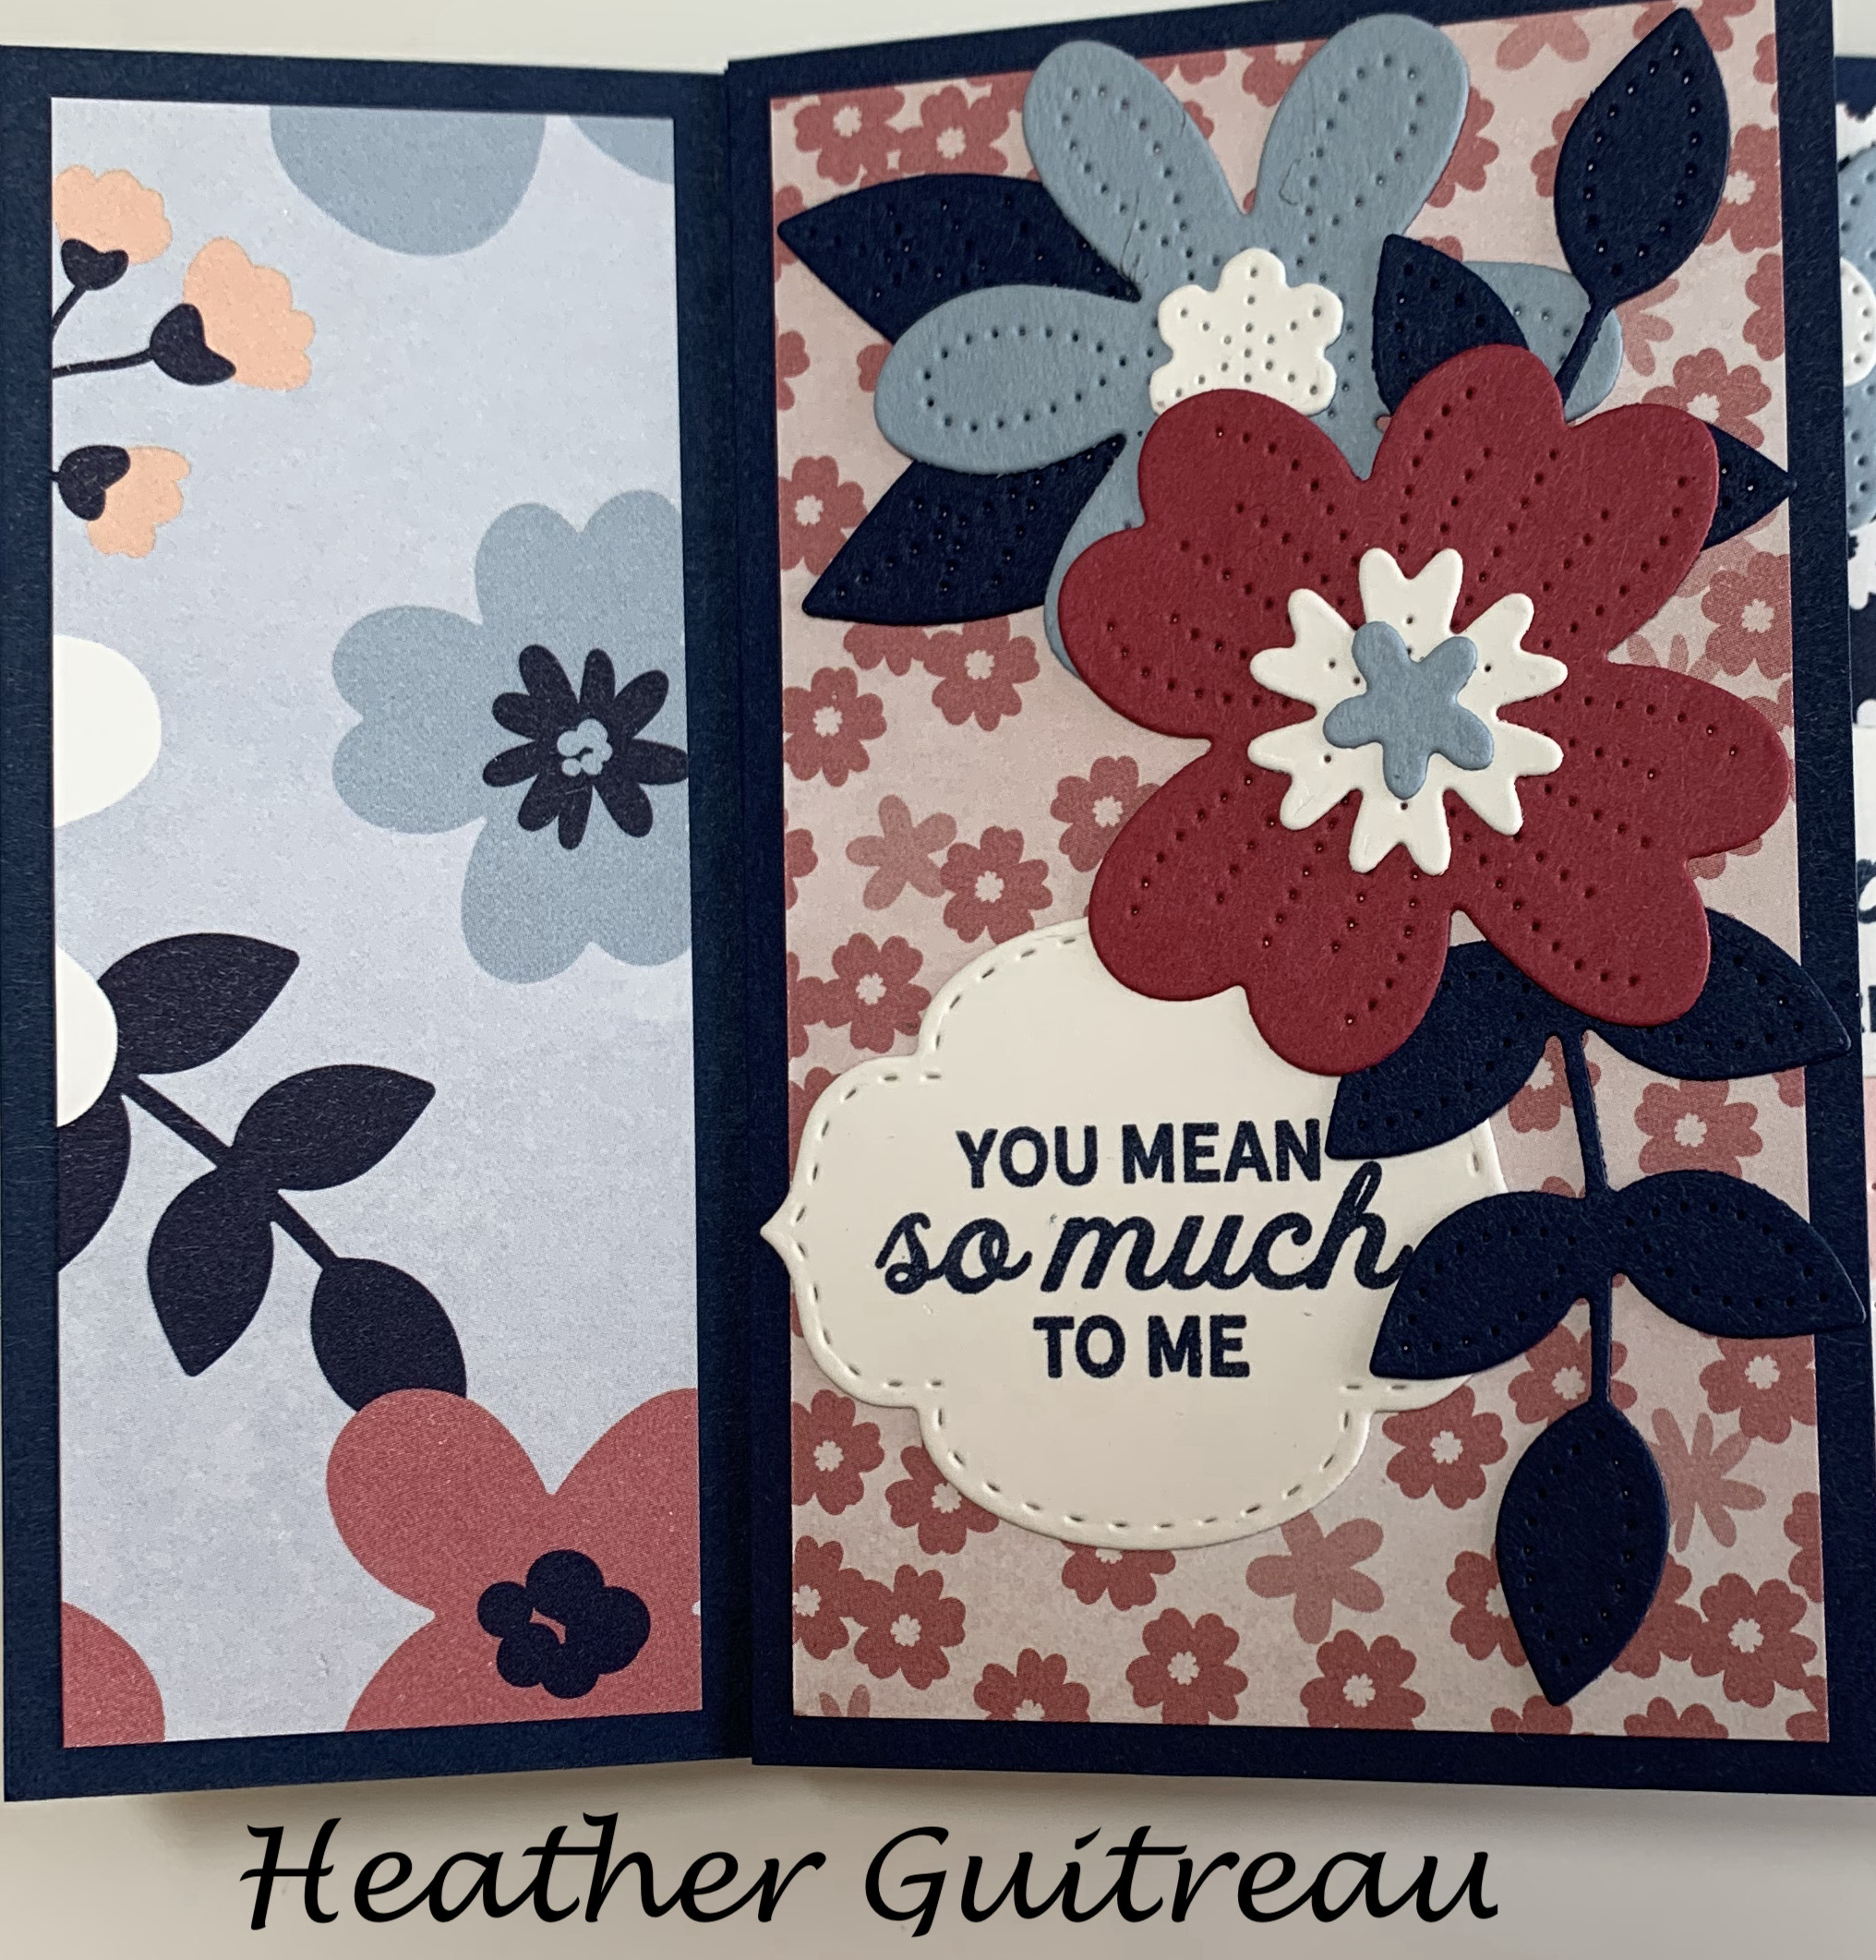
Heather Guitreau- for a friend using the Pierced Blooms Dies:
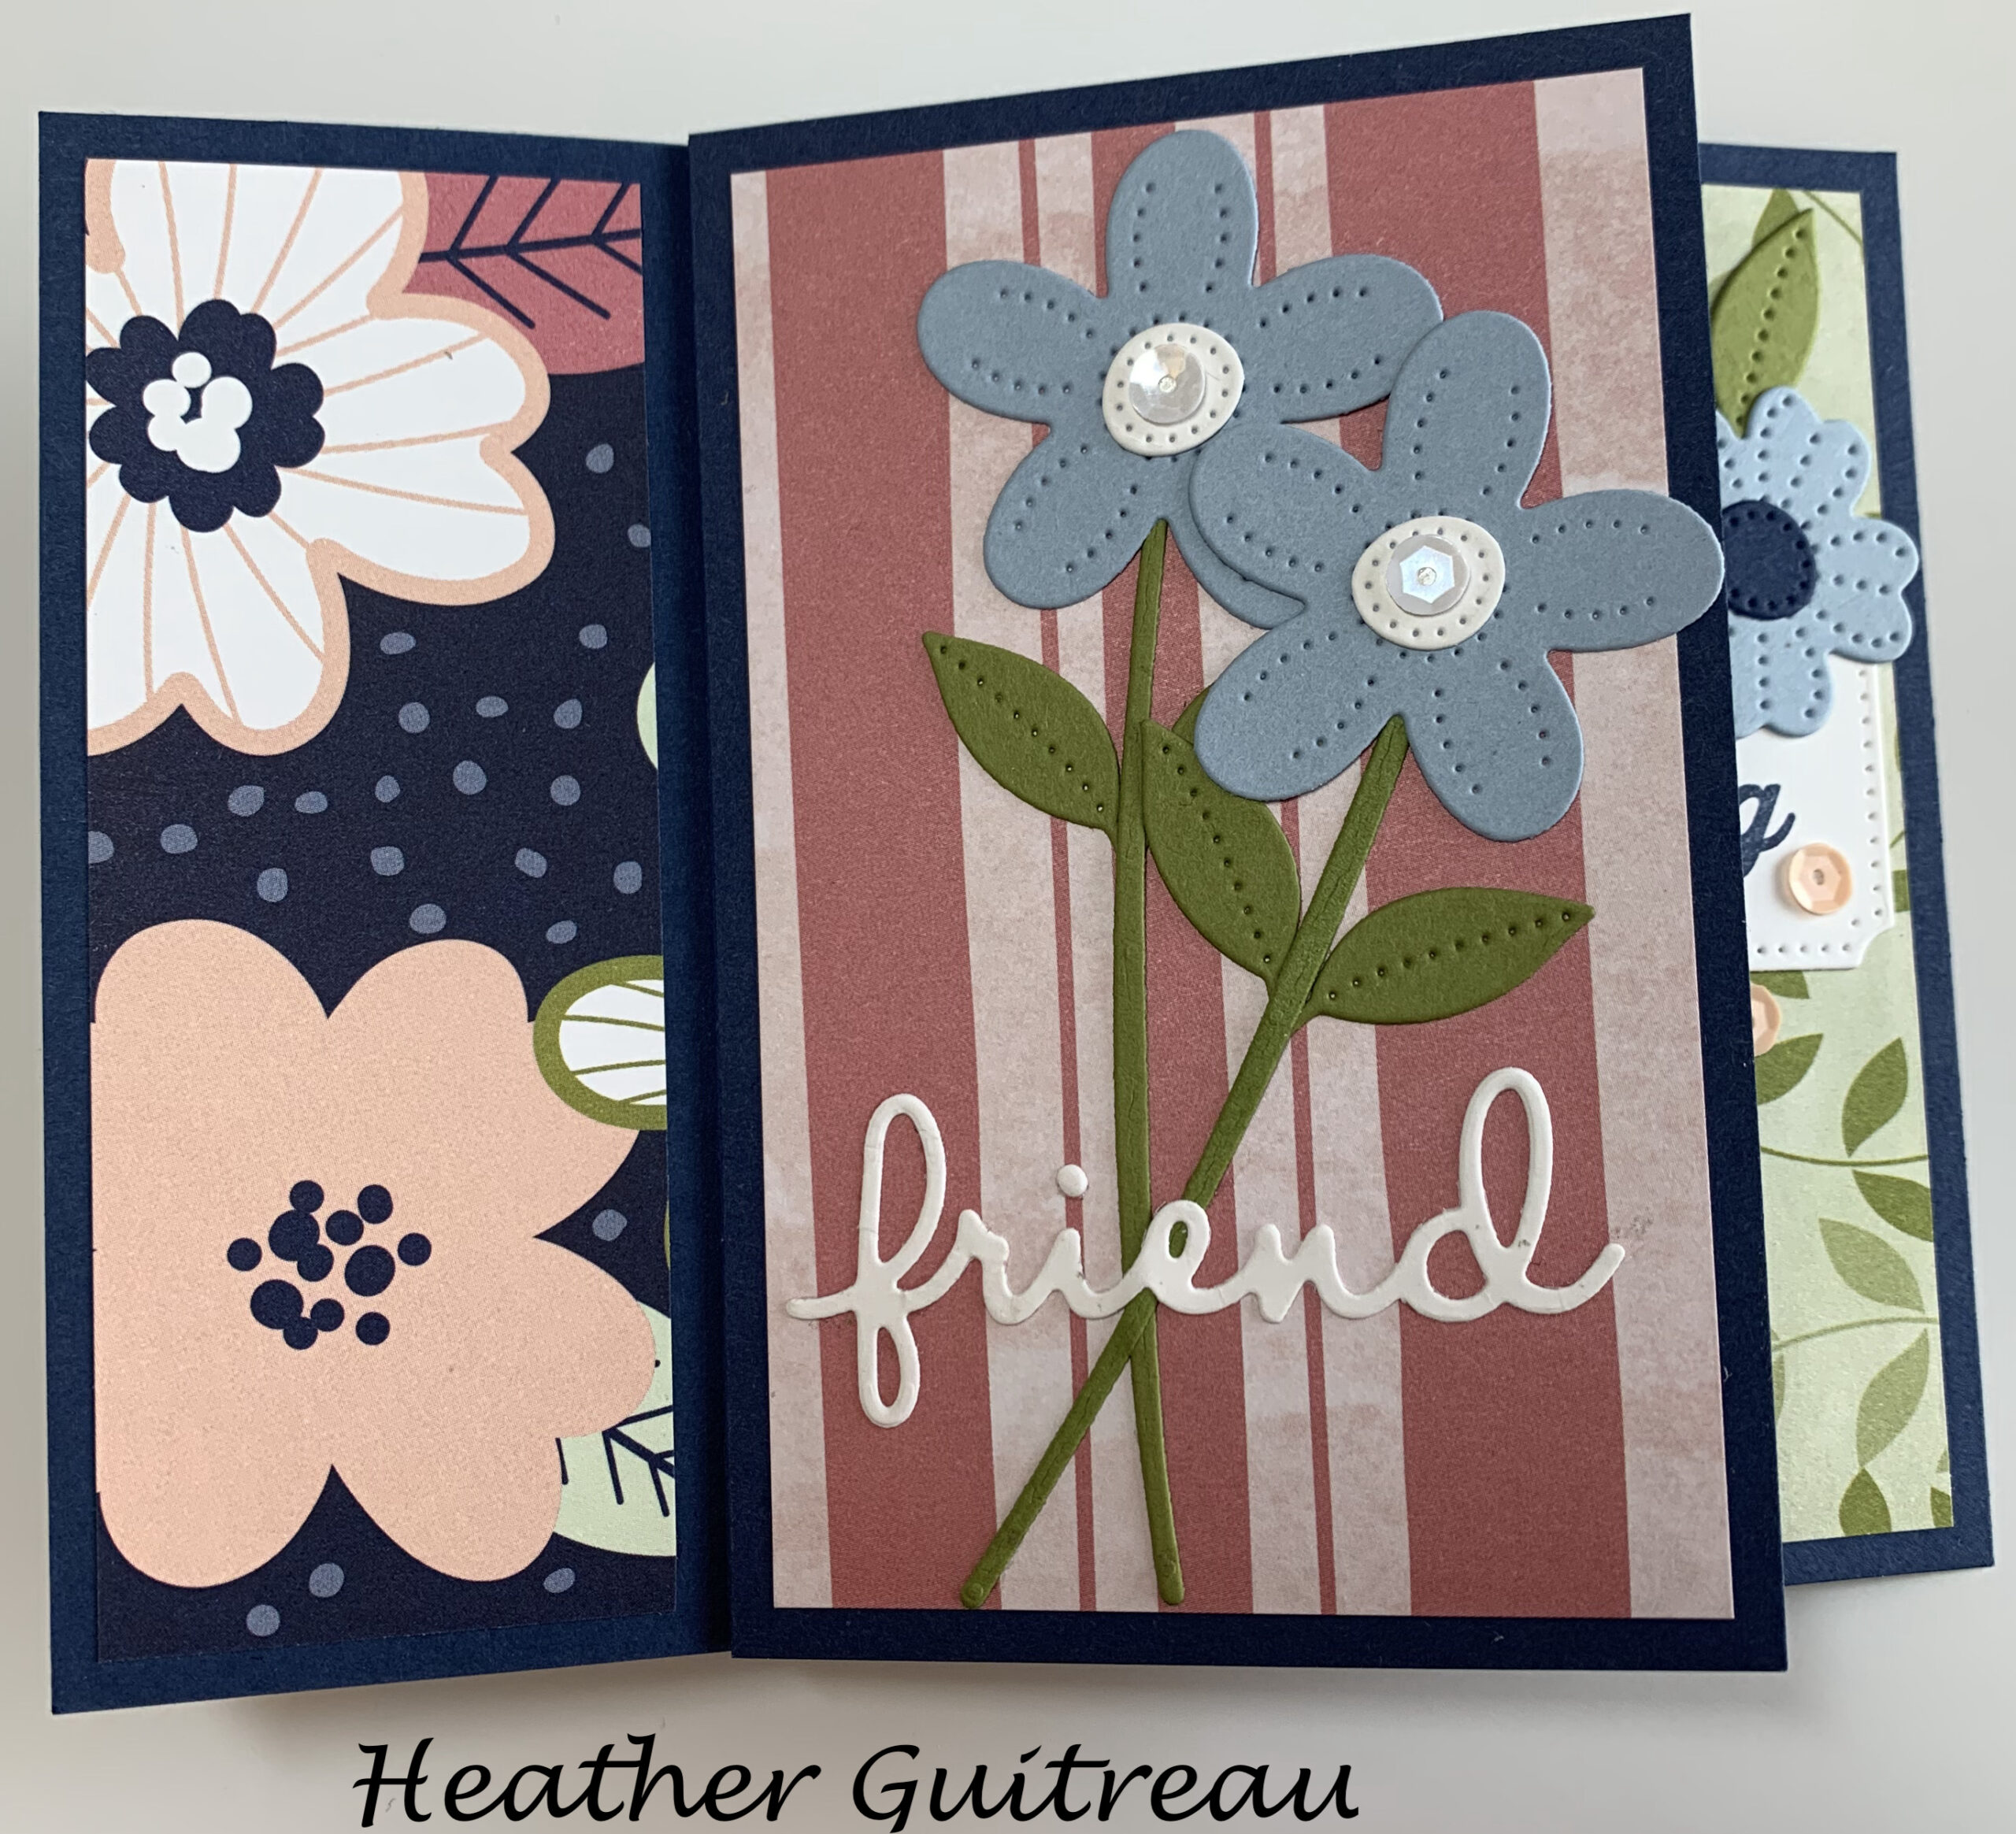 .
. 
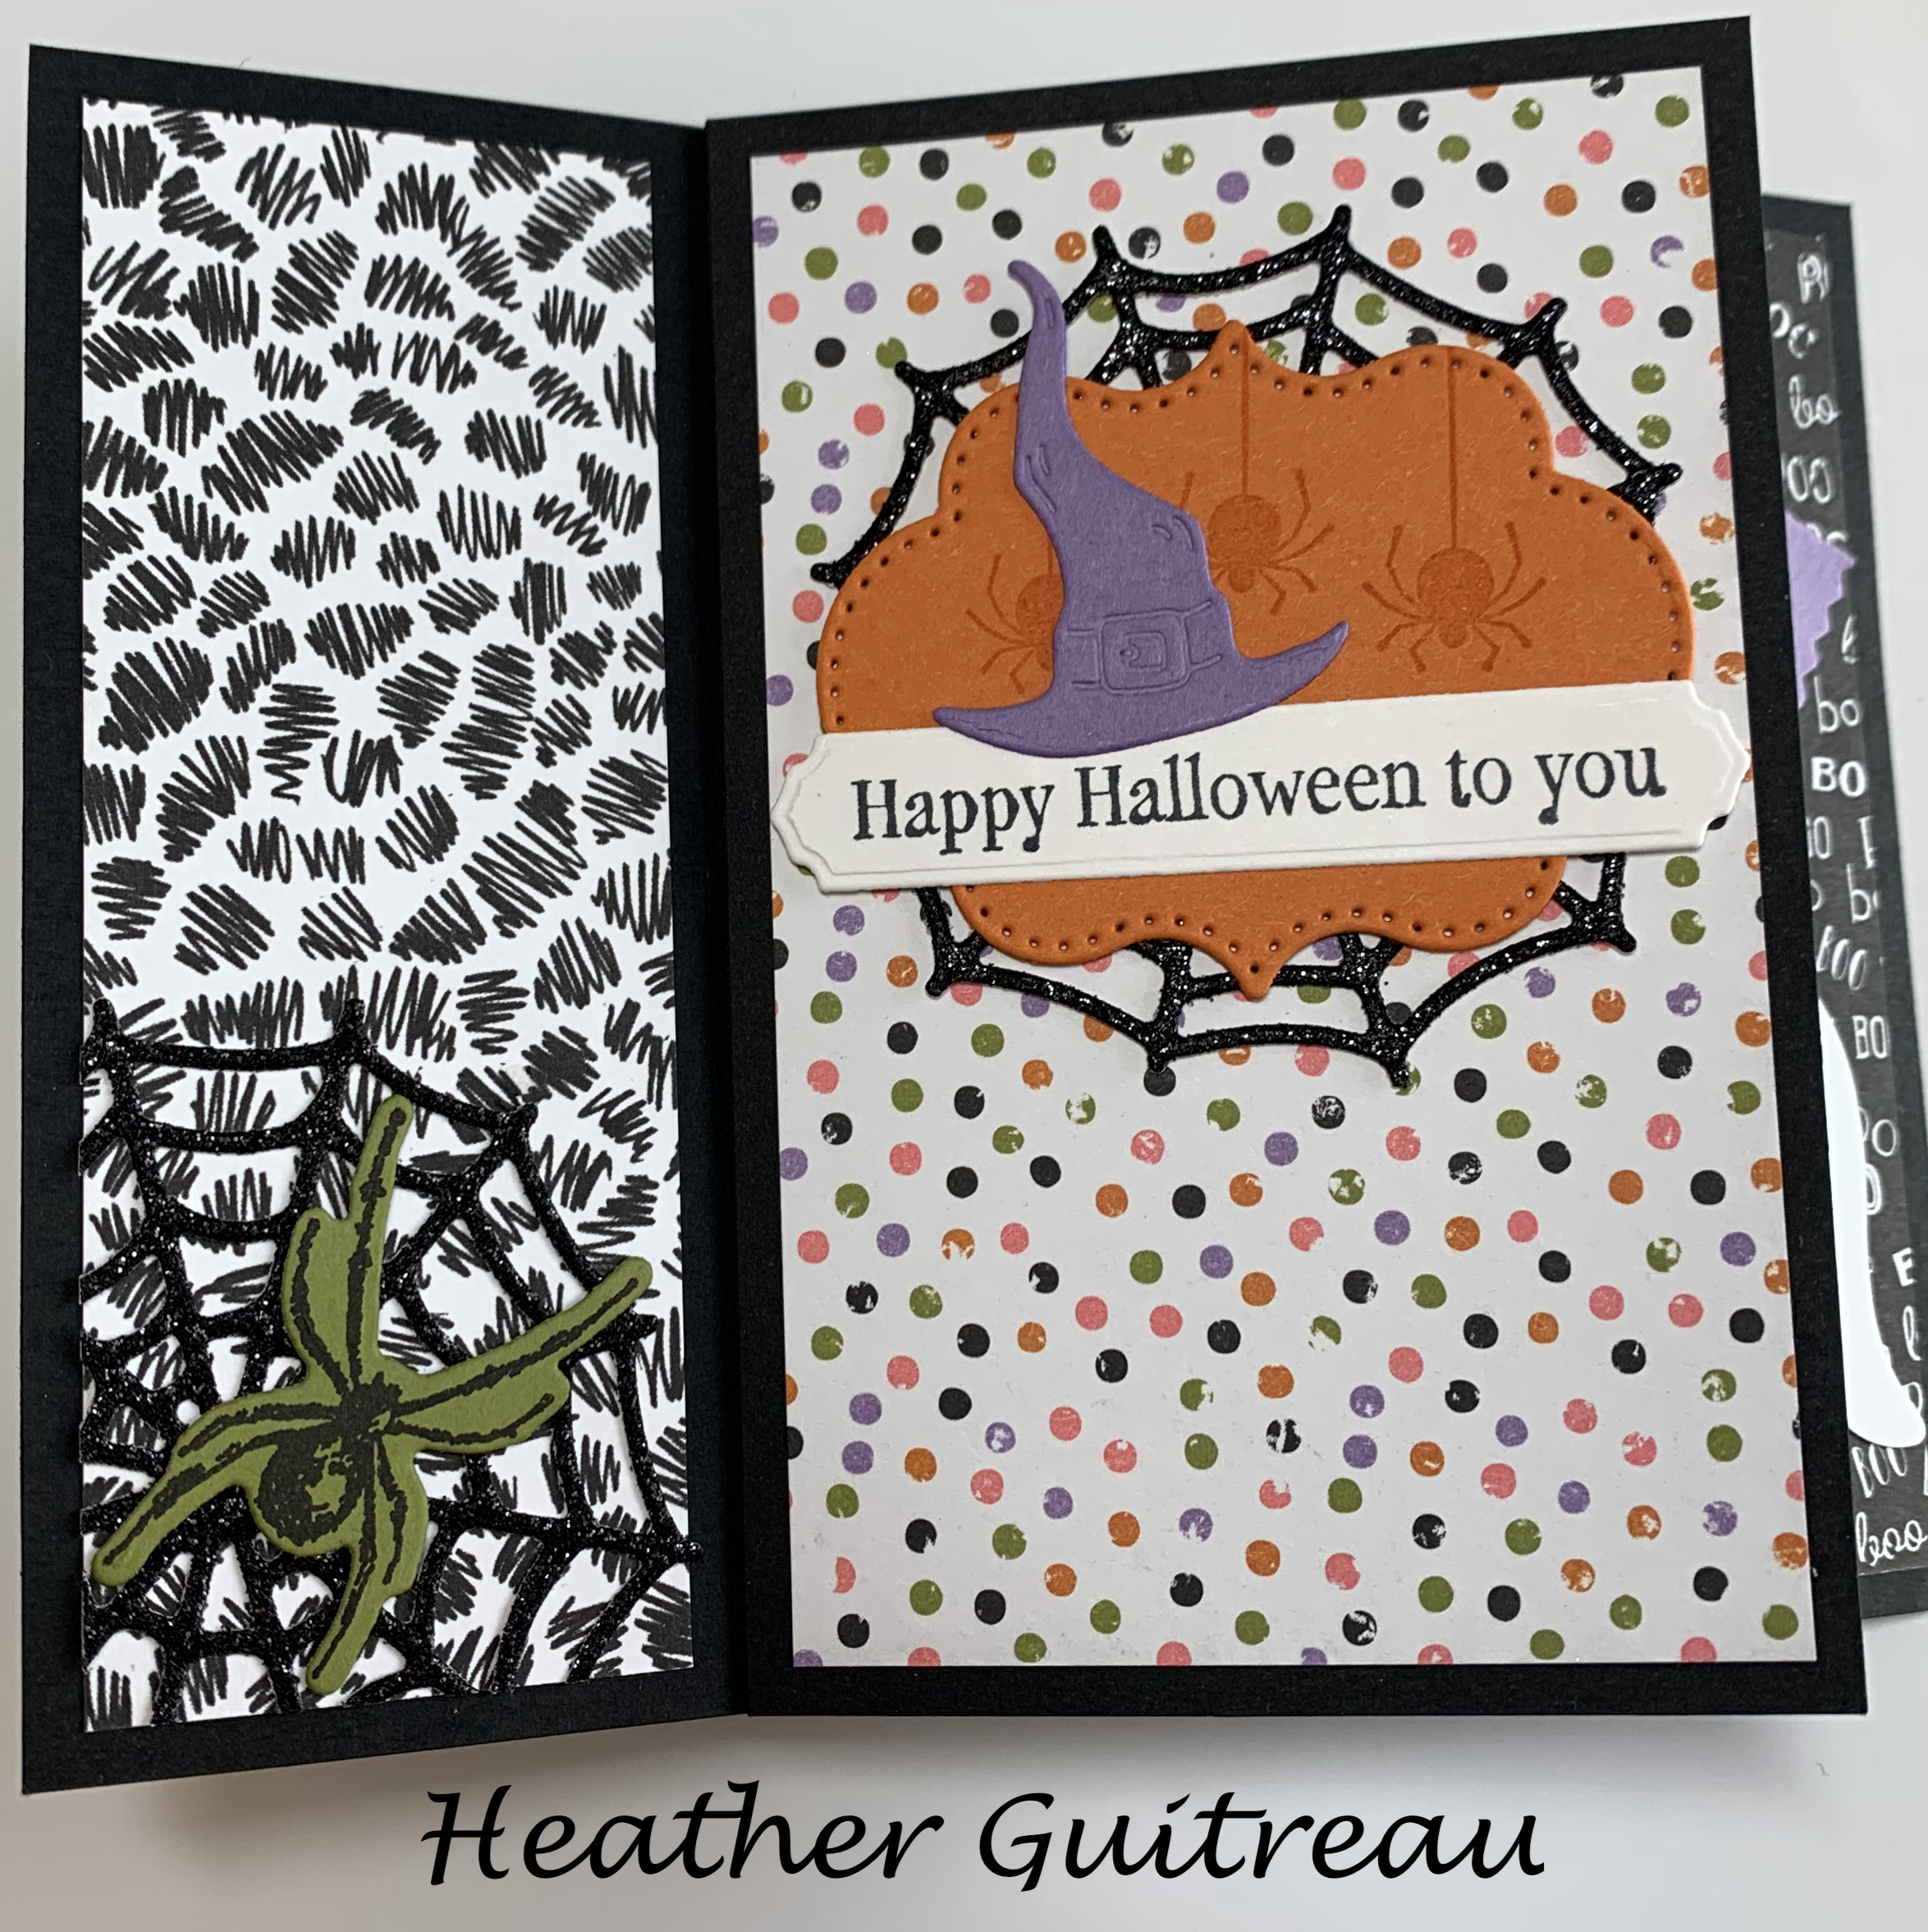
Heather Guitreau- for Halloween using the Cute Halloween Designer Series Paper, the Cutest Halloween Stamp set and the Frightful Tags dies with the Black Glitter Paper from Stampin’ Up! and other fun Halloween sets. Those ghosts are upside down tulip punches.
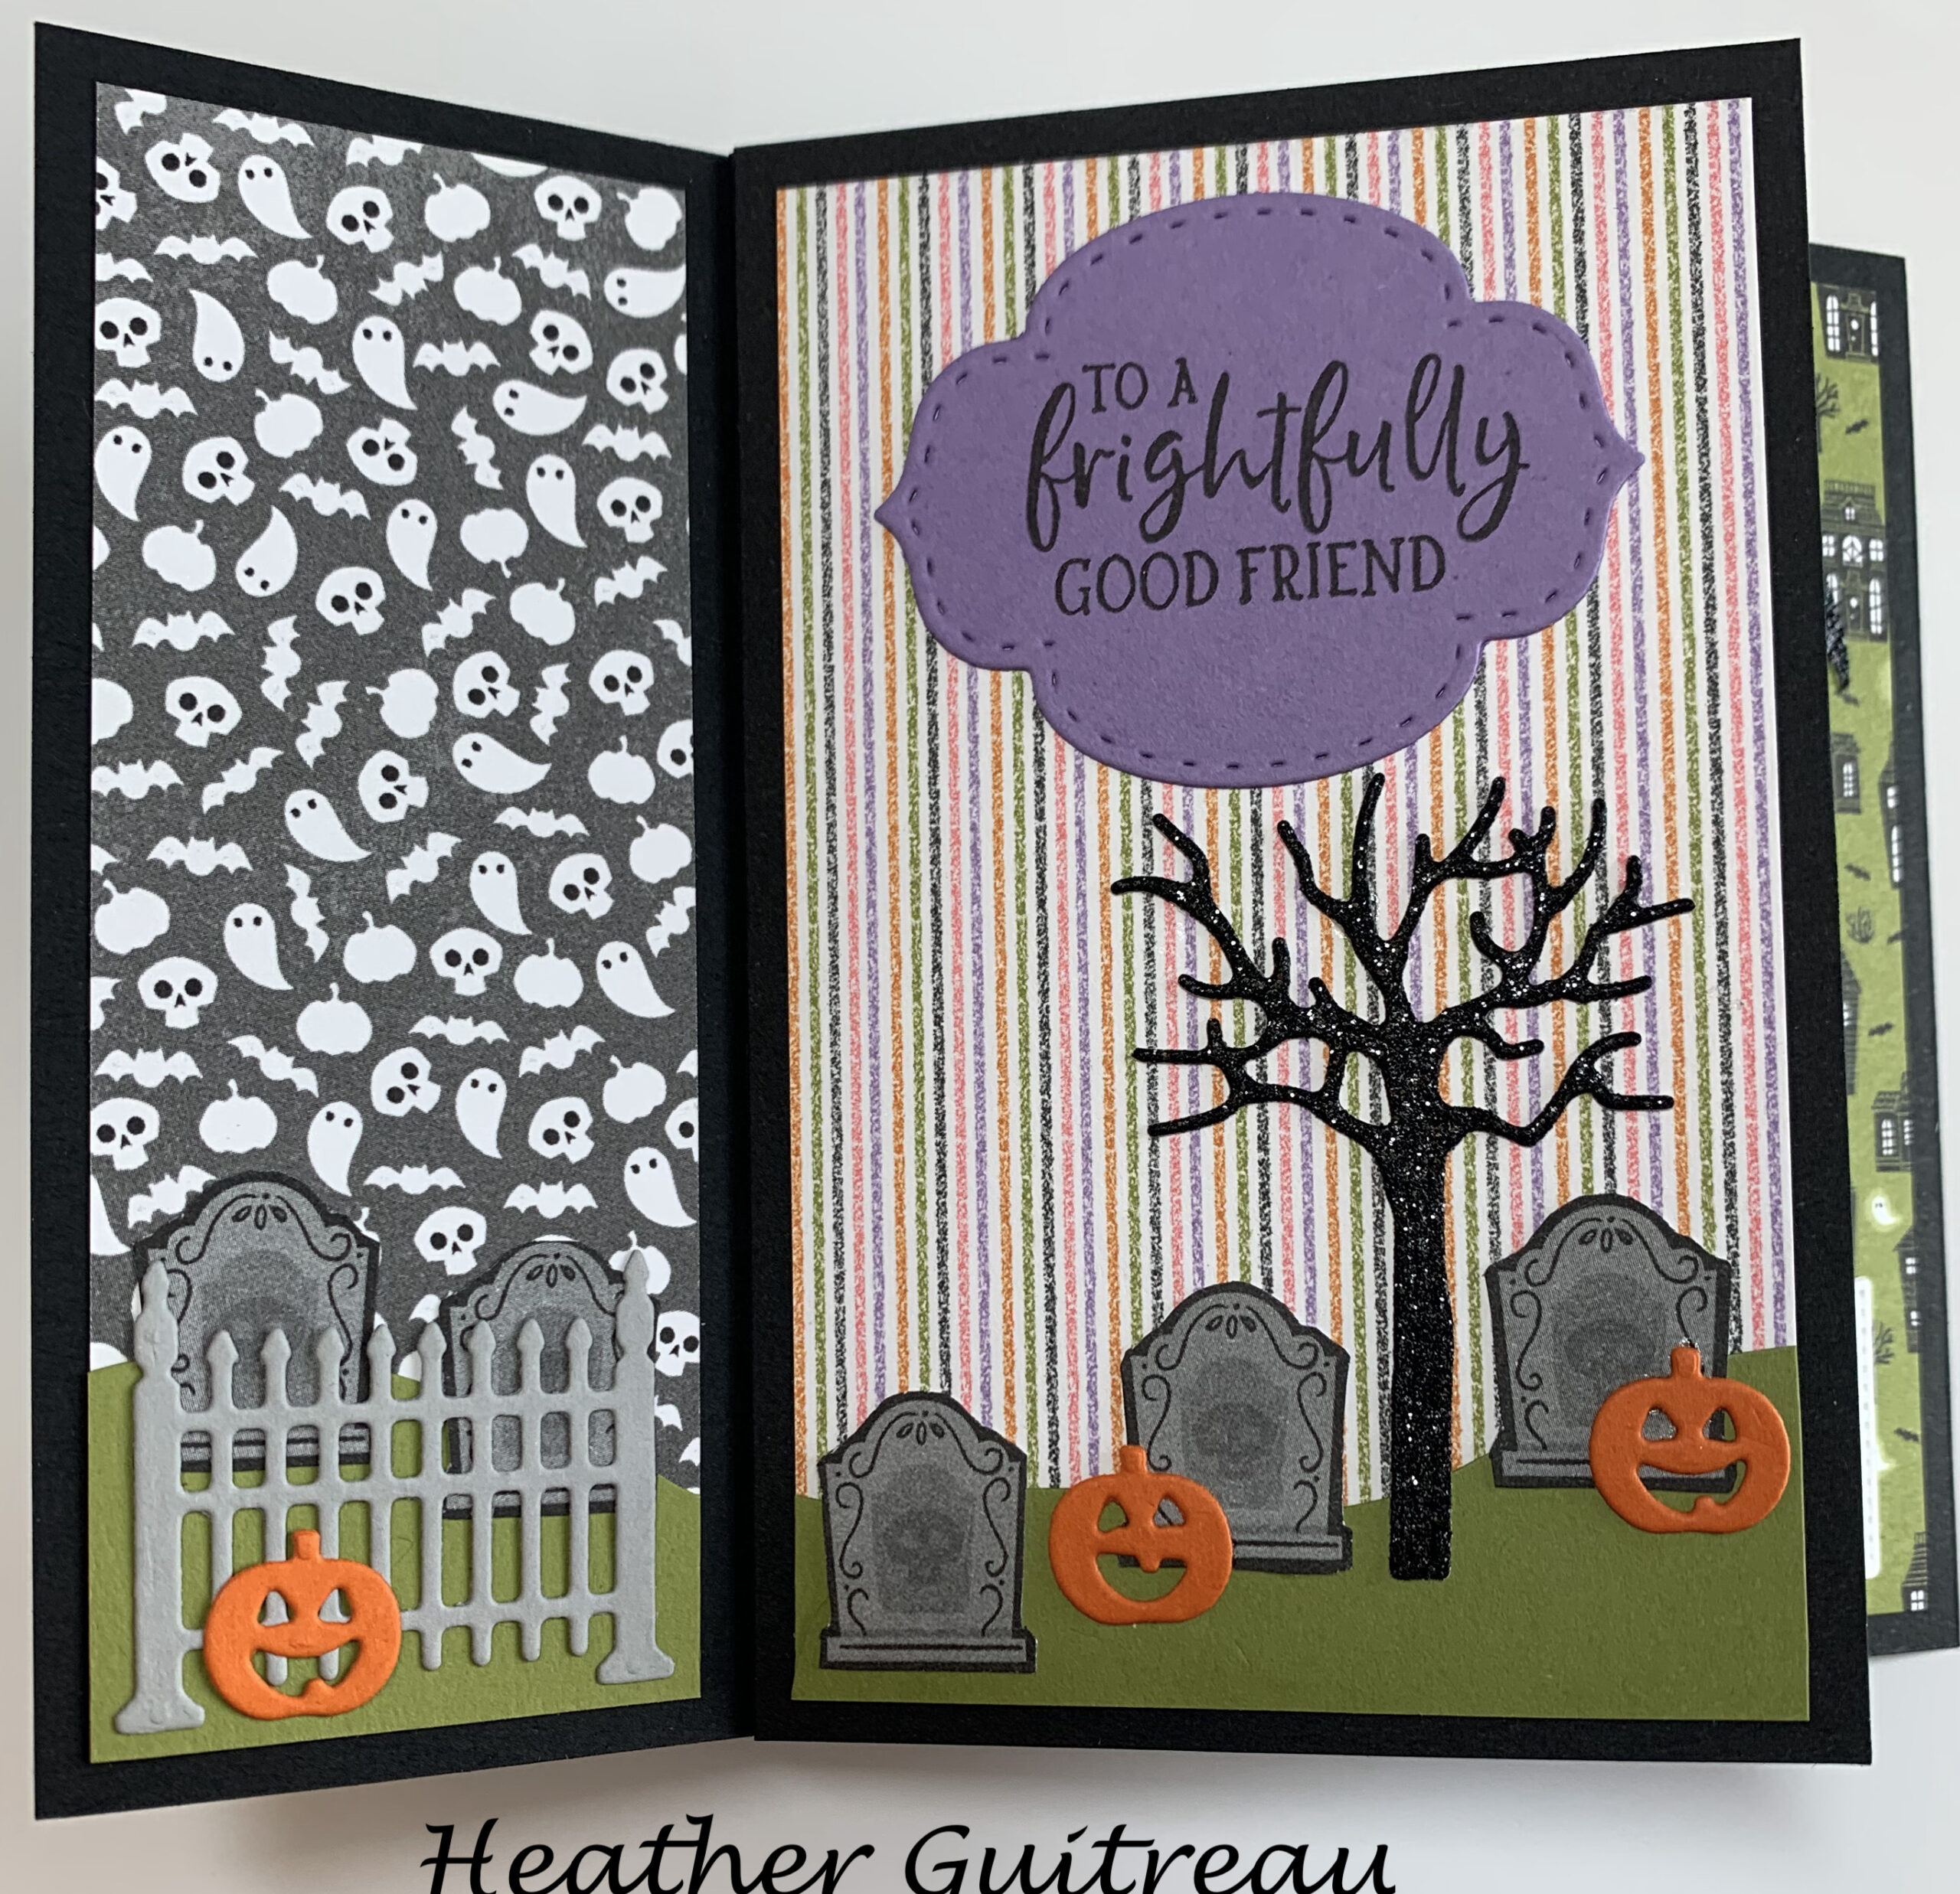 .
. 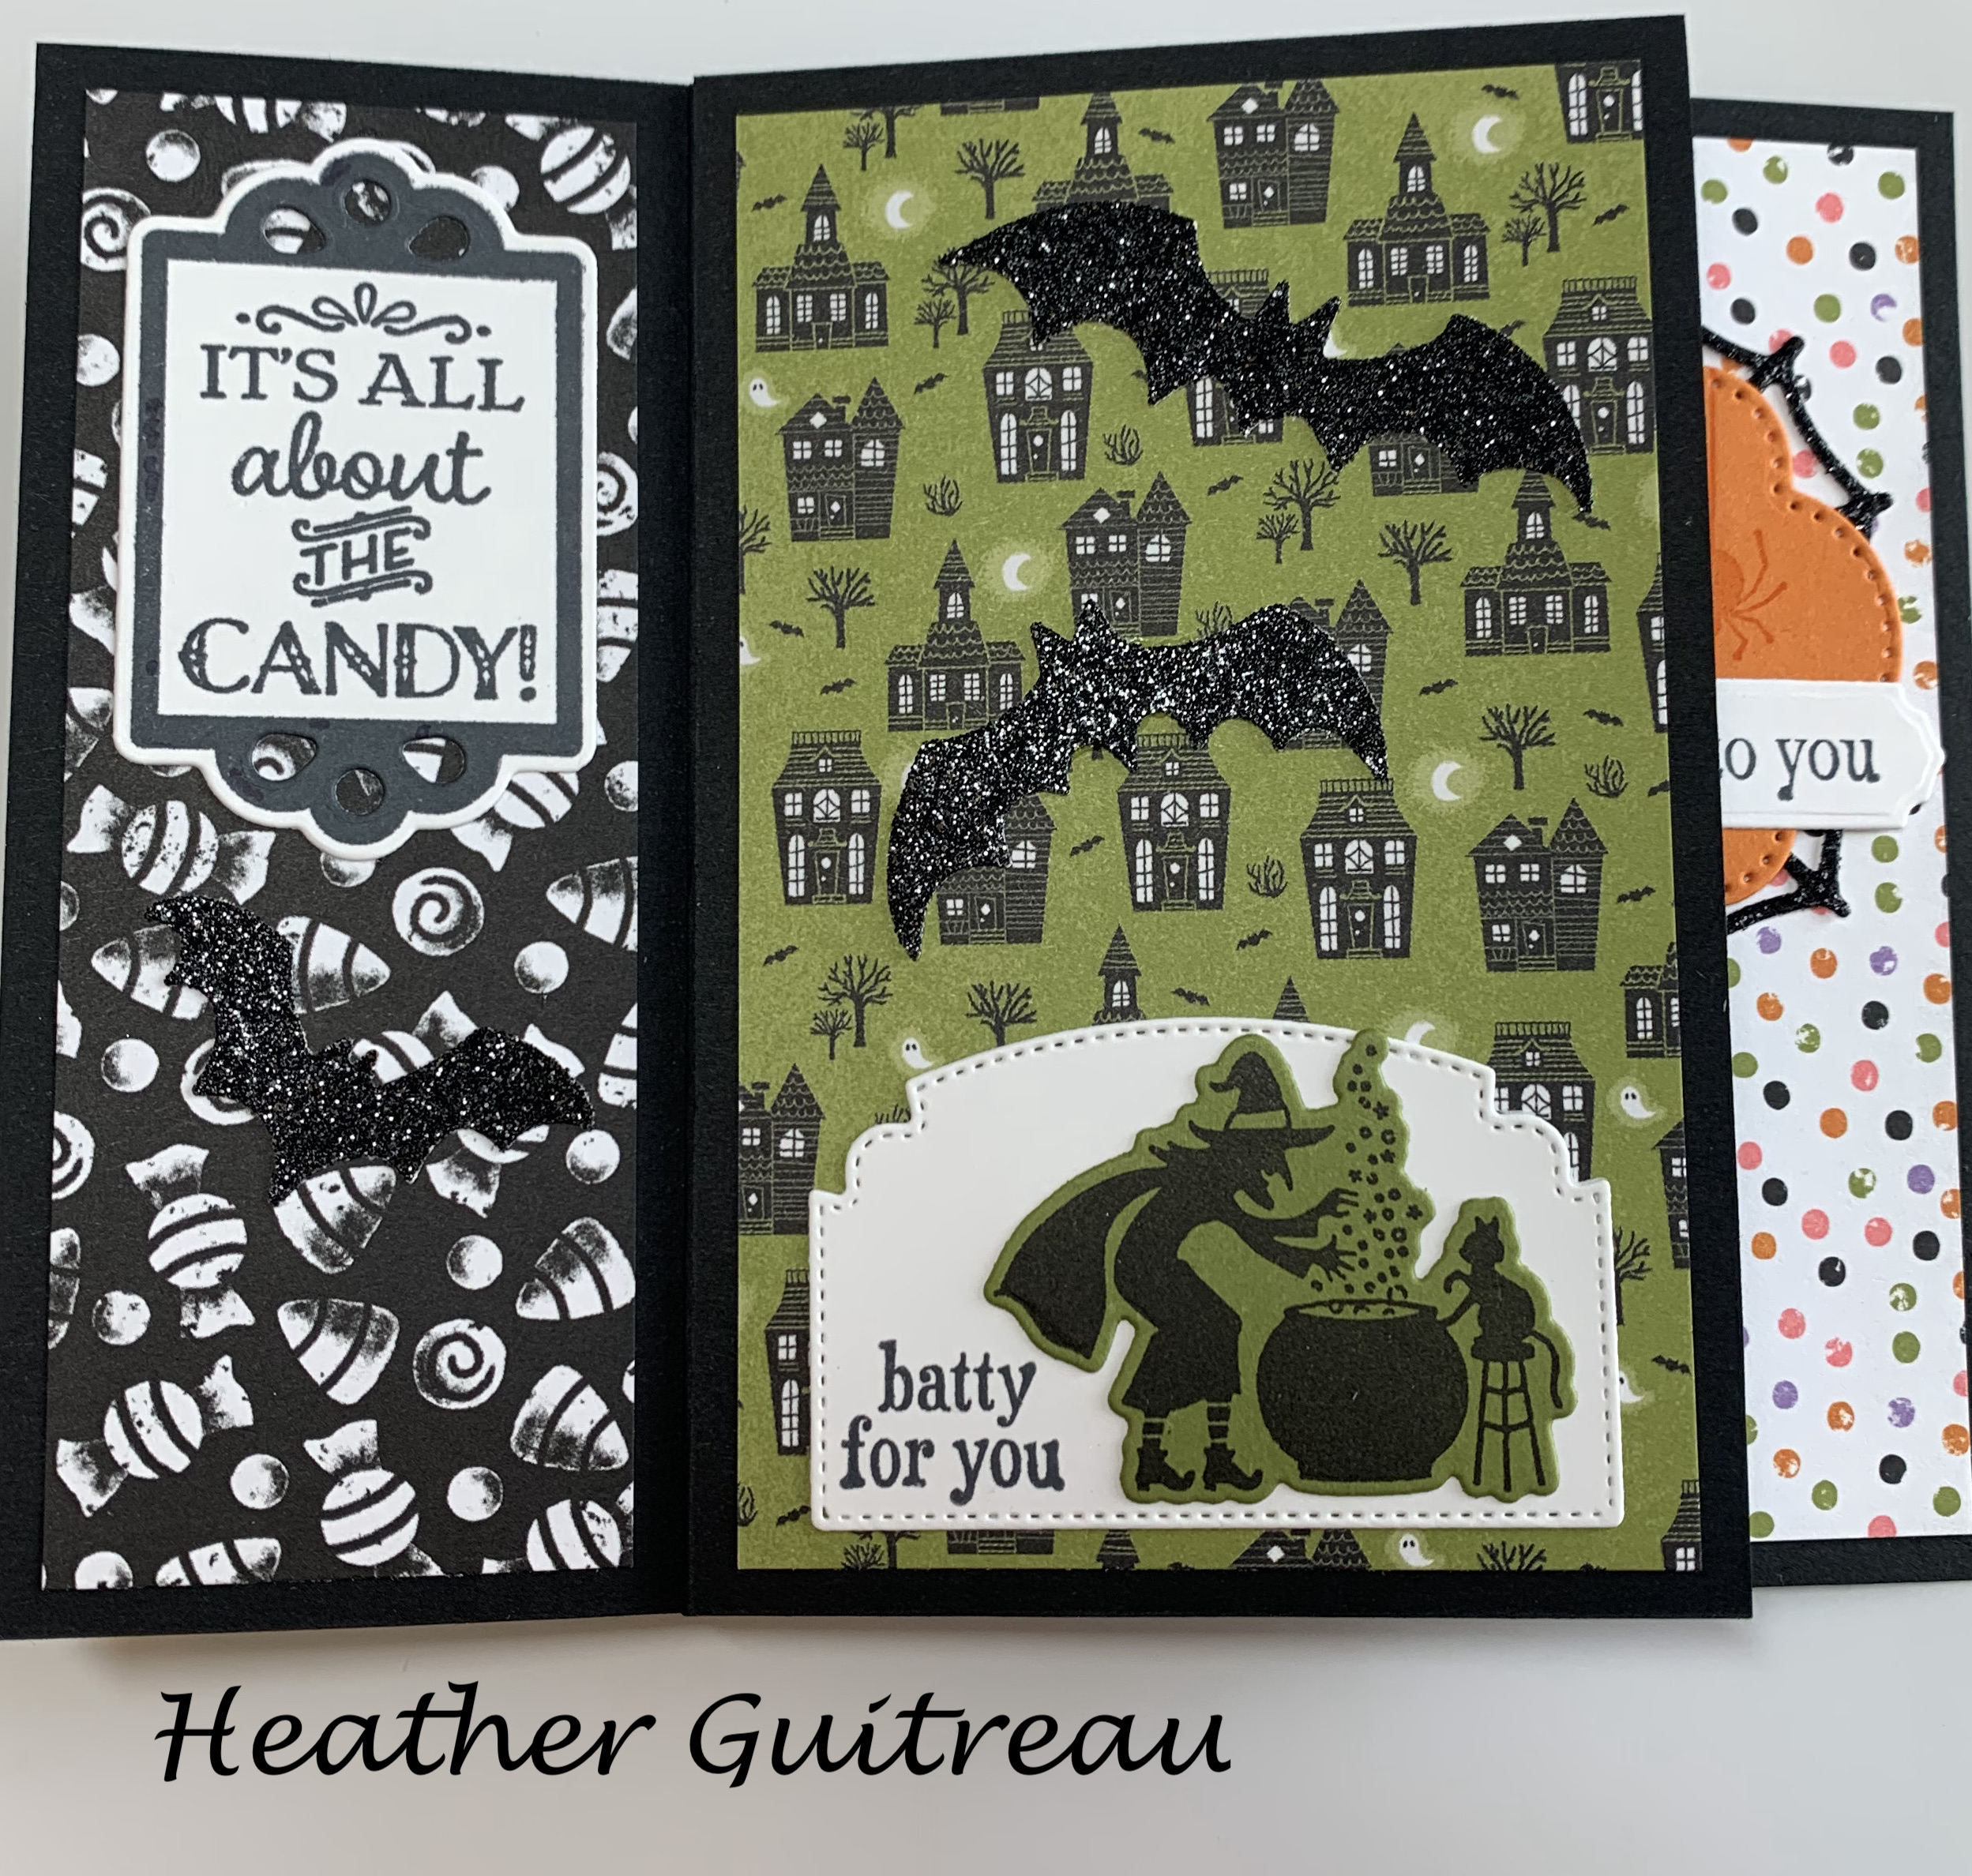
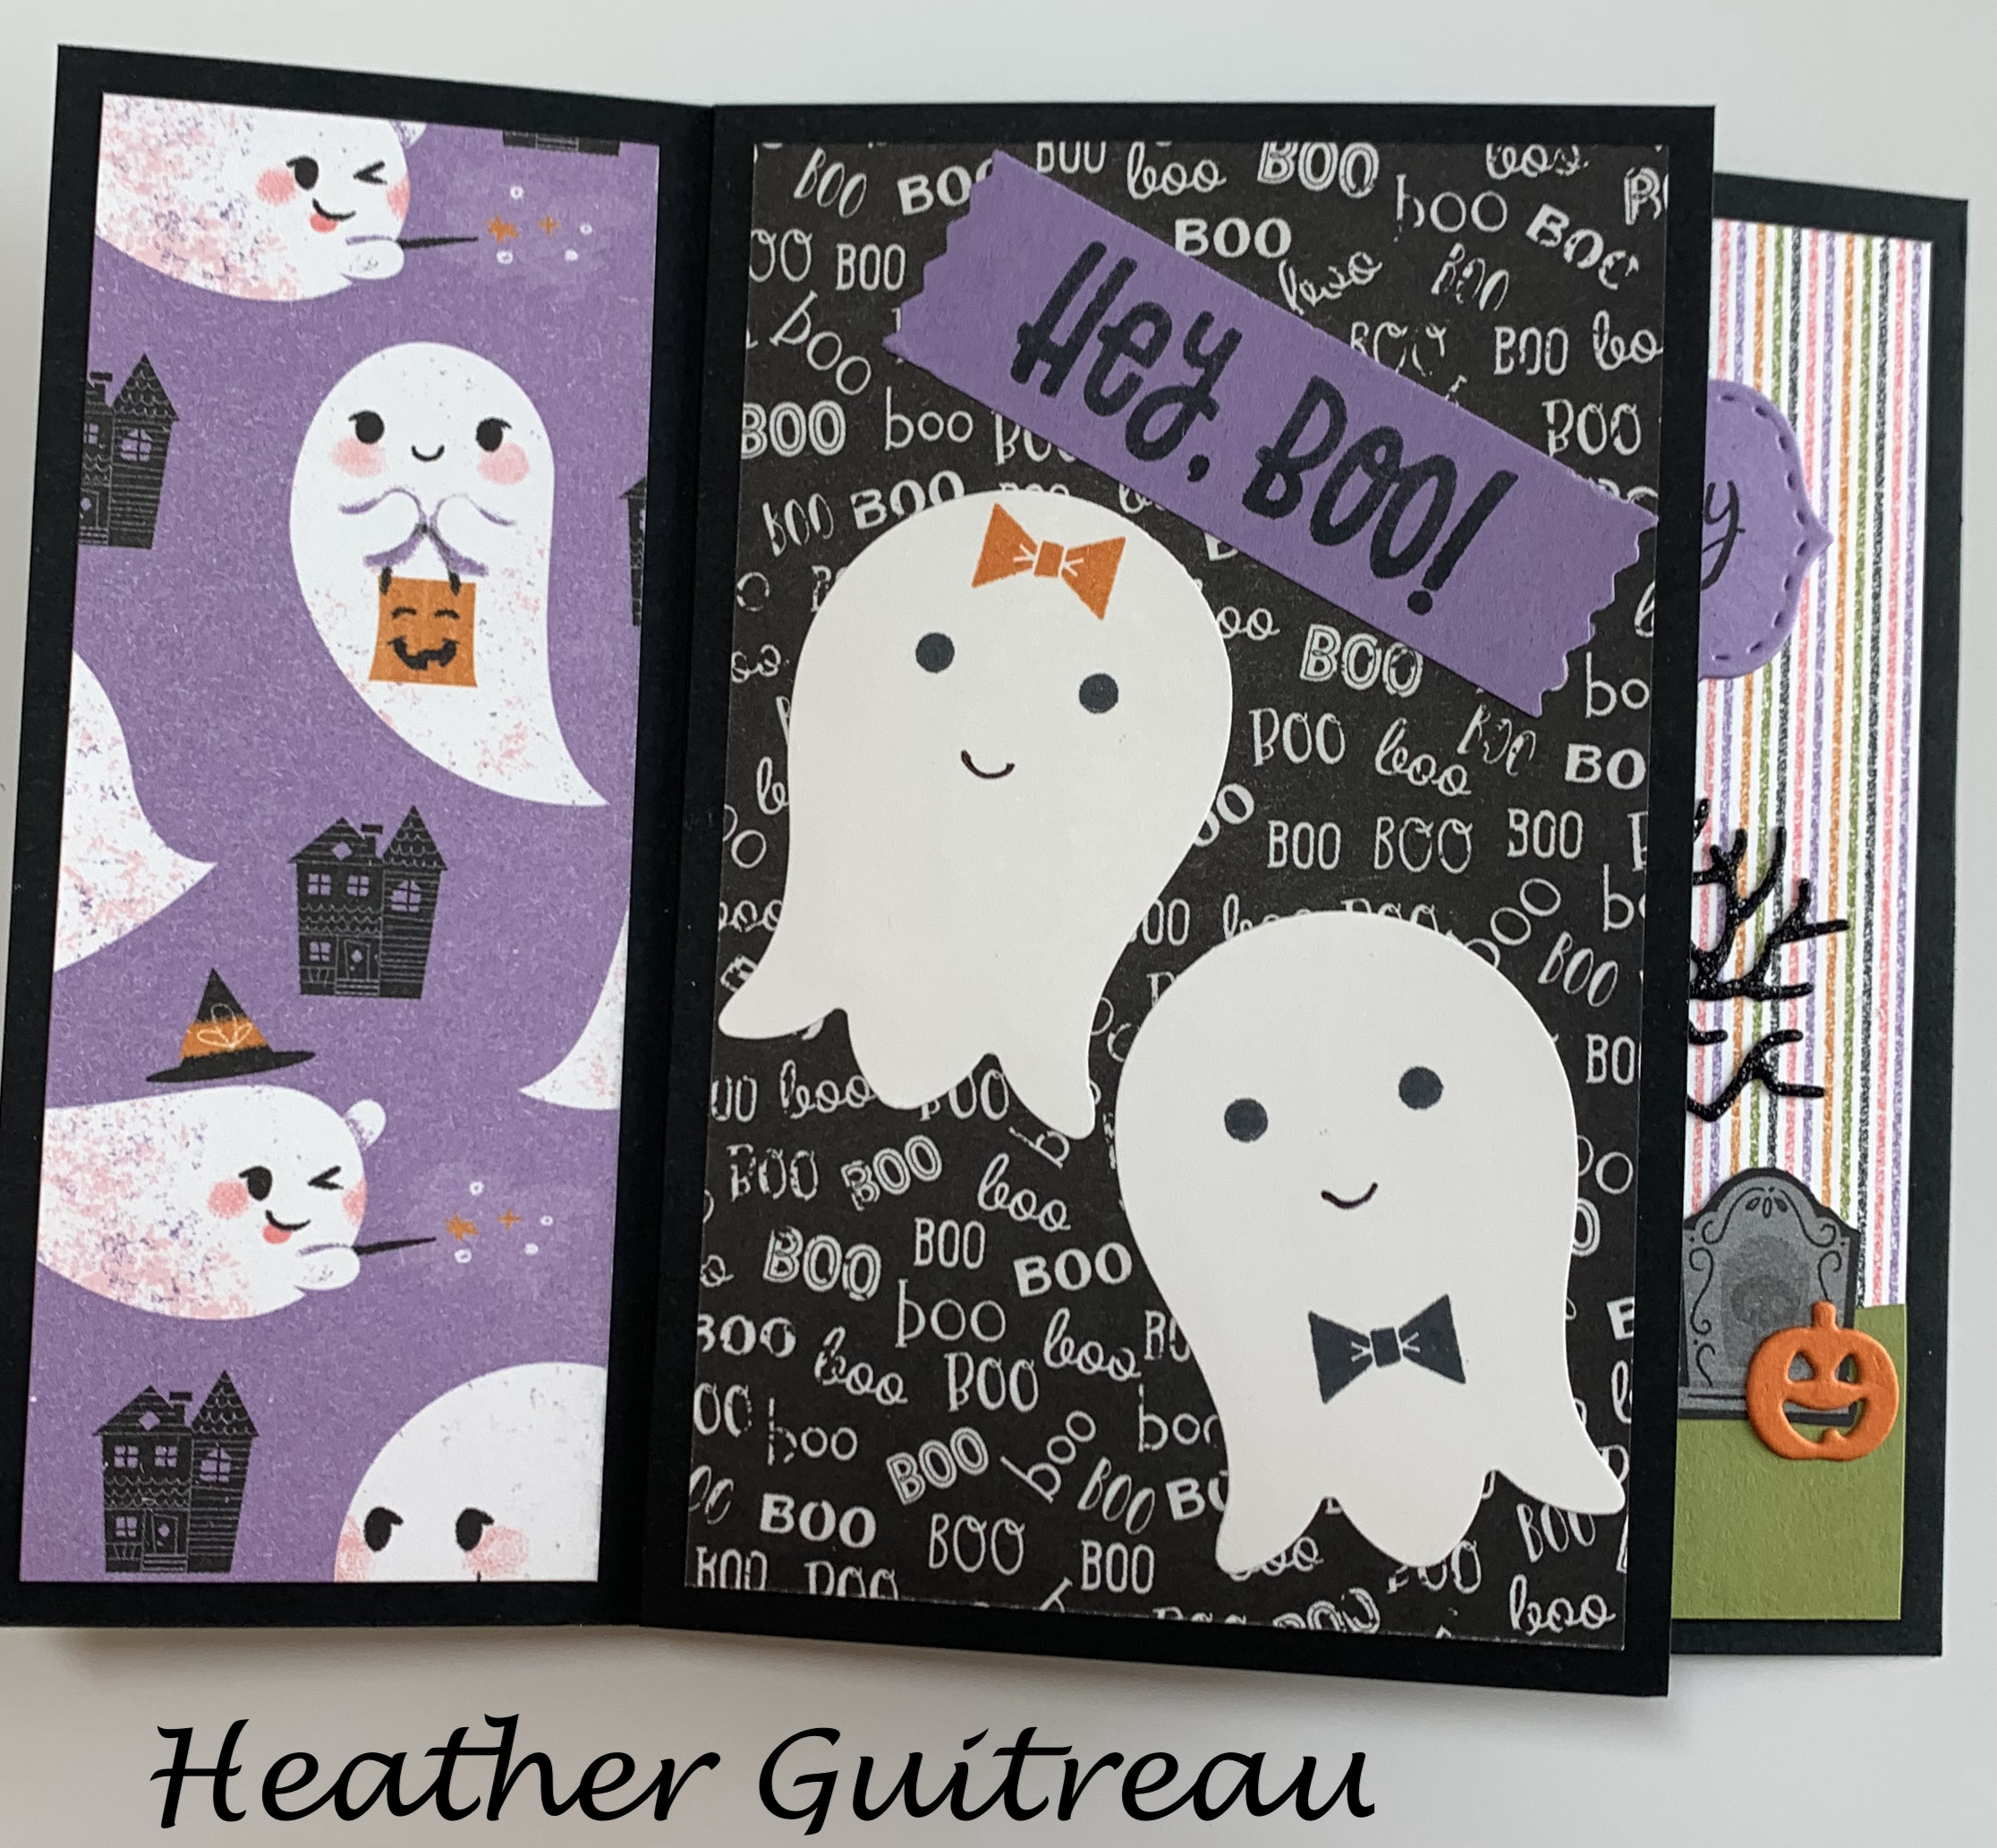 .
. 
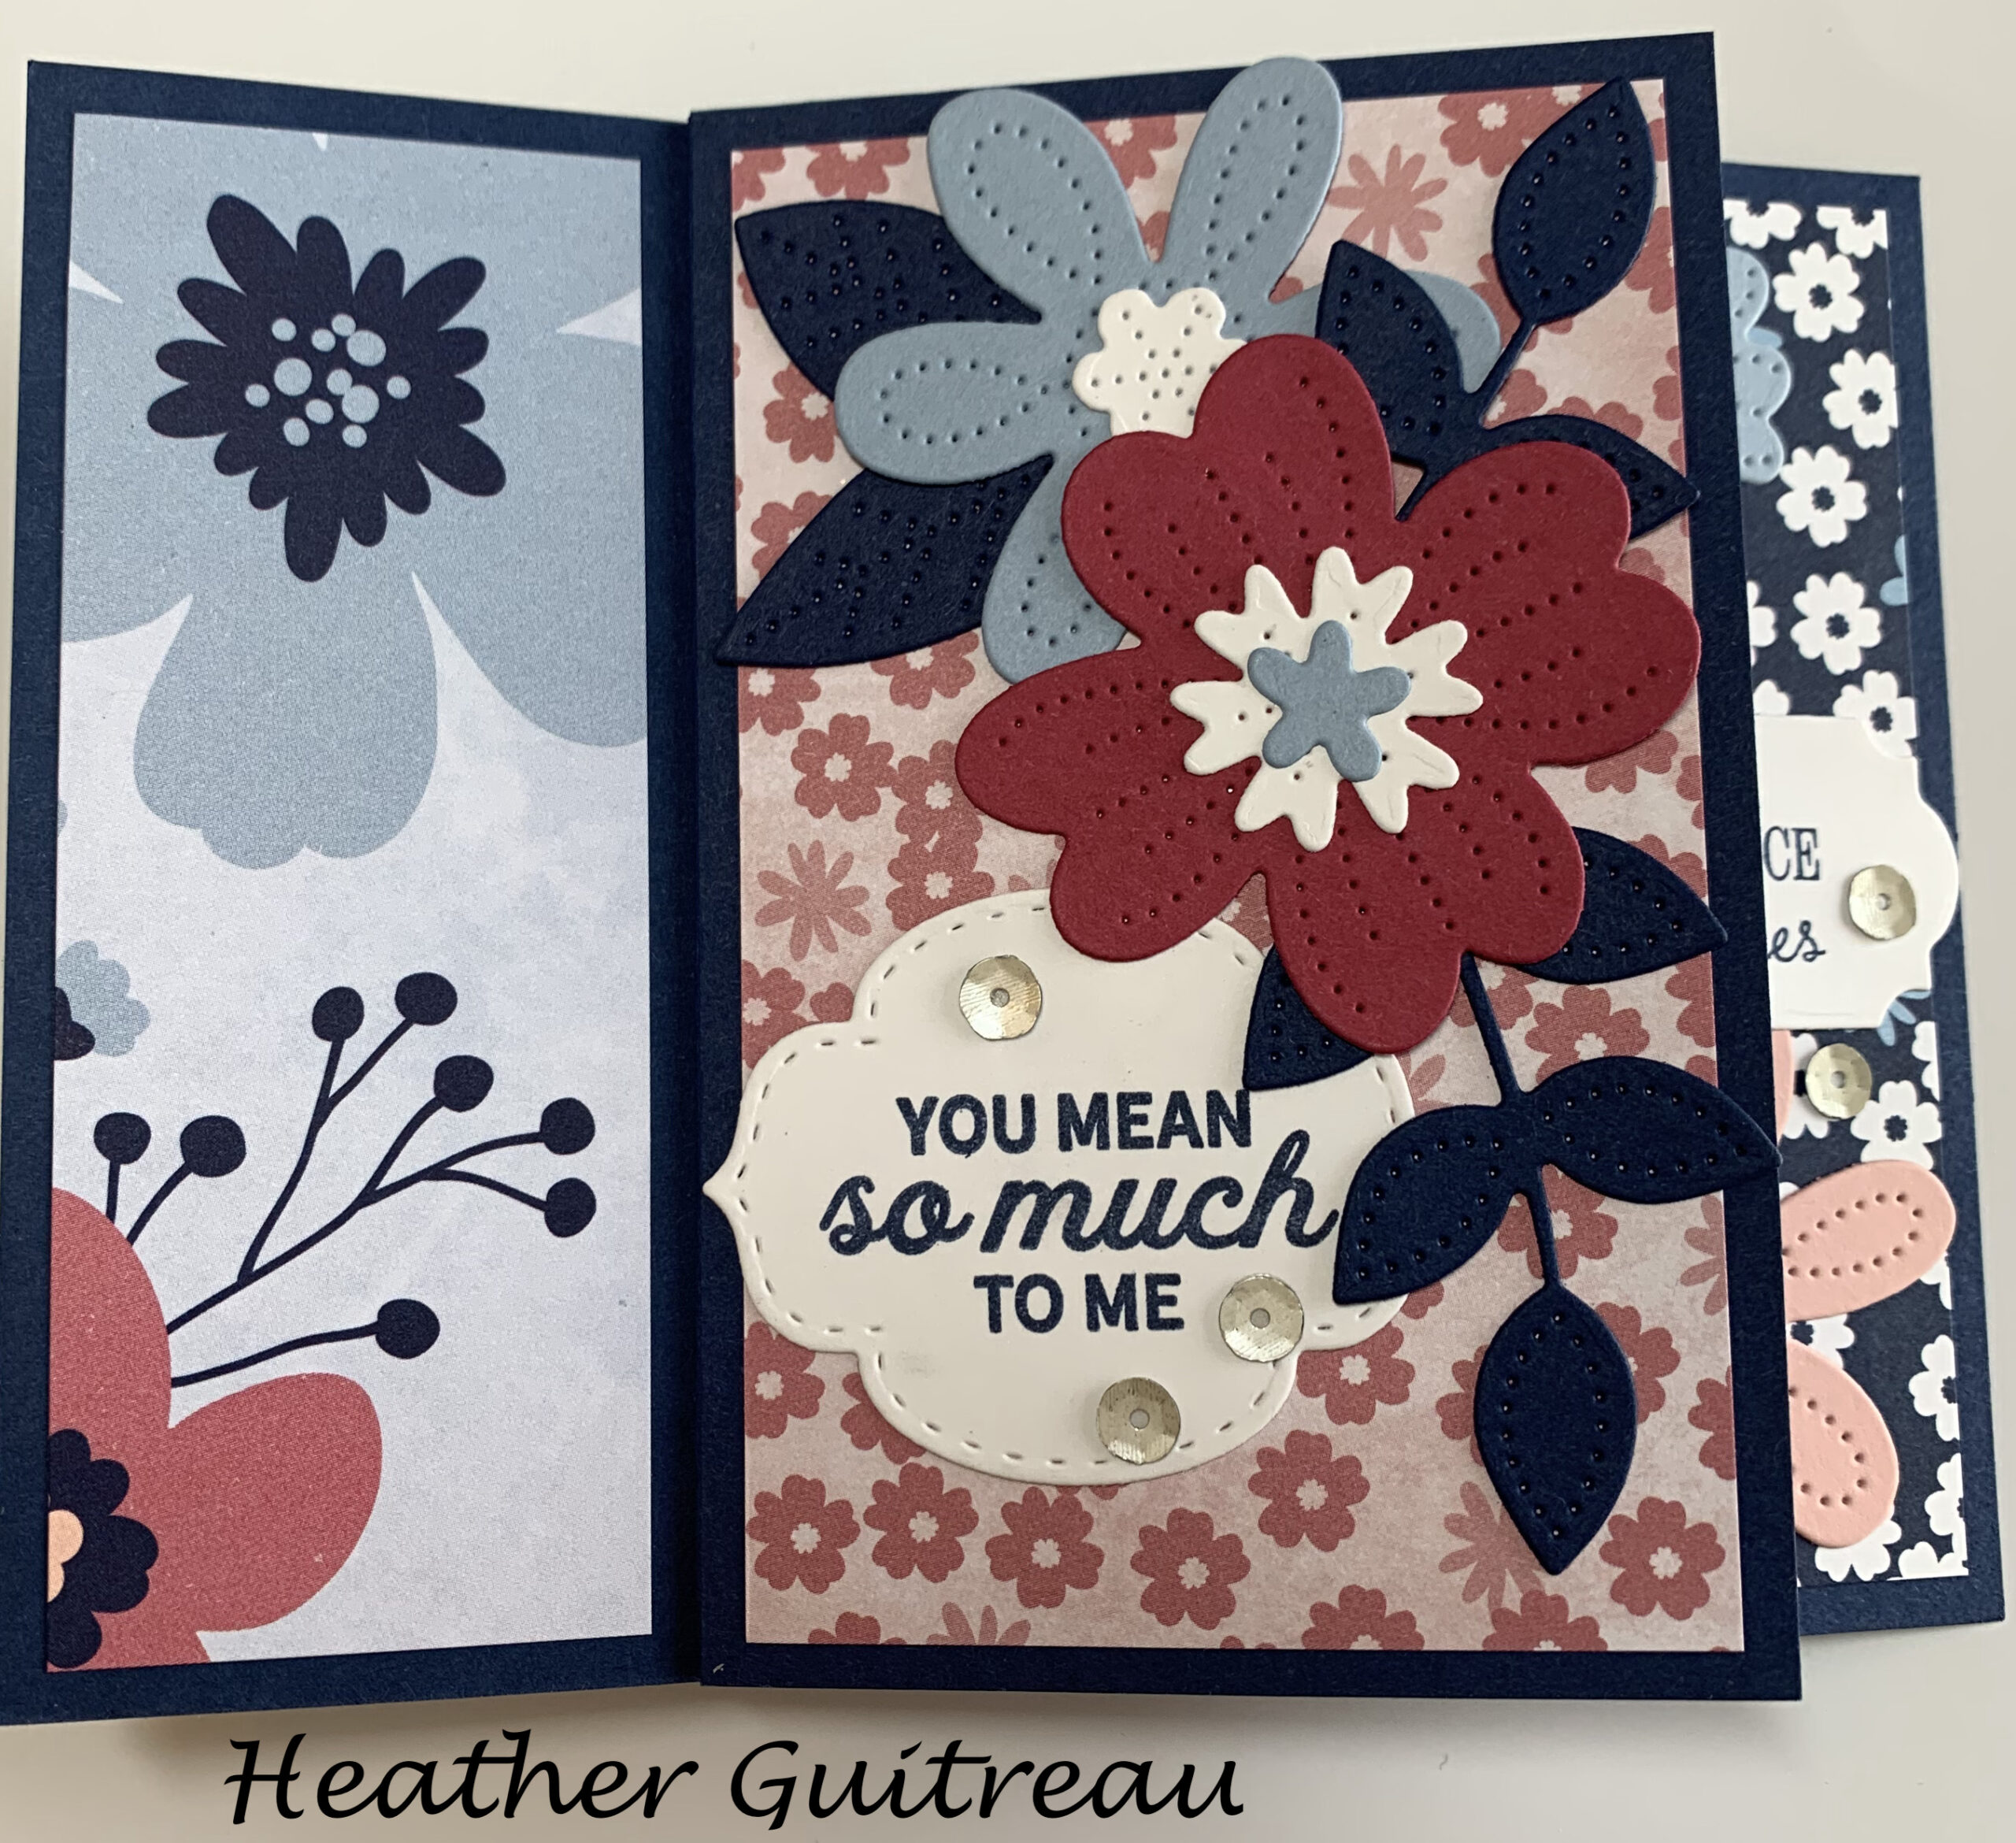
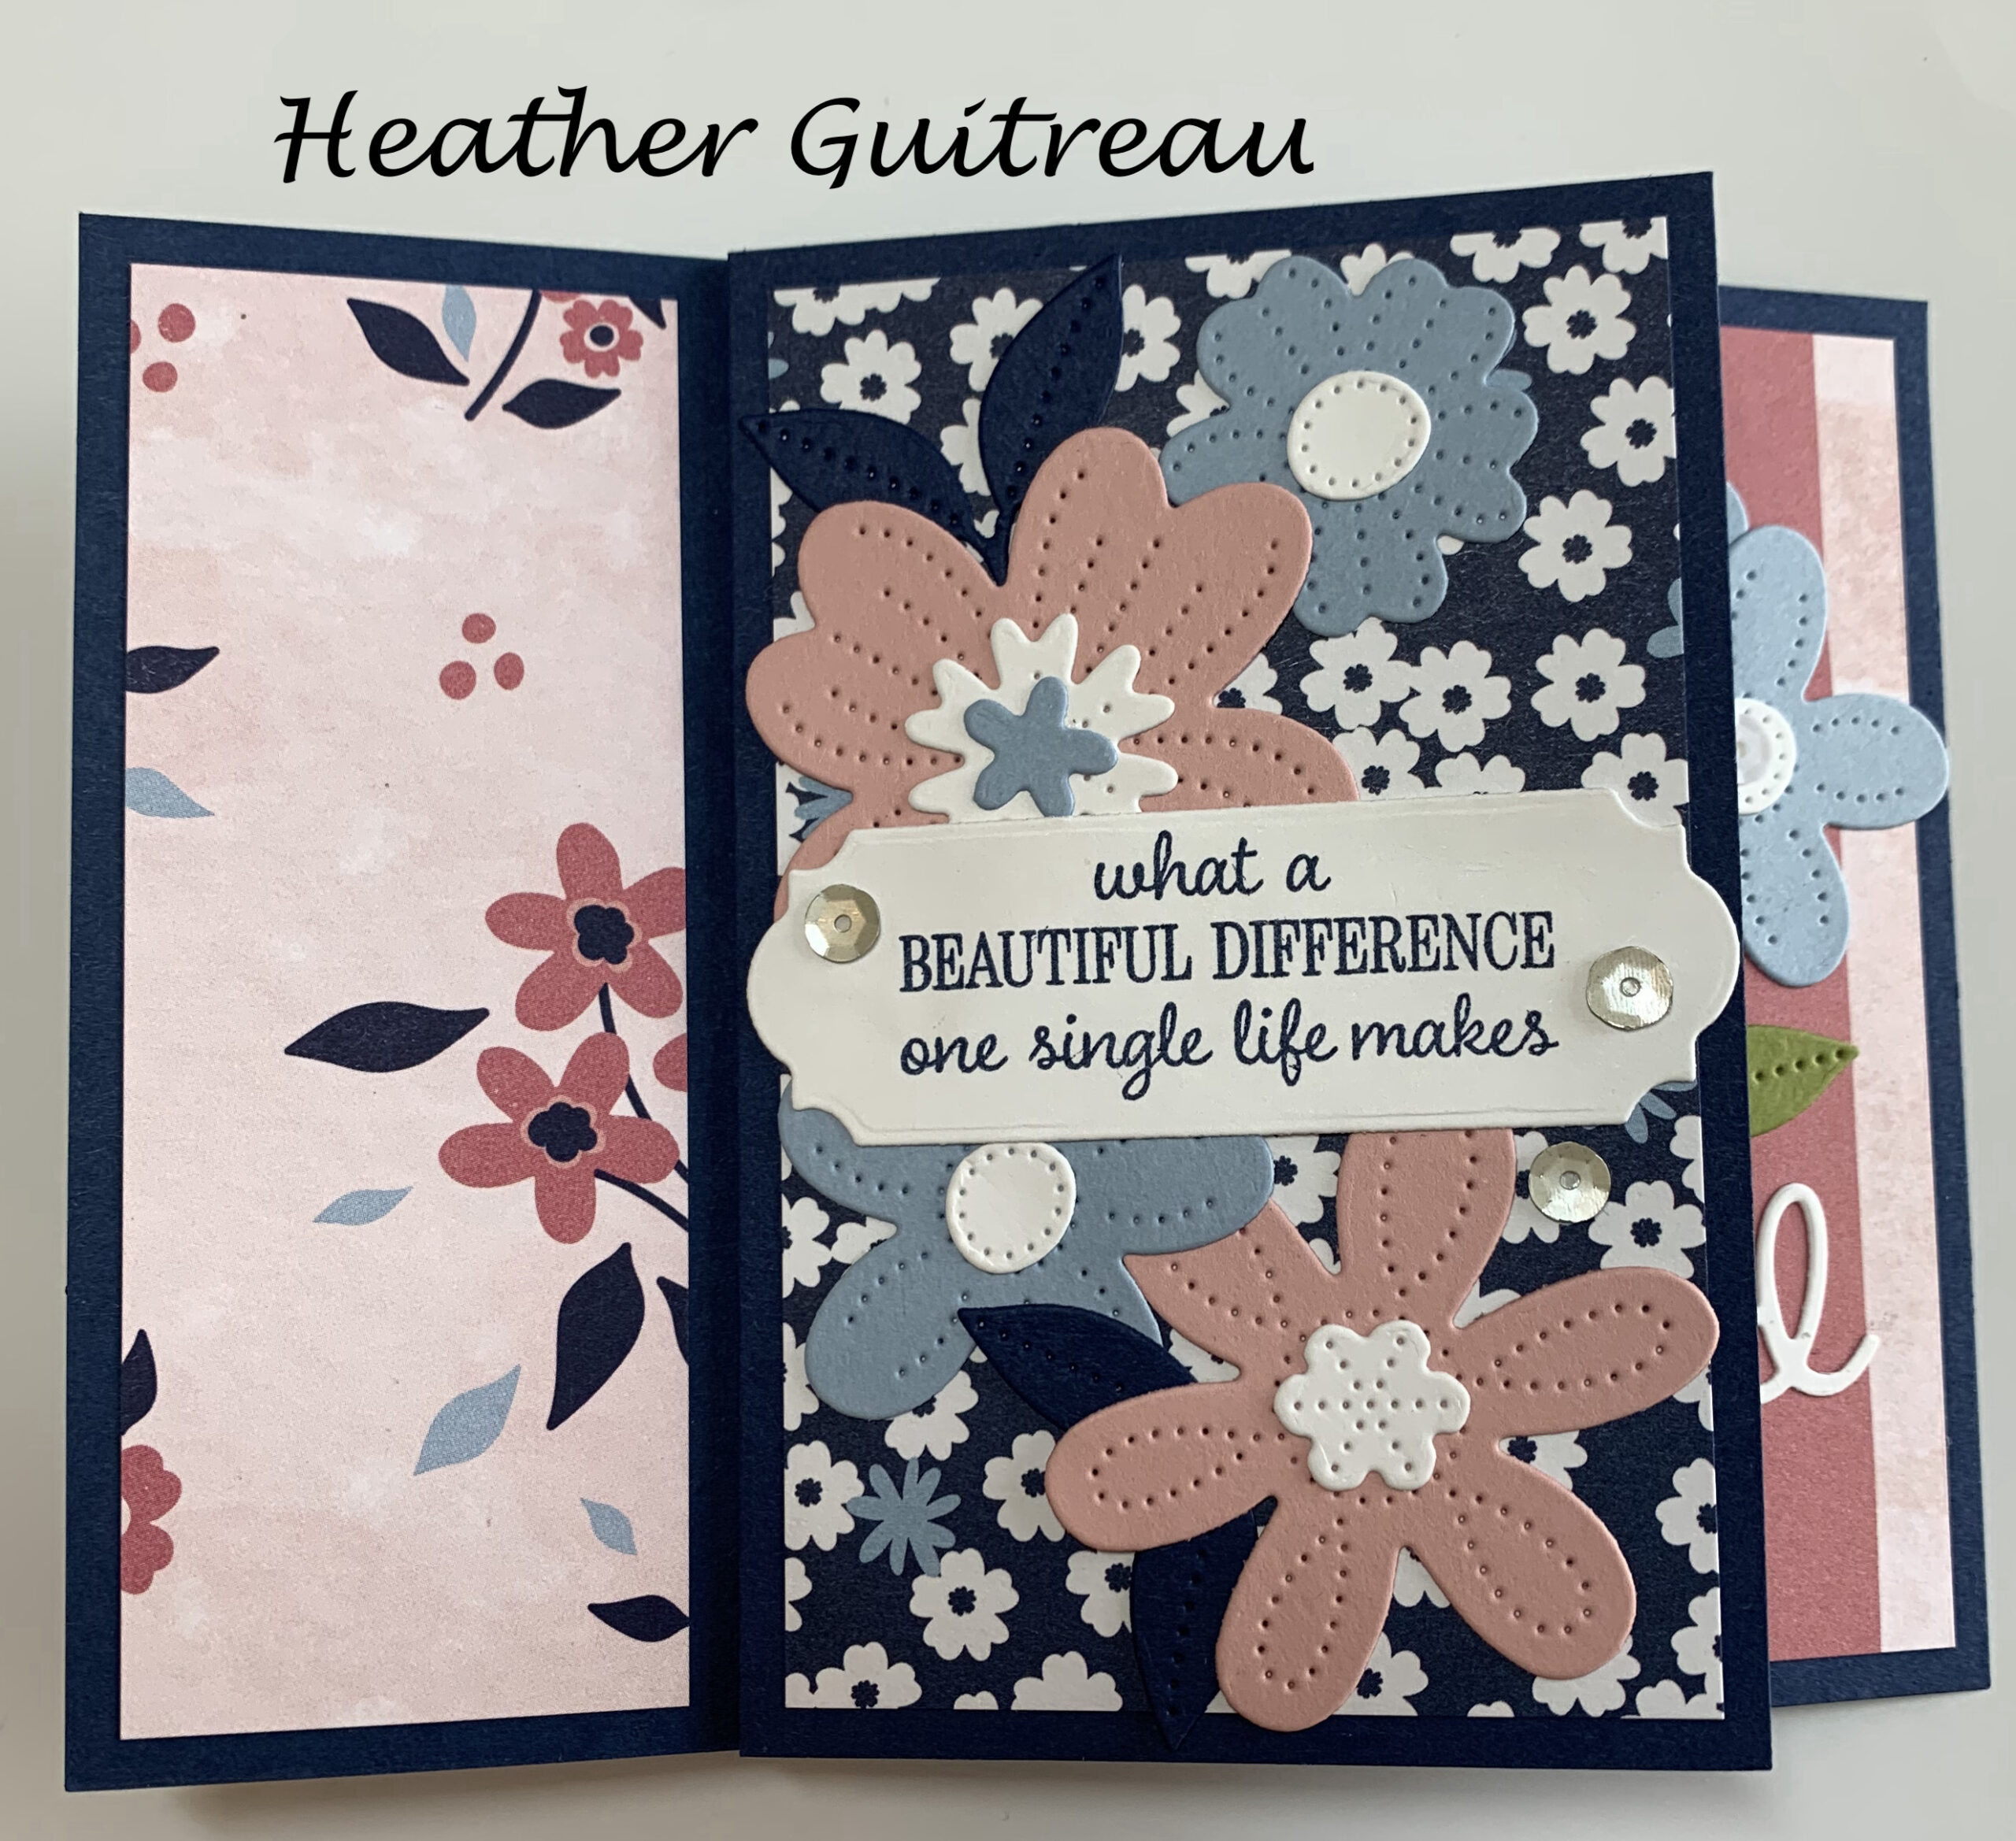
Heather Guitreau- for her Mother
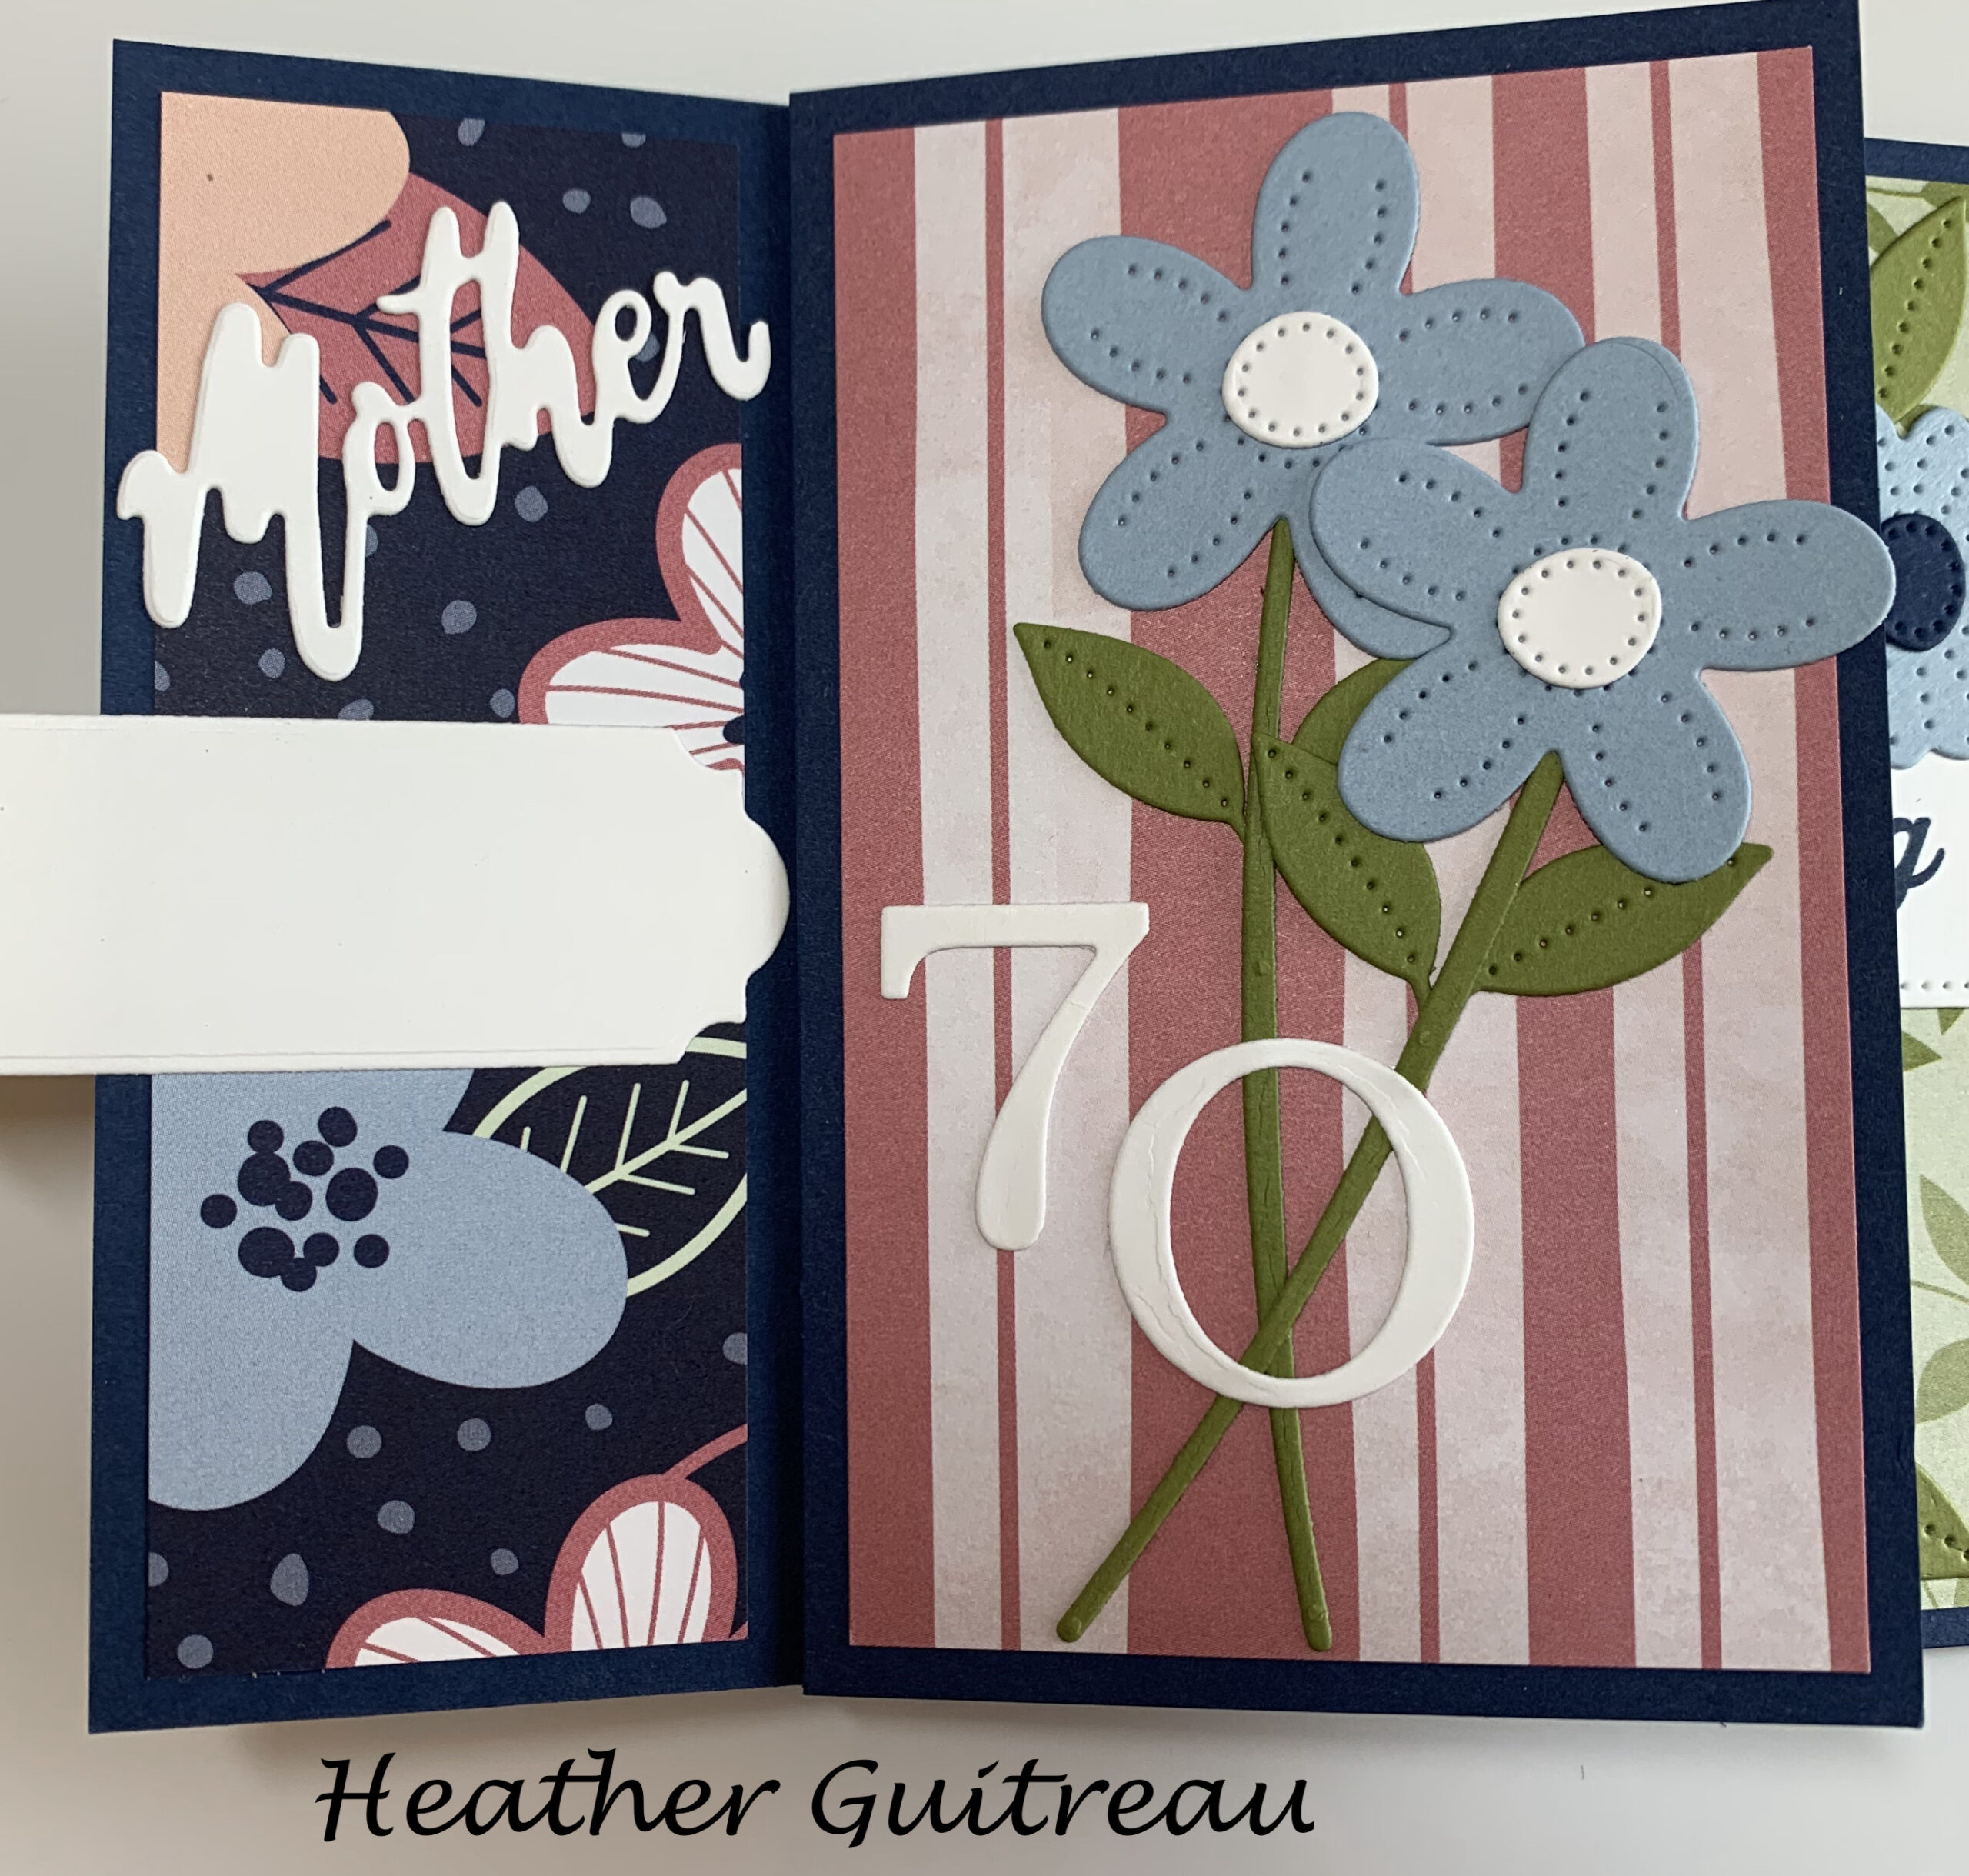 .
.  .
.
 .
.  .
.
 .
.  .
.
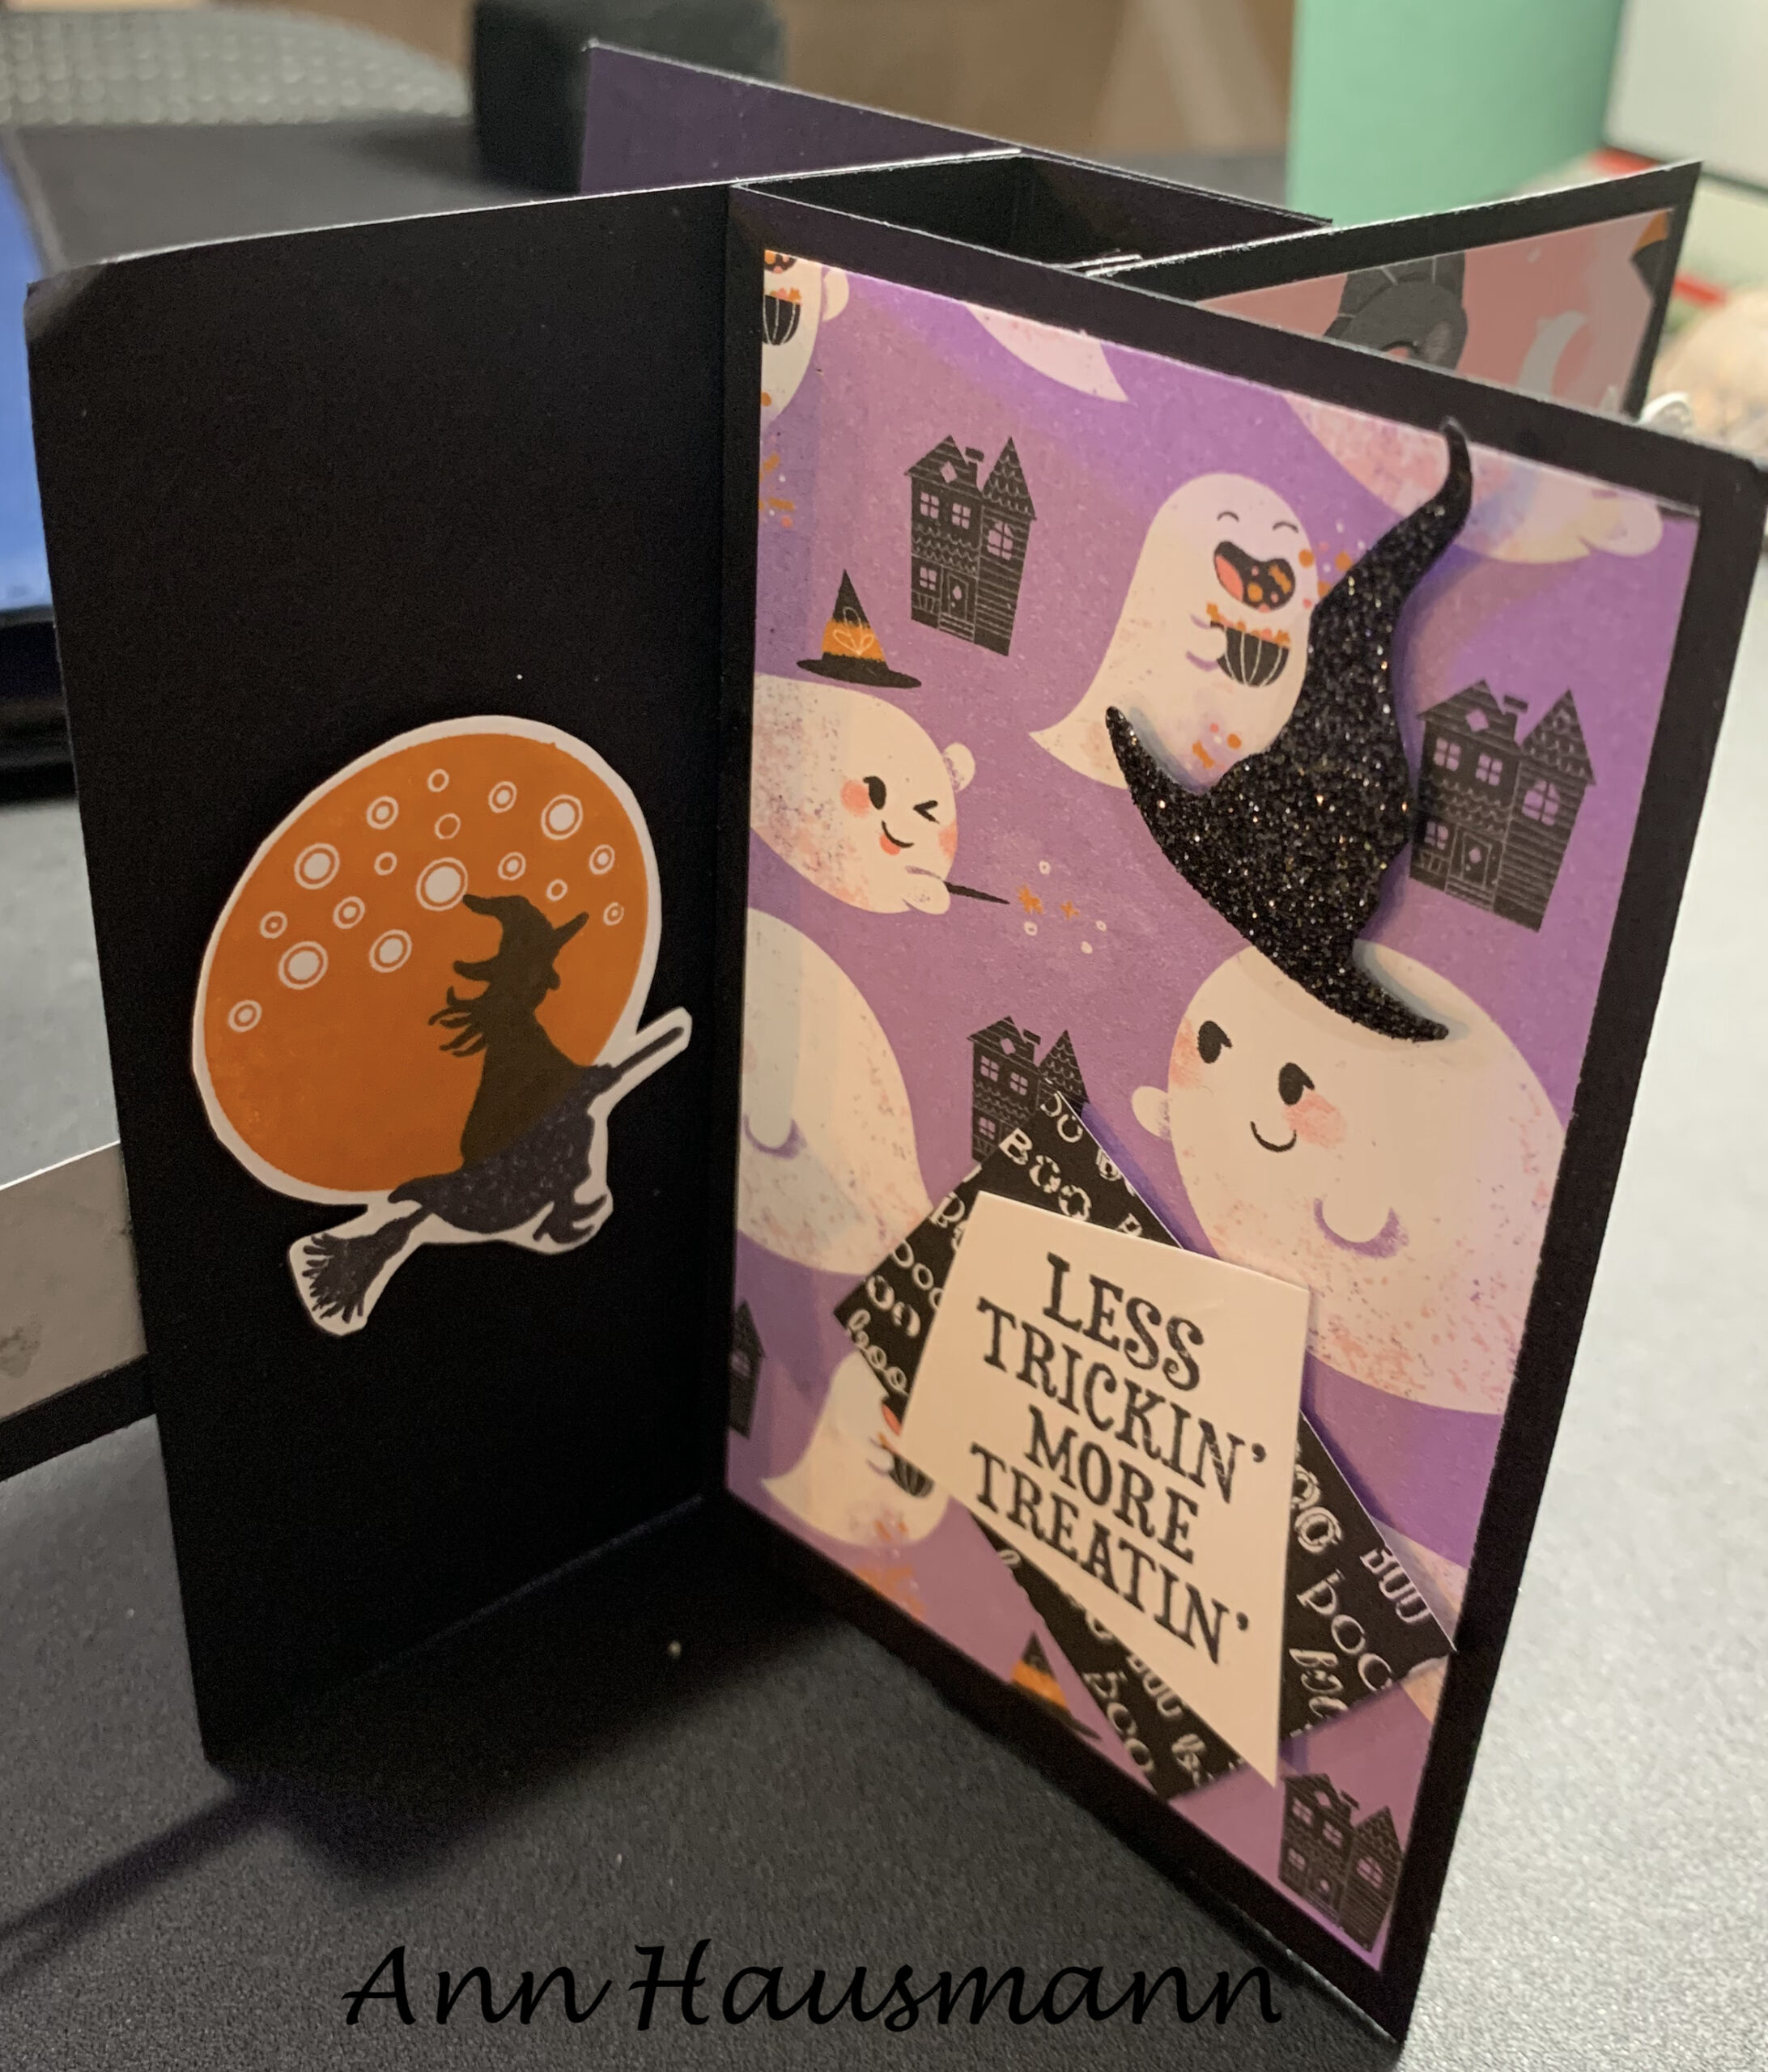
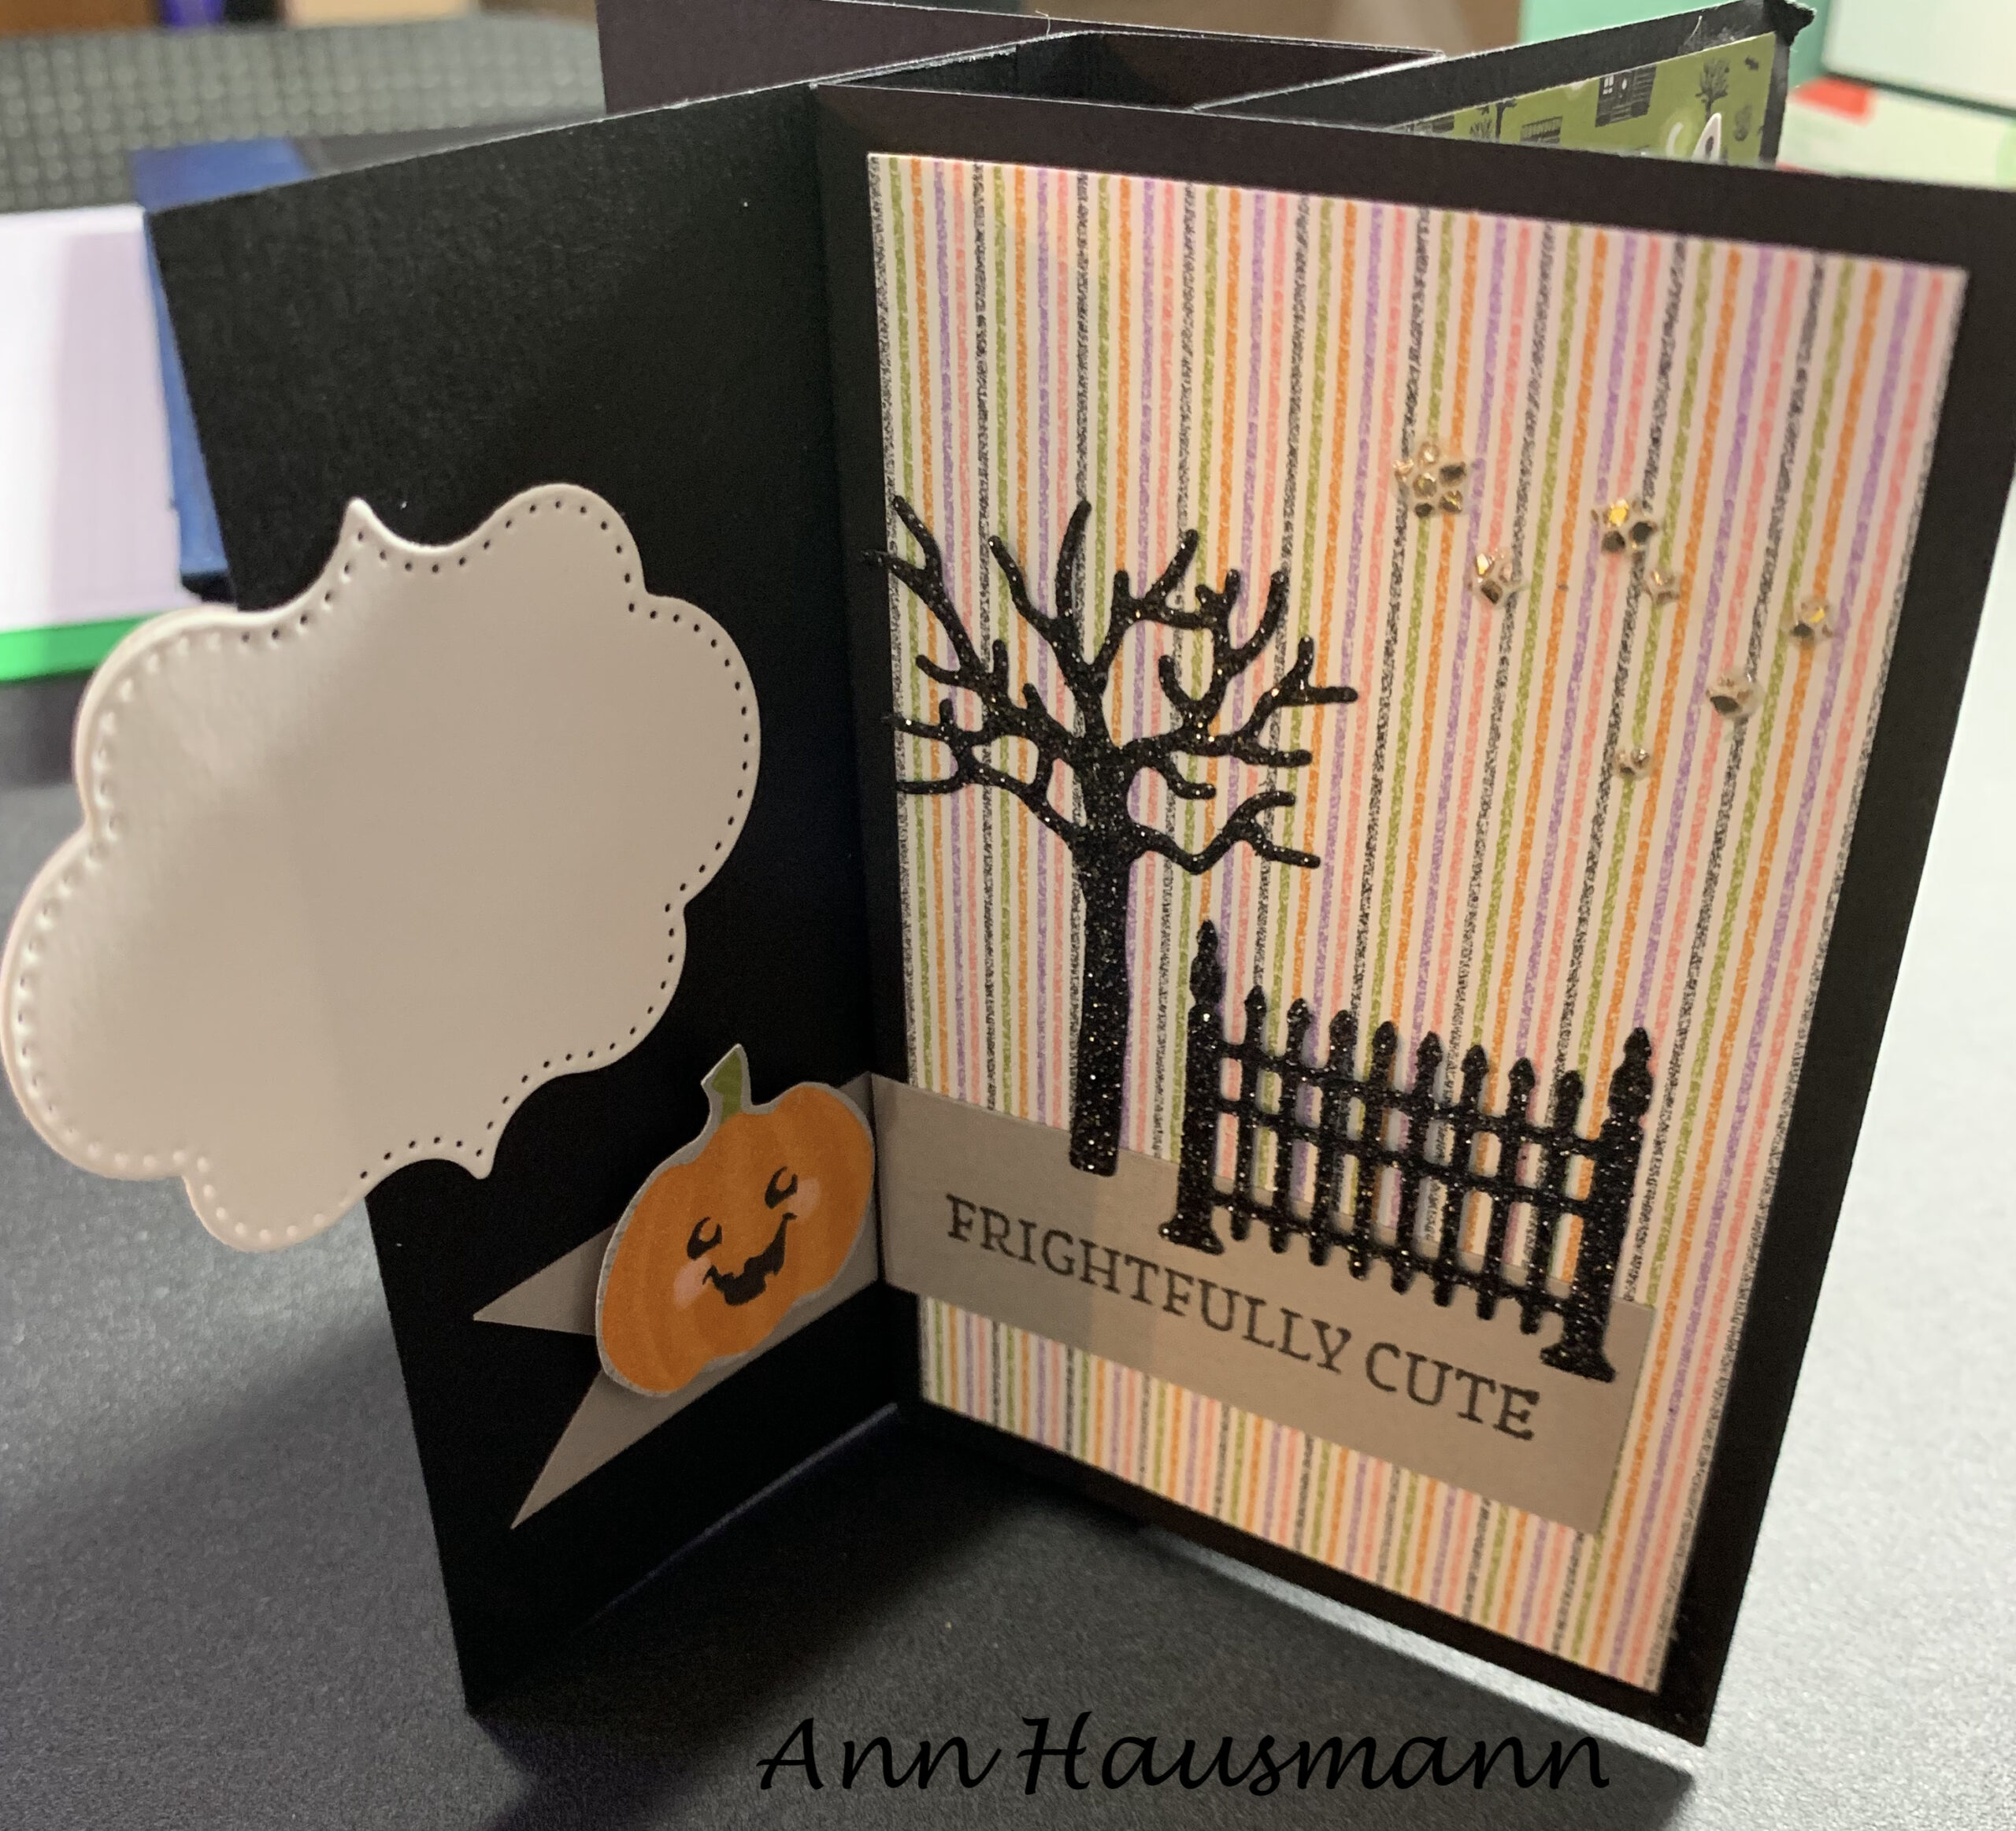
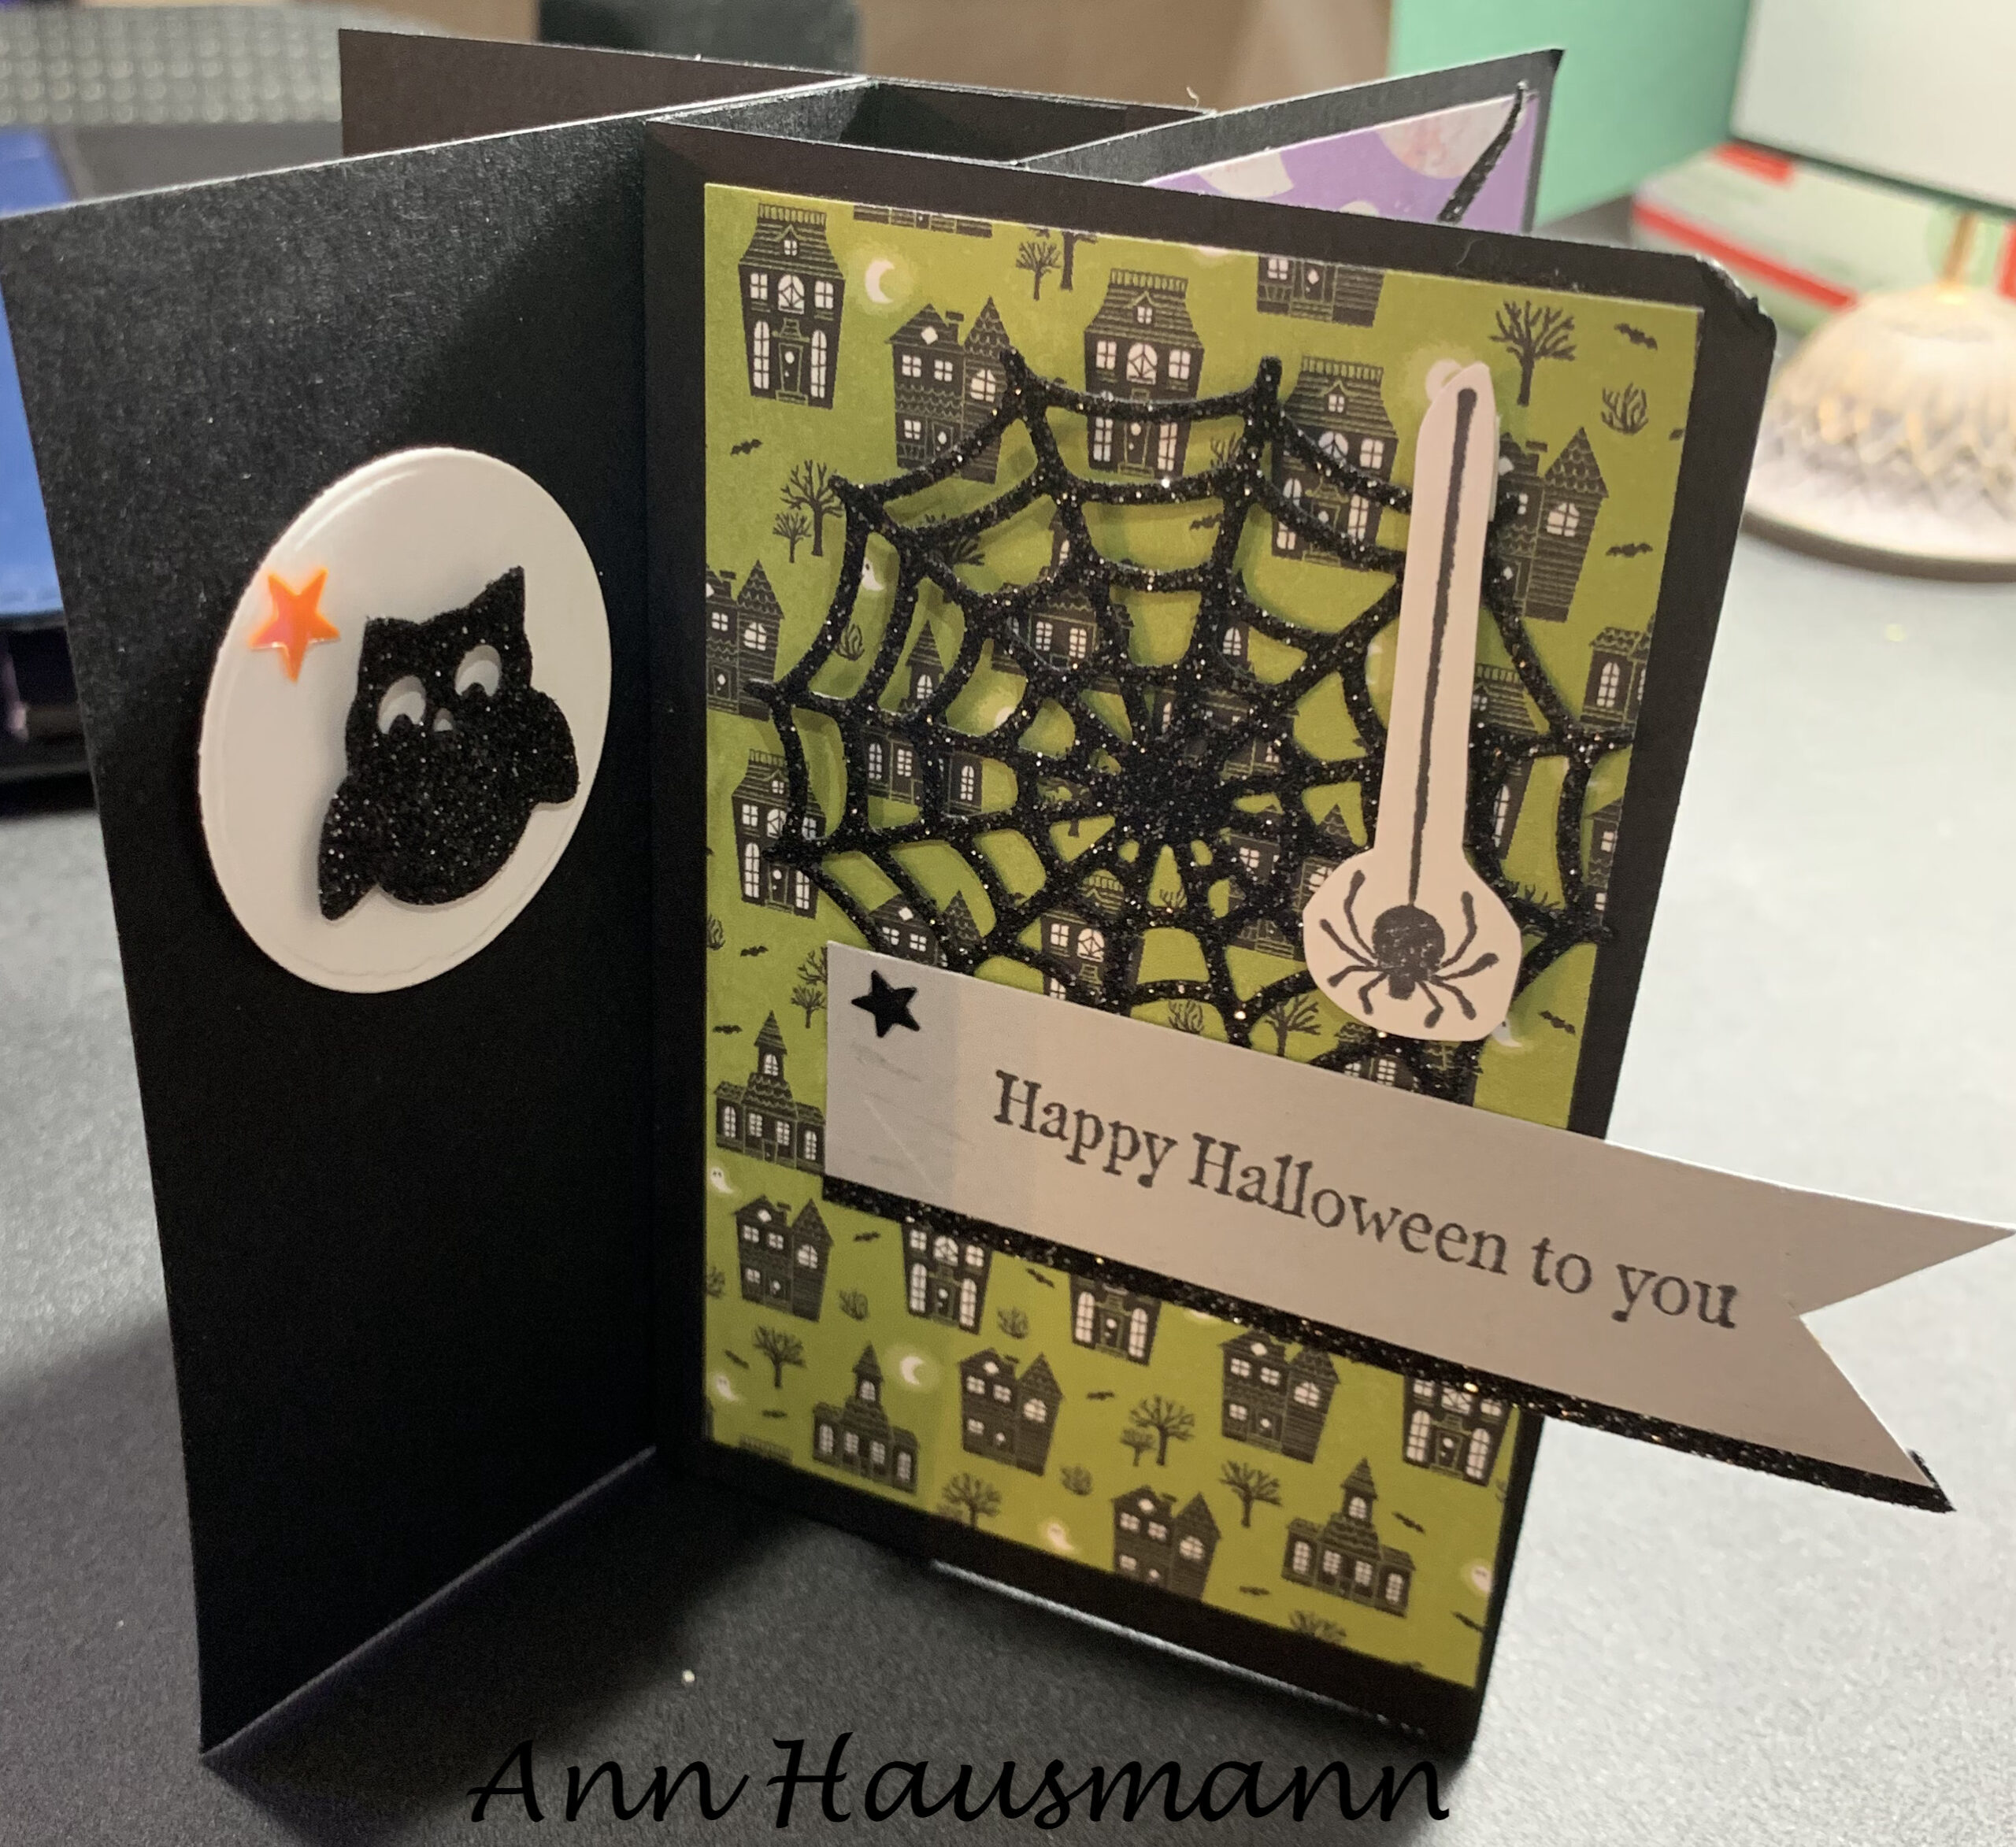
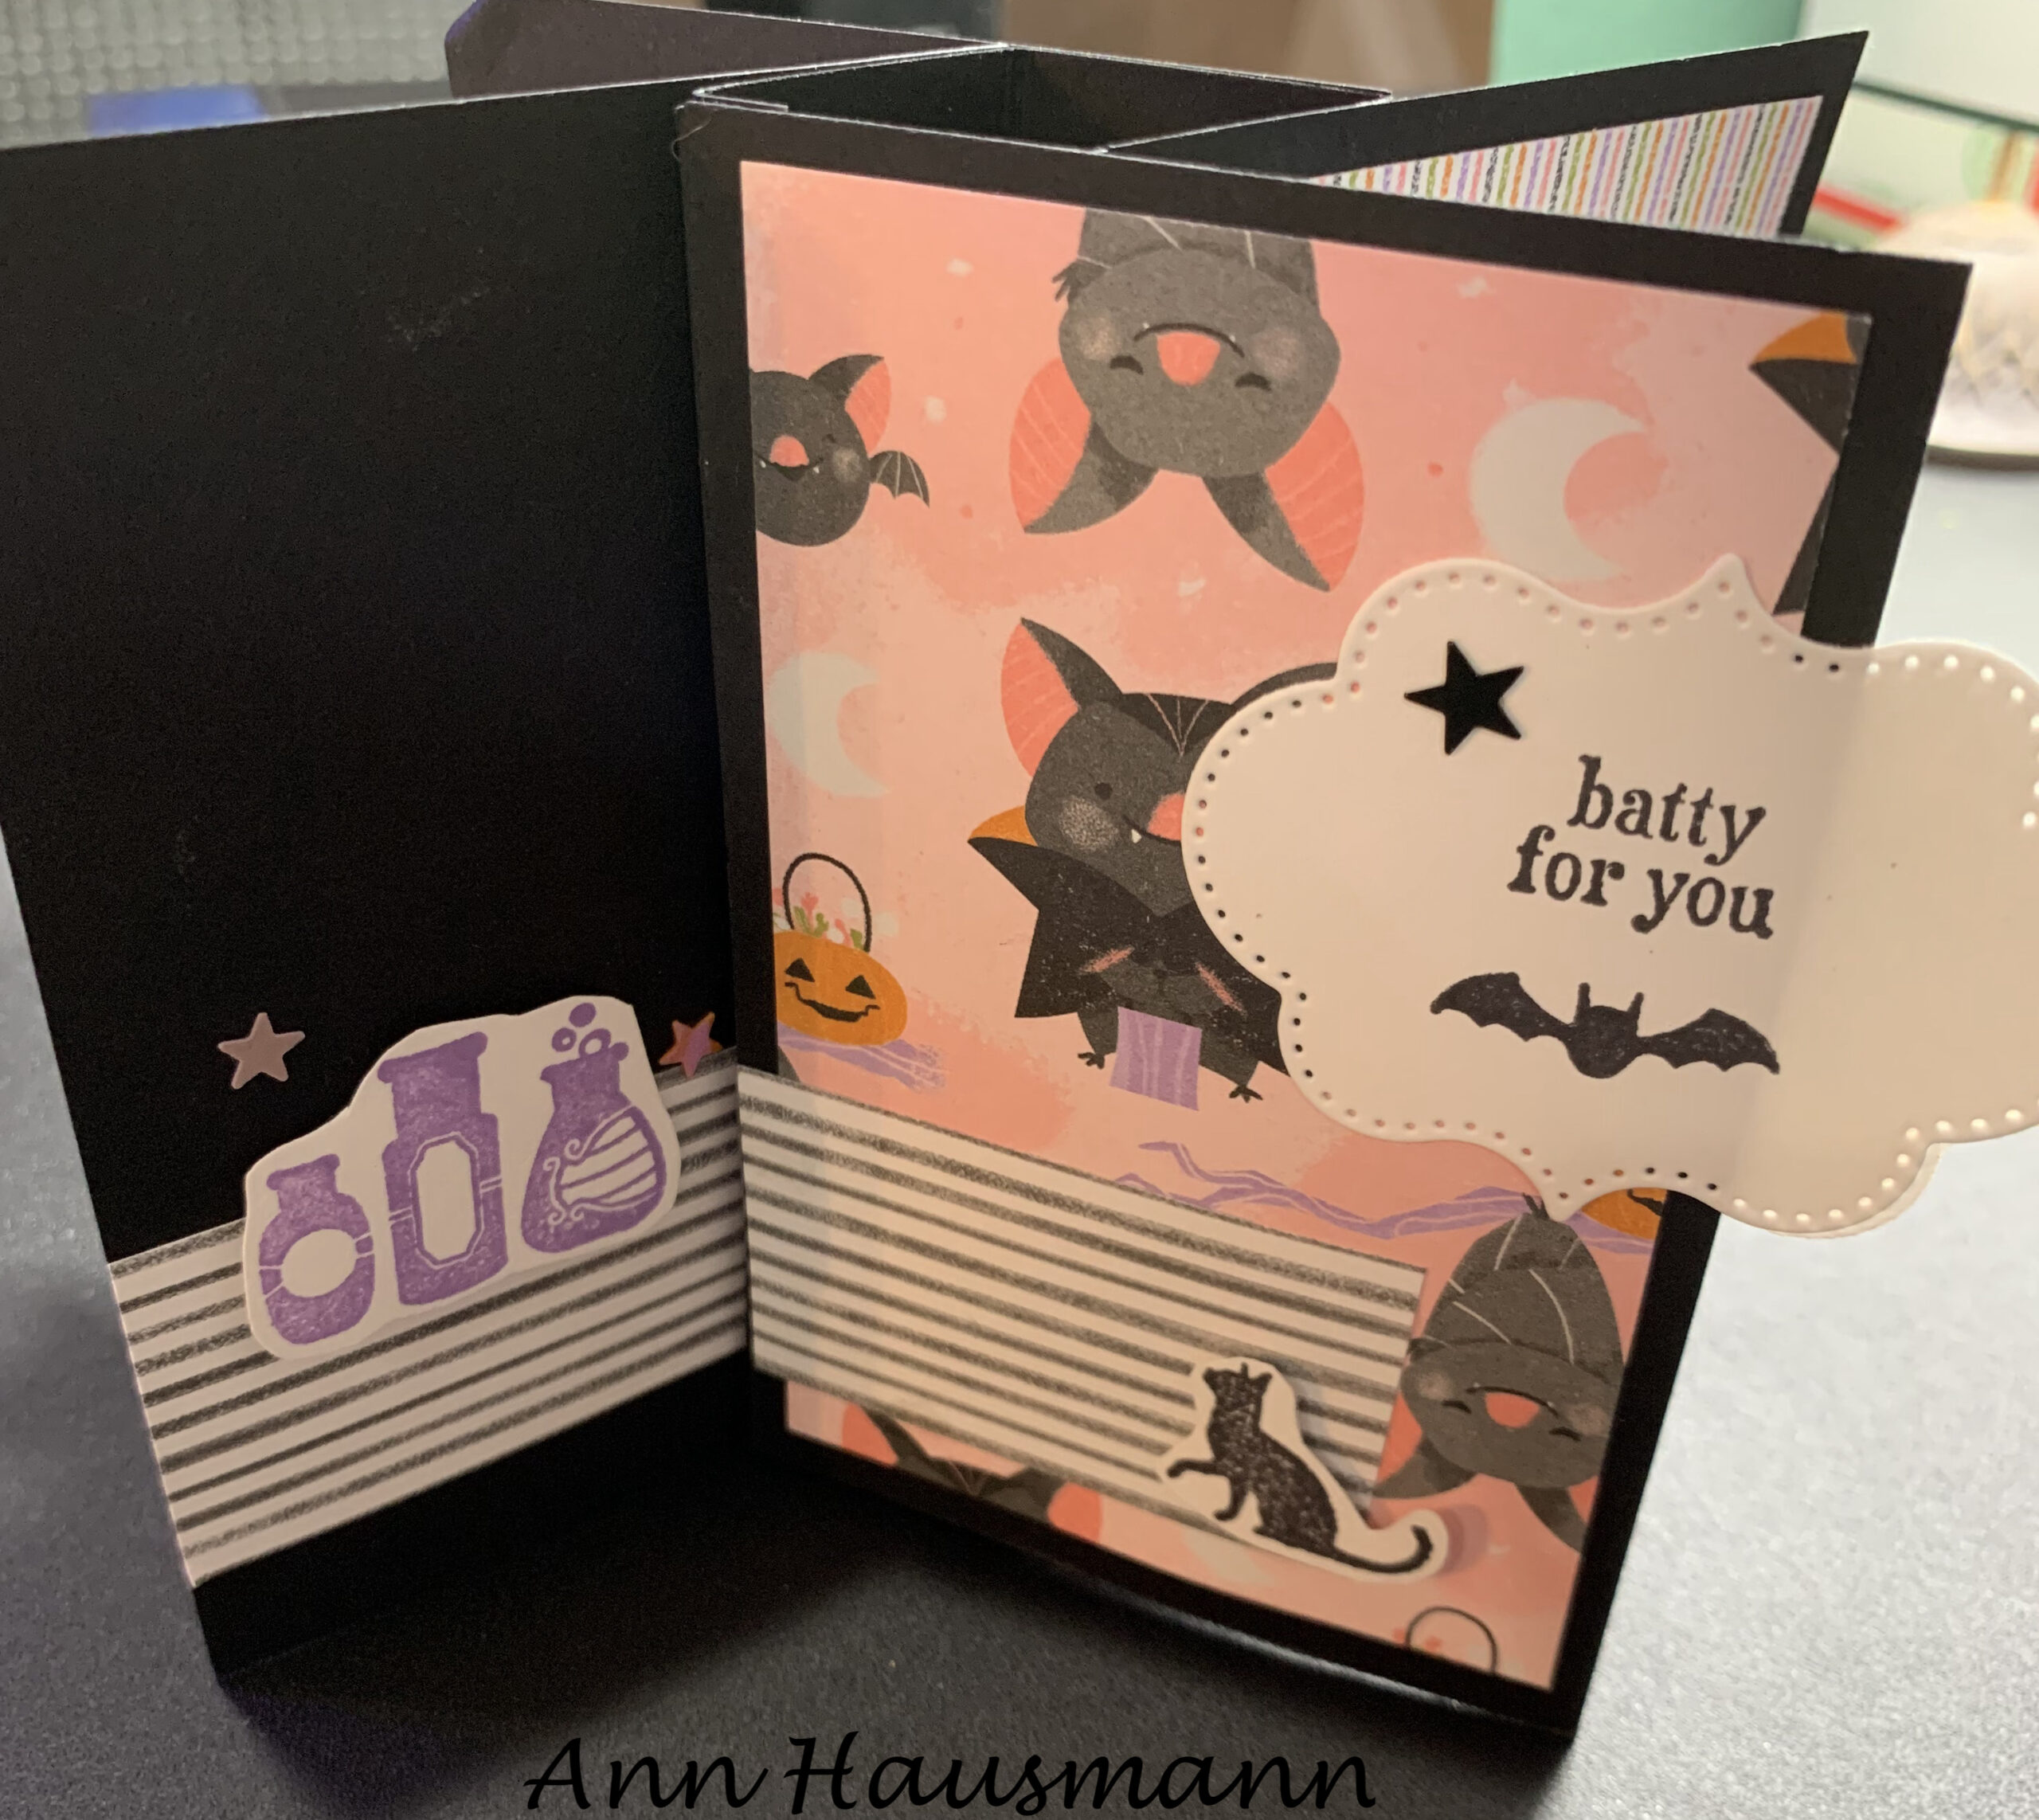
Ann Hausmann made a Halloween card as well! I must say, the Black Glitter Paper just makes the card awesome as does the Designer Series Paper with bats and cute little ghosts. Of course without the dies to cut the glimmer paper into owls and spider webs, and a witch hat and a tree and a fence, well — yes, my pretty, we must have dies! (she says in a witch’s voice!)
Did those wonderful cards inspire you to make your own Pinwheel Tower Card? When it is a very special occasion, it is worth taking time for a very special card!
SAL, Smile A Little as you stamp your way to Christmas- only 87 days away
Karen. (Click on little Sal in the computer to go to the online store)

August Swaps and Mystery Card #15
Hello Stamping Friends,
Hostess code: WKQ6CJ7R with Cindy as our hostess this month.
I just had the most incredible weekend with the Backstage At Home Stampin’ Up! virtual leader’s event. The speakers were tremendous and the chance to network with demonstrators all over the world was delightful! Next year the event will be in person in New Orleans! Join my team of Carin’ Crafters and/or let me help you promote so you, too, can attend these events!
Would you like to attend a virtual Stampin’ Up! conference for any level of demonstrator November 11-13? Join my team, if you haven’t, and we’ll meet here and have fun together; for you out of town folks, we will set up a Zoom with you so you feel a part of the PARTY! Don’t have an upline nearby? Come and join the fun, we are all a family of stampers no matter what! So hop on over to your website tomorrow, August 31, and sign up for the November event, then block it out on your calendar so you don’t make appointments on those days. Click on the “Events” tab in your demonstrator website and find out all about it!
Wow! You really have a lot of enthusiasm today!
I do, Sal! And I can’t wait to hear all the other speakers when the videos are posted. We had to choose just one speaker for each session. It was hard to choose since the topics all sounded interesting.
Now– let’s go on to today’s agenda of posting the Mystery card and the swaps from August. We meet on the second Tuesday of the month for club, or for some event I conjure up, and then we meet by Zoom on the fourth Tuesday of the month for a Mystery Card challenge and to share our swaps. September 14 we are having casual crafting at my house to make a Pinwheel Tower Card at 9:30. Prepare your own kit and we will work together to make the cards. The tower card is the new rage on social media and I think every video I have watched uses different measurements. Choose one of the videos you like and make a kit to bring on the 14th at 9:30. I will put on the coffee!

Mystery Card Challenge #15 printable file
Step 1: Adhere the large DSP (Designer Series Paper) section to the front of the card base.
Step 2: Adhere the 1″ scored section of the card base strip at the middle of the inside of the card base 1/8″ over from right
Step 3: Turn the strip of DSP over to its other side and adhere to the neutral 4” X 5 ¼” piece on the right side
Step 4: Adhere the neutral and its DSP on top of the strip glued on in step 2
Step 5: Add a greeting or an image on the strip that folds over the front and decorate
I used the ‘Gingerbread & Peppermint’ DSP from the Mini Catalog and fussy cut out the ornaments and peppermints. If I had purchased the bundle or the entire suite I would have had dies to cut out both. There are five 5! sizes of circles in this die set so imagine the possibilities! Do you know where that tag comes from? It is in the new ‘Pretty Pillow Box Dies’. The greetings are in the ‘Snowman Season Stamp Set’, a carryover in the Annual Catalog.


It isn’t even September and you have a Christmas card made! I am impressed!
It is a record, Sal! Maybe next year I will do a ‘Christmas in July’ like so many others like to do.
Sharon Fincham used the ‘Turtle Friends’ stamp set on retired Whale of A Time DSP. She hooked her flap under the ‘Story Label Punch’ to keep the card shut. Great idea, Sharon.

Heather Guitreau used the ‘In The Wild’ DSP and ‘Big Cats’ dies. She made a great closing flap and used a greeting from the ‘Wild Cats’ stamp set:

She made a second card thinking she needed to follow directions but we all know that the best creativity often happens outside the box!

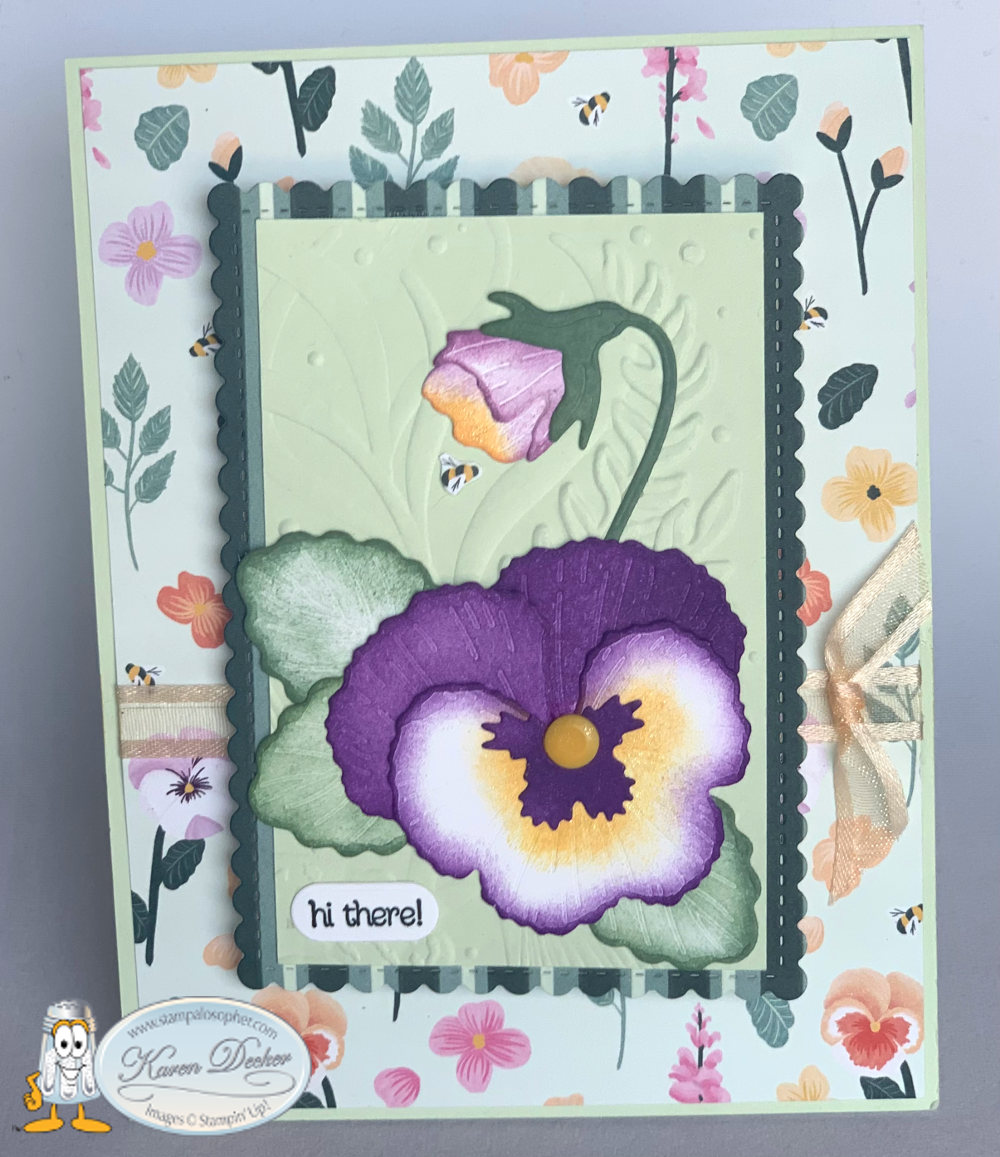
Joy Meadow’s card uses the ‘Pansy Petals’ DSP with the greeting from the ‘Pansy Patch’ stamp set on a ‘Story Label’ punch.
 .
. Ann Hausmann used the ‘Beautifully Penned’ DSP that is free with a $50 purchase during this round of Sale A Bration which goes through September 30. I love the pop of color on the black and white.

Jo Brooks’ card made me wish I had purchased the Playful Pets DSP from the last catalog. However, we have pets DSP in our new mini called ‘Sweet Stockings’ and it is now on my wish list!


 .
.
Is that as cute as it gets?! Thank you everyone for a fun time of Mystery Stamping. I ran out of time and sent you a video instead of walking you through each step but I will get back to normal in September!
You even have the Mystery card picked out I hear!
Shhhh, Sal, or I will start talking about it and give everything mysterious away!
August 2021 Swaps
Jo Brooks used the ‘Stitched Triangle’ dies and for the bouquet of flowers, the stamps in ‘Welcoming Window’. It is the great two step stamping that we love with a stamp for the greenery and another stamp for the flowers. Adding the lace was genius!
 .
. Sharon Fincham used the ‘Turtle Friends’ and ‘Scalloped Contours’ die for this delightful card:
 .
.
 .
. Joy Meadows used the ‘Pattern Party’ DSP available to hostess’ and the ‘Dragonflies’ punch with lots of added sparkle on the black. Note how she used a flap on the front of the base instead of the standard base. Very cool and shows off both sides of the pretty DSP.
 .
.

Ann Hausmann found the cutest little lip gloss containers that looked like popsicles at Target and made a fun popsicle card with Very Vanilla and Pool Party. The popsicle images are in the ‘Sweet Ice Cream’ stamp set, retired from the last mini, but Ann hand drew all the faces to match the lip gloss container. You are the cool one, Ann!!

Lori had fun with the ‘Nothing’s Better Than’ stamp set which carried over to the Annual Catalog. She formatted the front words on her computer, printed them on card stock then added the words and images which she cut with her Brother Scan and Cut. The coloring is awesome as she matched the coloring on the words to the colored images. So Creative!

 .
.
My swap card was a clean and simple card. I wanted to show the swappers the beautiful ‘In Color Shimmer Vellum’ (the pink layer on the card) and the ‘Expressions In Ink’ DSP with its gold foil on the pink that looks like the alcohol ink on vellum technique we just learned. I used the ‘Tailored Tags’ dies with a cutout of gold for the reinforcement ring. The ribbon is the In Color 3/8″ Open Weave ribbon. To get the ribbon to lay on the tag the way I wanted, I used two pieces. I used glue dots to loop the bows on the right and left with nice little tails and then used a second piece and more glue dots to tie a middle around the bow. I secured the knot and the tails of this piece of ribbon on back of the tag. The good sized thanks is in the ‘Artistically Inked’ stamp set. Can you see the shimmer of the pink vellum?

Recipe for Thank You Card
- Base: Thick Basic White, 5 1/2 X 8 1/2 scored at 4 1/4
- Layer: Polished Pink Shimmer Vellum, 5 1/2 X 4 1/4
- Top: Expressions in Ink DSP, 5 1/4 X 4
- Tag: Basic White, 3 1/2 X 1 1/2, die cut with Tailor Made Tag, third from the largest plain tag
- Gold Foil, Scrap, cut with the square reinforcement ring
- Inside Border Strip: Polished Pink Shimmer Vellum, 4 1/4 X 1
- Inside Top Layer: Expressions In Ink DSP, 4 X 3/4
- Embellishment: 3 In Color gems
- Ink: Polished Pink
- Stamp Set: Artistically Inked
Did you enjoy that show? It is like having a scrapbook of cards that I hope inspires you to make your own special creation.
Remember to join Paper Pumpkin before September 10th if you want this special fall kit:
We have one more month to take advantage of Sale A Bration’s free products!

And remember to sign up for On Stage and sign up to be a part of my team if you would like to attend On Stage. (Think Prize Patrol, A goody bag, Make and Takes, The Upcoming catalog and lots of fun!) Click on the JOIN button here or at the tab on the blog.

Hostess code: WKQ6CJ7R with Cindy as our hostess this month. Cindy’s craft room is gradually getting set up there in Tehachapi, California and she made this cool card:

Since we didn’t have club in September, I set Cindy up as hostess to help her get back into stamping. She has been regularly placing outside orders that were credited to club members hostess codes so it seemed right to give her a chance at free products!
We hope to see you on Zoom some fourth Tuesday of a month, Cindy!
Her Hostess code: WKQ6CJ7R, click on little Sal to go to the online store!
SAL, Stay And Linger a bit dear summer
Karen (Thank you for choosing me as your demonstrator. After this past weekend of meeting and seeing many talented demonstrators, I felt honored to have so many of you following me.)
Pansy Petal Product Class
Hello Stamping Friends,
Hostess Code: ZBP7XPBT
Have you been just thrilled with the new Annual Catalog? I held a catalog launch the day the catalog went live and later in the month a Pansy Product Class to use the new Pansy Patch Stamp Set and Pansy Dies with the gorgeous Pansy Petals Designer Series Paper (DSP).
We made a card that used the dies to cut out pansies from the DSP, a card using only the stamps, a gift card holder showcasing the Designer Series Paper (DSP) and a card using the dies to do awesome punch art— four cards, four different ways to use the bundle!
Can we see the gift card holder first?
That is a beautiful one! I cased one I saw on Lynn’s Locker changing up the greeting and cut outs and……
Pansy Petals Card #1 Gift Card Holder Showcasing the DSP

 .
. Recipe: Pansy Petals Card #1
- Base: Blackberry Bliss, 4 1/4 X 11, scored at 5 1/2
- Layer: Pansy Petals DSP, 4 X 5 1/2, die cut with the largest Scalloped Contour Die
- cut out the middle with the 3rd smallest Scalloped Contour Die
- Greeting: Basic White 3 1/2 X 3 1/2, stamp with the greeting from the Better Places stamp set and cut out with the Scalloped Contour Die that has the dots and dashes
- Pansies: Pansy Petals DSP, die cut one large and one small pansy from the DSP with Pansy Dies
- Leaves: Pansy Petals DSP, die cut three leaves, one of each color, from the DSP with Pansy Dies
- Card Holder: Soft Succulent, 2 3/4 X 4, die cut with largest Scalloped Contour die
- Adhere with tear and tape on sides and bottom as close to edge as possible
- Embellishment: Flower Flourish with a rhinestone in the middle
- Ink: Blackberry Bliss
- Stamps: Better Places hostess stamp set
Pansy Petals Card #2 with Die Cut pieces on Scalloped Contour Die Layer and then popped up on Designer Series Paper


Recipe – Pansy Petals Card #2
- Base: Calypso coral, 11 X 4 1/4, scored at 5 1/2
- Layer 1: Evening Evergreen, 4 1/8 X 5 3/8
- Layer 2: Pansy Petals DSP, 4 X 5 1/4
- Top Layer: Basic White, 4 X 2 3/4, die cut with 3rd from smallest Scalloped Contour Die
- Inside: Basic White, 4 X 5 1/4
- Inside Strip: Evening Evergreen, 1/8 X 5 1/4
- Flowers:
- Top of leaves and stem: Evening Evergreen, 2 X 2 1/2
- Leaves: Soft Succulent, 2 1/2 X 1 1/4
- Edges of pansy, beard and inside of bud: Calypso Coral, 3 1/2 X 2 1/4
- Inside of petals at back of pansy and outside of bud: Pale Papaya, 3 1/2 X 1 1/2
- Largest petal of the pansy: Basic White, 2 1/8 X 1 5/8
Note: for those of you who may want to teach this class- Save the above pieces with the cut outs already made for a template for your students to follow; glue to a basic black cardstock like this:

- Embellishments: An Elegant Faceted Gem in the middle of the flower and a fussy cut bumble bee and inside flower
- Ink: Evening Evergreen
- Stamp Set: Pansy Patch
- Dies: Pansy Dies, Scalloped Contour Dies
Not so fast, Sal, there are two more cards that we made. The next one uses my favorite die set – the Curvy Dies and greetings from the Quite Curvy Stamp Set. You can only get this for the next two days then it is gone gone gone.
Pansy Petals Card #3 using the Quite Curvy Stamp Set and Curvy Dies (on sale until June 30):


I love how the plain stripes and the very busy flowerdy DSP balance each other out. I saw this combo on Aromas and Art.com with Su Mohr. The inside bottom stripes are from the cutout on the front so die cut the front carefully.
Recipe – Pansy Petals Card #3
- Base: Thick Basic White, 8 1/2 X 5 1/2, scored at 4 1/4
- Top Layer: Pansy Petal DSP, 5 1/2 X 2 1/2, Cut with the Curvy Die on 5 1/2 length; the cut of the curve is 2 1/2″ down from the top on the left and 2″ down from the top on the right.
- Bottom Layer: Pansy Petal DSP-Stripes going vertical, 5 1/2 X 1 1/2; the cut of the curve is 3/4″ on the left and 1 1/4 ” on the right hand side.
- Pansy: Pansy Petal DSP, Die cut one large pansy
- Leaves X 3 : Soft Succulent, 1 X 3 1/2, Die cut three leaves- the die does the embossing of the veins!
- Glue the leaves to the back of the pansy and pop it all up with dimensionals
- Embellishments: Three of the Evening Evergreen In Color Jewels
- Ink: Evening Evergreen
- Stamp Set: Quite Curvy
- Dies: Curvy Dies
Use the Stamparatus to position the curved sentiment from Quite Curvy between the two DSP sections on the front matching the curves of the DSP. If you are concerned that you may not get it stamped correctly, temporarily adhere your top and bottom and then stamp so that you can add a piece of Basic White if you mess up. With the stamparatus, I was able to draw the placement of the card on the grid sheet and the stamp was adhered to the plate with the correct curve. No one had a problem getting it correct.
Pansy Petals Card #4, Stamping the Pansies and Leaves


Recipe – Pansy Petals Card #4
- Base: Thick Basic White, 8 1/2 X 5 1/2, Scored at 4 1/4
- Layer 1: Pacific Point, 5 1/2 X 4 1/4, Cut with the largest Ornate Layer Die (Remember to put a folded piece of dryer sheet underneath your cardstock- it pulls out almost all the little dots so you don’t spend time pocking them out) Layer the dryer sheet, then the cardstock, then the die. Glue this layer directly to the base being careful not to get glue close to the holes.
- Top Layer: Basic White, 3 3/8 X 4 7/8, This will be stamped and then popped up on the Ornate layer
- Embellishments: Three of the Holiday Rhinestone gems
- Inks: Pacific Point, Garden Green, Daffodil Delight, Crumb Cake
- Stamp Sets: Pansy Patch for the front greeting, Encircled In Friendship greeting for the inside
- Dies: Ornate Layers Dies
To stamp:
- Stamp your greeting first at the top so you know how close you can get with the large pansy, full strength in Pacific Point
- Use Pacific Point to ink up the full pansy images, STAMP OFF, then stamp, one large pansy a little left of center and two small pansies. “Ink up, stamp off, stamp on”,,,,,, “Ink up, stamp off, stamp on”. I have to sing that to remember!
- Position the bud so it is above the small pansy and yet not off the paper, ink up in Pacific Point, STAMP OFF, stamp on
- Ink up the detail shadowy stamps in full strength Pacific Point and stamp them over the images
- Using Night of Navy Ink stamp the little beards on the three pansies
- Using Daffodil Delight Ink stamp the centers on the pansies
- Use the Waterfront stamp set and Crumb Cake Ink to stamp the ground in the bottom 3/4″, or freehand with a blender pen
- Now MASK OFF the pansies and the ground to stamp the greenery
- Using Garden Green Ink, ink and stamp the stem going to the bud
- Using Garden Green Ink, ink and then stamp the single stem three times coming down to the ground from the large pansy; one time stamping to the shorter pansy and twice to the taller pansy; use a garden green marker to soften where the edges of the stamp meet when you stamp multiple times
- Using Garden Green Ink, Ink up the small leaves full background, STAMP OFF, stamp on
- Using Garden Green full strength, ink up and stamp the detail shadows of the leaves
- Mine looked funny with the stem to the bud going out of a leaf so I masked the leaves and stamped a little stem between the leaves.
Variety is the spice of life, Sal, and I think we held to our motto of ‘bringing a pinch of creativity to spice up their crafting lives’!
Don’t forget the other pansy cards we made in a previous post- click their picture to go to that post for directions. There’s ribbon on both of these, Sal! I think I liked this sponged pansy best.
 .
. 
And Joy’s swap card with the pansy:
 .
. You now have a seven card collection of pansy cards! If you feel overwhelmed with the number of dies check out this guide made by Gail Ellis of Blue Rose Paper Treasures. Isn’t it great to have others to help us?! Pinterest also has guides to different colors to use for the pansies.

July 1 is the start of the Designer Series Paper (DSP) sale and you can buy the Pansy Patch DSP at 15% off. Here is a cute gif showing the other papers offered in this sale:

That makes me dizzy – may we have a list?
How about a picture and a list?
 .
. 
Use Hostess Code: ZBP7XPBT if you do decide to order and you will help me to buy prizes with hostess dollars for upcoming events. Check out the JJ Mini one more time to make sure you don’t miss anything.
I thank you most sincerely!
SAL, Stamp A Lot, Smile A Little, and always be Salt And Light to those around you!
Karen

 Did you say ‘Youtube’?
 .
. 


Lions & Dragons – Oh My!
Hello Stamping Friends,
Let’s have some fun with Lions (dandelions) and Dragons (dragonflies)!
January’s hostess code is : UEEZKD2D for use if your order is under $150.
Yesterday I was live on Facebook with January’s club cards. Each club member had kits with all the supplies so this time my presentation was different with just the construction of the card without going from the beginning to the end and listing all the sizes of the card cuts, so this blog post will fill in the gaps!
Dragonfly Z Fold Club Card Introducing The Dandy Garden Suite

This suite is on Page 25 of the JJ catalog (Jan-June mini)!


Recipe:
Base: Bumble Bee, 5 1/2 X 10 7/8, Lay the base horizontally at the 7 1/4″ mark and cut down 1 1/8 inch, then score the rest of the way.

Secondly, mark the left hand side down from the top at 3 3/8″ and cut the base from 1 1/8″ to the 3 3/8″ mark. (Note: the tip of the cut is at 1 1/8″).

Score the base at 3 5/8″ from the left. You now have two score lines: one at 3 5/8′ and one at 7 1/4″.
Your base is done!
Let’s mount our little dragonflies and the bumblebees on little strips of window sheets.
Window sheet strips (X2): 3/8″ X 1 1/4″
Bumblebees: Use the Dandy Wishes Dies little Bumblebee die to cut two bumblebees from the Dandy Garden DSP (Designer Series Paper). Color the back of the bumblebees with Mossy Meadow. Place glue dots on the top of one of the window sheets, one on the front and one glue dot on the back, and then adhere your bumblebees back to back. The “Garden Wishes” stamp set has a bumblebee image to stamp if you would rather have a stamp set than a die set.
Dragonflies: The Dandy Garden DSP has sheets that match up with the Dragonfly punch (which is bundled with the ‘Dragonfly Garden’ stamp set for a 10% discount) and you will punch out two matching small dragonflies and mount them on your window sheet strip with a glue dot on the window sheet front and on the back.
Back Layer of the Z fold: Dandy Garden DSP, full rectangle – 3 3/8″ wide X 5 1/4″ tall. The DSP is directional.
Middle Layer of the Z fold (which is on the back of the base): Dandy Garden DSP, Start with a piece of DSP, 3 3/8″ wide X 4 1/8″ tall, Mark down 1 1/8″ on the right hand side and cut from the tip of the left hand side to the mark on the right hand side. Flip your base over and place your bumblebee where he will be on top of a dandelion at the back when you fold the card flat. Use a glue dot to position the bumblebee and then adhere the DSP.
Front Layer of the Z fold: Dandy Garden DSP, 3 3/8″ wide X 3″ tall to start. Mark 1 1/8 ” down -this time on the left hand side and cut a diagonal from the tip of the 3″ to the 1 1/8″ mark. Before adhering, wrap your linen thread around the DSP and tie a bow.
Note: On both the middle and the front layer, you can place your DSP where it will go, and make your marks for your diagonal cuts without measuring so that if your diagonal cut is not quite perfect your layer will be and will have a nice 1/8″ border.
Greeting Border: Bumblebee, 3 1/4″ X 3 1/4″, cut with the Largest Square Stitched Shape Die (2 5/8″)
Greeting Top Layer: Whisper White, 2 1/2″ X 2 1/2″, cut with the 2nd largest Square Stitched Shape Die (2 1/8″). I stamped the greeting from Dragonfly Garden, “May Good Things Grow All Year Long”, in green, and then did a stamp off of the dragonfly cluster across the greeting in Bumble Bee ink.
Embellishments: One little ladybug mounted with a glue dot. 16″ of Mossy Meadow Braided Linen Trim.
Alternative Cut: Diagonal Z fold with the diagonal from the back to the front.


The base of this card uses just 1/2 of a piece of cardstock so you can make two cards from one sheet.
Base: Bumble Bee, 5 1/2″ X 10 7/8″ scored at 3 5/8″ and 7 1/4″ with a diagonal cut from left to right at the 5 1/2″ cut down to 1″ from the bottom on the right.
Note: I have a 1/8″ border on the right, left and tops but did not have a border on the bottom.
Back Layer: DSP, 3 3/8″ wide X 3 1/4 ” tall, cut diagonally left to right from the 3 1/4″ tip to 1 3/8″ down from the top.
Back Greeting: Shimmer White, 3 3/8″ wide X 1 7/8″ tall, For this greeting I stamped the “Thank You For Your Kindness” from Dragonfly Garden in blue and then added a punched out dragonfly.
Middler Layer– goes on the back of the base: DSP, striped in this case, 3 3/8″ wide X 3 7/8″ tall , diagonally cut from the right to the left from the tip to left marked at 1 1/2 “. Tip: place the top of your layer with a nice 1/8” border and trim the bottom since it is flush to the bottom.
Front Layer: 3 3/8″ wide X 2 3/8″ tall, cut diagonally from the left to the right marked at 1 3/8″ from the top. Now wait — don’t adhere yet.
Dragonfly: Dandy Garden DSP, punch two large dragonflies and mount them with glue dots on a strip of Window Sheet 3/8″ X 1 1/4″. Use another glue dot to adhere the window sheet to the front of the base.
After the Dragonfly is adhered – adhere your front layer.
Embellishments: Die cut a bumble bee from DSP and adhere to front; adhere a ladybug trinket with a glue dot to front; tie a little bow with 8″ of Mossy Meadow Braided Linen Trim and adhere it to the back.
Which do you like better? A rectangle back or a diagonal back? Leave a comment with your vote by January 25 for a chance to win the ladybug trinkets!
Sand and Sea Club Cards Introducing The Sand & Sea Suite

This suite is on page 41 of the JJ catalog.

I used the Whale Of A Time Designer Series Paper instead of the paper in the suite so I had a smaller background behind the shells. The cards shown above have three different backgrounds from the Whale of a Time DSP:

Which do you like best? #1) little fishes amongst the seaweed, #2) seahorses, #3) the coral reef
Leave a comment with your vote by January 25 for a chance to win The Opal Rounds embellishments!
Recipe:
Base: Pretty Peacock, 5 1/2″ X 8 1/2″, Scored at 4 1/4″
Layer 1: Whale of a Time DSP, 5 3/8″ X 4 1/8″
Layer 2: Garden Green, Start with 5 1/2″ X 4 1/4″ and cut with the largest Seaside Seashell Die to make a base.
Layer 3: Granny Apple Green, Start with 5 1/2″ X 4 1/4″ and cut with the largest Seaside Seashell Die, then cut out all the little vines and glue them to the Garden Green base. This gives you a nice contrast of greens. Note: you can cut into the seashells to give more area to adhere the vines since the seashells will be glued on top.
Layer 4: Pearlescent Specialty Paper, Start with 5 1/2″ X 4 1/4″ and cut with the largest Seaside Seashell Die, then cut out all the seashells and glue them on the base over the greenery.
Greeting: Shimmery White, Start with 1 X 2 1/2″, stamp the greeting, and then cut with the rectangle stitched die to make a perfectly sized rectangle. Cut one end, stop halfway, reposition the die on the other end and cut that half. I demonstrate this in the video.
Inside: Shimmery White, 5 3/8″X 4 1/8″
Inside strip: DSP cut from the same piece as the background, 5/8″ X 4 1/8″
Here are two examples of what I did on the inside:


So you can vote and really see the backgrounds here are up close images of the cards:
#1 – Little fishes

#2 – seahorses

#3 – Coral Reef

Remember it is Sale A Bration time with free products for each $50 or $100 order!!
January’s hostess code is : UEEZKD2D for use if your order is under $150.
SAL, Share A Love
Karen

Hand Drawn Blooms and Prized Peony
Hello Stamping Friends,
Today’s Facebook Live event was successful!! For those of you who have done this for a long time I’m sure you are shaking your head but it was my third Facebook Live and the second one crashed and had to be abandoned. So two successful events feels rather nice!
Club members received two card kits for this month’s club and we joined together with a Facebook Live followed by a Zoom meeting. We created an Easel card with the Hand Drawn Blooms bundle and a Tri-Fold card with the Prized Peony bundle.
What you still need is the specific recipe for each card.
Easel Card with Rainbow Glimmer Paper:
Color #1, Daffodil Delight and Melon Mambo

Color #2, Granny Apple Green and Bermuda Bay

The Banner Blooms Die was used to cut the beautiful bouquet from the Rainbow Glimmer Paper. Since the paper is multi colored the cards were different depending on where the cut was made.
Recipe:
- Base: 4 1/4 X 11 scored at 5 1/2 and 2 3/4
- Layer 1: 5 3/8 X 4 1/8 Make 2 and Corner Round the top of one
- Layer 2: Shimmer White, 4 X 5 1/4 , Corner Round the top
- Easel Holder: Shimmer White, 4 X 1
- Scrap of Shimmer White on which to stamp the words to put on the banner 3 X 1 1/2
- Rainbow Glimmer Paper: 6 X 4, cut one bouquet and one butterfly
- Twine: 10″
- Jewels to embellish: 3
- Ink: Bermuda Bay or Melon Mambo
- Stamp Set: Hand-Drawn Blooms
- Die Set: Banner Blooms
 Gosh, you didn’t post for a month and now you made a video! When do I get to be in the video?
Patience, Sal, I have been working with an animator and soon you will be joining the videos.
Prized Peony Tri-Fold Card:
I just received my mini catalog preorder and added a stamped image to my wedding card using the Little Treats Stamp set:

Isn’t that just the perfect addition?
Here is the original one I did in the Facebook Live Video:


Recipe:
- Base: Whisper White 12″ X 6″
To cut your tri-fold follow these step by step instructions:
- Place the base on the Stampin’ Up! Cutter the long way – (vertically) on 2″ mark- and cut from the 2″ to the 10″ mark on the cutter
- Move the base to the 4″ mark on cutter and cut from 2″ to 10″
- Turn the base the short way-(horizontal) and place it at the 2″ mark of the cutter and score from 0″ to 2″, lift the scoring blade and move to the 4″ mark on the cutter and score from 4″ to 6″
- Move the base to the 4″ mark on cutter and score from 0″ to 6″- top to bottom
- Turn the base to the other side and place it at the 2″ mark of the cutter and score from 0″ to 2″, lift the scoring blade and move to the 4″ mark on the cutter and score from 4″ to 6″
- Move the base to the 4″ mark on cutter and score from 0″ to 6″- top to bottom
Front Base Layer: Whisper White 5 1/8 X 3 5/8
Layer #1 all in Basic Gray:
- (1) 5 X 3 1/2 for front base
- (2) 5 7/8 X 1 7/8
- (3) 3 7/8 X 1 7/8
- (5) 1 7/8 X 1 7/8
Layer #2 in Designer Series Paper (Note: two of the top layers are whisper white)
- (1) 4 7/8 X 3 3/8 for front base
- (2) 5 3/4 X 1 3/4
- (2) 3 3/4 X 1 3/4
- (4) 1 3/4 X 1 3/4
Whisper White – all three pieces are embossed at the bottom with the Peony Edge Die
- (1) 2 1/4 X 4 1/4 Front Banner
- (1) 3 3/4 X 1 3/4 for stamping greeting
- (1) 1 3/4 X 1 3/4 for stamping peony
Envelope Punch Board – Whisper White Envelope Paper 8 1/4 X 8 1/4 with 3 3/8 score line starting point
Envelope Decor – Designer Series Paper 6 X 3 1/2, glue to flap and then fussy cut to fit
Ribbon – 1/4″ Gray Granite Shimmer Ribbon- 10″ for knot, 12″ for bow
Elegant Faceted Jems – 3
Peony (4) – Petal Pink 8 1/2 X 3 , die cut the four parts, each piece slides into the next largest piece matching up the notches. Use a bone folder to curl the edges and then sponge with Blushing Bride for a darker contrast.
Stamin (1) – Scrap of Daffodil Delight at least 1″ square
Leaves (3)- Garden Green large sections 2 X 3, die cut one of each size
Leaf accent (3)- Granny Apple Green 2 X 3, die cut one of each size

I used a glue dot to attach each piece at the notch and then added dimensionals in between the layers.
Here is the base with the gray granite layer and the DSP layers, the white part of the base is where you will glue the front base so it does not need a gray layer:

This shows the front base added and the die cutting at the bottom of each edge of the white pieces:

Obviously, you want to stamp the white pieces before you adhere.

I stamped the greeting in Basic Gray and then colored the back of the peony stamp with Stampin’ Write Markers – Petal Pink, Daffodil Delight, Garden Green and Granny Apple Green.
Note: Do not use Stampin’ Blends – they will stain your stamp.

Prized Peony Suite Card
Here is a card I made using every single one of the Prized Peony Suite products for a thank you card. I am casing Mary Deatherage of Stampsnlingers with this one:


Recipe:
- Base: Gray Granite 4 1/4 X 11 scored at 5 1/2
- Front Base: Gray Granite 4 1/4 X 5 1/2 Embossed with the Dainty Diamonds Embossing Folder; it might need shaved a hair on the edges if it stretches
- Front Mat: Petal Pink 2 7/8 X 5 1/2
- Cross Panel Mat: Petal Pink 2 1/8 X 4 1/4
- Inside Mat: Petal Pink 4″ X 5 1/4″
- Front Vertical Top: Peony Garden Designer Series Paper (DSP) 2 3/4 X 5 1/2 colored with Stampin’ Blends Petal Pink and Granny Apple Green. Don’t panic as you color the DSP flowers pink, as they look an ugly dark pink from the grey on the back of the DSP showing through. Once it dries it is a pretty petal pink!
- Front Horizontal Panel Top: Peony Garden DSP 2 X 4 1/4
- Inside Liner Top: Whisper White 3 7/8 X 5 1/8
- Sentiment: Whisper White Scrap stamped with Hand Drawn Blooms and fussy cut
- Ribbon – 1/4″ Gray Granite Shimmer Ribbon- 4″, glued underneath peony with glue dot
- Elegant Faceted Jems – 3
- Peony (4) – Petal Pink 8 1/2 X 3 , die cut the four parts, each piece slides into the next largest piece matching up the notches. Use a bone folder to curl the edges and then sponge with Blushing Bride for a darker contrast.
- Stamin (1) – Scrap of Daffodil Delight at least 1″ square
- Leaves (3)- Garden Green large sections 2 X 3, die cut one of each size
- Leaf accent (3)- Granny Apple Green 2 X 3, die cut one of each size
There you have it folks, recipes, pictures, a video and everything you need to create some beautiful cards!
SAL, Such A Lot (of pieces)
Karen
Shrinky Dink Lady Bug & Thoughtful Blooms
Hello Stamping Friends,
This week’s card is one of those cards that will make you smile many times as you make it! You do make the cards I post, right?
 Or they can just smile as they look at yours!
That’s true, Sal! I love to go shopping and smile at people and see if I get a smile back. I tell Paul I am collecting smiles! So hopefully today’s card will bring a smile to your day.
I made a shrinky dink ladybug with the Little Ladybug stamp set. This set is free through the end of March with a $300 party/order. All our hostess’ this quarter have been able to earn the stamp set. We are starting a new rotation of clubs if you would like to be part of a club and earn hostess rewards like this.

To make a shrinky dink ladybug:
- Stamp the Little Ladybugs on clear shrinky dink paper with Staz On ink
- Cut them out with the coordinating framelits (#153588- available until March 31)
- Color the back with alcohol markers; use Light Real Red Stampin’ Blend as the color will darken as it heats
- Preheat the oven to 325 degrees and line a cookie sheet with parchment paper
- Put them on the cookie sheet and in the oven colored side up for two to three minutes, they will curl then lay flat
- Leave them in an extra 30 seconds after they lay flat
- Remove from oven and flatten them with an acrylic block
You must use Staz On ink and alcohol markers. In the past we used permanent ink Sharpies but now we have a whole plethora of our own alcohol markers.

Now that you have a tiny ladybug, let’s give her some flowers with the Thoughtful Blooms Sale A Bration stamp set, free with a $50 order.

It might help if we could see a picture of the card.
Imagine that! But I wanted to have you look at that stamp set first. See those four green leaves going in all directions? That is one stamp set and it becomes the center point for building the rest of the bouquet. I thought it was four different stamps that I would have to mount, but not so. I stamped the leaves in Garden Green and then stamped three little sprigs between the green leaves in Pear Pizzaz and then stamped those little dots at the top of the sprigs in orange. The dots are also just one stamp that fits perfectly on the sprig and since the set is photopolymer you can see to line the dots up nicely. I stamped little yellow flowers at the top of the blank green stems and dotted the middle with a black marker. I stamped a large flower in Rich Razzleberry and punched it out then added Wink of Stella, mounted it with dimensionals in the very middle and put a yellow Happiness Blooms Enamel Dot in the center. A few copper sequins added a bit more sparkle (and covered a smudge)!

Here’s a different ladybug:

Those flowers are cool but the little ladybugs steal the show!
That makes me smile. The Happy Birthday is in the Little Ladybug set and the trellis border is in Thoughtful Blooms. I stamped the HB in Rich Razzleberry and the trellis in Soft Suede.
Check out another version with large orange flowers and using the teeny tiny centers from the stamp set:

Whoever designed this set thought of everything!
It is a cool set and there is a matching punch for the large flower you can earn free with a $100 order.

For the inside I used another of the Sale A Bration sets free with a $50 order:


The ladybugs steal the show again!
It looks like the first one is saying to the others: “Look at me, I can stand on one leg!” The third one gets tricky and says “Look at me, I can roll over!”
Have you smiled, yet? Here is the large orange flower:

Which do you like better- the small yellow flowers or the large orange flowers? A flying shrinky dink ladybug or a sitting shrinky dink ladybug?
The framelits for cutting out the ladybugs are available only through the end of March along with several other framelits that coordinate with the mini and SAB catalogs:

Next week I will have two cards using the Sending Flowers Dies from these coordinating framelits to make a spring and Easter card.
It seems that will spoil the surprise for my club tomorrow, but you are right, Sal, these could sell out soon. Let me give the dimensions to the ladybug card first. Notice that I didn’t use the standard layers. I have smaller layers and more of them than normal:
- Base: Blackberry Bliss, 8 1/2 X 5 1/2, scored at 4 1/4
- First Layer: Crushed Curry, 3 3/8 X 4 5/8
- Second Layer: Blackberry Bliss, 3 1/4 X 4 1/2
- Top Layer: Whisper White, 3 X 4 1/4
- Inside: Whisper White, 3 3/8 X 4 5/8
- Shrinky Dink Sheet: 2 X 2
- Center Blossom: Whisper White, 1 X 1
- Embellished with 3 copper sequins and one Happiness Blooms Yellow Enamel Dot
- Inks: Soft Suede for the trellis, Rich Razzleberry, Garden Green, Pear Pizzaz, Grapefruit Grove, Crushed Curry
So next week come back and check out the details on the spring and Easter cards below plus a Happy Birthday pop up card.
Order the Sending Flowers Dies # 153589 to make these:


SAL, Smile A Lot
Karen
Click on Sal in the computer to go to the online store. Hostess Code through Saturday: K2YHG6BG

Welcome to my blog!

Sal Window to Products


