
Home » All Occasion (Page 2)
Category Archives: All Occasion
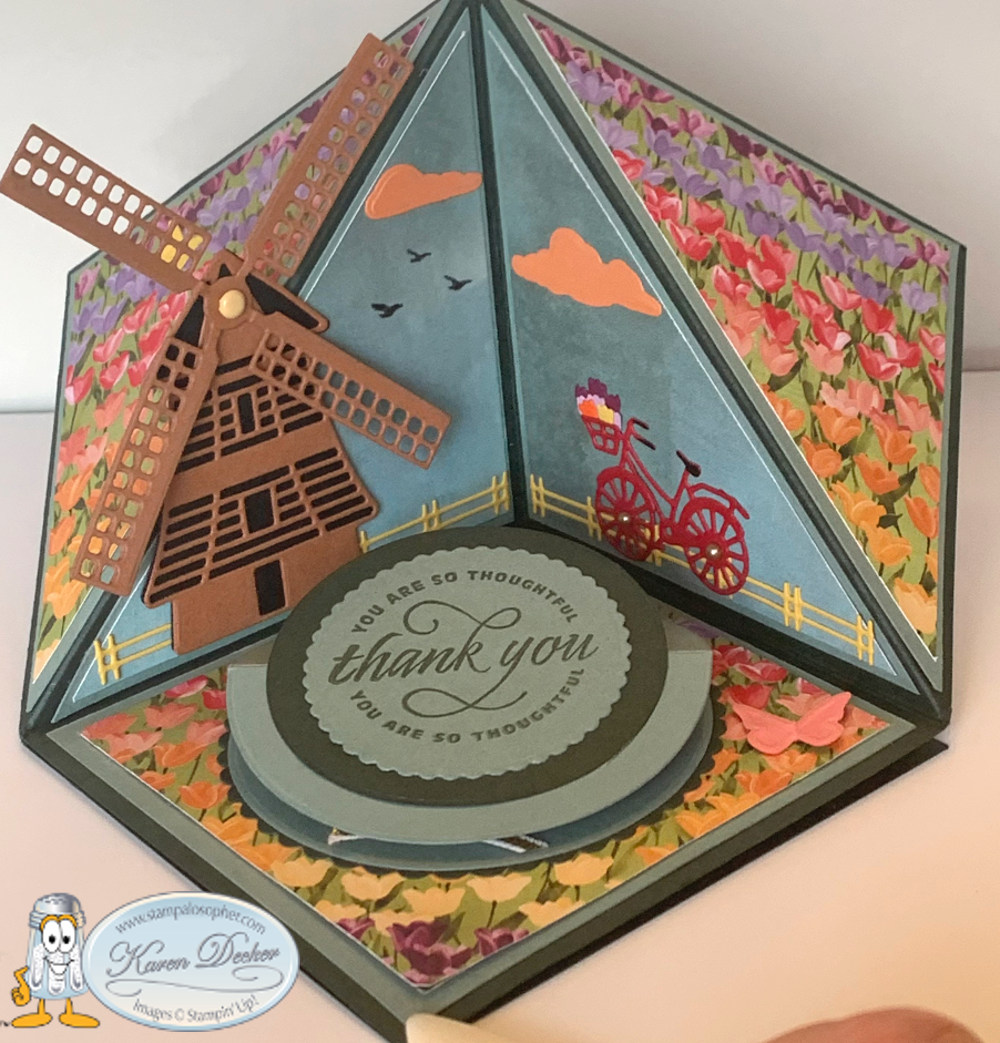
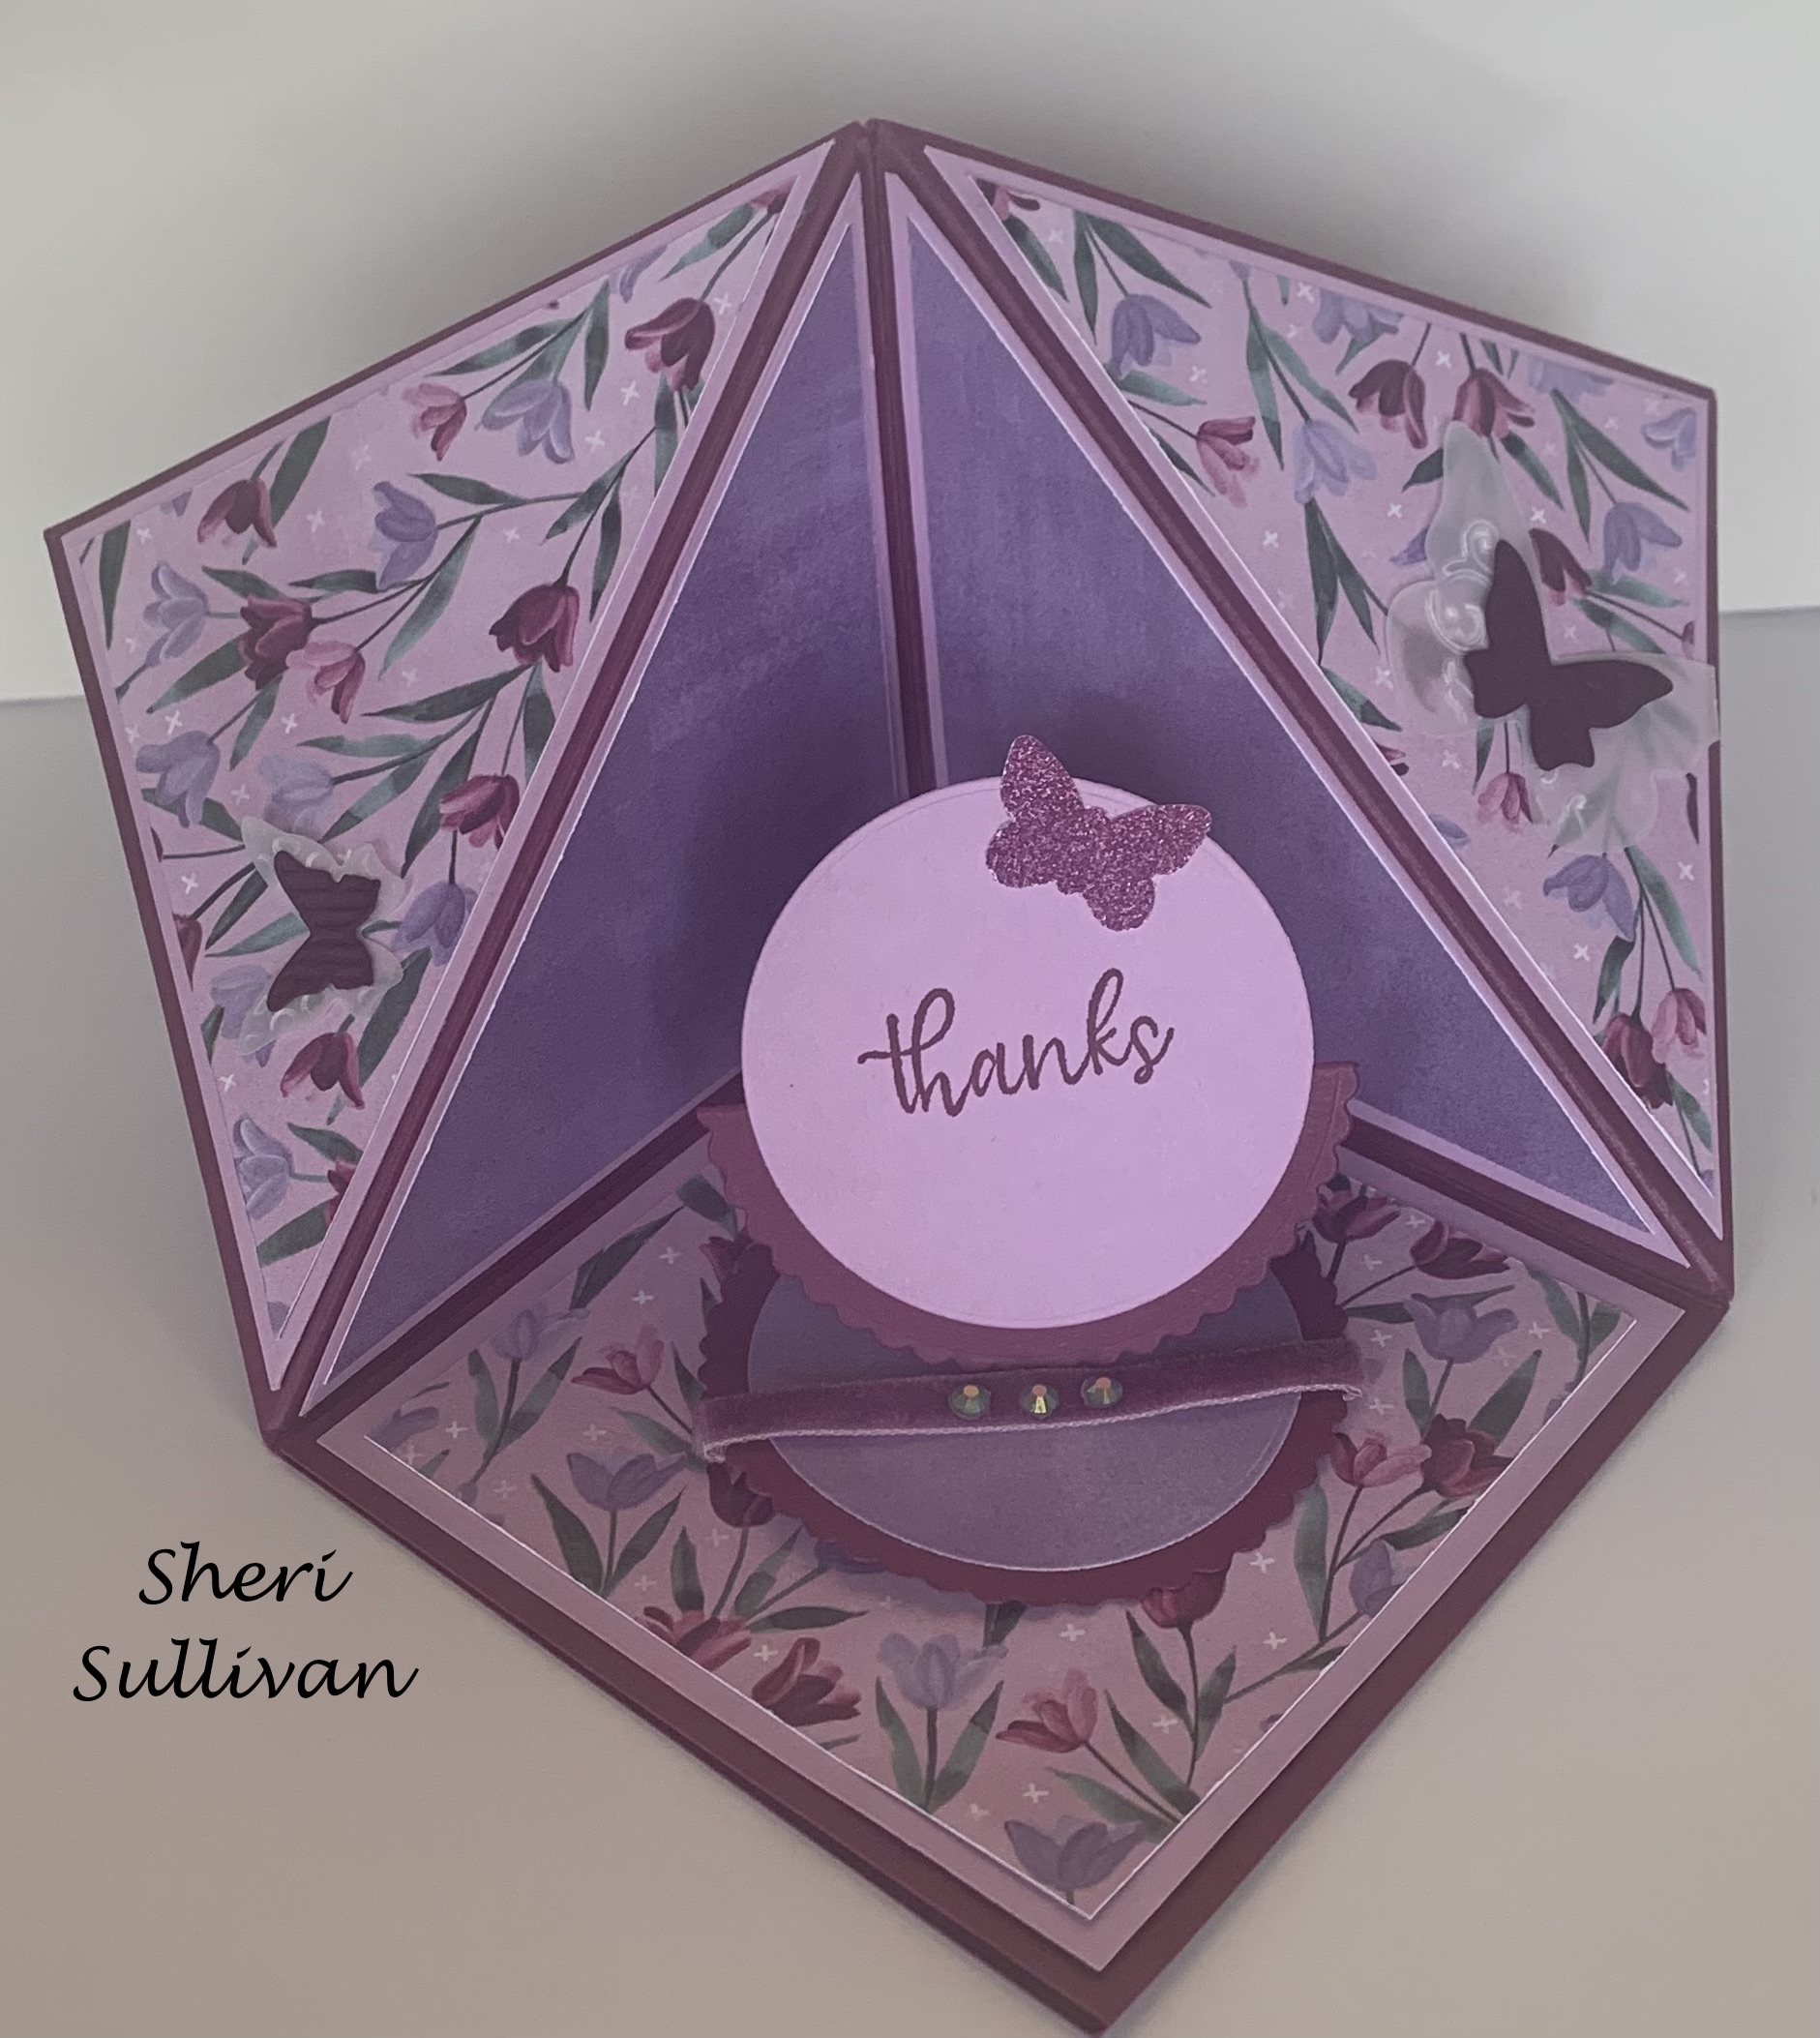
Triangle Corner Pop Up Card for Case The Creator (CTC) #3
Hello Stamping Friends,
Case The Creator Card Challenge
This month we cased Dawn Griffith’s Triangle Corner Pop Up Easel Card!
Yes, Dawn calls it a “Fancy, Schmancy Corner Fun Fold”! Her video is in the instructions.
Case The Creator #3 printable pdf file

I ordered the tiny magnets from Amazon:

 .
.  .
. 
The bicycle is hidden when you open up the easel so be careful with your design. I had a lot of fun with the bicycle! I used the long, tiny tulip die to create a basket of tulips! I will write my greeting under the ‘thank you’ since I went against protocol and made the bottom left another flower display instead of the place to write a note.
Heather made a fabulous graduation card with beautiful gold embossed paper and black! I love the diploma for the easel stand up!
 .
. 
Joy’s beautiful card uses the ‘Expressions In Ink’ designer series paper. We only have until May 2nd to get discontinuing items, like this DSP, from the annual catalog!
 .
.
Sharon’s uses the Tea Time stamp set and Tea Together dies- look at the little heart she put on the lid!

Sheri used the ‘Flowering Fields’ DSP and the ‘Simply Succulents’ stamp set for greetings:
. 
 .
.
Ann used the ‘You’re A Peach’ DSP and the ’Sweet As A Peach Bundle’. Those peaches even look fuzzy! The amazing “Dist ink tive” stamps! These are in the Annual catalog as well so order before May 2.

 .
.
Jo’s little rabbit made us all smile, and eggs from the Arrange A Wreath set and Wreath Builder Dies were perfect with the paper.
 .
.  .
.
 They followed instructions and had a large place for a message.
Indeed! Isn’t it fun to see all the different creations from one set of instructions?!
SAL, Seeing April Leave
Karen
Click on little Sal in the computer to shop.

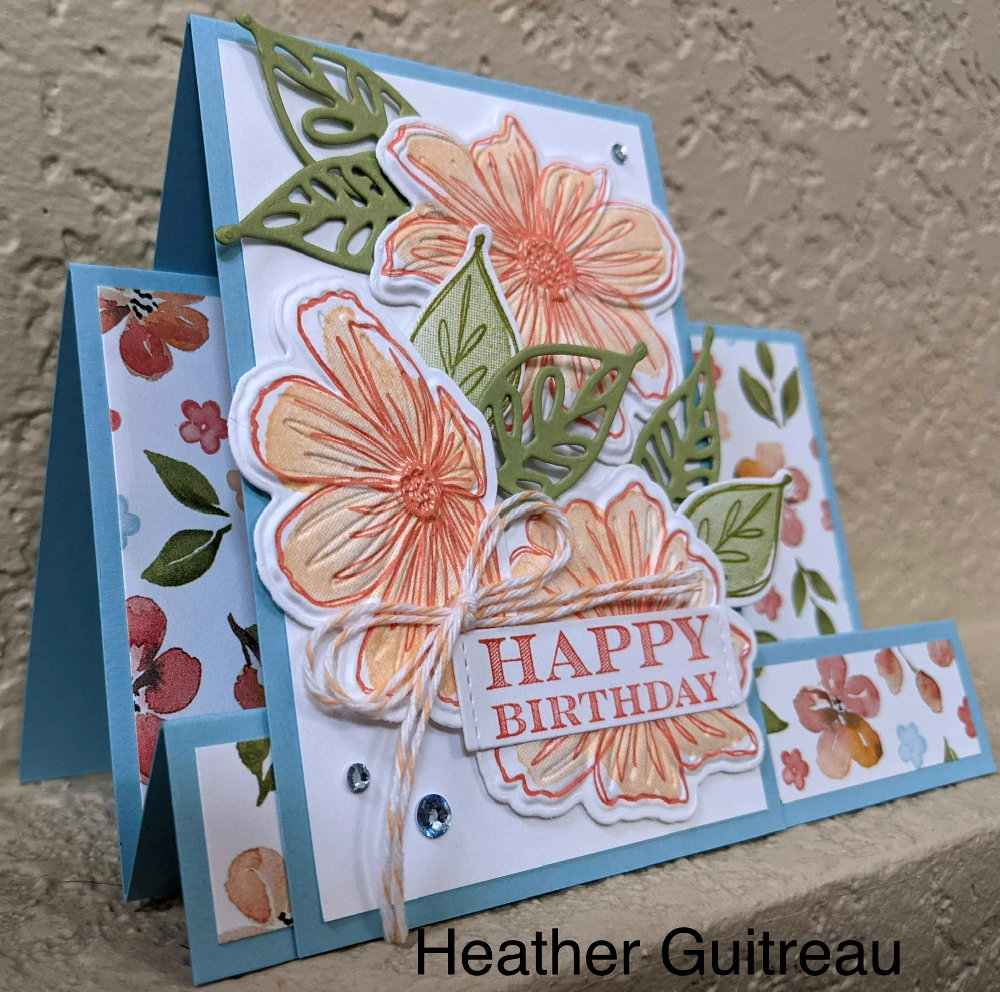
Simple Side Step Card
Hello Stamping Friends,
Let’s look at a Simple Side Step Card. I saw this design on Lori Pinto’s Lollipop Paper & Ink blog and used it for my Case The Creator #2 Challenge with my stamping group. It is so cool to see all the different cards from one set of instructions!
Case The Creator #2 printable pdf file
And here is the file if you don’t want to print it out:

I used the SAB Daffodil Afternoon designer series paper for my background and the Daffodil Dies for my card:
 .
.  .
. 
Joy Meadows used the Pierced Blooms Dies for her beautiful card:

Ann Hausmann used the Sale A Bration Friendly Hello set with the Friendly Hello Designer Series Paper:
 .
. Heather Guitreau used the Art In Bloom bundle with its Bloom Hybrid Embossing folder and dies:


They are all beautiful and so fun to see the variety! Thank you for participating!
I made a thank you card using this same style. I used the Happy Hedgehogs stamp set and the retired Love You Lots stamp set and the SAB Thoughtful Blooms set. I used the New Horizons DSP and then sponged the front to match the DSP after masking the stamped images. The hedgehog is the little one in the set and I used the reverse image technique to face him toward the right. Just use a silicone pad and your stamparatus, stamp the image several times in Memento on the silicon pad and then carefully lay your paper on top and burnish to get a nice reverse image.
 .
. 
Thank you for sharing some of your precious time with me!
SAL, Spring At Last
Gather Together with Nuts About Squirrels
Hello Stamping Friends,
This card is a case of one made by Lezards de Cilou. Hers was made as a much larger card but the idea was great so I made a normal A2 size card,.
 .
. 
Recipe:
Woodtone Designer Series Paper (DSP) is either ‘In Good Taste’ or ‘Beauty Of The Earth’ (Both are in the Annual Catty) or just use Early Espresso and Emboss with the Bark 3D embossing folder.
Stamp Sets: Nuts About Squirrels and Pretty Pumpkins
Inks: Soft Suede- squirrel outlines; Cinnamon Cider for stamping the color of the squirrels; Pumpkin Pie for greetings and one inside little leaf; Cajun Craze for a leaf; Crushed Curry for a leaf; Early Espresso for branches and veins on the leaves.
Blender Pens: Ivory for shading on the squirrels; Bronze for the top of the acorn; Lt Cajun Craze for bottom of acorn.
Marker: Pumpkin Pie to add dots to greetings
Dies: Layering Diorama Dies, Tailored Tag Dies
Embossing Folder: Cracked Paint
- Base: Bumble Bee, 4 1/4 X 11, scored at 5 1/2.
- Back Piece for a background: Woodtone DSP, 2 1/4 X 3 5/8, this is to be a background for your cutouts. Glue to base.
- Middle layer: Woodtone DSP, 3 5/8 X 4 5/8, die cut with smallest Layering Diorama Die, emboss with the Crackled Paint embossing folder and then distress and sponge the edges with Early Espresso- Turn this layer upside down so your openings are different.
- Very Top Layer: Woodtone Designer Series Paper; 3 7/8 X 4 7/8. Cut with the second from smallest Layering Diorama Die centering about 1 1/2″ top and bottom. Emboss with the Crackled Paint Embossing Folder. Sponge the cut out to add shadows and glue to the back piece you glued on the base.
- Tree Branches at top: DSP from Beauty Of The Earth, 1 3/4 X 4, fussy cut the edges
- Inside Layer: Basic White, 3 7/8 X 4 7/8, Stamp greeting, then the little leaves in bottom corner. The stamp set has a two time stamping for the leaves- the leaves are stamped and then the veins are stamped over top, I used Pumpkin Pie ink, Cajun Craze Ink and Crushed Curry Ink and then stamped the veins in Early Espresso.
- Squirrel, acorns and tree branch – Basic White, 3 3/4 X 5
- Stamp the squirrel outline in Soft Suede twice with the Stamparatus
- Stamp the two step coloring of the squirrels with Cinnamon Cider stamped off once, reinked and stamped off a second time
- Color in the squirrel with Ivory Stampin’ Blends
- Stamp two additional acorns and color with Bronze on the top and Lt. Cajun Craze on the bottom
- Stamp the tree branch with Early Espresso and fussy cut
- Greeting: Basic White, 1 1/2 X 3, Mask half the greeting with sticky note, ink, remove mask and then stamp. The inside gets the other half of the greeting doing the same thing. Then add three little dots with the Pumpkin Pie Marker. Cut the front with the smallest Tailored Tag Die. Hide the circle under the squirrel’s head.
After making a couple I determined the best way to add the layers was dimensionals around the opening of the middle layer and gluing the sides with glue runner or Tombow. Then the top is popped up with adhesive strips.
 .
.  .
. Using the Layering Diorama Dies is not as complicated as it looks and there are so many creative applications online. The Nuts About Squirrels carries over to next year so that is good news for you demonstrators wanting to use it for your classes.
. That was cool! I bet the others sent you great swap cards as well!
They did and we should take a look so we have a scrapbook of ideas for the future!
Cindy’s card is a wonderful Thanksgiving greeting that you must see even though it is not a swap. Look at the many lovely Designer Series Papers she used and the Pretty Pumpkin stamp, linen thread and gold gems! The pumpkin is glossy and beautiful in real life. I think she used the baby wipe technique for the colors and then embossed with clear embossing powder. It sparkles!

Ann’s beautiful card uses the Beauty of the Earth Designer Series Paper, Scalloped Contour Dies and Beautiful Trees dies.

Lori’s helping me with Christmas cards with her swap using the Playful Penguin Designer Series Paper and Misty Moonlight card stock, Layering Diorama Dies, Curvy Christmas sentiment, Christmas Whimsy card kit for star stamp, and fussy cut little creatures from the Designer Series Paper. So cute!!

Jo used the Days To Remember stamp set with the Brushwork Alphabet and lovely Designer Series Paper and sequins:

Joy used a Pale Papaya card base with a layer of Blackberry bliss (love that combo) and then weaved strips of the Beauty of the Earth Designer Series Paper on a Pale Papaya layer embossed with the Tasteful Textile embossing folder. She used the Pretty Pumpkins Stamp set with the bundled Detailed Pumpkins dies for the pumpkins and the greeting is from the same set.
 .
. Sharon’s card uses fun table name markers from her stash to make a cute Thanksgiving card:
 .
.
Lucille’s card is lovely with lots of sparkle and stitched leaves on a Bumble Bee base with an Old Olive layer. The ‘hugs’ is die cut and the oval is a stitched oval.

‘A pinch of creativity to spice up your crafting life!’
SAL, Sending A Lot of cards to inspire you
Karen. (Click on little Sal to go to the online store)
August Swaps and Mystery Card #15
Hello Stamping Friends,
Hostess code: WKQ6CJ7R with Cindy as our hostess this month.
I just had the most incredible weekend with the Backstage At Home Stampin’ Up! virtual leader’s event. The speakers were tremendous and the chance to network with demonstrators all over the world was delightful! Next year the event will be in person in New Orleans! Join my team of Carin’ Crafters and/or let me help you promote so you, too, can attend these events!
Would you like to attend a virtual Stampin’ Up! conference for any level of demonstrator November 11-13? Join my team, if you haven’t, and we’ll meet here and have fun together; for you out of town folks, we will set up a Zoom with you so you feel a part of the PARTY! Don’t have an upline nearby? Come and join the fun, we are all a family of stampers no matter what! So hop on over to your website tomorrow, August 31, and sign up for the November event, then block it out on your calendar so you don’t make appointments on those days. Click on the “Events” tab in your demonstrator website and find out all about it!
 Wow! You really have a lot of enthusiasm today!
I do, Sal! And I can’t wait to hear all the other speakers when the videos are posted. We had to choose just one speaker for each session. It was hard to choose since the topics all sounded interesting.
Now– let’s go on to today’s agenda of posting the Mystery card and the swaps from August. We meet on the second Tuesday of the month for club, or for some event I conjure up, and then we meet by Zoom on the fourth Tuesday of the month for a Mystery Card challenge and to share our swaps. September 14 we are having casual crafting at my house to make a Pinwheel Tower Card at 9:30. Prepare your own kit and we will work together to make the cards. The tower card is the new rage on social media and I think every video I have watched uses different measurements. Choose one of the videos you like and make a kit to bring on the 14th at 9:30. I will put on the coffee!

Mystery Card Challenge #15 printable file
Step 1: Adhere the large DSP (Designer Series Paper) section to the front of the card base.
Step 2: Adhere the 1″ scored section of the card base strip at the middle of the inside of the card base 1/8″ over from right
Step 3: Turn the strip of DSP over to its other side and adhere to the neutral 4” X 5 ¼” piece on the right side
Step 4: Adhere the neutral and its DSP on top of the strip glued on in step 2
Step 5: Add a greeting or an image on the strip that folds over the front and decorate
I used the ‘Gingerbread & Peppermint’ DSP from the Mini Catalog and fussy cut out the ornaments and peppermints. If I had purchased the bundle or the entire suite I would have had dies to cut out both. There are five 5! sizes of circles in this die set so imagine the possibilities! Do you know where that tag comes from? It is in the new ‘Pretty Pillow Box Dies’. The greetings are in the ‘Snowman Season Stamp Set’, a carryover in the Annual Catalog.


It isn’t even September and you have a Christmas card made! I am impressed!
It is a record, Sal! Maybe next year I will do a ‘Christmas in July’ like so many others like to do.
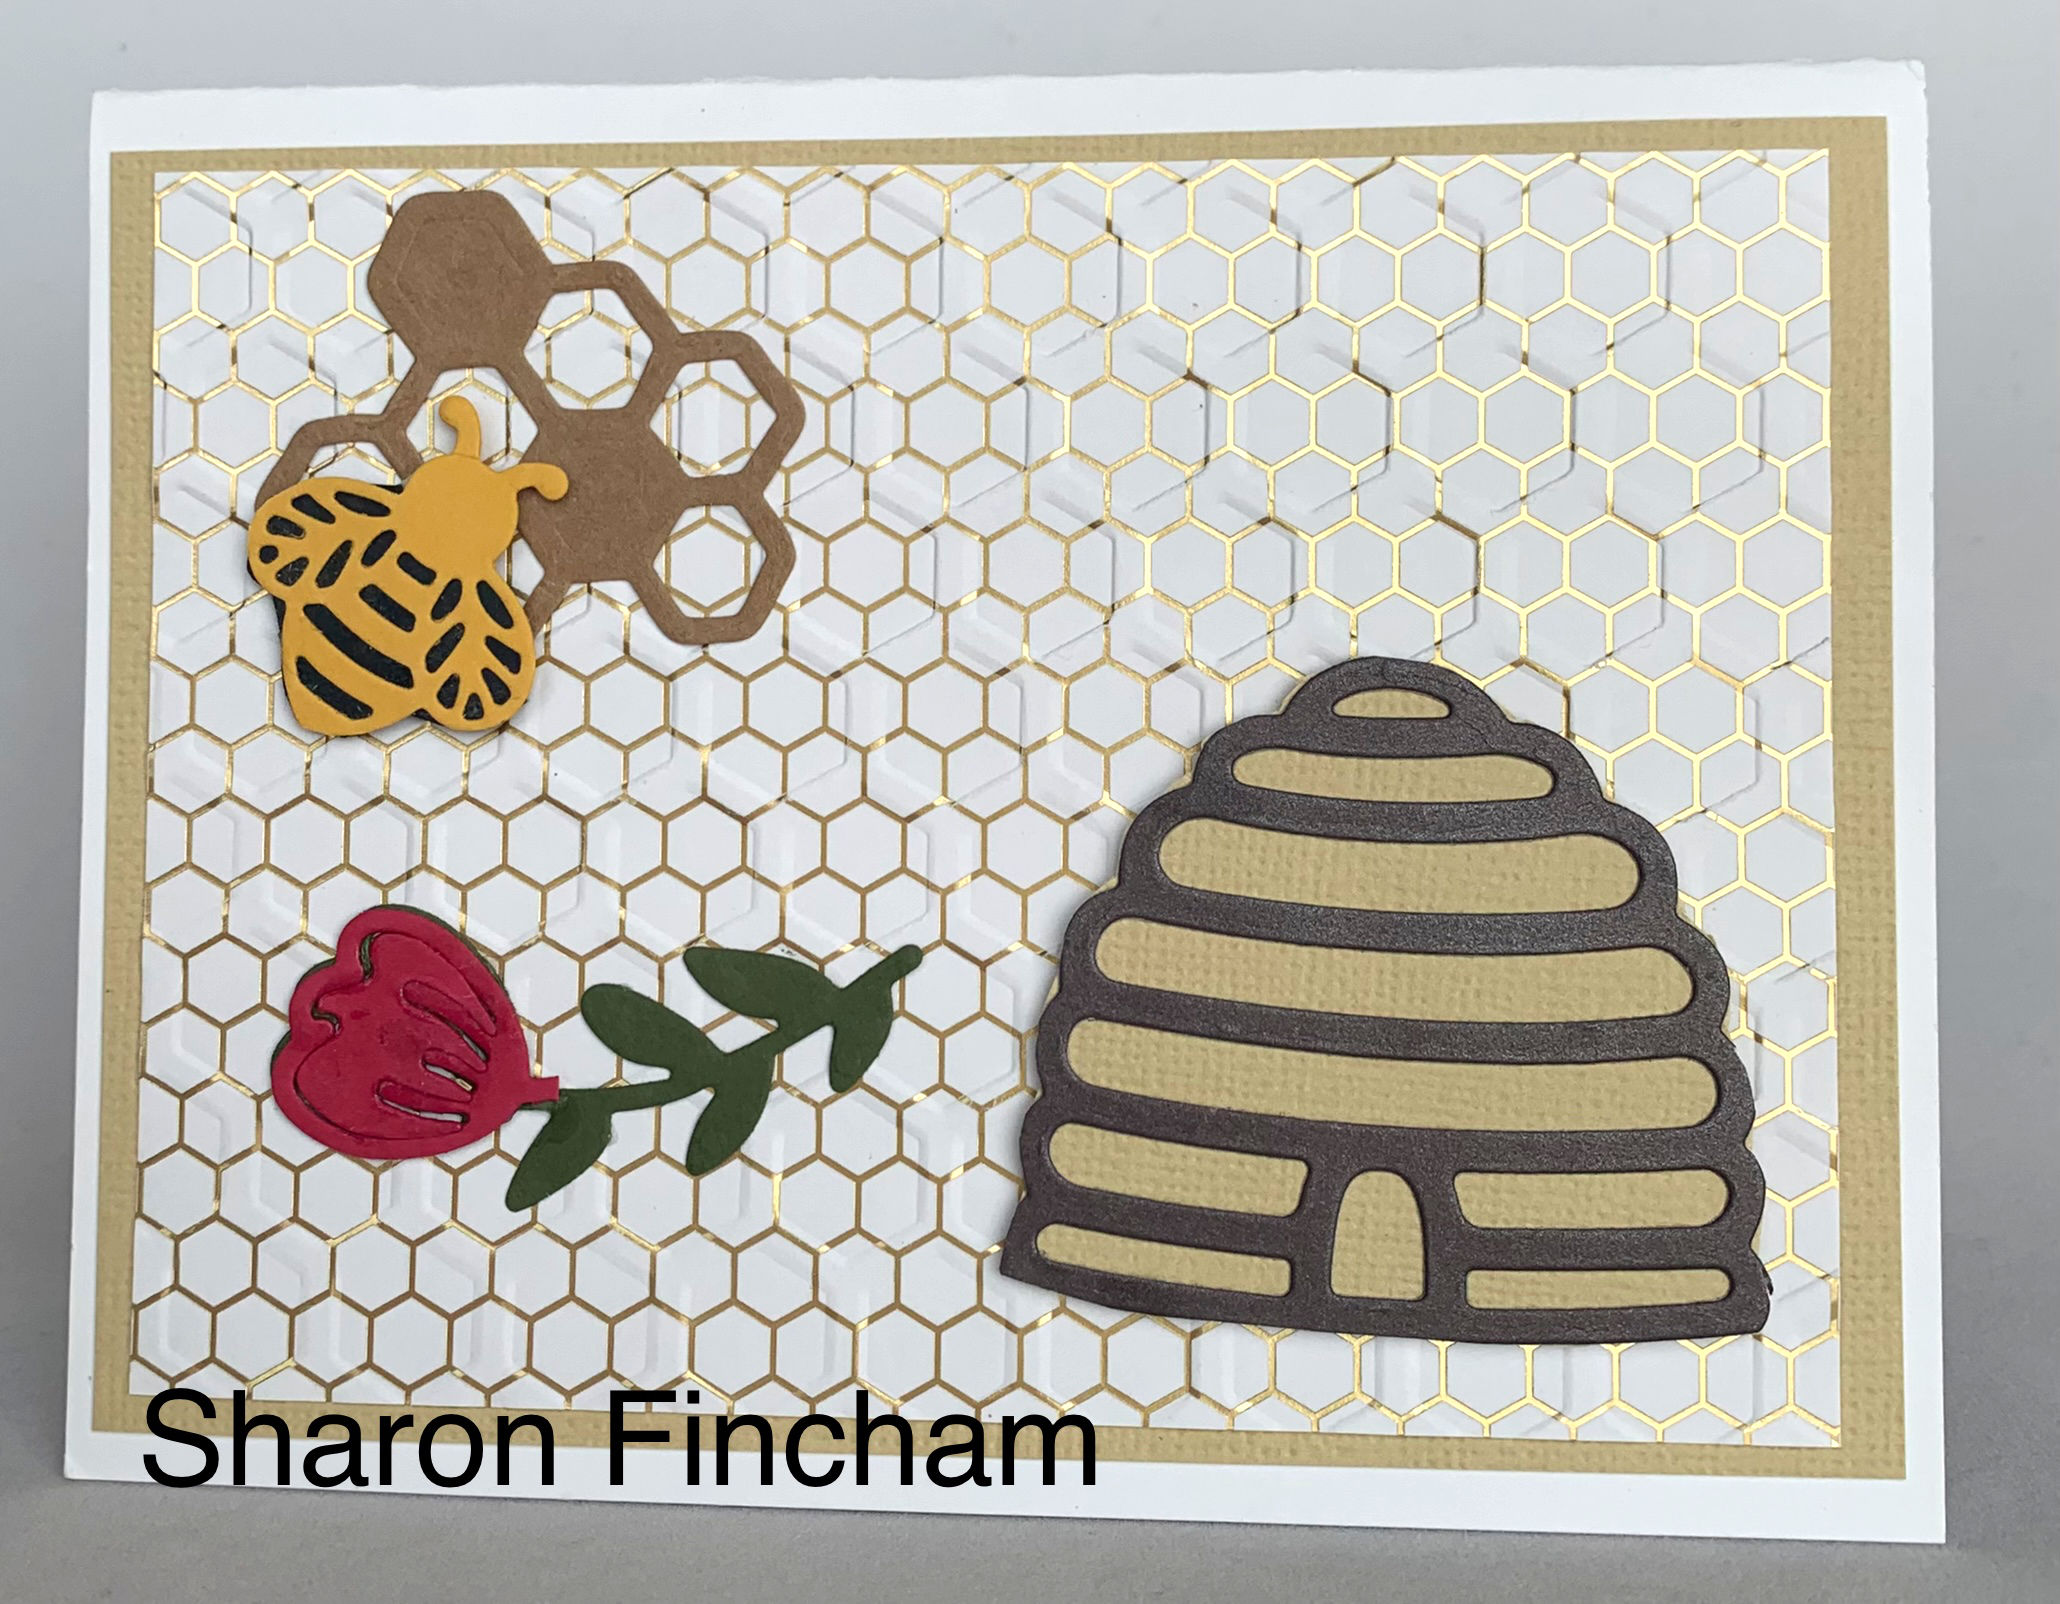
Sharon Fincham used the ‘Turtle Friends’ stamp set on retired Whale of A Time DSP. She hooked her flap under the ‘Story Label Punch’ to keep the card shut. Great idea, Sharon.

Heather Guitreau used the ‘In The Wild’ DSP and ‘Big Cats’ dies. She made a great closing flap and used a greeting from the ‘Wild Cats’ stamp set:

She made a second card thinking she needed to follow directions but we all know that the best creativity often happens outside the box!

Joy Meadow’s card uses the ‘Pansy Petals’ DSP with the greeting from the ‘Pansy Patch’ stamp set on a ‘Story Label’ punch.
 .
. Ann Hausmann used the ‘Beautifully Penned’ DSP that is free with a $50 purchase during this round of Sale A Bration which goes through September 30. I love the pop of color on the black and white.

Jo Brooks’ card made me wish I had purchased the Playful Pets DSP from the last catalog. However, we have pets DSP in our new mini called ‘Sweet Stockings’ and it is now on my wish list!


 .
.
Is that as cute as it gets?! Thank you everyone for a fun time of Mystery Stamping. I ran out of time and sent you a video instead of walking you through each step but I will get back to normal in September!
You even have the Mystery card picked out I hear!
Shhhh, Sal, or I will start talking about it and give everything mysterious away!
August 2021 Swaps
Jo Brooks used the ‘Stitched Triangle’ dies and for the bouquet of flowers, the stamps in ‘Welcoming Window’. It is the great two step stamping that we love with a stamp for the greenery and another stamp for the flowers. Adding the lace was genius!
 .
. Sharon Fincham used the ‘Turtle Friends’ and ‘Scalloped Contours’ die for this delightful card:
 .
.
 .
. Joy Meadows used the ‘Pattern Party’ DSP available to hostess’ and the ‘Dragonflies’ punch with lots of added sparkle on the black. Note how she used a flap on the front of the base instead of the standard base. Very cool and shows off both sides of the pretty DSP.
 .
.

Ann Hausmann found the cutest little lip gloss containers that looked like popsicles at Target and made a fun popsicle card with Very Vanilla and Pool Party. The popsicle images are in the ‘Sweet Ice Cream’ stamp set, retired from the last mini, but Ann hand drew all the faces to match the lip gloss container. You are the cool one, Ann!!

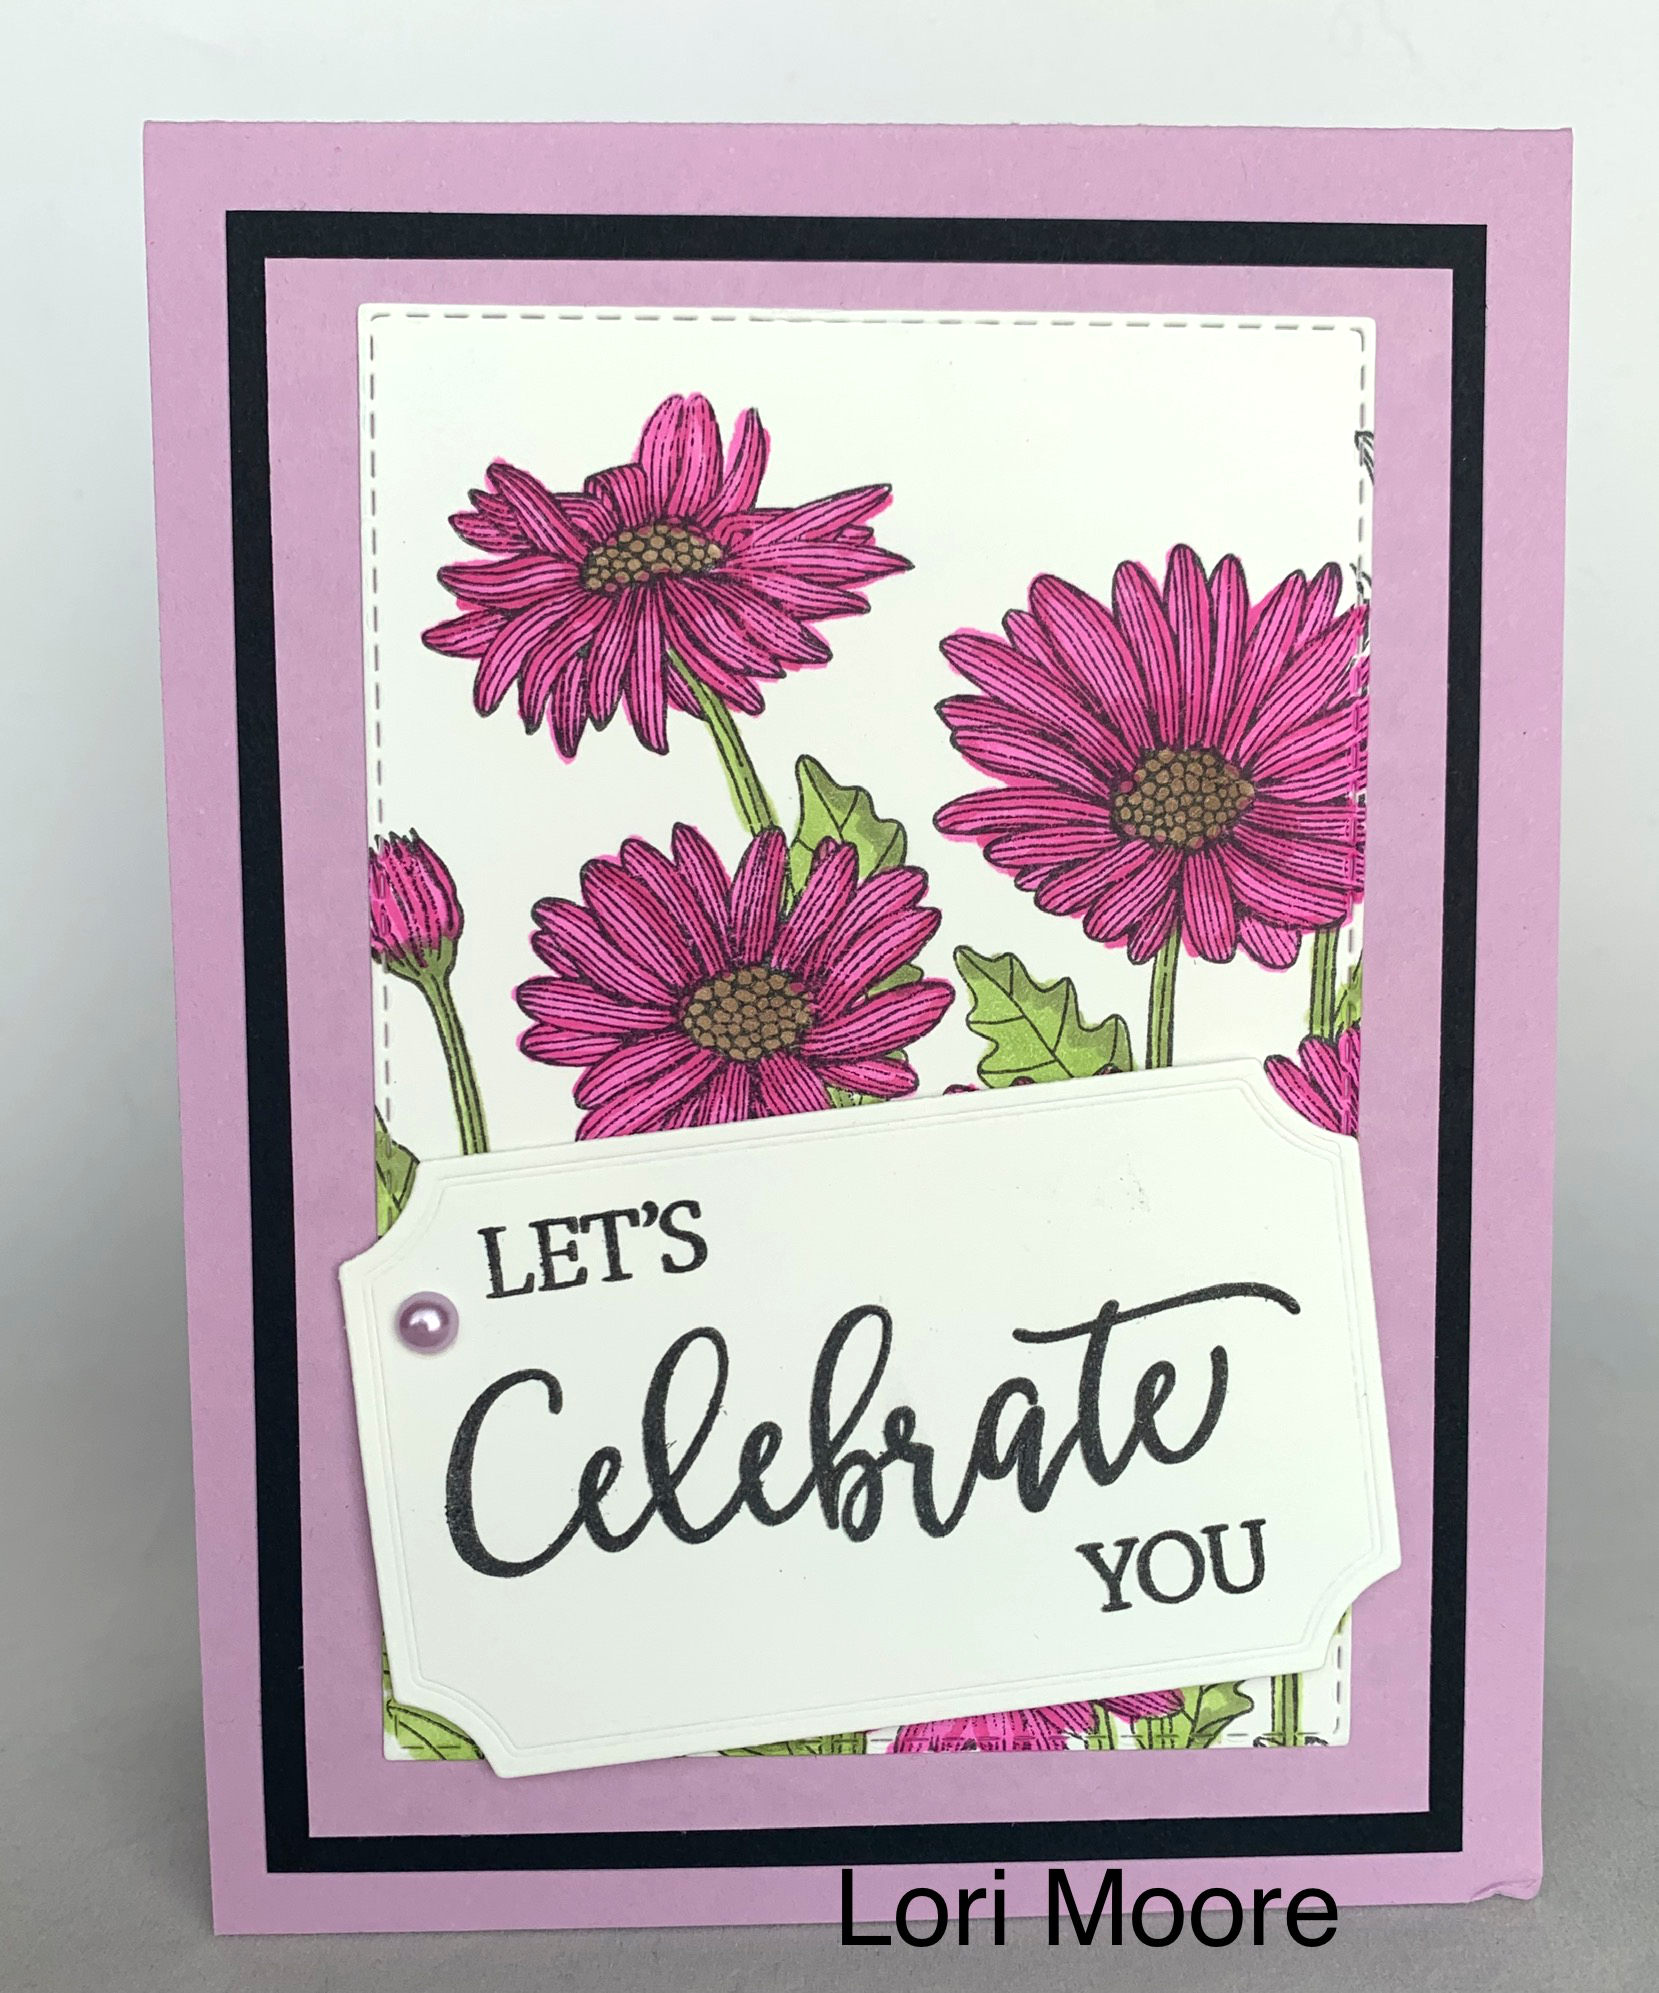
Lori had fun with the ‘Nothing’s Better Than’ stamp set which carried over to the Annual Catalog. She formatted the front words on her computer, printed them on card stock then added the words and images which she cut with her Brother Scan and Cut. The coloring is awesome as she matched the coloring on the words to the colored images. So Creative!

 .
.
My swap card was a clean and simple card. I wanted to show the swappers the beautiful ‘In Color Shimmer Vellum’ (the pink layer on the card) and the ‘Expressions In Ink’ DSP with its gold foil on the pink that looks like the alcohol ink on vellum technique we just learned. I used the ‘Tailored Tags’ dies with a cutout of gold for the reinforcement ring. The ribbon is the In Color 3/8″ Open Weave ribbon. To get the ribbon to lay on the tag the way I wanted, I used two pieces. I used glue dots to loop the bows on the right and left with nice little tails and then used a second piece and more glue dots to tie a middle around the bow. I secured the knot and the tails of this piece of ribbon on back of the tag. The good sized thanks is in the ‘Artistically Inked’ stamp set. Can you see the shimmer of the pink vellum?

Recipe for Thank You Card
- Base: Thick Basic White, 5 1/2 X 8 1/2 scored at 4 1/4
- Layer: Polished Pink Shimmer Vellum, 5 1/2 X 4 1/4
- Top: Expressions in Ink DSP, 5 1/4 X 4
- Tag: Basic White, 3 1/2 X 1 1/2, die cut with Tailor Made Tag, third from the largest plain tag
- Gold Foil, Scrap, cut with the square reinforcement ring
- Inside Border Strip: Polished Pink Shimmer Vellum, 4 1/4 X 1
- Inside Top Layer: Expressions In Ink DSP, 4 X 3/4
- Embellishment: 3 In Color gems
- Ink: Polished Pink
- Stamp Set: Artistically Inked
Did you enjoy that show? It is like having a scrapbook of cards that I hope inspires you to make your own special creation.
Remember to join Paper Pumpkin before September 10th if you want this special fall kit:
We have one more month to take advantage of Sale A Bration’s free products!

And remember to sign up for On Stage and sign up to be a part of my team if you would like to attend On Stage. (Think Prize Patrol, A goody bag, Make and Takes, The Upcoming catalog and lots of fun!) Click on the JOIN button here or at the tab on the blog.

Hostess code: WKQ6CJ7R with Cindy as our hostess this month. Cindy’s craft room is gradually getting set up there in Tehachapi, California and she made this cool card:

Since we didn’t have club in September, I set Cindy up as hostess to help her get back into stamping. She has been regularly placing outside orders that were credited to club members hostess codes so it seemed right to give her a chance at free products!
We hope to see you on Zoom some fourth Tuesday of a month, Cindy!
Her Hostess code: WKQ6CJ7R, click on little Sal to go to the online store!
SAL, Stay And Linger a bit dear summer
Karen (Thank you for choosing me as your demonstrator. After this past weekend of meeting and seeing many talented demonstrators, I felt honored to have so many of you following me.)


July 2021 Swaps
Hello Stamping Friends,
Hostess Code for August: WRQKTXMA with Joy as our hostess!
Announcement from the home office: The delayed products are back in stock and you can order them now!
If you are new to following blogs, be sure and click to open the blog post in your email and then click the title again to go to the main site. Sometimes the videos don’t even work if you don’t completely open the blog post by clicking twice.
Thank you for giving me some of your precious time as I share inspiration to bring a pinch of creativity to spice up your crafting world!
Today’s inspiration comes from the July swaps! Let’s look at the red, white and blue ones first! I love to decorate the house with cards for the season and now I have some to save forever and put on the end tables and shelves around July 4th. Do you decorate with cards?
Joy’s card feels like a 4th of July picnic with a plate of goodies on a red and white tablecloth amidst a garden of flowers! Love it! She used the ‘Encircled In Friendship’ stamp set and the ‘Encircled in Beauty’ dies with Basic White, Paper Blooms DSP, Berry Delightful DSP, Crinkled Seam Binding and Opal Rounds.

Jo’s card is another ‘save forever to decorate’ card. She used the ‘Ornamental Christmas’ framelits for the stars, the ‘All Around Wreath’ dies for a red and white layered wreath, the ‘Playful Alphabet’ dies for the lettering of July, and ‘Family Party’ for Happy 4th. Inside she used the ‘Celebrate You’ dies. She sponged with Pacific Point ink to get the shaded blue look on the base!


The inside of Sharon’s card was as decorated as the outside and both were beautiful! She used the’ American Celebration’ holiday stamps from Close To My Heart and a 4th of July block stamp for the inside. She used silver, white and aqua tinsel embossing powders with Carousel & silver sparkle embossing glitters. She has a silver star embellishment on the flag, a gold star brad on the fireworks, and blue and red stars from a roll of stickers for the inside. She used a Spots and Dots cuttlebug embossing folder and square dies from Hobby Lobby. Her cardstocks are Whisper White, Cherry Cobbler and blue.


Lori’s swap card would put a smile on anyone’s face! She made watermelons from the ‘Layering Circle dies’ and a ‘Tasteful Label Die’ for the sentiment. She also used ‘Create With Friends’ stamp set and a Close To My Heart ‘August Word Puzzle’ for sentiments. She used a small flower punch and the ‘Pattern Party’ hostess DSP with Whisper White, Polished Pink, Garden Green and Blushing Bride card stock.


Prepare to be wowed, awed and inspired by Ann’s fabulous diorama card! She used the ‘Mountain Air’ stamp set and ‘Majestic Mountain’ dies with a sentiment from Happy Trails by Simple Stories. Her cardstock is Old Olive, Crumb Cake, and Basic White with inks of Early Espresso, Shaded Spruce, Mossy Meadow, Balmy Blue, Pool Party and So Saffron.


My card is a ‘sort of’ case of one I saw Frenchie Martin post at Frenchie Stamps.com. I used her idea of the ‘Stitched Stars’ with the medium ‘Daisy Punch’ and ‘Daisy Punch’ to layer red, white and blue on top of the stars, but I cut the stars in half so they covered more of the card front and I added a different sentiment and ribbon. The dies cut out stars that I used on the top of a 1/2″ Basic White circle and on the inside red and white strips. Do you recognize that Stampin’ Up! red, white and blue ribbon? No? It is the 1/4″ ‘Quilted Ribbon’ in red and green and I used our ‘Dark Night of Navy Blends’ to color the green to make it blue! The sentiment is from the ‘Hey Birthday Chick’ stamp set stamped on a ‘Stitched So Sweetly Die’ with a sponged edge of real red.
 .
. 
Recipe for 4th of July Card:
- Base: Thick Basic White, 5 1/2 X 8 1/2 scored at 4 1/4
- Layer 1: Real Red, 5 1/4 X 4
- Layer 2: Basic White, 5 1/8 X 3 7/8
- Swirly Star: Night of Navy, 4 X 2, cut in half and adhere to red daisy then adhere to card front
- Daisy:
- Real Red 2 1/2 X 2 1/2 punched with larger daisy punch
- Basic White 2 1/2 X 2 1/2 punched with larger daisy punch
- Night of Navy 2 X 2 punched with medium daisy punch
- Circle on top of daisy: Basic White, scrap, with 1/2″ punch layered with a small star cut out from the die
- Greeting: Basic White, 2 1/2 X 2, Stitched So Sweetly Die, stamped in Night of Navy, sponged with Real Red
- Stamp Set: Hey Birthday Chick
- Inks: Night of Navy for sentiment and Real Red for sponging
- Dies: Stitched Stars Dies, Stitched So Sweetly
- Punches: Daisy Punch, Medium Daisy Punch and 1/2″ circle punch
- Ribbon: 1/4″ Quilted Ribbon, 6 1/2″ with the green stripe colored with a Dk Night of Navy Stampin’ Blend
- Inside strips:
- Real Red 4 X 1/2
- Basic White 3 7/8 X 3/8
- 3 Night of Navy stars from the die cut outs used for the swirly stars on front
- Embellishments: 3 holiday red rhinestones
I am so blessed to have found these dear stamping friends!
Didn’t some of them actually find you?
Yes, Sal, that is true! Through mutual friends and the online search for a demonstrator, we all came together.
We would love to have more of you join our circle of stampers so give me a shout out if you are interested in club or holding a workshop or attending events. 303-815-0838. If you would like to join my team of Carin’ Crafters we have a special offer during Sale A Bration and you can pick out a bundle of your choice to add to your starter kit. Check the details out HERE in my previous blog post!
Hostess Code for August: WRQKTXMA with Joy as our hostess! Click on Sal in the computer to go to the store.
SAL, Smile A Little
Karen
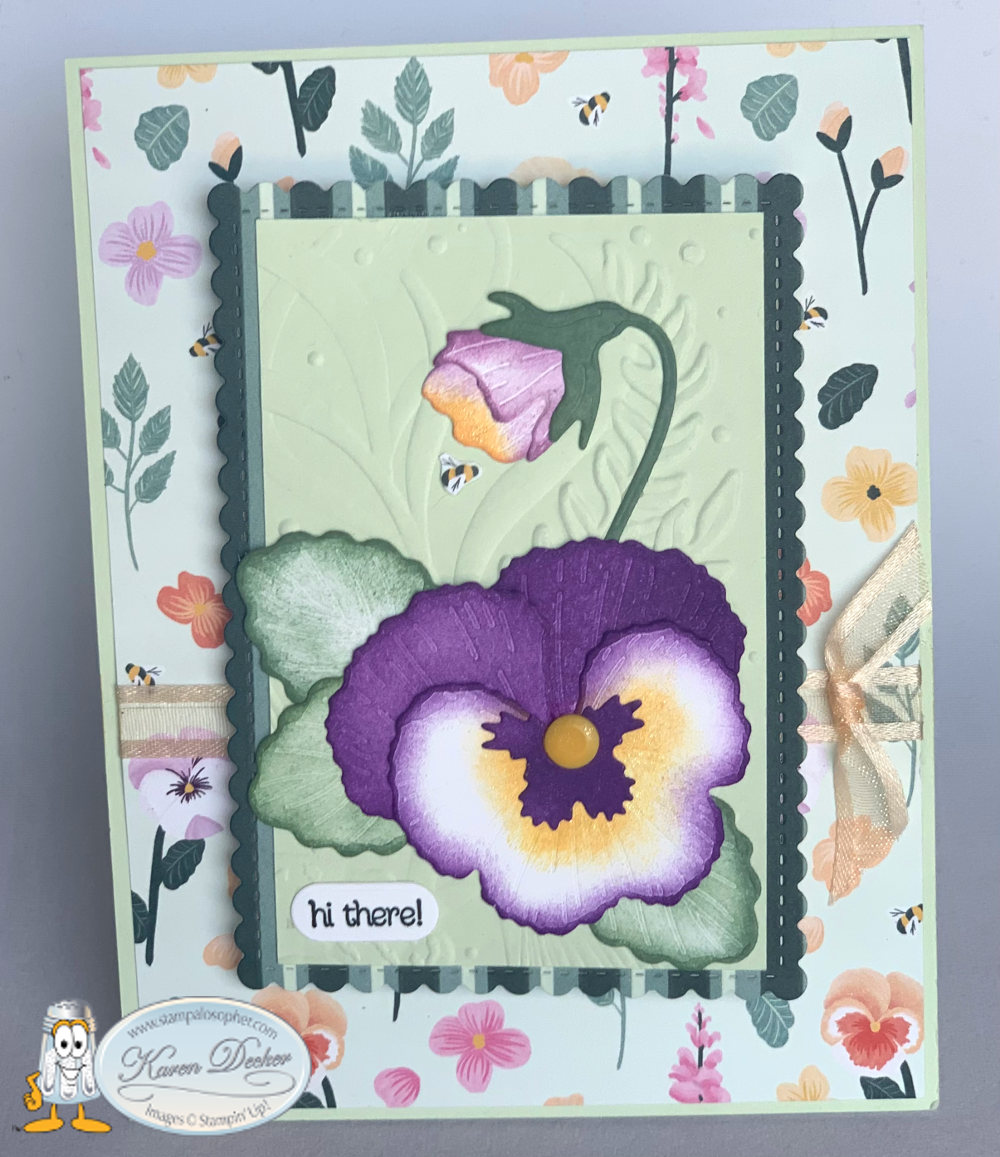
Pansy Petal Product Class
Hello Stamping Friends,
Hostess Code: ZBP7XPBT
Have you been just thrilled with the new Annual Catalog? I held a catalog launch the day the catalog went live and later in the month a Pansy Product Class to use the new Pansy Patch Stamp Set and Pansy Dies with the gorgeous Pansy Petals Designer Series Paper (DSP).
We made a card that used the dies to cut out pansies from the DSP, a card using only the stamps, a gift card holder showcasing the Designer Series Paper (DSP) and a card using the dies to do awesome punch art— four cards, four different ways to use the bundle!
Can we see the gift card holder first?
That is a beautiful one! I cased one I saw on Lynn’s Locker changing up the greeting and cut outs and……
Pansy Petals Card #1 Gift Card Holder Showcasing the DSP

 .
. Recipe: Pansy Petals Card #1
- Base: Blackberry Bliss, 4 1/4 X 11, scored at 5 1/2
- Layer: Pansy Petals DSP, 4 X 5 1/2, die cut with the largest Scalloped Contour Die
- cut out the middle with the 3rd smallest Scalloped Contour Die
- Greeting: Basic White 3 1/2 X 3 1/2, stamp with the greeting from the Better Places stamp set and cut out with the Scalloped Contour Die that has the dots and dashes
- Pansies: Pansy Petals DSP, die cut one large and one small pansy from the DSP with Pansy Dies
- Leaves: Pansy Petals DSP, die cut three leaves, one of each color, from the DSP with Pansy Dies
- Card Holder: Soft Succulent, 2 3/4 X 4, die cut with largest Scalloped Contour die
- Adhere with tear and tape on sides and bottom as close to edge as possible
- Embellishment: Flower Flourish with a rhinestone in the middle
- Ink: Blackberry Bliss
- Stamps: Better Places hostess stamp set
Pansy Petals Card #2 with Die Cut pieces on Scalloped Contour Die Layer and then popped up on Designer Series Paper


Recipe – Pansy Petals Card #2
- Base: Calypso coral, 11 X 4 1/4, scored at 5 1/2
- Layer 1: Evening Evergreen, 4 1/8 X 5 3/8
- Layer 2: Pansy Petals DSP, 4 X 5 1/4
- Top Layer: Basic White, 4 X 2 3/4, die cut with 3rd from smallest Scalloped Contour Die
- Inside: Basic White, 4 X 5 1/4
- Inside Strip: Evening Evergreen, 1/8 X 5 1/4
- Flowers:
- Top of leaves and stem: Evening Evergreen, 2 X 2 1/2
- Leaves: Soft Succulent, 2 1/2 X 1 1/4
- Edges of pansy, beard and inside of bud: Calypso Coral, 3 1/2 X 2 1/4
- Inside of petals at back of pansy and outside of bud: Pale Papaya, 3 1/2 X 1 1/2
- Largest petal of the pansy: Basic White, 2 1/8 X 1 5/8
Note: for those of you who may want to teach this class- Save the above pieces with the cut outs already made for a template for your students to follow; glue to a basic black cardstock like this:

- Embellishments: An Elegant Faceted Gem in the middle of the flower and a fussy cut bumble bee and inside flower
- Ink: Evening Evergreen
- Stamp Set: Pansy Patch
- Dies: Pansy Dies, Scalloped Contour Dies
Not so fast, Sal, there are two more cards that we made. The next one uses my favorite die set – the Curvy Dies and greetings from the Quite Curvy Stamp Set. You can only get this for the next two days then it is gone gone gone.
Pansy Petals Card #3 using the Quite Curvy Stamp Set and Curvy Dies (on sale until June 30):


I love how the plain stripes and the very busy flowerdy DSP balance each other out. I saw this combo on Aromas and Art.com with Su Mohr. The inside bottom stripes are from the cutout on the front so die cut the front carefully.
Recipe – Pansy Petals Card #3
- Base: Thick Basic White, 8 1/2 X 5 1/2, scored at 4 1/4
- Top Layer: Pansy Petal DSP, 5 1/2 X 2 1/2, Cut with the Curvy Die on 5 1/2 length; the cut of the curve is 2 1/2″ down from the top on the left and 2″ down from the top on the right.
- Bottom Layer: Pansy Petal DSP-Stripes going vertical, 5 1/2 X 1 1/2; the cut of the curve is 3/4″ on the left and 1 1/4 ” on the right hand side.
- Pansy: Pansy Petal DSP, Die cut one large pansy
- Leaves X 3 : Soft Succulent, 1 X 3 1/2, Die cut three leaves- the die does the embossing of the veins!
- Glue the leaves to the back of the pansy and pop it all up with dimensionals
- Embellishments: Three of the Evening Evergreen In Color Jewels
- Ink: Evening Evergreen
- Stamp Set: Quite Curvy
- Dies: Curvy Dies
Use the Stamparatus to position the curved sentiment from Quite Curvy between the two DSP sections on the front matching the curves of the DSP. If you are concerned that you may not get it stamped correctly, temporarily adhere your top and bottom and then stamp so that you can add a piece of Basic White if you mess up. With the stamparatus, I was able to draw the placement of the card on the grid sheet and the stamp was adhered to the plate with the correct curve. No one had a problem getting it correct.
Pansy Petals Card #4, Stamping the Pansies and Leaves


Recipe – Pansy Petals Card #4
- Base: Thick Basic White, 8 1/2 X 5 1/2, Scored at 4 1/4
- Layer 1: Pacific Point, 5 1/2 X 4 1/4, Cut with the largest Ornate Layer Die (Remember to put a folded piece of dryer sheet underneath your cardstock- it pulls out almost all the little dots so you don’t spend time pocking them out) Layer the dryer sheet, then the cardstock, then the die. Glue this layer directly to the base being careful not to get glue close to the holes.
- Top Layer: Basic White, 3 3/8 X 4 7/8, This will be stamped and then popped up on the Ornate layer
- Embellishments: Three of the Holiday Rhinestone gems
- Inks: Pacific Point, Garden Green, Daffodil Delight, Crumb Cake
- Stamp Sets: Pansy Patch for the front greeting, Encircled In Friendship greeting for the inside
- Dies: Ornate Layers Dies
To stamp:
- Stamp your greeting first at the top so you know how close you can get with the large pansy, full strength in Pacific Point
- Use Pacific Point to ink up the full pansy images, STAMP OFF, then stamp, one large pansy a little left of center and two small pansies. “Ink up, stamp off, stamp on”,,,,,, “Ink up, stamp off, stamp on”. I have to sing that to remember!
- Position the bud so it is above the small pansy and yet not off the paper, ink up in Pacific Point, STAMP OFF, stamp on
- Ink up the detail shadowy stamps in full strength Pacific Point and stamp them over the images
- Using Night of Navy Ink stamp the little beards on the three pansies
- Using Daffodil Delight Ink stamp the centers on the pansies
- Use the Waterfront stamp set and Crumb Cake Ink to stamp the ground in the bottom 3/4″, or freehand with a blender pen
- Now MASK OFF the pansies and the ground to stamp the greenery
- Using Garden Green Ink, ink and stamp the stem going to the bud
- Using Garden Green Ink, ink and then stamp the single stem three times coming down to the ground from the large pansy; one time stamping to the shorter pansy and twice to the taller pansy; use a garden green marker to soften where the edges of the stamp meet when you stamp multiple times
- Using Garden Green Ink, Ink up the small leaves full background, STAMP OFF, stamp on
- Using Garden Green full strength, ink up and stamp the detail shadows of the leaves
- Mine looked funny with the stem to the bud going out of a leaf so I masked the leaves and stamped a little stem between the leaves.
Variety is the spice of life, Sal, and I think we held to our motto of ‘bringing a pinch of creativity to spice up their crafting lives’!
Don’t forget the other pansy cards we made in a previous post- click their picture to go to that post for directions. There’s ribbon on both of these, Sal! I think I liked this sponged pansy best.
 .
. 
And Joy’s swap card with the pansy:
 .
. You now have a seven card collection of pansy cards! If you feel overwhelmed with the number of dies check out this guide made by Gail Ellis of Blue Rose Paper Treasures. Isn’t it great to have others to help us?! Pinterest also has guides to different colors to use for the pansies.

July 1 is the start of the Designer Series Paper (DSP) sale and you can buy the Pansy Patch DSP at 15% off. Here is a cute gif showing the other papers offered in this sale:

That makes me dizzy – may we have a list?
How about a picture and a list?
 .
. 
Use Hostess Code: ZBP7XPBT if you do decide to order and you will help me to buy prizes with hostess dollars for upcoming events. Check out the JJ Mini one more time to make sure you don’t miss anything.
I thank you most sincerely!
SAL, Stamp A Lot, Smile A Little, and always be Salt And Light to those around you!
Karen
June Mystery Card #14, June Swaps and more
Hello Stamping Friends,
Hostess Code: ZBP7XPBT

For 24 hours only 12:00 AM to 11:59 PM on tomorrow June 24 you can get free shipping on orders $50 and more. Running out of Basic White cardstock, glue dots, stampin dimensionals, …… ?? Order now and if your order totals $50 or more you won’t pay the shipping. Of course the JJ (Jan-June) mini has some amazing items that are retiring and some are even up to 50% off. You can order all you want and not pay the shipping. Click in the Last Chance Box to visit the store and see what is left:

And remember, Stampin’ Up! has a new line of kits and as they sell out, new ones are added so check back often to:

Wow – there is a lot going on!
Yes, Sal, and it just gets better! July 1 Stampin’ Up! will have a sale on select Designer Series Papers (DSP), and in August the new mini catalog and second Sale A Bration (SAB) promotion go live! If you ordered from me this past year, or are a member of club, you will receive both the mini catalog and the SAB brochure in your mailbox! Or contact me if you would like the catalogs and I will send you one. Email: [email protected] or text to 303-815-0838
Let’s look at Mystery Card Challenge #14:
Mystery Card Challenge #14 printable pdf file

Whoo hoo – it’s a Faux Pinwheel Card!!
Well, the true pinwheel cards are made with triangles and one edge folds in to the middle for a fancy fold. Our’s lies flat.
I made one just to make sure the dimensions worked:
 .
. 
I used the Dandy Garden DSP (retiring in 7 days-just saying). The greeting and the inside vine are from Very Versailles and I embossed the front with the Ornate Floral Embossing Folder. I used a 3/4″ circle punch for a scrap embossed piece. Can you guess where the stitched shape for the greeting comes from? No? Well, it is one of the shapes that you die cut with the Messages die. I cut several for use with other greetings like this one! I had truly overlooked this greeting in the Very Versailles set. I love scrolly images and this one is so nice!
Here is the second faux pinwheel card that I made during the Zoom as I instructed others how to construct the card:


I used the True Love DSP which is also retiring with the JJ Mini Catalog. The greeting is from Many Messages which was introduced in the JJ Mini Catalog and carries over to the new Annual Catalog – but wait — it has a second set of greetings in the new catalog:
 .
. Think how nice it would be to have all those shapes cut out blank or stamped to use!
Check out Ann’s bright and pretty faux pinwheel using DSP from Sale A Bration and the Tasteful Textile 3D Embossing Folder. The greeting is another in the Many Messages stamp set.

Sharon’s Pinwheel is unique with amazing trinkets and an embossing folder with anchors!

Jo’s pinwheel card uses the birds from a previous DSP and pool party for a soft subtle look! Her greeting is one I know I will use often; it comes from the Welcoming Window stamp set.

Joy’s card uses black and white DSP from the hostess Pattern Party DSP with a pop of yellow to brighten it up! She embossed the yellow with the Ornate Floral embossing folder

Such fun cards! Thank you Ann, Sharon, Jo and Joy for participating. Send me a picture if you make one yourself and I can add it to this collection of Faux Pinwheel Cards.
June 2021 Swaps
I made my June swap using the Curvy Dies and the Quite Curvy Stamp Set. If I were in charge this set would carry over for years like the Lovely As A Tree set that was in for many years. But it isn’t; it retires June 30 with the JJ Mini. The dies are on sale for 50% off and you would get free shipping tomorrow- ju..
So sorry, I do repeat myself! This card is a case of one that Jenny Moore of Stamping Moments made except I changed the flowers and the DSP. The DSP is from the hostess Pattern Party paper in Misty Moonlight layered on a Just Jade base with a bridge fold design. The yellow flowers and inside greeting are from Hand Drawn Blooms and the daisy is the medium daisy punch.


Recipe for Curvy Bridge Fold Swap Card
- Base: Just Jade, 8 1/2 X 5 1/2, Score at 2 1/8 on each end of the 8 1/2 side
- Right hand side Layer: Pattern Party DSP, 5 1/4 X 1 7/8
- Inside Layer: Basic White, 5 1/4 X 4
- Curvy Cut Left Layer: Basic White, 3 1/2 X 5 1/4, die is placed about 1″ from right hand side with flourish facing left
- Vine, bird, & 2 medium daisy punches: Basic White, 4 1/4 X 5 1/2, stamp then die cut the vine and bird
- Yellow Flowers: Bumblebee, 3 X4, stamp six with Memento Ink and flower in Hand Drawn Blooms; cut the middle out of three of the six and layer on top of the other six with a folded glue dot, ( when you roll a glue dot on itself to use, you get a slight pop up a little less than the depth of a Stampin’ Dimensional.
- Branches of leaves: Just Jade, 3 X 2 1/2, Cut three full branches with the Curvy die and one partial branch for the right hand flower
- Greeting: Misty Moonlight, 3 1/4 X 1 3/4 die cut with a Tasteful Label Die
- Bling on flowers: Ephemera pack sequins
- Faux Felt for Middle of Daisy: Use a scrap of Bumblebee and use a bone folder over and over to distress the cardstock and break the fibers until you can pull apart the two layers of the cardstock. Voila – faux felt.
- Stamp sets: Quite Curvy, Hand Drawn Blooms
- Ink: Versa Mark with white embossing powder for front greeting, Misty Moonlight for inside greeting
- Dies: Curvy Dies, Banner Bloom Dies (yellow flowers) Tasteful Labels Dies
- Punch: Medium Daisy Punch
- Stampin’ Blends: Light and Dark Shaded Spruce for vine and Light and Dark Seaside Spray for birds
Jo’s swap card was so delightful! She used the Dressed To Impress stamp set with a Melon Mambo ‘compact’ on a layer of diamond embossed Basic White on a Basic White base. For the mirror she used silver foil and she used the Layering Circle Dies to cut the folded Melon Mambo, and then sparkled it up with Bright Enamel Shapes.

 .
. Ann used the Back On Your Feet stamp set with Paper Blooms DSP and Old Olive cardstock embossed with the Checks and Dots embossing folder on a Basic Black base. She die cut the scalloped square with the Layering Square die and Crumb Cake card stock. The greeting uses the Double Oval Punch. She has Opal Rounds and Black Matte Dots for bling. She colored the turtle with Old Olive and Soft Suede blends- for a truly perfect ‘blend’ of colors.

Joy made an arrow fun fold card for a striking card-pun intended. She even made specially sized envelopes to mail them. Wow! She used the Expressions in Ink DSP, Artistically Inked Stamps & Dies, Soft Succulent Ink, and Pale Papaya Cardstock. I love that large die cut and the gold foil in the DSP. This card took my breath away!
 .
. Sharon’s card uses the Honey Bee stamp set and the Hey Girlfriend stamp set with the Honey Bee DSP and a Honeycomb embossing folder and Bumble Bee dies. So darn cute!!


Lori’s card is another beautifully colored card using the Daisy Garden stamp set, the Create With Friends outside sentiment and the Best Year stamp set for the inside sentiment. Her layers are Fresh Freesia, Basic Balck and Whisper White with the top layer cut with the Rectangle Stitched Framelit Die. She colored with Magenta Madness, Mossy Meadow, Bronze and Granny Apple Green Blender Pens. Gorgeous card! I love black as an accent and daisies – ahh be still my heart.


It is a good thing that our cards aren’t in a contest. It would be impossible to pick a winner!
I had three other cards that I wanted to show you just for fun.
Sharon was in a seaside mood and made this additional card:

Joy was using more black and white and made a beautiful card:

And Lucille gave me this thank you card after spending a weekend with me as her house was being shown:

Amazingly talented stampers- each and every one!
That is it for today! Tomorrow Stampin’ Up! will let demonstrators know what DSP will be 15% off starting July 1 so stay tuned.
July we will be traveling to Glacier National Park for a long vacation so there will be no event on my standard second Tuesday of the month but we are swapping in July and I will have those cards at the end of the month.
You told everyone you would be posting the cards from the pansy product class. Yes?
I did say that and yes, I will post those sometime soon!
In the meantime, stock up with free shipping and check out the retiring items.
Hostess Code: ZBP7XPBT
SAL, Still A Lot of items in the sales
Karen
Simply Succulents and Potted Succulents Dies
Hello Stamping Friends,
Hostess code: ZBP7XPBT
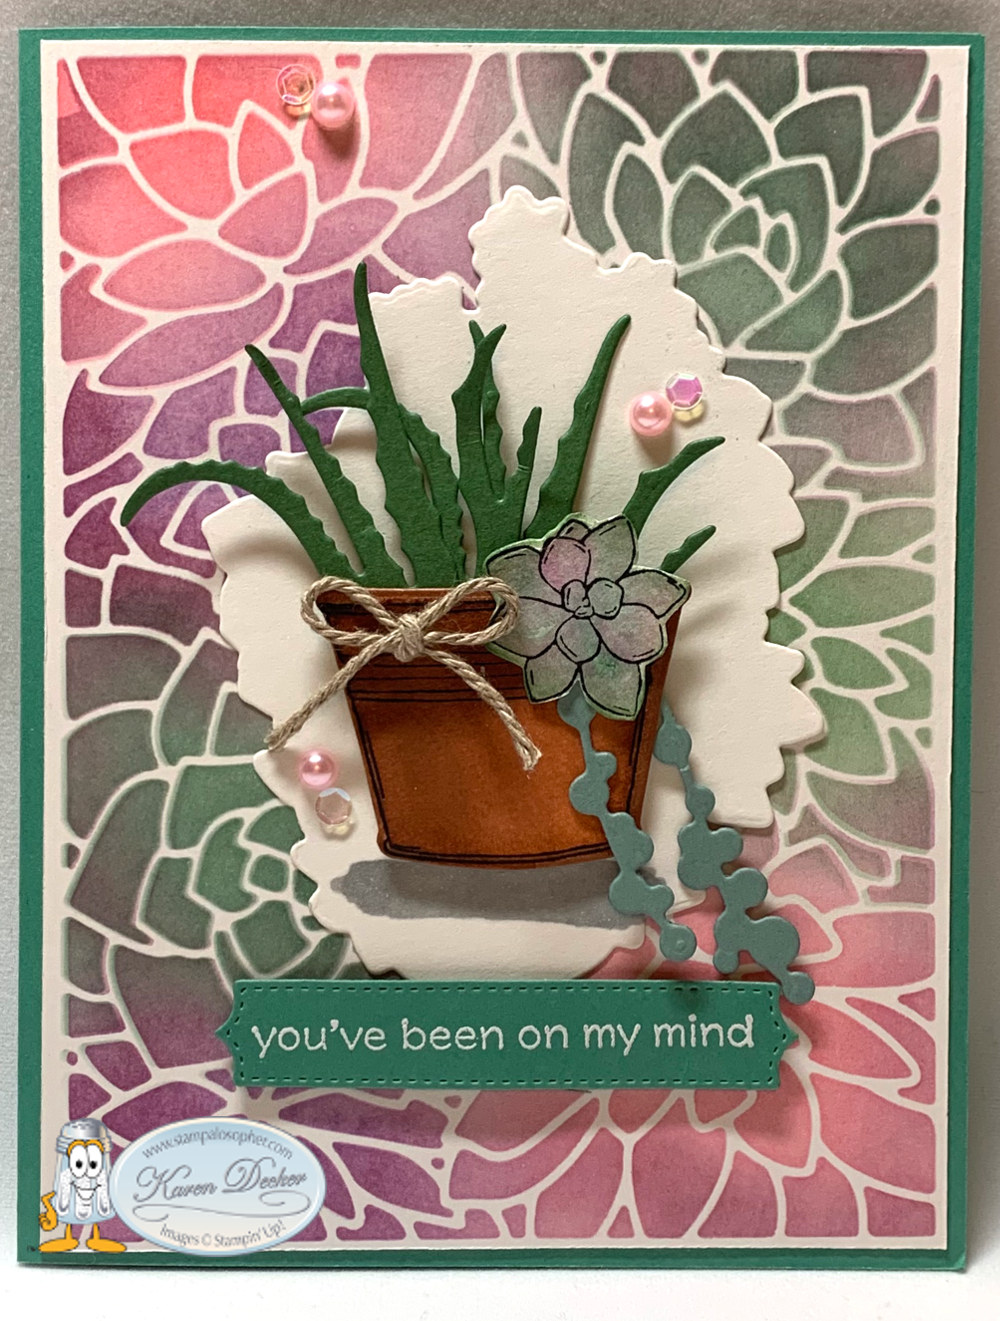
Our first rotation of club was last Tuesday, June 8, and we made what I call ‘Two At A Time’ cards using the Simply Succulents Stamp set and the coordinating Potted Succulents Dies. We used the largest die to create a stencil to sponge the succulents, check out these dies:

Then using our stamparatus we stamped our images with Stazon ink on water color paper.

I think they would rather see the cards first.
Ahhh….. I suppose that would be a good idea.
CARD 1:

CARD 2:
 .
. INSIDE OF BOTH CARDS:

It is ‘two at a time’ because we use the stencil itself on the first card and the sponged piece on the second card. We die cut the Shimmer White for a cut out on the first card and a background piece on the second card. I cut three aloe vera plants at the same time using one on the first card and two on the second card. Two runners were cut with the dies with one used on each card.
If you would like to watch a video for making the cards it is on both Youtube and on my Facebook ‘Stampalosopher’ page as well as here:
Recipe For ‘Two At A Time’ Simply Succulents:
- Card Bases: 5 1/2 X 8 1/2 scored at 4 1/4
- Card 1 – Highland Heather
- Card 2 – Just Jade
- Shimmer White: 5 1/2 X 4 1/4; make 2 and die cut one with card size stencil die, tape to second piece and sponge; after sponging, use the paper trimmer to cut off 1/16 of an inch on each side. Use the long sides to bring all those pretty colors to the inside. See the picture of the inside above.
- Card 1 – Use the die cut stencil
- Card 2 – Use the sponged background
- Shimmer White: 5 3/8 X 4; die cut the upper right hand side with the large succulent combo die, punch the corners with the Triple Punch (retired)
- Card 1 – Use the full piece with the upper right corner die cut out
- Card 2 – Use the die cut out from the full piece; sponge ever so lightly with Soft Succulent ink & Blending Brush
- Shimmer White: 2 3/4 X 4 1/4 for Card 1 to go sandwiched between the card base and the stencil layer, place 1/8″ from sides of the base in top right corner
- Shimmer White: 2 3/4 X 4 1/4 to make the two inside cut outs using the large succulent die to cut out then stamping with the greeting in the stamp set ‘Encircled In Friendship’
- Card 1 – Sponge Shimmer White piece ever so lightly with Highland Heather ink & Blending Brush
- Card 2 – Sponge Shimmer White piece ever so lightly with Soft Succulent ink & Blending Brush
- Watercolor Paper: 5 X 5; stamp all images at the same time
- Card 1 – Larger combo of succulents stamp and a pot
- Card 2 – One small succulent and a pot
- Garden Green: Aloe Vera Plants; Make 3, 5 1/2 X 2 1/2
- Soft Succulent: Trailing Vines; Make 2, 5 1/2 X 1
- Greeting: 1 X 3, stamped with Versa Mark and greeting from the Stamp Set ‘You’ve Been On My MInd’ then embossed with white embossing powder
- Card 1 – Highland Heather
- Card 2 – Just Jade
- Bakers Twine: Crumb Cake
- Card 1 – 11″ to wrap a pot and tie a bow
- Card 2 – 6″ to tie a little bow
- Embellishments:
- Card 1 – Pastel Pearls in Gorgeous Grape
- Card 2 – Pastel Pearls in Pink with a sequin beside it from the Expressions in Ink Ephemera Pack
Embellishments are even two at a time – how quaint!
Is that a compliment, Sal, or are you being sarcastic?
- Inks used: Highland Heather, Soft Succulent, Flirty Flamingo, Mint Macaron, Blackberry Bliss, Cinnamon Cider, Pear Pizzaz, Garden Green, Gorgeous Grape
- Stampin’ Blend: Soft Smoky Slate used to create shadow on Card 2
- Stamp Sets: Simply Succulents, Encircled In Friendship
- Dies: Potted Succulent Dies
Thank you for stopping by today. I hope you have learned a bit more about using our tools to create awesome cards. If you are looking for a demonstrator, I would be honored to have you choose me and join our group of Carin’ Crafters!
For now, SAL, sailing a long to the next project
Karen
Hostess code: ZBP7XPBT
Click on little Sal in the computer to go to the online store.
Peek A Boo Card and Open Book Easel Card
Hello Stamping Friends,
Let’s look at this month’s club cards for those who have kits and need the instructions or those who want to recreate cards like them!
Peek A Boo Card

Here is the Youtube video: (Did you know you can go to the settings and increase the speed?)

Thanks to Dawn Griffith for these dimensions.
- Base: Basic White, 4 1/4 X 8 1/2 scored at 4 1/4
- Using the 2nd Largest Oval in the Stitched Shapes Framelits, fold the Basic White and cut ovals on the right hand side through both front and back. My ovals are 1/2″ down from the top to the top edge of the framelit, 3/4″ up from the bottom to the bottom edge of framelit and 2 1/4″ from the right side of the Basic White to the left hand side of the framelit.
- Front: Hydrangea Hill Designer Series Paper (DSP), 4 1/4 X 5 1/2
- Inside: Hydrangea Hill DSP, 4 1/4 X 4 1/4 (minus a hair on the horizontal side to take into account the score line)
- Using your Oval Framelit and a sticky note to hold the DSP in place on the Basic White, cut an oval in the front DSP and another oval on the inside DSP. SAVE the cutout from the inside to glue on the mechanism.
- Mechanism A: Highland Heather, 4 1/4 X 5 3/4, scored on the long side at 5 1/2
- Mechanism B: Highland Heather, 4 1/4 X 3, scored on the short side at 2 3/4
- Fold and burnish well the 1/2″ tabs on mechanisms A & B. Attach A to the left side of the front DSP with the tab to the inside and attach B to the inside DSP on the right hand side with the tab hidden on the inside. Note: I used tear and tape and rolled the tiny bit of excess tape back onto itself to prevent any glue from catching on the mechanism.
- Use a pencil to outline the oval on the Highland Heather and stamp your front greeting. I used Blackberry Bliss to give a darker purple color and the friendship greeting in ‘Grace’s Garden’ stamp set.
- Stamp the greeting on the oval cutout for the inside; I used the friend greeting from ‘Heartfelt’
- After attaching the mechanisms, glue your inside DSP to the Basic White and then the front DSP to the Basic White. Note: put the glue on the white not the front DSP because that piece is larger than the Basic White. The small mechanism should go into the middle with the large mechanism at the back.
- Use your pencil again to draw the oval for the inside on the mechanism that peeks in when you open the card. Glue the oval cut out in place
- Embellish with a little piece of ‘Gorgeous Grape Ribbon’ 2 X 1 1/2, two blackberry bliss punched butterflies, 3 pastel pearls and 1 butterfly gem (can you find it hiding on the left hand side?)
Open Book Easel Card
I was so delighted with how this card turned out and patting myself on the back but then had a humbling experience as I tried to do the Facebook Live and the sound echoed and the lighting didn’t work…… The silver lining to the mishaps was that I went to Youtube and learned how to edit a Youtube video so I could cut out the first eight minutes of echoing to make it a little easier for you to endure. Unfortunately, I couldn’t fix the lighting so it still has a bit of a glare – so sorry for that less than professional presentation. If you viewed the first video you see I had both lighting and sound corrected. I made better notes for set up next time.


Thank you to Tina Zinck of the Serene Stamper for teaching me how to make an Open Book Easel Card.
- Base: Misty Moonlight, 5 1/2 X 8 1/2 scored at 2 1/8 and 4 1/4. Fold in half and then Z fold the 2 1/8″ score line
- Bottom Layer at top of easel and the layer at the base of easel (X2): Brass Foil in the ‘World of Good’ DSP, 5 1/8 X 1 7/8, watch the direction of the words as you glue the pieces to the base
- Easel Stand: Misty Moonlight, 5 1/8 X 7/8 and a DSP strip of compasses, 4 7/8 X 5/8; Note the Misty Moonlight has no border but the compasses DSP does have a border
- Globe and Stand: Misty Moonlight, 2 1/4 X 2 1/4, Die cut circle with the circle in the World Map Dies, Use Brass Foil 2 1/4 X 3 1/4 to die cut the globe and the stand
- Book Layers:
- Cinnamon Cider: 5 1/8 X 3 7/8; score at 2 9/16 – one 16th mark past the half mark
- Designer Series Paper: (Beige with words) 4 7/8 X 3 5/8; score at 2 7/16, one 16th mark less than the half mark
- Cinnamon Cider: 4 5/8 X 3 3/8; score at 2 5/16, one 16th mark past the quarter mark
- Designer Series Paper: (Map) 4 3/8 X 3 1/8; score at 2 3/16, one 16th mark less than the quarter mark
- Banner: Cinnamon Cider, 1 X 3, Stamp with Memento Black and embellish with the Antiqued Corners
Curl each of your book layers. Break the fibers with the bone folder then wrap around the Take A Pick tool.
Place Tear and Tape on the middle of each book layer, burnish well, attach to its layer. Note: fold the layer in half to place so you can get it right on the score line of the next layer down.
Place glue dots on the edge of each layer and push the layer in toward the middle to maintain the curl before you push down on the glue dots. Hint: Use less curl if you are mailing and a little more if you are hand delivering.
Place Tear and Tape on the easel top base at 1/16 down from top and over 1/16 on the right and the same on the left and all the way down on the top easel layer to mount the book to your easel base. Mount your book recurling that last layer if needed.
Use glue dots to mount the globe to the bottom of the top page of the book checking placement so that the globe fits correctly on the base.
Stamp your greeting on the Cinnamon Cider strip, embellish with the antique corners and mount with glue dots.
I used white embossing and “Congratulations on this new beginning” on the inside.
That, my friends, is the second of our two club cards for April. May is the catalog launch and then we start a new club rotation in June so contact me if you are interested and I will answer any questions you may have. Text 303-815-0838.
Remember: the World of Good Suite and all its individual products (page 24-26 of the Annual Catalog) are retiring and most have a huge discount right now so head to the online store to purchase them. The Butterfly punch I used on the first card is also retiring (Butterfly Duet, pg. 165) and it is great for quick embellishments in the color of your choice. Butterflies are always good for those times when we get a shadow or smudge on our artwork!
Have a wonderful day!
SAL, Share A Love of stamping

Welcome to my blog!

Sal Window to Products


