
Home » St. Patrick’s Day
Category Archives: St. Patrick’s Day
Having fun with Leprechauns!
Did you all eat corn beef and cabbage and look for leprechauns? Nor did I, however, I did have fun with leprechaun cards!
Last month at the Shoebox event, Jo Brooks was the hostess and we made two St. Patrick’s Day cards to which I added leprechauns to delight the hearts of the grandkids! The Whimsy stamp set “Lucky Leprechauns” had fun images to stamp which were even more fun to color! I just put a leprechaun over the greeting on Jo’s design- sounds like a trick a leprechaun might do -popping up just anywhere!

I added two more on the inside and stamped a couple leprechauns on a separate sheet to send in the envelope for the little ones to color.

The shamrocks and greeting are from the Stampin’ Up! ‘Lucky Clover’ stamp set. I just colored the back of the stamp to say ‘sending love’ instead of ‘sending luck and love’. Jo’s black and white plaid/dots and those bright green sequins were the perfect accents!
Jo’s second card was as beautifully designed as the first:
 .
. 
I just modified the inside with a leprechaun and the ‘Lucky Clover’ greeting! It was fun to have two different color schemes on the cards! Thank you, Jo, for a fun time and two great cards!
Having just purchased a Mini Minc Machine for foiling as well as a roll of bright green foil, I designed a few cards using the Whimsy “Lucky Leprechauns” stamp set and the Whimsy Toner Card Fronts – 8 to a pack, 2 each of 4 designs.


The toner fronts from Whimsy are a full A2 card size so I had to cut off a strip to have a border on front so I used that strip on the inside of one of the cards. ‘Sending Love’ is from Stampin’ Up!’s Lucky Clover set, the ‘Lucky to have U’ and the ‘happy St. Patrick’s Day’ are from Whimsy’s Lucky Leprechauns. The front leprechaun is on a craft spring for extra fun!
 Cute! But you could have just put a green hat on me!
Hmmmm…… let me think about that.
I tried to catch the beautiful foiling on this next card front:
 .
. It is a white card toner front from Whimsy on a gold foil layer on a black base.
 .
. Just looks stamped with garden green to me.
I know; maybe that is why foiling is not promoted very highly by some. Trust me, it is beautiful in real life. I used an oval to cut out the ‘Happy St. Patrick’s Day’ on the second card front from Whimsy so I could use it next year and yet have a matching border for the inside of this card.
 .
. The greeting is from Stampin’ Up!’s ‘Pansy Patch‘ stamp set.
You should name your leprechauns!
Let’s see, the bowler hat, the top hat and the beanie hat? How about O’Pat, O’Reilly and O’Gill?
Which hat do you like best?
I used Copic Alcohol Markers for the coloring:
- YG17 – Hats and Jackets
- YG13 – Shamrocks
- Y35 – Gold (I don’t recommend the gold Wink Of Stella- it was too dark, but the clear Wink of Stella worked well.)
- YR00 – Face
- E13, E15 – Shoes and Hat Band
- YR 18 – Beard
- C9, C7 – Pot
I am new to Copics but I found that I could use one marker for different shades just by adding additional layers.
Will you ever be ahead of the celebration instead of behind?
It is fun to ‘scrapbook’ what I have done here on the blog. Hopefully others enjoy looking back and smiled seeing these cute little characters!
Happy Spring everyone!
SAL, Sharing A Laugh
Karen

CTC #1 Pocket Card
Good morning, Stamping Friends,
Here is a walk down memory lane for a swiper St. Patrick’s Day card. When you pull the card side to side the pot of gold pops up:

You can click on the image to go to the post for detailed pictured instructions! We can change the images to a current product while maintaining rainbows, shamrocks and a pot of gold!
Now there’s a thought! And we could add a pepper shaker to be your friend!
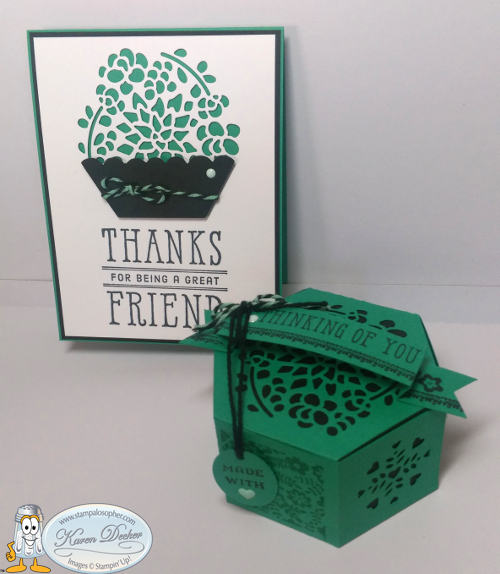
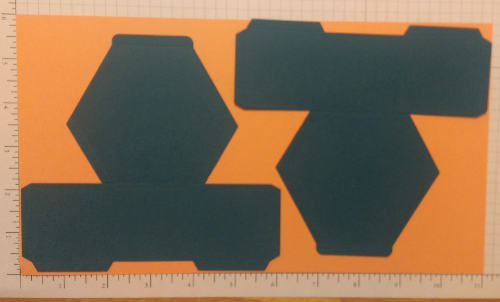
Ann Hausmann cased Kirsteen Gill and made the cutest St. Patrick’s Day favor:
 .
.  .
.
Thank you, Ann!
February Case The Creator #1 printable pdf file (click on the blue)
 Lynn Dunn of Stamptastic Designs is our creator! Thank you, Lynn.

I made a Valentines Day card since I had all those supplies sitting at my work table, and then I used the same design for February thank you cards. Another sincere thank you to all those who ordered in February! Oops…. That’s why I have you!
I used the ‘Always In My Heart’ stamp set for Be My Valentine on a banner die cut from the Floral Heart Dies. The paper is the ‘Sweet Talk’ Designer Series Paper in the mini catalog. I fussy cut candies for the inside. The Happy Valentine’s Day fits so perfectly in the opening and is from the retired ‘Heartfelt’ stamp set. The ribbon is the Faux Linen Real Red ribbon from the mini catalog.


For the Thank You card and a card for Mom I made these:
 .
.  .
.
The paper is from the ‘Flowering Fields’ designer series paper, also in the mini catalog and I used the ‘Jar of Flowers’ stamp set to make a bouquet the perfect size for the pocket opening. I had a stack of products by the time I finished:
- Delivering Cheer stamp set – shadow under the jar
- Positve Thoughts stamp set – Hugs, Prayers, Love
- Forever Blossoms stamp set – All of me loves all of you
- Prized Peony stamp set – Love & thanks to a dear friend
- Jar of Flowers stamp set – Tulips & stems, jar stamped on a window sheet with stazon ink
- Detailed Bands Dies – cut once in Basic White and once in Fresh Freesia
- Stampin’ Blends – Lt Fresh Freesia, Dk & Lt Soft Succulent, Dk Rich Razzleberry, Lt Highland Heather, Pineapple Punch
To the above CTC instructions I added a Gorgeous Grape belly band permanently attached – 1″ X 8 1/4″, score at 1/4″ and then gently fold to determine where it will wrap on the side, then score that fold.
For the bow on the jar I used a 1/8″ X 4″ strip of Gorgeous Grape and folded in a 45 degree fold to which I added a second 1/8″ X 1 1/2″ strip tucked in at the fold.
I also added a 3 X 4 Basic White piece to go on back of the insert for writing a message, a doily and three little brass butterflies.
 . I love the little fussy cut flower laying on the ground in the insert! Nice touch.
Thank you, Sal! Let’s look at the cards from those who participated and sent me pictures.
Joy used the cut off for the pocket to make a second card and the Layering Ovals punch for two different greetings. She’s using products from the Art Gallery suite.

Sharon did three different cards – the pocket card and then used the pieces for two others. She used the ‘Expressions In Ink’ designer series paper and a paper bow from the ‘Pierced Blooms Dies’.
 .
. 

Ann used the hostess ‘Pattern Party’ designer series paper and the ‘Pierced Blooms Dies’. I love the stripes that peek out from the back:
 .
. 
Heather used the Poppy set in Pool Party for a lovely card:
 .
.  .
. Thank you, dear stampers, for participating and helping others see the variety of creations from one fun fold pocket card! We have a large flower in the opening, a whole bouquet in the opening, a lovely paper bow or even a heart in the opening!
SAL, Spring At Last
Karen
Click on Sal in the computer to go to my store:’

What’s this? A Hidden Pot of Gold?
Hello Stamping Friends,
The current hostess code is: KTHPFHPP A hostess will be picked from all those ordering! We have two weeks left of Sale A Bration and several new products added as free with a $50 order. Click here.
For club this month we made a St. Patrick’s Day card! It is a wiper card special fold and the pot of gold pops up out of the middle!


Let’s start by making a rainbow with our Stampin’ Up! markers. I tried blender pens and the alcohol Stampin’ Blends but was able to get the clearest image with the markers. I cut out an oval with a framelit and used the center of my grid paper to determine placement for the Whisper White cardstock. I went over 9 squares and down 9 squares and marked the oval with the placement line. ( I will list all the measurements at the end.)

Now place your cardstock on the grid paper and draw the first rainbow line holding the marker at a somewhat slanted angle – too much slant and your line will be too thick, too little slant and your line will be too thin. Use the thick end of the marker and let the curve of the oval guide your hand. Remember, this is a marker not a crayon so you don’t need to press hard. After the first line is drawn, move the oval up slightly to mask the first line and draw the next line. Continue for all seven colors. You will do ‘damage control’ at the end when you have completed all the rainbow lines by switching to the thin end of the marker and coloring in any missed bits or edges. I advise practicing once on the grid paper before doing the card. Clean the tips of your markers by tapping them off on the grid paper after each attempt. The oval will absorb the ink so use the other side of the oval after practicing, just be sure and cover your cardstock with sticky notes so the ink from the practice side of the oval doesn’t get on your cardstock. I tried a window sheet to see if that would keep the ink from bleeding but it wasn’t any better.

With your rainbow completed, run the cardstock through the Big Shot with the Subtle Embossing Folder.
For the greeting we will use the stamp from “Love What You Do” and the framelit from “Wonderful Floral”. The Stamparatus will let us stamp and then restamp until we have a perfect image. I placed the framelit on the paper to verify I had enough on each side of the greeting for the cutout- but be careful – those magnets love to grab framelits! Remember – stamp first – then cut!

After you have cut out the stamped greeting, use the negative space of the cutout to mark the cut for the gold glimmer paper. On the back of the glimmer paper draw around the cutout with a pencil and then fussy cut. You could cut out the glimmer paper with the framelit but then all those little rectangles on the side will have to be taped in place. Fussy cutting was easier for me.


Adhere the gold glimmer paper directly to the card front and then pop up the greeting. When adhering to glimmer paper glue dots work the best so place a glue dot on top of each dimensional. Since the glimmer paper is not a circle, be careful to line up your greeting before gluing down the glimmer paper.

That picture shows the beauty of the ‘Subtle’ embossing folder!
I needed a birthday card for my daughter so I colored the stamp with my marker leaving out ‘friend’ and then used the retired ‘Family Reunion’ stamp set which has a daughter stamp to stamp the middle of the greeting. Sticky notes worked better than the grid paper to align the ‘daughter’ stamp since you can see through the sticky note. (It took me more than once to get it aligned right so I threw away sticky notes instead of grid paper.)


I will square it up when I cut it out with the framelit and put a bling over the dot where the ‘i’ in friend was touched when I colored. Butterflies and bling fix most anything!
With the rainbow and greeting completed, let’s stamp! I wanted the images to be a rich shiny black so I embossed them and then cut them out. The Whisper White cardstock we used for the greeting has enough room for all with enough left over to cut out two lily pad flowers.

Let’s go to the Big Shot now and cut out our pieces. Cut two pots out of black using the retired ‘Cannery Set’ lid. The ‘Coffee Cup’ framelits has a lid that would work, too. Cut out the lily pad with the Hop Along framelits and nine hearts for shamrocks with the ‘Every Day Jar Framelits’. Use a 1/4″ circular punch, mine was just an office punch, and punch out three green circles for the back of the shamrocks and a dozen or so glimmer paper circles for the coins in the pot. Punch half circles out of the side of the glimmer paper to line the front edge of the pot so it looks like the coins are half way out of the pot.

Now the relaxing fun! Coloring! I used light and dark ‘Granny Apple Green Stampin’ Blends’ for the frogs. I colored their tummies and the dots with the light and then did two layers of the dark for the rest. The open mouth got a little ‘Blushing Bride Marker’, the lilies got a touch of Dark Daffodil Delight and the unicycle was colored in Light Smoky Slate with a Daffodil Delight seat. The bug was colored in Dark Highland Heather and Dark Daffodil Delight. The bees got a touch of Dark Daffodil Delight. The lily pad was sponged on the edge for extra depth. The two frogs and the purple bug were popped up. The lily pad, flower, bees and shamrocks were glued directly down.
To give your pot the illusion of a front edge, place your framelit on the pot and score around the edge then move the framelit up a bit and score again. Color black between the scored lines and use a Versa Mark pen to make it even darker.


I used the fine tip glue pen to place my first layer of half coins on the pot and to glue the coins that adhered directly to the black paper. When stacking the coins be sure and use glue dots so they will stick to the glimmer paper.
My first attempt at the shamrocks was with the fine tip glue pen but I didn’t like the result (shown here) so I used a glue dot on top of the 1/4″ circle and found it much easier to place the little hearts and have them stay in place. Cut just a little triangle out of the bottom of your 1/4″ circle if you don’t want it to show under the stem. I fussy cut little stems.

This picture shows the shamrocks with glue dots. Less mess and no shiny excess from the glue.

The front is adhered directly to the black layer and those two layers are popped up on a Garden Green layer but don’t glue it on the base until you have constructed the wiper.
Use your bone folder to fold the two score lines on the two base pieces in Z folds. Place the front to the back and check that you have the folds going the right way. It should look like this:

The front has the long portion on the right. Lay this face down on your grid sheet. The top is now at the bottom.

Line up your scored wiper piece with the bottom of the card (which is really the top when you stand it up). Place the diagonal of the scored portion on each edge of the second fold of the Z. Before adhering the wiper piece, bend the diagonal forward and backward a few times to exercise its movement! To score the wiper, place the square piece with a right angle at the 1/2″ of the right side of the Stampin’ Trimmer and the opposite right angle on the same line. I drew a pencil line to show you what I mean. Score- creating a little triangle on one corner.

You are going to glue only that little triangle to the cardstock. I tried tear and tape and it pulled off so I found ‘Tombow liquid glue’ worked well, you just have to hold it in place for a bit and be careful not to let the glue squish out. I like to put ‘Tombow’ on the piece I am gluing and then count to twenty before adhering so it doesn’t squish out. I did use ‘Tear and Tape’ on the front and back edges.

The pot is next! Glue the window sheet to the wiper piece and then glue the pot upside down to the other side of the window sheet at the very edge of the cardstock. Glue on your second pot to cover the window sheet.

Stand the front back up, line the edges of each side carefully, adhering the front to the back. Voila! You have made a wiper card!
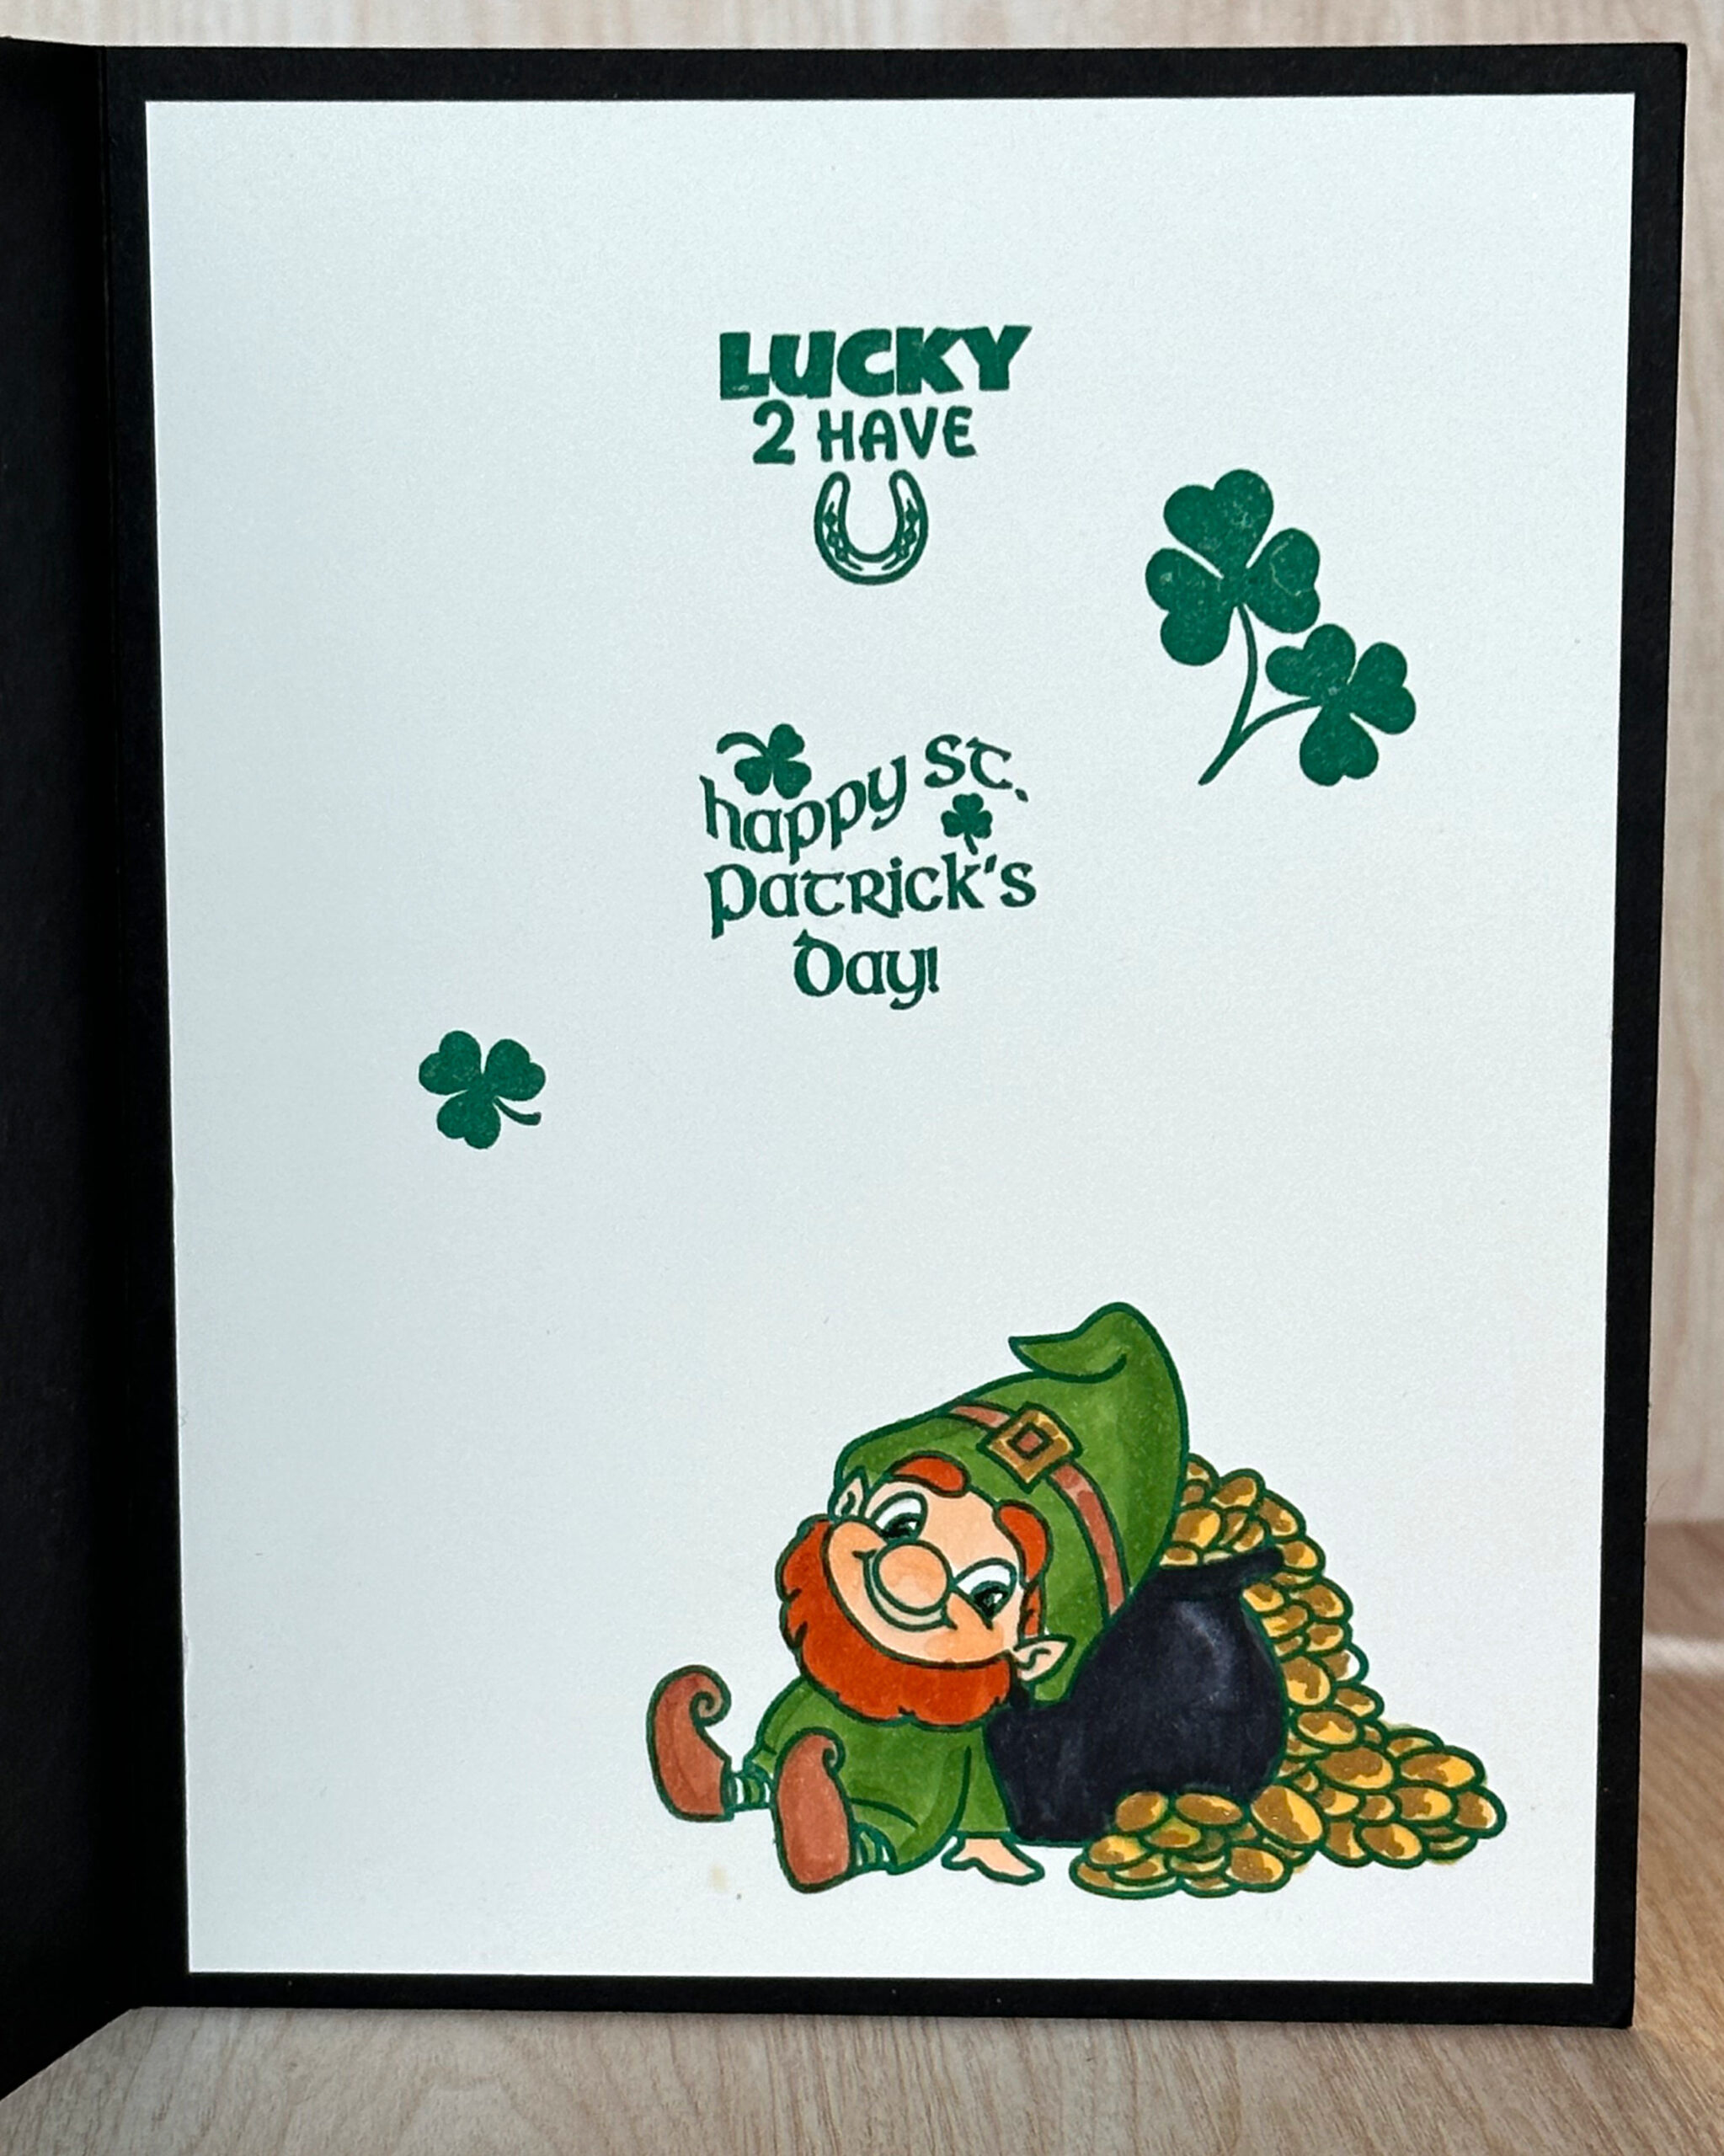
Finish by gluing the Garden Green strip on the front side and stamping the back of the card. The greeting stamp used on the back is a retired Stampin’ Up! stamp but the four leaf clover is in the ‘Amazing Life’ stamp set. The ‘ Make A Difference’ stamp set has the alphabet in capitals and small letters so you could make ‘daughter’ or Happy St. Patrick’s day with that set.
Supplies:
- So Hoppy Together Sale A Bration stamp set with coordinating framelits
- Love What You Do stamp set for the greeting
- Amazing Life Stamp set for the four leaf clover (great for the envelope, too)
- Wonderful Floral Framelits for the greeting
- Every Day Jars Framelits for the hearts
- Framelits – Cannery Set for the pot (The Coffee Cups framelits has a lid that would work well)
- Granny Apple Green Ink
- Garden Green Ink
- Stampin’ Blends – Light and Dark Granny Apple Green, Dark Daffodil Delight, Dark Highland Heather, Light Smoky Slate
- Markers – Basic Black for the edge of the pot, Blushing Bride for the mouth. Markers for rainbow in order of use-
- Rich Razzleberry
- Night of Navy
- Pacific Point
- Garden Green
- Daffodil Delight
- Pumpkin Pie
- Real Red
- 1/4″ circle punch
Dimensions:
- Base: Granny Apple Green (make 2) 7″ X 4 1/4″ Scored at 1 1/4″ and 2″
- Wiper Pop Up: Granny Apple Green 2 1/4″ X 2 1/4″ scored diagonally with the right angle at the 1/2″ mark on Stampin Trimmer and the other right angle lined up straight across on the same 1/2″ line
- Front Side Layer: Granny Apple Green 4″ X 1″
- Front & Back Layers: Garden Green (make 2) 4 3/4″ X 4″ Glue Directly to base
- Black Layer for front: Basic Black 4 1/2″ X 3 3/4″ Pop up with dimensionals
- Top Layer: Whisper White (make 2) 4 3/8″ X 3 5/8″
- Whisper White for cutouts: 5 1/2″ X 4 1/4″
- Lily Pad: Granny Apple Green 1 1/2″ X 3 1/8″
- Gold Glimmer paper for behind the greeting and for the coins: 2 1/2″ X 4″
- Black for pot: (make 2) 4″ X 1 1/4″
- Window Sheet: 1 1/2″ X 1 1/4″
- Shamrocks: Garden Green 1″ X 3 1/2″
- Oval cut out for rainbow: Whisper White 5″ X 4″ to make a 4 3/8 X 3 1/2″ oval (retired oval set)
That took longer to detail than it probably would take for a video. I need to get to work on producing videos. Which do you like better – videos or detailed pictures?
Let me know if you have questions.
Mark your calendars for Saturday, April 13 or Tuesday, April 16 at 10:00. I will be having a card class and luncheon on those days ( same cards each time). We will meet from 10:00 to 2:00 and make four cards. I will provide a light lunch. The cost is $20 and RSVPs are necessary by April 5, please. There are so many wonderful products I want to use before the catalogs go away June 3rd. Assuming the product is still available for you to order, we will do one card with the Tea Together stamp and framelit set, one card with the Wonderful Romance bundle, one card with the Beauty Abounds bundle and one card with the Let It Ride stamp set.
Text, email or leave a comment with this post. The comment is at the end of the post.
SAL, (Stamp A Lot, Smile A Little, and Share A Love)
Karen
Click on little Sal in the computer to order, the hostess code is KTHPFHPP:

Window Shopping Bundle!
 Hurry Stamping Friends,
Don’t let the Window Shopping Bundle get away! It is on page 43 of the Occasions catalog and is just the cutest! It might get carried over in the big catalog come June 1st, however when Stampin’ Up! introduces a product with matching Thinlits it is bundled with 10% savings but not when it is carried over to the next catalog. The bundle is $50.25 which will qualify you for a free Sale A Bration product.
Remember, purchase $50 of anything from any catalog and get one item from Sale A Bration for free. Three additional items were introduced February 21:


Check out the sample items made with these products:

Click on the brochure picture below to see all the other Sale A Bration products. But hurry the Card Tin is already sold out and product is only available while supplies last!

Thank you, Deana, for a wonderful party to introduce the Window Shopping bundle and the Sale A Bration products.
Our project at the party was either a Birthday Box with matching card which uses the Window Shopping stamp set:

or a Thinking of You box and matching card:
Notice the banners use the Delicate Details free stamp set from Sale A Bration:

The Emerald Envy box uses the third one down and the Dapper Denim box uses the second one down to be a bit more masculine. The flower and cupcake on the edges of the banner are part of the Window Box stamp set! The banner uses a 5 1/2″ X 7/8 inch piece of card stock and the little Thinlit from the set that scores and cuts the end! The video below will show that in detail.


For a thank you gift, I used the same Window Shopping Bundle and made a little St. Patrick’s Day basket.

Hmmm…. It did have chocolate in it at one time; at least the tea light and mints are still there for the picture. I used Cucumber Crush paper and the Mint Macaron ribbon which is still in the Clearance Rack. Why a tea light? Because the door prize was a tea light holder made with Watermelon Wonder card stock:
 To make the tealight you use two pieces of the main Thinlit just as you do for the box:
 Remember the middle heart is directional so punch your windows accordingly.
I demonstrated the basket pieces with the same color. You only need one piece of the main box Thinlit for the basket and one piece 8 1/2 X 3/4 for the handle:
 The Thinlit set makes a basket just perfect for a little Easter gift!

The regular box uses two Thinlit cutouts which fit nicely on a 6 X 11 piece of paper:
 The home office has a wonderful video for construction of the box so rather than recreate the wheel I will insert it here. If you are viewing this on your smartphone you may need to click on the little SAL image at the top of the post to go to the main blog where videos work.
Drum roll please: Presenting The Window Box Thinlit dies:

One more quick note – check the bottom of your Big Shot machine once in awhile. The bottom screws need to be kept tightened as well as the screw on the handle. The machine comes with a little tool to keep the handle tightened but you will need a phillips screw driver to tighten the bottom screws.

Cheerio but be back soon! (I just went to the high school’s performance of Oliver. It was exceptional and I can’t get the songs out of my mind- but who would want too?!)
SAL,
Karen (Click on SAL to go to the online store)

Card Buffet January 2015
The specials this week are very “special”! Did you know you can use your reinkers and Dazzling Diamonds Glimmer Paper to make many different colors of glimmer paper?!
Technique Alert: Colored Glimmer Paper: Drip drops of ink on your glimmer paper and use your Aqua Painter to spread the color evenly. So easy!
Card Buffet Report:
We had a great time with Valentines, A Sympathy card, A St Patrick’s Day card, A Birthday Card and A Thank You Card. Each stamper took home a Treat Box Holder with a bookmark designed by Peggy Tassler and featured on Too Cool Stamping with Angie Leach. Click on the link for directions. Here is my version with our new Stack With Love Designer Series Paper:


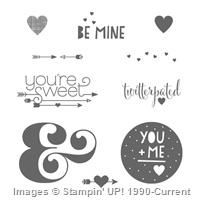
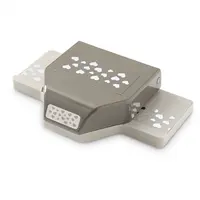
Do you see those little bitty hearts on the bookmark? They are from our new Heart Confetti Punch. Before this punch, our smallest heart was the owl punch heart which I used here with red glimmer paper inside the heart with the arrow. There are two different ways to make the window for the nuggets. Angie Leech used the Modern Label punch, lining up the punch with punched sticky notes. After trying that technique (second image) I used the Project Life Framelit so I only had to make one cut (first image).
Supply List
Built for Free Using: My Stampin Blog


Remember the Thank You card from a previous post? Jennifer did a double punch on the paper piercing and used a candy dot to match the stem of the flower. I love seeing the creativity of my stampers.
Have a great day and use hostess code JEJ32FKT to be entered in February’s online drawing. Congratulations to Shanon who won the set of Rhinestones in January’s drawing and December went to Robyn for post comments.
Stamp A Lot,
Karen
Welcome to my blog!

Sal Window to Products


