
Home » Birthday Children
Category Archives: Birthday Children
Whimsy Stamps Winter Friends-Digital Stamping
I was looking at digital stamps at ‘Whimsy Stamps’ – ‘Wee Stamps’ and found a perfect one for my little granddaughter! It is called Winter Friends.


 Looks like a party of winter friends!
Yes, I found a Designer Series Paper – DSP, with all those characters and it was fun to add her name and her age and a happy birthday banner being held by the penguin and polar bear! The backside of the DSP was just the stars so I layered that plain piece under the image to keep the card from being a bit too busy. The card is 6 X 6 so I can have all the characters included. We have an envelope punch board so we could just custom make the envelope to fit the 6 X 6.
I printed the image on cardstock and then cut it with the Window Frames #4 die. I cut a second Window Frame in grey cardstock and cut it in half to frame the image.
Recipe
- Base: Textured White, 12 X 6, scored at 6
- Layer 1 (X2): Fresh Freesia, 5 3/4 X 5 3/4
- Layer 2: DSP with animals, 5 1/2 X 5 1/2
- Layer 3: DSP (back of the animal DSP), 5 1/2 X 2 1/2; place in middle 1 1/2 on each side
- Inside Layer 2: DSP 5 3/4 X 1 1/2
- Digital Image: Print on 8 1/2 X 11 cardstock and then cut with Window Frame Die (fourth from smallest)
- Frame for Digital Image: Grey cardstock, 4 1/4 X 4 1/4, with Window Frame Die #4, then cut in half
Coloring with Copic Alcohol Markers
- Hair: Y06, Y13, E00
- Pink on Coat, scarf stripes, boot stripes, gloves: RV23
- Green on Coat: YG13
- Face: E00
- Blush: RV10
- Scarf: C5
- Boots: E31
- Berries: R27
- Leaves: YG17
Use Lt Smokey Slate on the edges of the rabbit and then lighten with the color lifter alcohol marker.
Other products used:
- Happy Birthday: Birthday Chicks Stamp set
- Inside: Winter Wishes Reindeer Stamp set from Sweet November Stamps
- Banner: Bunch of Banners Framelits – Stampin’ Up!
- Name: Rosette Dies
- Age: Playful Alphabet stamps – Stampin’ Up!, stamped and cut with bitty banner punch
- Snowflakes: Snowfall Thinlits Dies – Stampin’ Up!

Here’s Joey learning to ski!
I can see why you picked the digital stamp! It does look like Joey.
And you can see why I didn’t try to replicate the colors of the coat on the digital image!
On the Whimsy Stamps site you can click on <Digital, then <Digital Products By Artist, then <Wee Stamps
Little Sal in the computer will take you there!
Thanks for stopping by!
Karen

Today’s riddle
Q: Why couldn’t the bike stand up?
A: Because it was 2 tired
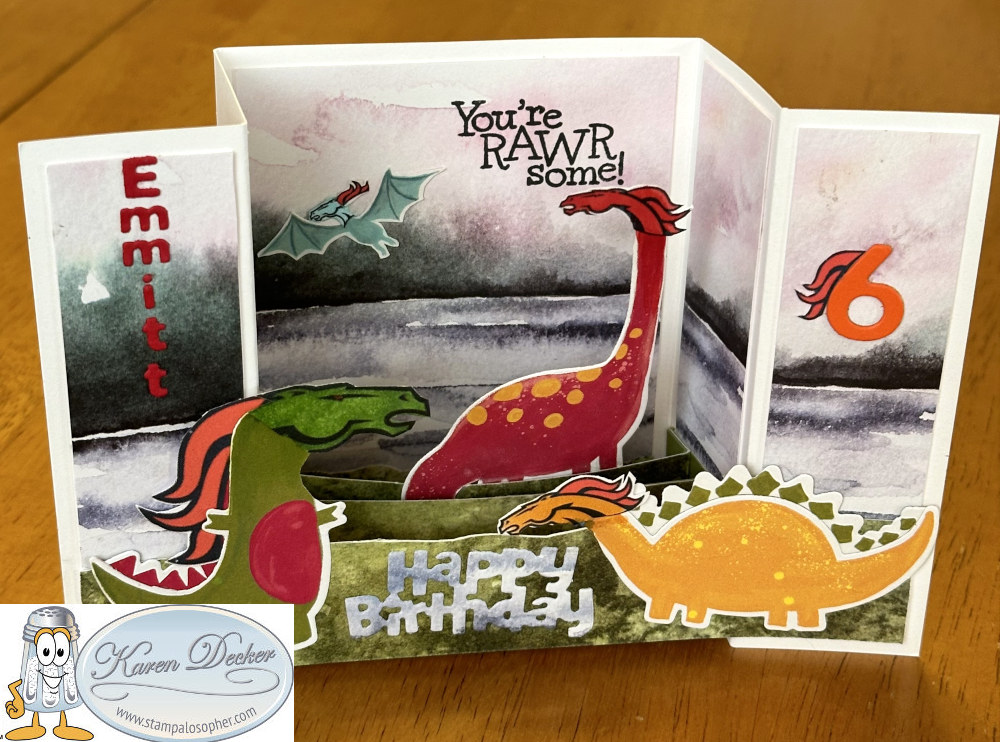
A Bronco-saurus Birthday
My dear grandson, Emmitt, turned 6 in January and he loves dinosaurs and Broncos- just like Papa! He wanted a Russel Wilson jersey for his birthday, so we found a shirt for him and then I got out my dinosaur dies and DSP- Designer Series Paper to make a u-fold box card for him. The dinosaur heads got replaced with Bronco heads to combine two themes. My inspiration came from Amanda Bates of the Craft Spa.

I used designer series paper for the background, die cut the dinosaurs from the DSP, and colored the Bronco heads to match as best I could. The Happy Birthday is from the Birthday Chicks dies. Emmitt’s name is from the dies in the Ribbon Rossett set and the ‘6’ is from our Large Number Framelit set.
Recipe
- Base: Thick White, 8 7/8 X 4 1/8, Score at 1 3/8, 2 3/4, 6 1/8, 7 1/2
- Bridge: Thick White, 5 7/8 X 1
- Background Scene: Horizon DSP, 4 sides are 1 1/8 X 3 7/8, back is 3 1/8 X 3 7/8; Amanda started with a blank white piece 7 5/8 X 3 7/8 and created her own background then cut it at 1 1/8, 1 1/8, 3 1/8, 1 1/8, 1 1/8.
- Box Sections:
- 4 1/8 X 1, score 3/8 ” from each side
- 4 7/8 X 1, score 3/4″ from each side
I only needed one box section but used both and then the dino can look like he is in the grass.
Have a wonderful day! I am off to make valentines.
SAL, Stamping A Lot today
Karen
Knights & Dragons Birthday Card
My grandson turned 7 on Christmas Eve, 2023, so another card was needed and since I was busy getting out Christmas cards, Paul took on the task of constructing the card! He was home recuperating from major back surgery so he was glad to help out. I made a castle card for Emma’s 5th birthday in September so all the details were on the blog post from that card- Beautiful Princesses.
So blue lettering means there is a link?
Yes, Sal, links are in blue as well as your words which aren’t a link.
Take a look at Paul’s card. I took a picture of the back because it shows his signature which makes it so special.


I purchased two additional die sets from Karen Burniston:
 .
. 

I don’t see a Princess or a Mermaid on the card?!
No, Sal, but if you look at the knight die you see that his helmet is down in front of his face. The Princess/Mermaid set has a die with a face that perfectly fits the knight. Karen Burniston explained using the princess head die for the construction of the Knight so I knew ahead of time what to purchase.
Paul only needed me to pick out the cardstock and designer series papers and a few extra dies and stamps.
Recipe
- Base: Crumb Cake, 4 1/4 X 11, scored at 5 1/2
- Inside Layer (X2), Green designer series paper , 3 3/4 X 5 1/4
- Front of the card uses the same green DSP but I made no measurements
- Castle Base (X2), Dark Grey, use a partial on the front and a full base on the inside
- Cut 3 long brick walls and 2 small walls in light grey cardstock and sponge with dark gray ink as you hold the die in place
- Do the same for the pieces you need for the front
- A moat and the pathway are fussy cut from designer series paper
- The sky is designer series paper stamped with birds from Stampin’ Up! ‘High Tide’ stamp set
- The inside ‘7’ on the shield is from Stampin’ Up! ‘Memorable Moments’ stamp set; the shield is fussy cut with a shape similar to the shield on the front
- To make the knight’s armor look shiny silver, Paul used a metallic silver sharpie
- The dragon looks to be cut from Garden Green with a front of Granny Apple Green
- For little pieces you need orange scraps, red scraps, white scraps and black scraps
- Additional Dies: SU Happy Birthday Thinlits die, SU Stitched Stars Dies, Layered oval die
- The lettering for Jax’s name on the flags is from the ‘i-crafter Ribbon Rosette Funny Add-on’ dies
I will put the youtube videos here for future reference. I hope to have a grandchild interested in making cards some day.
This post should conclude all my cards through December 2023. Now I can move on to journaling the ones in January and the January Shoebox event with Christine as our hostess so come back soon to see those.
Well, January 4 is Amber, January 7 is Joey, January 8 is Jonathan and January 9th is Emmitt, then I have two friends at the end of January.
Only Joey and Emmitt’s are new designs so you won’t be completely overwhelmed with posts.
Thanks for stopping by!
SAL, Send A Lot of love
Karen
Click on little Sal to go to Karen Burniston’s site.
He doesn’t want to be spotted!
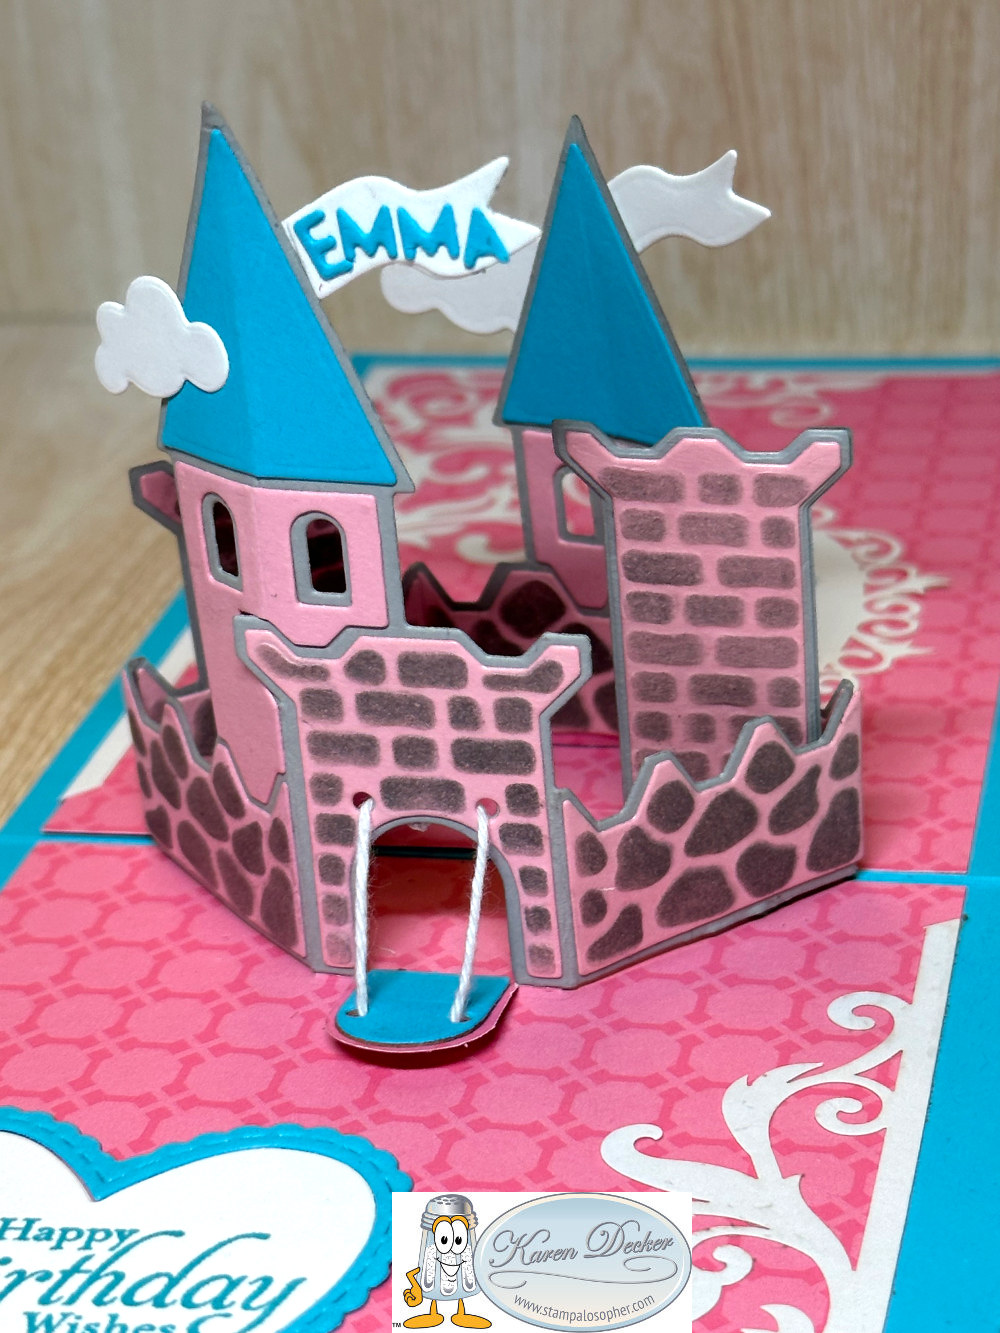
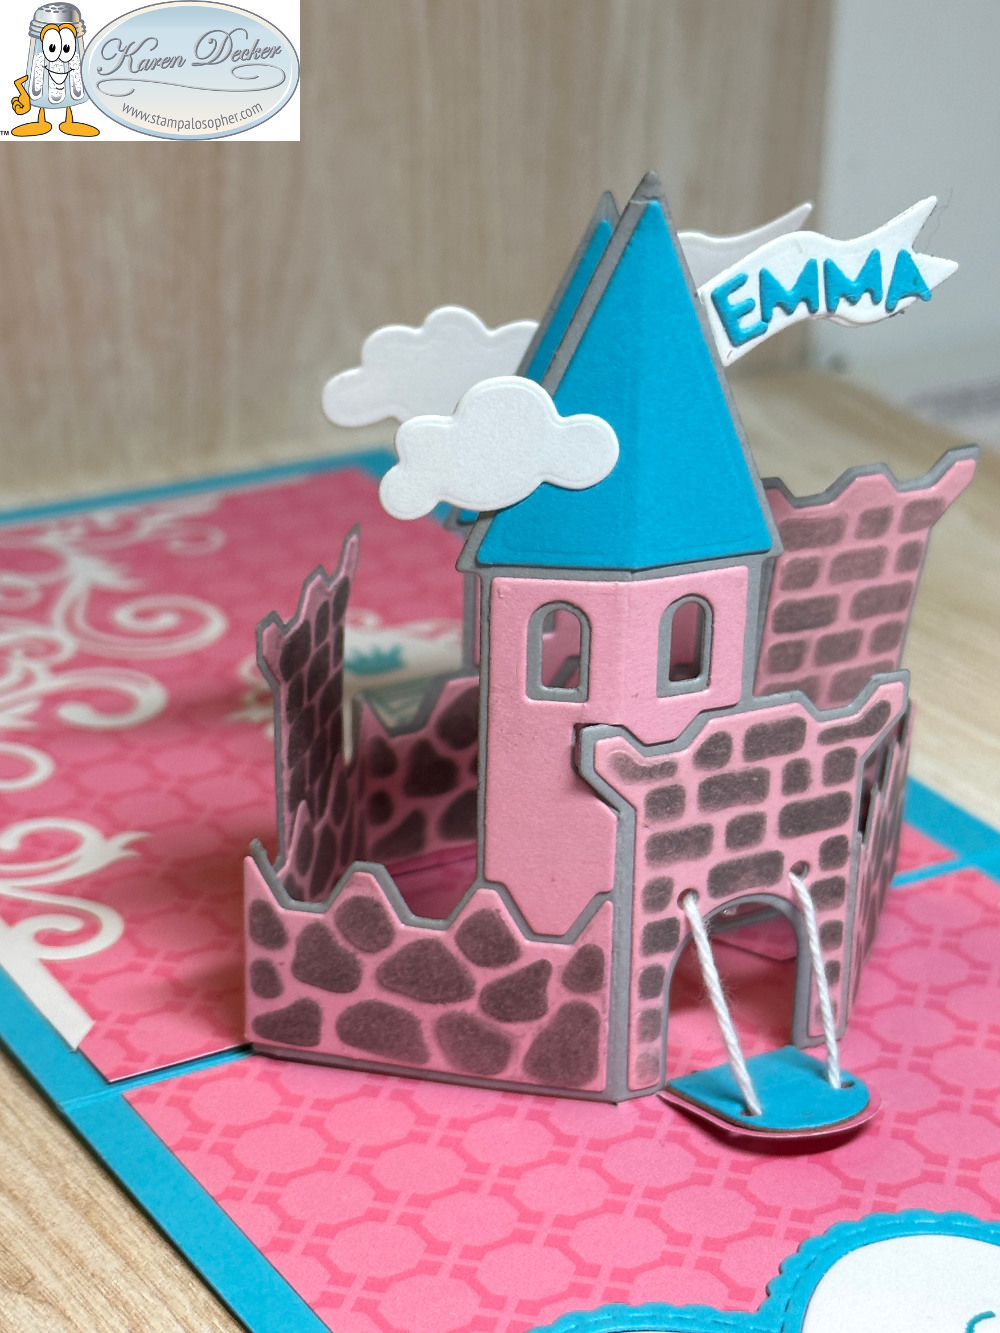
Beautiful Princesses
My granddaughter turned 5 in September and she loves all things Cinderella, so I purchased a pop up castle from the Karen Burniston collection of dies and several Disney stamp sets. I also shrunk down a picture of my granddaughter in the Cinderella gown her mother bought her for a Christmas gift last year. I had to shrink it several times to get the right sizing but wound up using all of the little pictures. She loved the card!
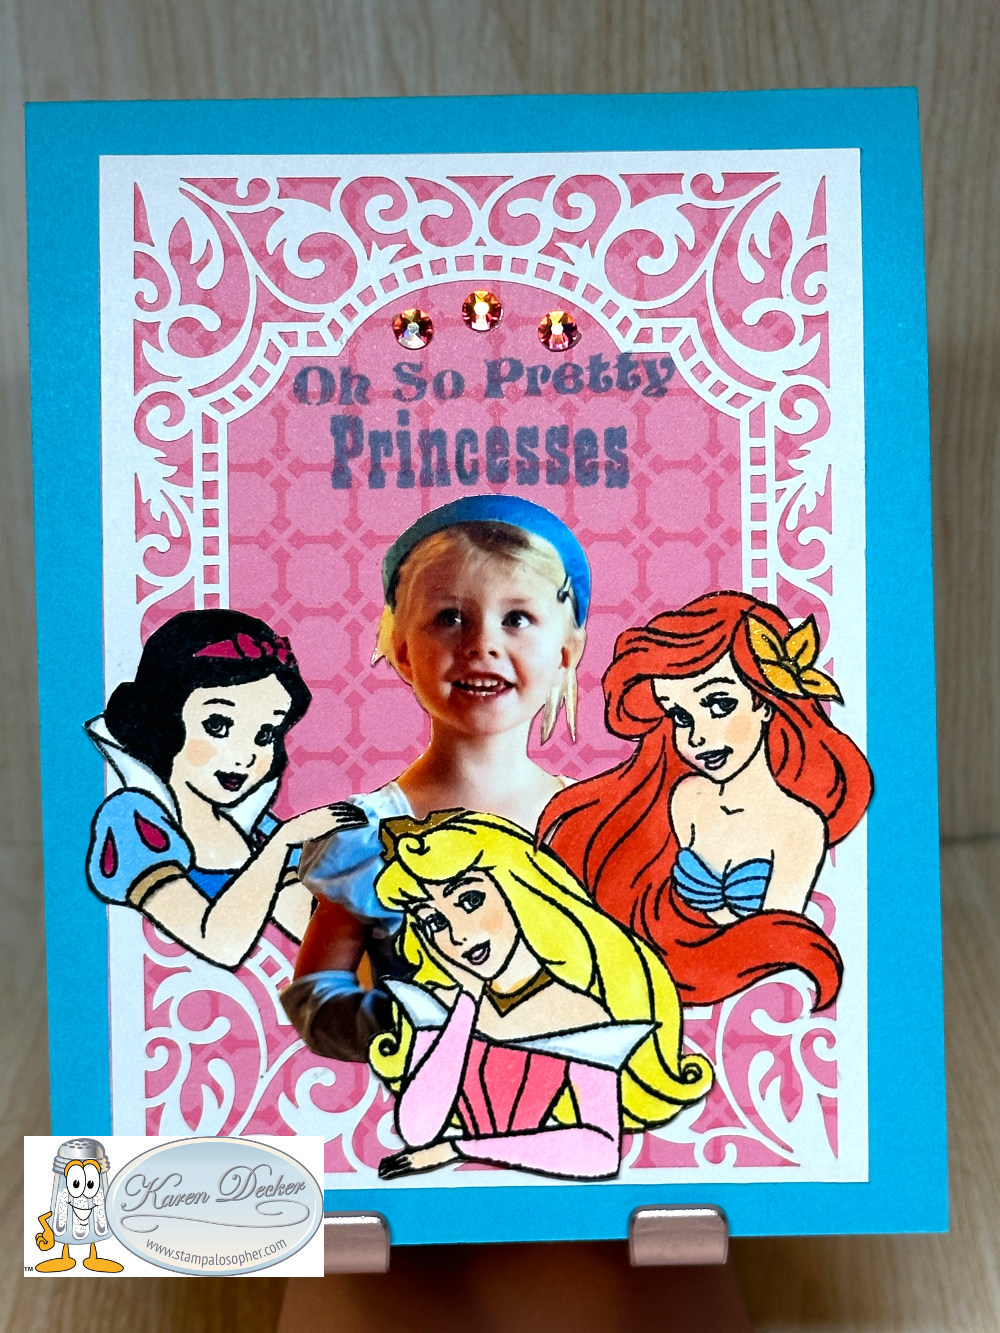
You can guess which of the four princesses is my favorite.
Did you color the princesses or cut them from paper?
I colored them, Sal, with Copic markers. Sadly, I started with Snow White and was diligent to write down the number of the copic I used but then didn’t do the others except Ariel’s hair.
- Snow White
- Bow RV09
- Sleeves B21
- Bodice B24
- Sleeve Band E31
- Skin E000 and YR00 for blush
- Ariel
- Hair R05
The nice thing about the blog is I can come back and edit this post adding the other colors after I do another set of princesses.
When you open the card the castle pops up…..
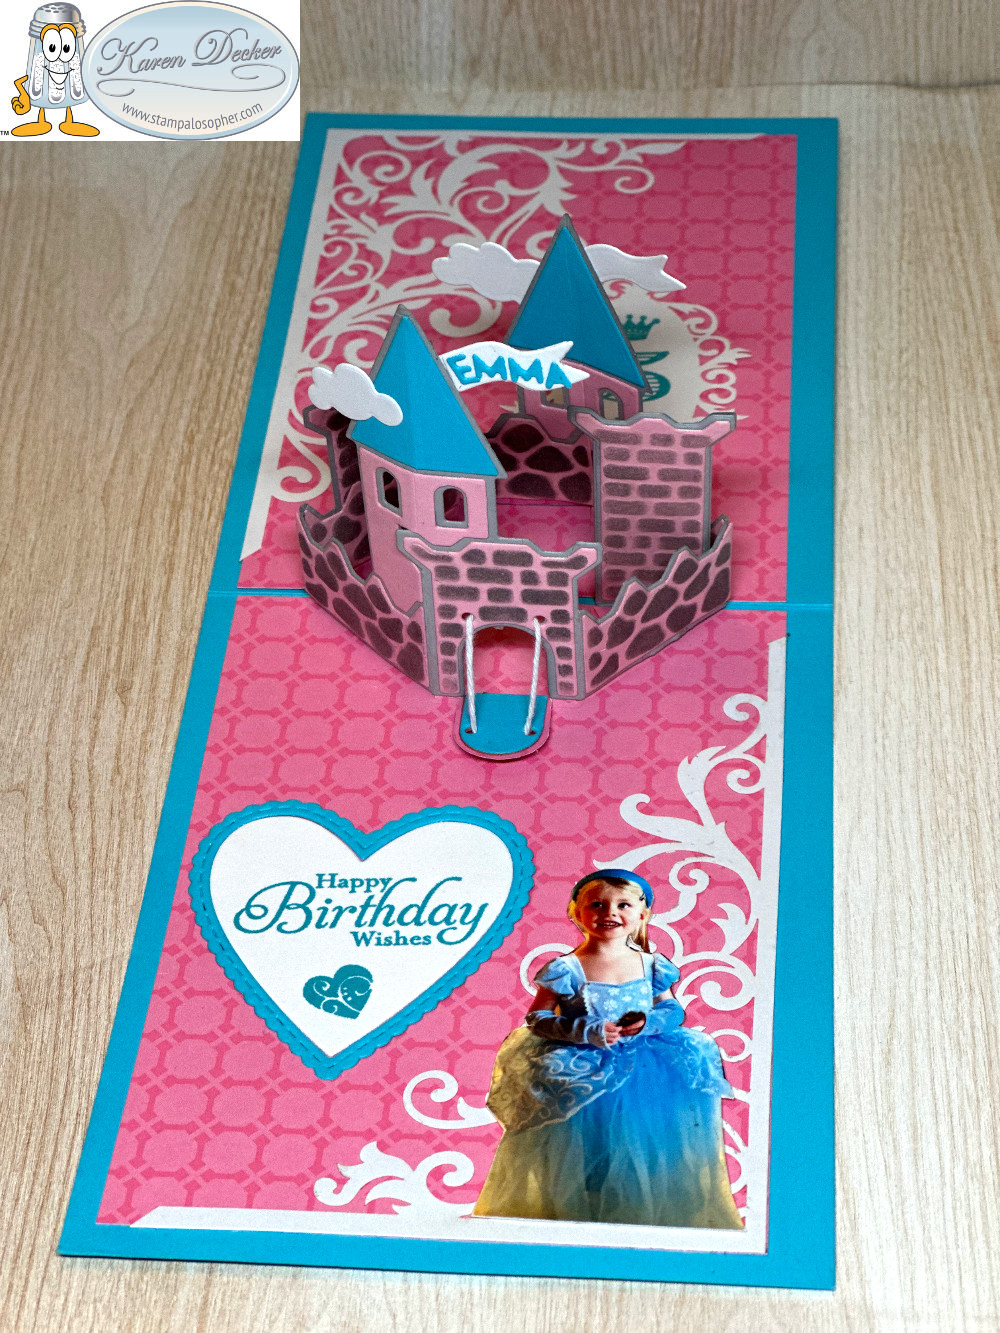
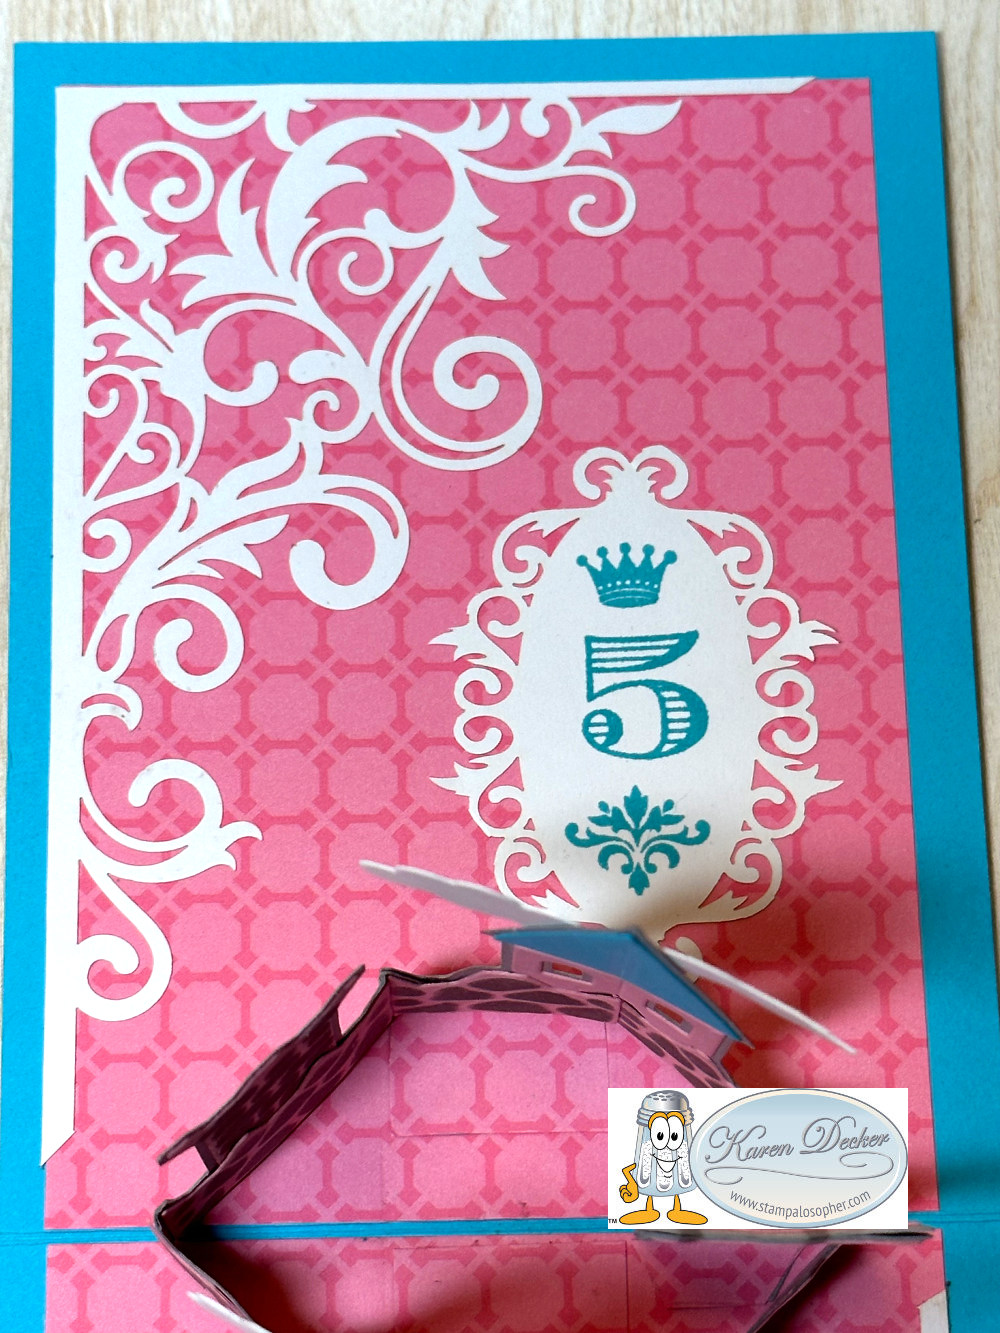
Here are some close up views that show the two towers….
 .
.  .
.
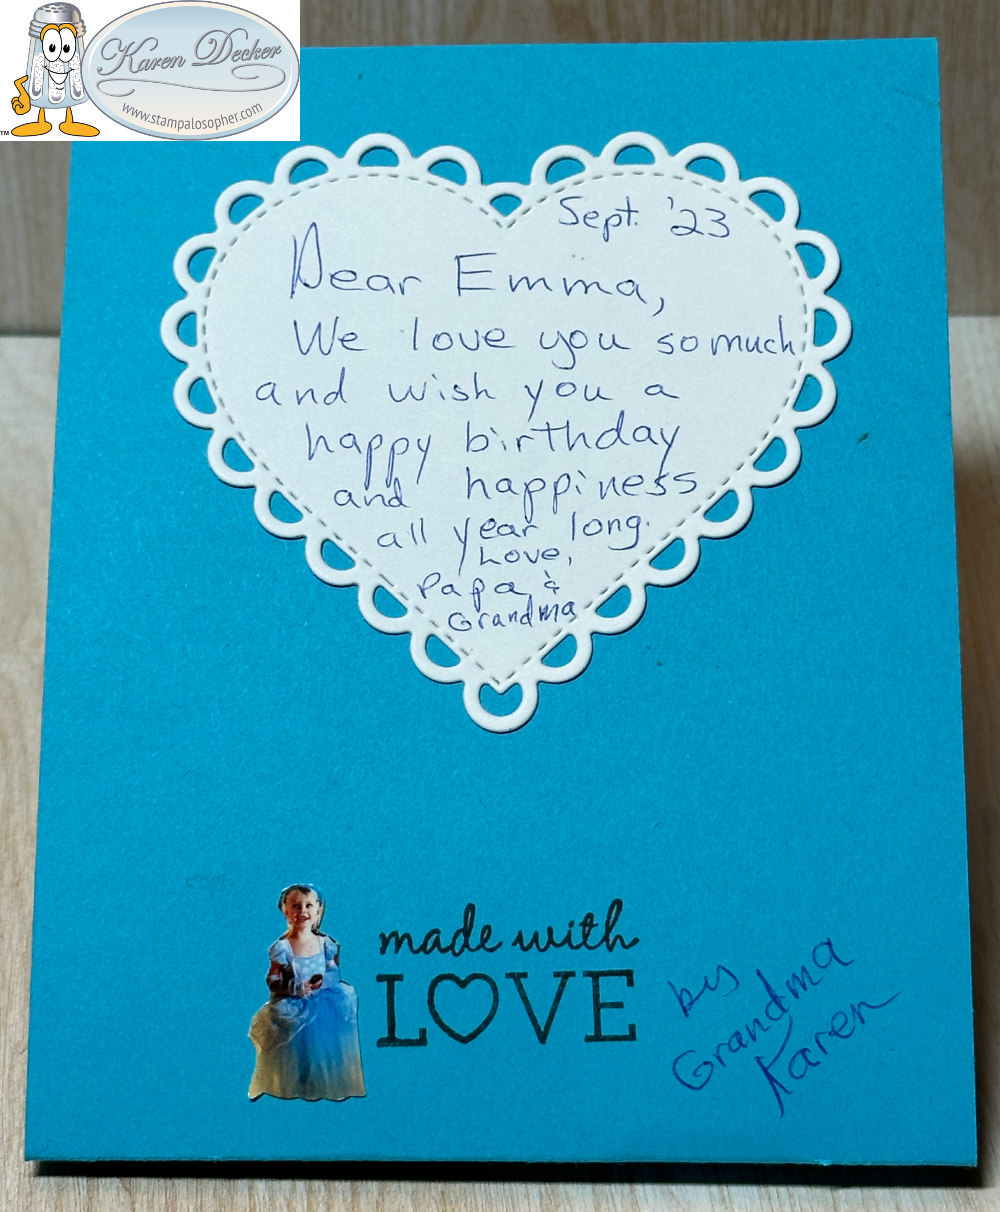
And for a place to sign, I added a cut out heart (Many Hearts Die set) on the back and one of the littlest pictures of Emma.
 .
.
The dies include the little flags and the clouds and you can hold the dies in place and sponge over the dies to add the brick look of the walls and towers.
- The Happy Birthday is from the Simply Sketched SU stamp set.
- The ‘5’ is from the Memorable Moments SU stamp set.
- The crown and flourish above and under the ‘5’ are from the Tiny Tags SU stamp set.
Tiny Tags is in the Bake Sale list!
It is, Sal, and it has a matching punch. Some of these miniature sets really come in handy. Click on the Bake Sale tab at the top to see all the available stamps, punches and dies.
- The white laser cut paper was in my stash from SU -Stampin’ Up.
- Base: Turquoise, 4 1/4 X 11, scored at 5 1/2
- Inside Layer (X2), Pink Designer Series Paper, 3 3/4 X 5 1/4
- Cut 3 long brick walls and 2 small walls in pink cardstock and sponge with gray ink as you hold the die in place
Was there a video you could share?
Great idea, Sal! I could never articulate the construction of the castle.
I found a sale at Simple Pleasures on ‘i-crafter Ribbon Rosette Funny Add-on’ dies to cut out the middle of a rosette with funny sayings like, ‘Adulted Today’, ‘Got Out of Bed’, … I don’t have a need for silly rosettes but the dies cut out teeny tiny little letters and that is why I bought them. A month later I wanted to put ‘Emma’ on the little flag of the castle and the letters were perfect!

For sure! There is an example in the video of a prince’s castle which would be good to make for the grandsons! There is also a victorian looking castle you could make for an adult card.
Even if I only used the die once, it was worth it to see Emma’s delight. She even put the card beside her bed.
Thank you for giving me a little bit of your precious time today as I share a creation to ‘bring a pinch of creativity to spice up your crafting world!”
Next time!
SAL, Sharing A Love
Karen
Click on little Sal in the computer to go to Karen Burniston’s shop:
Elephant Parade Pop & Twist Birthday Card
Happy New Year! Let’s start it out with a Pop Up and Twist Birthday Card. I used the Elephant Parade Stamp Set and Elephant Dies for Emma’s fourth birthday card as well as the retired Mischievous Mouse Hostess Stamp Set. I wanted 4 mice – 4 elephants – 4 peanuts – 4 butterflies – 4 balloons and 4 bits of bling. Thanks to Jaime Marsh for the front design on Pinterest and Teri Pocock of Stampin’ Magic for a great Youtube video showing how to make the card.


 . So…. who couldn’t resist counting?
Sort of like the joke.. “The first sign of craziness is a hair on your finger knuckle, the second sign is looking for it!”
Here is Teri Pocock’s youtube video- you will need this for construction of the mechanism.
https://www.youtube.com/watch?v=WIQ869fvcGc
Recipe
- Base: Flirty Flamingo, 4 1/4 X 11, scored at 5 1/2
- Flirty Flamingo, 10 X 3 1/2, score at 2 1/2, 5, 7 1/2; Fold to ‘W’ and burnish well
- Pop Up Mechanism: Flirty Flamingo, 8 X 3 1/2
- Score down the middle of the 3 1/2 side at 1 3/4
- Mark both long sides at 2 1/4 and 5 3/4
- Score on the diagonal from the 2 1/4 to 5 3/4 marks
- Fold the center as a mountain fold
- Fold the diagonals as Valley folds
- Burnish well
- Border Mat top and bottom (X3): Basic White, 4 X 5 1/4 (1/8″ reveal)
- Top Base Layers (X3): Mint Macaron, 3 1/2 X 4 3/4 (1/4″ reveal); Emboss with diamond embossing folder.
- Pop Up Top Layers: Basic White, 3 1/4 X 2 1/4
- Elephants, mice, balloons, butterflies, heart: Basic White, 8 1/2 X 11
- Stamp in Memento Tuxedo Black
- Color with Stampin’ Blends, Lt Smoky Slate, Dk Petal Pink, Mint Macaron
- Peanuts: Stamp 2 with Memento on Mint Macaron and stamp 2 on Flirty Flamingo; die cut
- Grass: Mint Macaron, die cut 5, one for outside, four for inside
- Outside circles:
- Basic White, 3 3/16 die cut circle (retired circle dies)
- Flirty Flamingo, 2 3/4 die cut with layered circle scalloped die
- Basic White, 2 1/16 die cut with layered circle plain circle die
- 4 green sequins
Note: The E, M, M, A and the ‘4’ stamped on the balloons is from one of Stampin’ Up!’s very first photopolymer sets- retired.
“It’s your birthday” is from Mischievous Mouse stamp set.
What about the outside greeting?
Oops, I forgot to list that in my notes. The greeting is in the Elephant Parade stamp set and the die is the Pretty Pillowbox die, stamped with the greeting in Mint Macaron on Basic White and then die cut, and a second die cut with flirty flamingo, cut in half and then layered under the basic white.
The heart for the inside greeting is a retired heart punch.
I love this cute animal card! It could be for an adult with a sense of fun!
That’s true! “We don’t quit laughing because we grow old; we grow old because we quit laughing.”
May we keep the childlike love of life!
Sal, Smiling A Lot with this card
Hostess code: MBCZMZ3P
Karen

Let’s talk about Stampin’ Up! instead of elephants! January 5th started the beginning of Sale A Bration and the new Mini Catalog! With each $50 or $100 purchase from the mini and/or annual catalogs you receive an item free from the Sale A Bration brochure. Click on the image to see a pdf of the catalog.


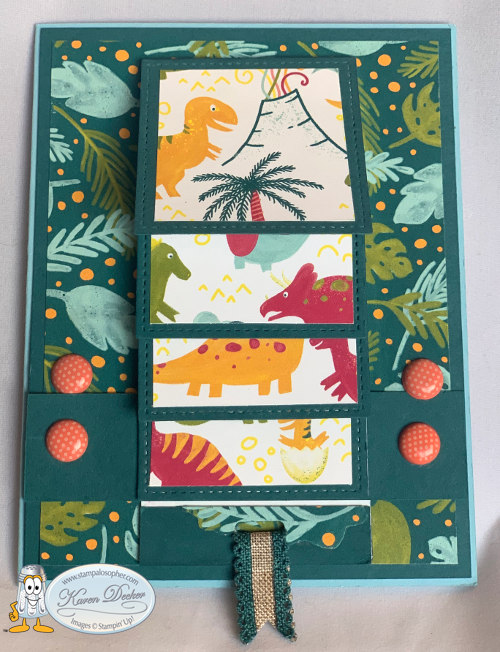
Dino Days Birthday Cards
Hello Stamping Friends,
Hopefully you are finding time during these windy winter days to have fun with your Sale A Bration products.
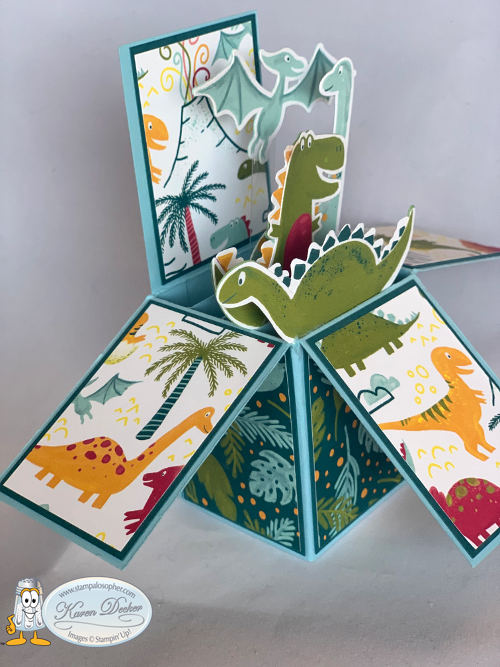
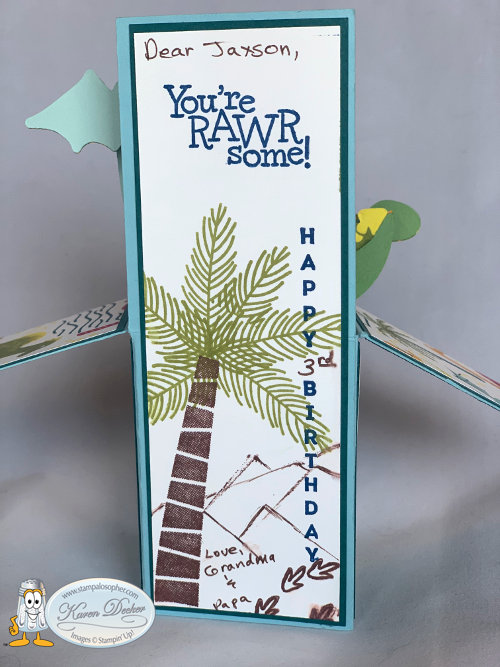
I made birthday cards for my grandsons Jaxson -now 3- and Emmitt -now 2! They are really into dinosaurs. I preferred the Mickey Mouse days but like my hubby says – they are boys and love to roar like a dinosaur and take dinosaur bites at dinner and attack Grandpa with a roar and a dino toy! What fun.
So it is Dino Days stamps and Dinoroar Designer Series Paper (DSP) with Dino Dies to cut out the dinosaurs on the DSP. See page 99 in the annual catalog:

I made a pop up box card and a waterfall card. The DSP is so ‘Rawrsome’ itself. It is mounted on a layer of Pretty Peacock and a card base of Balmy Blue. The pop up box card fits perfectly inside our standard envelopes.
Pop Up Box Card:

We cut out dinosaurs from the DSP and another dino of the same in a matching card stock to glue behind the DSP for strength. The dinosaurs were mounted on a strip of window sheet to secure them to the box base:
The back of the box lends itself to more stamping and I used the Vertical Greetings (retired) for the Happy Birthday and the Dino Days stamps for the greeting, palm tree, and dino tracks. I hand drew the mountains.
We cut out several additional dinosaurs and backed them with cardstock to stick in the pockets of the clothes we bought for their birthdays so they had dinosaurs to play since clothes are just not the preferred gift for toddlers.
Measurements: Click on the blue for all the instructions and examples of different boxes:
Box Card pdf
Waterfall Card:
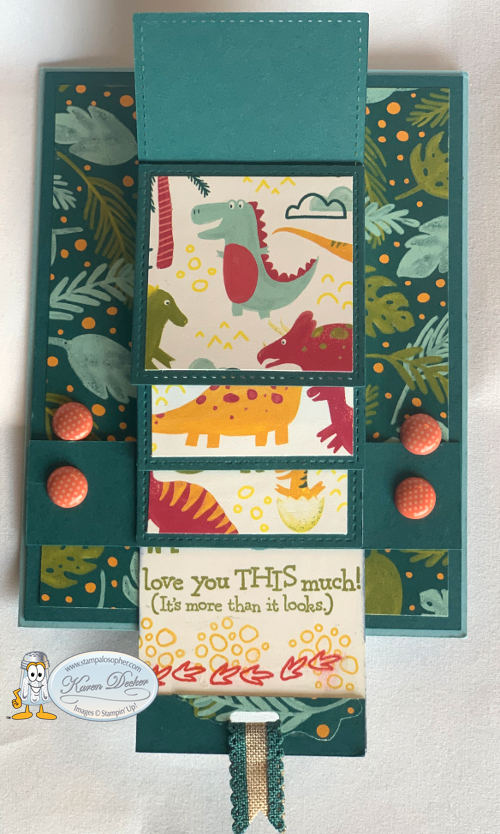
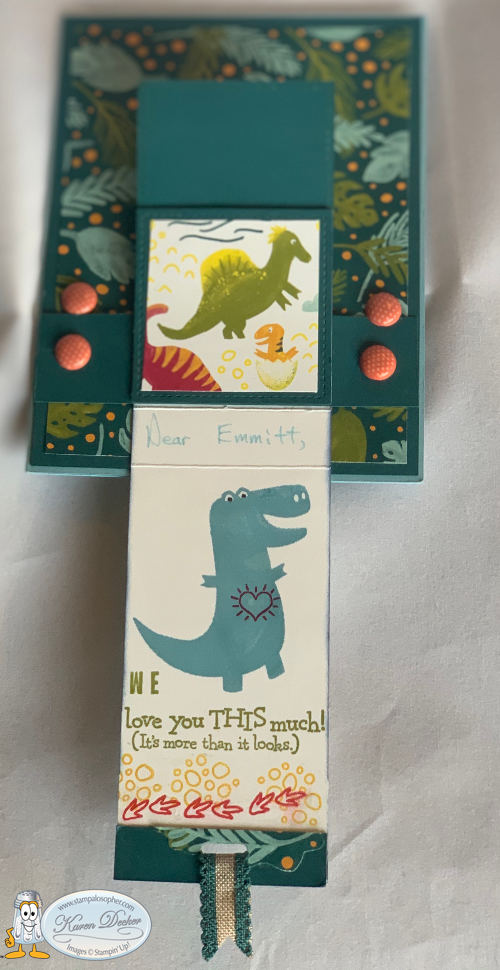

Waterfall Card pdf
The pdf is from a past waterfall card. The difference on this one is that I used two layers on top of the base and increased the size of the little panel layers by 1/8″ so I could use a square Stitched Shape Framelit. I started with a small square Stitched Shape Framelit with a Pretty Peacock layer but I thought it was too small for the outside so I used it on the inside of the card and switched to a larger square Stitched Shape Framelit and used it to cut the Pretty Peacock layers behind the DSP squares which I just cut to size. I was able to get more of the dinosaurs on the top layer with a bigger square.
Base: Balmy Blue 5 1/2 X 8 1/2 scored at 4 1/4
First Layer: Pretty Peacock 5 3/8 X 4 1/8 (make 2 so you have one for the inside)
Second Layer: Dinoroar Designer Series Paper (DSP) 5 1/8 X 3 7/8 (make one of whisper white for the inside)
Waterfall Strip: Whisper White 2 1/8 X 9 1/4; Scored at 3/4″ intervals, 2 1/8—-2 7/8—3 5/8—4 3/8 (1/8 more than the standard directions), Burnish your score lines well going in one direction so the strip looks like a candy cane.
Front Belt: 1″ X 4 1/4″; punch a hole for the brad 1/2″ over and 1/2″ up on both sides of the belt.
Peacock Squares layered on the strip like shingles: (4) 2 1/8 X 2 1/8
Top Squares of DSP: (4) 1 3/4 X 1 3/4
Ribbon: Pretty Peacock 1/2″ scalloped linen ribbon: 3″ run through a ribbon hole punched at the bottom of the waterfall and then glued together with glue dots.
Adhere the DSP full sized layer to the Peacock front layer – NOT the Balmy Blue Base yet – and then place your belt 1″ from the bottom of the Peacock layer and mark through your belts’ hole punches with a pencil- see above- to punch the two layers for adding the belt with brads. I added a tiny strip of tear and tape to the back of the belt between the hole and the edge of the belt just to secure it in place and then put the brad through the three layers. Now you can attach the layers to the Balmy Blue Base- I suggest tear and tape for extra strength.
When gluing the Peacock squares, put adhesive on the white 3/4″ sections of the white waterfall strip not on the back of the Peacock squares. You will attach the TOP only of the Peacock squares to the 3/4″ sections. Slide the waterfall strip under the belt. Put tear and tape on the belt just the width of the waterfall (2 1/8″) and attach the bottom 1″ of the waterfall to the belt.
Be careful as you stamp the large section of the belt so that you do not get it on the wrong side of the white waterfall strip.
Placing the belt an inch from the bottom is critical to making the card work. I didn’t read my own directions and just placed it where I liked it. That is why I have two sets of brads so I could cover up my mistake and place the belt correctly.
We will be doing another waterfall card in club this month so follow my blog to get that post and see another rendition using the Rustic Retreat stamp set. Just add your email at the top right of the blog where it says “subscribe”.
Thank you for stopping by. Have a wonderful day! Click on SAL in the computer to go to my store.
SAL, Stamp Away the Long winter days
Karen

Valentine Shaker Card and 3D Thinlits
Hello Stamping Friends,
My Early Bird Stamp Club met Saturday and we had a great breakfast provided by our hostess, Sheri, and then made a Valentine Shaker Card and a 3D thinlit Card. I love the word “twitterpated” from Bambi and had to have that stamp set. Here is how I used it:


And here is a Recipe Sheet for you to print if you keep a notebook of ideas:
Valentine Shaker Card Recipe Sheet
Click on any of these products to go to the store:


Built for Free Using: My Stampin Blog
Our second card was a 3D Thinlit Birthday Card featuring the Crazy About You stamp set & Thinlit Bundle:


Recipe Sheet: 3D Thinlit Bday


Built for Free Using: My Stampin Blog
Card Buffet January 2015
The specials this week are very “special”! Did you know you can use your reinkers and Dazzling Diamonds Glimmer Paper to make many different colors of glimmer paper?!
Technique Alert: Colored Glimmer Paper: Drip drops of ink on your glimmer paper and use your Aqua Painter to spread the color evenly. So easy!
Card Buffet Report:
We had a great time with Valentines, A Sympathy card, A St Patrick’s Day card, A Birthday Card and A Thank You Card. Each stamper took home a Treat Box Holder with a bookmark designed by Peggy Tassler and featured on Too Cool Stamping with Angie Leach. Click on the link for directions. Here is my version with our new Stack With Love Designer Series Paper:


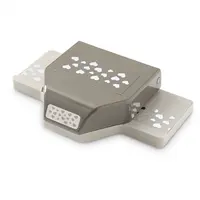
Do you see those little bitty hearts on the bookmark? They are from our new Heart Confetti Punch. Before this punch, our smallest heart was the owl punch heart which I used here with red glimmer paper inside the heart with the arrow. There are two different ways to make the window for the nuggets. Angie Leech used the Modern Label punch, lining up the punch with punched sticky notes. After trying that technique (second image) I used the Project Life Framelit so I only had to make one cut (first image).
Supply List
Built for Free Using: My Stampin Blog


Remember the Thank You card from a previous post? Jennifer did a double punch on the paper piercing and used a candy dot to match the stem of the flower. I love seeing the creativity of my stampers.
Have a great day and use hostess code JEJ32FKT to be entered in February’s online drawing. Congratulations to Shanon who won the set of Rhinestones in January’s drawing and December went to Robyn for post comments.
Stamp A Lot,
Karen
Welcome to my blog!

Sal Window to Products


