
Home » Bookmark
Category Archives: Bookmark
Grace’s Garden & Garden Gateway Dies & Bookmark
Hello Stamping Friends, (Click on the title to go to the full blog if you are viewing this on your mobile device)
Today’s card is a bridge fold card using Grace’s Garden Stamp Set and Garden Gateway dies.
I used the Forever Greenery DSP (designer series paper) for the background. I thought the ferns looked like evergreen trees and made a great background. Remember that movie ‘Secret Garden’ where the children find the gate to a beautiful garden?
Here is the card with a large evergreen tree and then the card with a small evergreen tree (fern).


Do you feel like you are in a forest?
I put the greeting on the back.
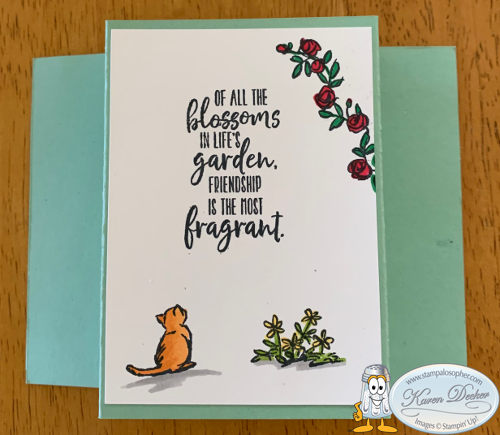
And more flowers and a sun in the middle of the front.

I taught a little bit about using the Stamparatus to save time by mounting three of the stamps on the plate and then moving the plate down two counts on the hinge and stamping again. The stamps I only wanted to stamp once, the bird, kitty cat and little flower were on the second plate and the gate and lupines on a third plate. I used three plates instead of 9 blocks when you count the greeting on the back!!

I stamped everything with Memento Tuxedo ink and then colored with Stampin’ Blends, except for the edging on the arch which I used a black Stampin’ Marker to color the edge so the arch looked very much like the gate and not so stark white. I just held the marker so I could rub the edge of the arch on the side of the marker, similar to sponging. Compare the arch on the first card without the edges colored to the arch on the second card with the coloring. Huge difference – yes? Little details like that make us artists not just crafters.
Grace’s Garden Stamp Set & Garden Gateway Dies Bridge Card Recipe
Base: Mint Macaron 8 X 4 1/4
Score the base at: 1 1/4, 2 1/2, 5 1/2, 6 3/4
Bridge Strip: Mint Macaron 5 1/2 X 1/2
Back for greeting: Whisper White 4 x 2 7/8
Front Garden Back: DSP 4 X 2 7/8
Sides and front: DSP Make 4- 4 X 1 1/8
Thick Whisper White for arch: 3 X 4 1/4, die cut with Garden Gateway Dies
Sun: 1″ punch of Daffodil Delight scrap, sponge the edge
Vines at corners: Mint Macaron 2 1/2 X 2 , die cut with Garden Gateway Dies
Cardstock for Stamped Images: Whisper White 5 1/2 X 4 1/4 make 2
Stamp two of each of the 3 flower images, die cut with Garden Gateway Dies
Stamp two fence posts and two rose vines, die cut with Garden Gateway Dies
Stamp one gate, one cat, one bird, die cut with Garden Gateway Dies
Note: 5 X 7 1/4 magnet sheet to hold the dies in place in your plastic pouch
Stampin’ Blends Coloring
Arch, Gate and Posts: Light Smoky Slate; also used the black Stampin’ Marker to color the edge of the arch.
Note: I colored with the Stampin’ Marker on the edge because the Stampin’ Blends will bleed.
Grass: Dk Old Olive
Lupine: Dk Highland Heather and Dk Granny Apple Green
Smallest flowers: Lt Mango Melody and Dk Granny Apple Green
Medium flowers: Lt Daffodil Delight, Lt Old Olive and a touch of Dk Mango melody in the center
Large hollyhock flowers: Dk Night of Navy and Lt Call Me Clover
Rose vine: Dk Real Red and Dk Shaded Spruce
Bird: Dk Daffodil Delight
Kitty Cat: Dk and Lt Pumpkin Pie
Remember to add a Lt Smoky Slate shadow below the cat and flowers on your back greeting
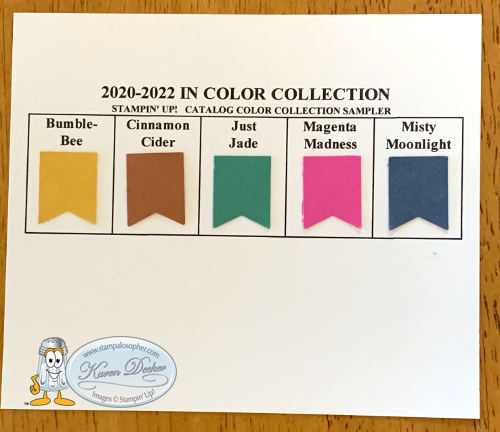
We made two other projects together – the In Color Sampler sheet and the In Color bookmark. It is tradition you know!
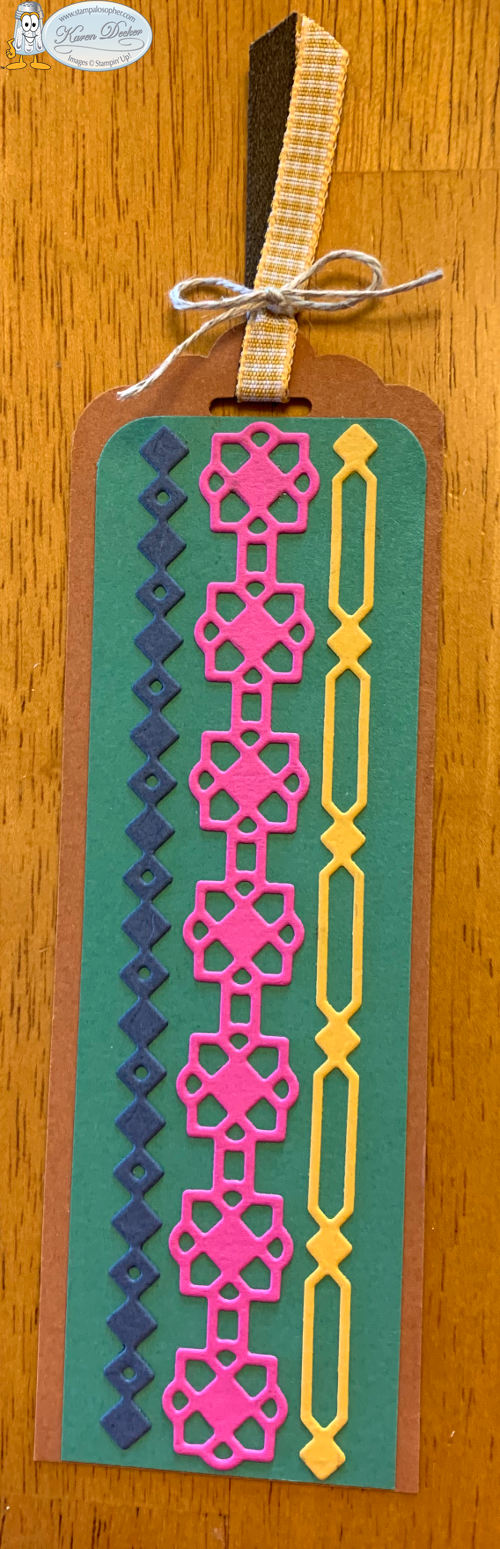
Bookmark Recipe
Base: Cinnamon Cider 6 X 2 (minus a hair) Punch with the Scalloped Tag Topper Punch
Layer: Just Jade 5 3/8 X 1 3/4 Corner round the top with the Detailed Trio Punch
Medallions: Many Medallions Dies in 1 X 5 1/2 strip Magenta Madness, 1/2 X 5 1/2 Misty Moonlight and Bumblebee.
Ribbon: 4″ of Faux Suede and Bumblebee Gingham; 6″ of Linen Thread
Magnet Insert to store Medallion Dies 6 1/2 X 6 1/4
See you soon!
SAL, Sharing A Lot
Karen

Catalog Launch with New Wonders
Hello Stamping Friends,
We had a fun day Saturday at the catalog launch. Jo and Lucille had cards to sell and Christine brought cute little boxes to sell that she had made and filled with chocolate kisses. I had many stamp sets and tools for sale and those that didn’t sell will be posted here on the blog under the tab “bake sale” after we return from Yellowstone.
I traveled to a funeral held on Thursday and was glad to have our new Stampin’ Up! bags to pack all my tools so I could make the In Color bookmark at the motel so it would be ready for the make-and-take at Saturday’s event.

The bag held the Stamparatus bag and the 12X12 paper carrier and the inks, stamp set, punch, shammy, ribbons, markers and more. Love it!!
So what did I come up with for the Make- And -Take that would introduce our five new colors?
Drum roll…… introducing “New Wonders”:

Isn’t she adorable? The Perennial Essence Designer Series Paper is the perfect background for her and all the new In Colors:

The words describe our new catalog!!

My club members were looking at our club schedule to see when they would be able to earn the New Wonders stamp set:

This set is a hostess set and can be earned by hosting a party or purchasing $150 or more of products. It is also a DistINKtive set with all the amazing dimensions of that special type of stamp. Do you notice how the pages on the bookmark look 3D?
Be sure and notice the Rococo Rose and Pretty Peacock ribbons used together on the bookmark. They are unique and beautiful!
Bookmark Recipe:
- In Color Base (Rococo Rose) 2 3/8″ X 8 1/2″ – corner rounded at the top
- Designer Series Paper (DSP) Perennial Essence 2 1/4″ X 8 3/8″ – corner rounded
- In Color strips to stamp the pages in each color 1 1/2″ X 3 1/4″ – 5 In Colors, stamp and fussy cut the pages only on each color
- Shimmer White for angel 2 1/2″ X 2 1/2″ Stamp, color and fussy cut. I left the pages on the image and then glued the Purple Posy on top of the Shimmer White. The darker colors won’t show the little hands as well.
- Shimmer White for greeting 2 3/4″ X 1 3/4″- use the 2nd smallest oval in the Stitched Shapes framelits
- 5″ ribbon in Pretty Peacock and Rococo Rose
- 8″ twine
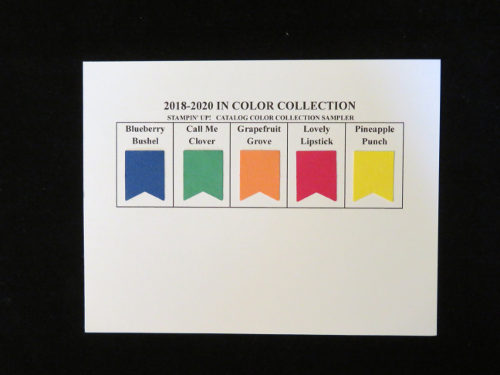
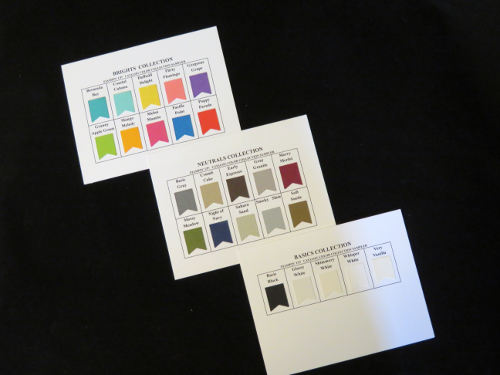
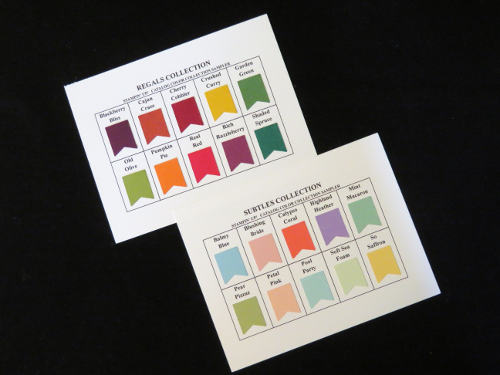
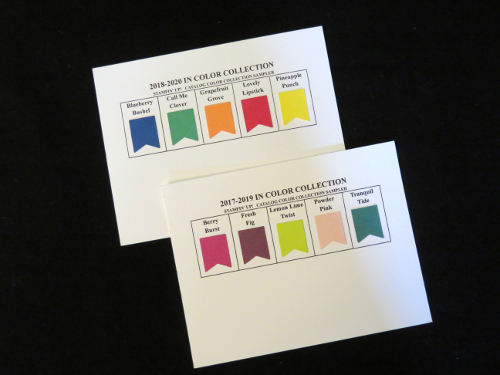
Each year I do a Color Chart for the five new In Colors and the stampers make one at the catalog launch. The colors will be current through June 1st of 2021. Each year a new set of five In Colors is introduced and those colors stay current for two years.

Contact me if you would like A) the set of 12 color charts or B) just the new In Color Chart and new comparison charts. The full set is $12, the new comparison charts and In Color Chart are $6. The 12 charts are the Basics, Neutrals, Regals, Subtles, Brights, Greens, Blues & Grays, Oranges & Yellows, Purples & Browns, Reds & Pinks, In Colors 18-20, In Colors 19-21.
I would love to earn your business and be your demonstrator! I have clubs that meet on Tuesdays and Saturdays every other month and in the off month I have Stamp A Stacks or other crafting events. Check out the calendar to see what’s in store for this coming year!
SAL, Stamp A Lot, Smile A Little, Share A Love
Karen
Click on little SAL to shop or the calendar to check out events.


Graceful Glass Vellum Bookmarks & Delightfully Detailed Suite

Hello Stamping Friends,
A new catalog year has started and Stampin’ Up! is celebrating their 30th birthday! It is great to be part of a company that keeps on keeping on (and keeping up with modern trends)!
Thank you for supporting the catalog launch on Friday and Saturday and the craft sale. All the left over products that didn’t sell are now in a new tab on this blog that I titled “Bake Sale”.
The new hostess code is C2HE3X22. Our bimonthly club is July 10th and guests are welcome for $5 or a $25 order placed between now and July 10th.
For the make and take at the catalog launch I displayed several new products and the favorite was the Delightfully Detailed Laser-cut paper shown on pages 38-39. It is part of the Delightfully Detailed suite. Our wonderful home office has compiled a set of videos introducing the new catalog products and this is the video that showcases the paper we all loved.
Click here to see all the new products-the paper is toward the end:

Of course, at every catalog launch we must make a ‘traditional’ bookmark for our catalogs and a color chart with the new In Colors so we can actually see them, punch them – love them! The bookmarks used the In Colors and the Graceful Glass Designer Vellum #146344, page 165.
The ribbon is 5/8″ Polka Dot Tulle in Whisper White, #146912, and various baker’s twine including the new Nature’s Twine #146342 which has the Grapefruit Grove color-see pages 200-201.
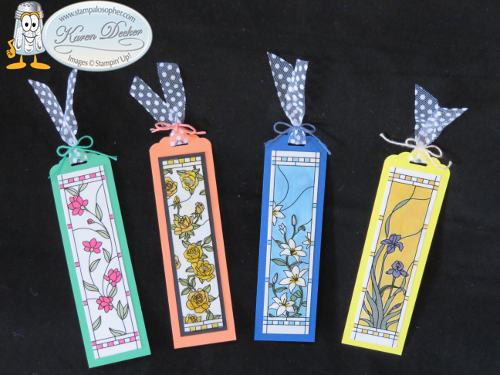
- Bookmark Base = 2″ X 7″ punched at the top with the Scalloped Tag Topper Punch #133324
- Whisper White for behind the vellum = 1 1/2″ X 6″
- Vellum = 1 1/2″ X 6″ (except the yellow roses which are 1 1/4″ X 5 1/2″)
- Black for the yellow roses = 1 1/2″ X 5 3/4″
The color charts use a 3/4″ length of cardstock punched with the retired banner punch.
To make vellum bright white, rub the backside of the vellum with a stylus #126189 on the Stampin’ Pierce Mat #126199:
 The front side:
 It also gives a 3D look and feel.
The color charts all had to be redone for the color revamp. This year I added a few extra color charts to compare color families.
Brights; Neutrals; Basics;
 Regals and Subtles;
 In Colors;
 Blues and Grays; Reds and Pinks;
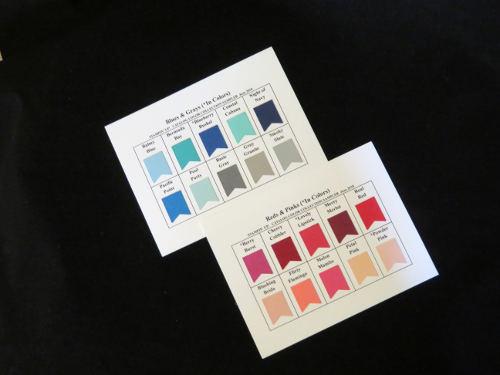 Purples and Browns; Oranges and Yellows; Greens;
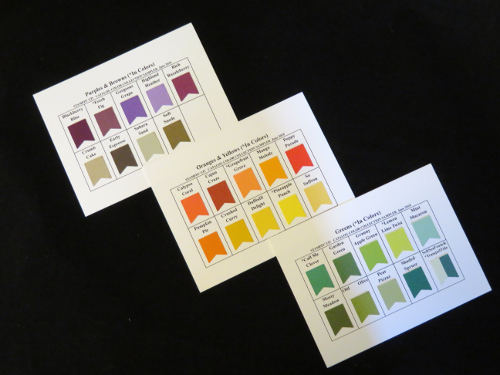 We have 13 greens so the last two had to be split.
There are twelve Color Charts. Email me if you would like the Excel spreadsheet or if you would like to order a set of cards. I will make them up for you for $8 – pick up at my house; or $10 -mailed within the USA. email: [email protected]
Contact me if you would like a catalog, I would love to earn your business and be your demonstrator.
SAL,
Karen

Happy Fourth of July!
Happy Fourth of July Stamping Friends!

May you have a wonderful day enjoying friends, food and fireworks and may we all remember that ‘freedom is not free’ and the many who have gone before and are serving now to preserve our freedom! Thank you to all those and thank you to a mighty God – may “One nation under God” be forever true!

This bookmark uses three of my many favorites in the catalog and the new Lemon Lime Twist ‘In Color’ paper. The greetings, front and back, are from “Crafting Forever” . The butterfly is from the ‘Move Me’ Thinlits and has a lovely matching stamp set. I will be posting a card using that set in the near future. For those of you who sell cards, the “Crafting Forever’ stamp set has a separate copyright stamp for using on your cards. The branch is from a long time favorite I hope never retires – “Thoughts and Prayers”. Here are the details:
- Base= Basic Black 2 1/2″ X 6 1/4″
- Front= Lemon Lime Twist 2 1/4″ X 6″
- Butterfly= Basic Black 2 1/2″ X 2 1/2″ Cut with Big Shot and Move Me Thinlits -Two butterfly thinlits used together
- Circles for the top= Basic Black 3/4″, Lemon Lime Twist 1/2″; punched with the 3/16″ hole punch (Crop A Dile)
- Words= Crafting Forever Stamp Set
- Dots on background= You Move Me Stamp Set
- Flowering Branch= Thoughts and Prayers stamp set
- Ribbon= 6″ Ombre Lemon Lime Twist, 6″ Black Baker’s Twine
- Three Rhinestone Basic Jewels
And for a few Fourth of July cards I went back into history and found one I had made by creating two sizes of tubes with card stock and then cutting very thin slices of the tube and mounting them to create a fireworks kind of look:

Remember Paper Pumpkin’s cute pinwheels a few years ago? I mounted them on a decoration I found at the store to make a fun wall hanging:

So celebrate the Stars and Stripes that represent our great country!

SAL, (Salute A Legend)
Karen


Welcome to my blog!

Sal Window to Products


