
Home » Easter
Category Archives: Easter
Easter Basket Card and 3D
In my last post you saw all the cool cards I made with the Divinity Designs Alleluia die and stamp combo. I also purchased from them a basket die set, a pastel egg paper/die duo and a pastel prints 6X6 paper pad. With all these wonderful products I made these cards with different crosses and different eggs:
 .
.
And this one:
 .
.
With pastels you can even stamp on the paper as I did here for the inside of the cards:

I had Easter baskets sitting out with paper grass so I used that grass in the paper baskets.
 A picture of the products might help you save words.
Good idea, Sal! And I will link Divinity Designs down below with little Sal in the computer.


That fourth screen shot is one of the pastel print papers. I used the Stampin’ Up! ‘Cross of Hope’ die and put the heart of the paper right in the middle of the ornate cross die. When I die cut the cross, I left the middle intact and put scotch tape on the back so the pieces wouldn’t come out in hopes the little heart would show. You’ll see more of that cross in the 3D baskets I made for the grandchildren. The greeting on the front comes from:

The layer on the front is the Stampin’ Up! Ornate Layers die and the inside greetings are from Stampin’ Up! ‘His Grace’. Check out my previous post ‘Easter Celebration’ to see the Alleluia die at work. There’s not much you need for a recipe on this card. It uses a standard base and layer. Here is a pdf you can print out with the standard layers.
Standard Layers.pdf printable doc
Let’s look at the little 3D baskets Paul and I made for the grandchildren:
 I added a little heart to the middle of these crosses since the paper heart didn’t stand out.
On the opposite side of the baskets I used the dove in ‘HIs Grace’ punched out with a circle punch and layered on a slightly larger circle in the same cardstock as the basket:
 .
. 
I cut out numerous eggs and glued matching ones back to back and added them to the basket before the candy. The boys baskets were purple and blue:
 .
. 
3D Basket Recipe
- Base: Cardstock of desired color, 6 X 6
- Score at 2 and 4
- Turn 90 degrees and score at 2 and 4
- Crease all score lines
- Adhere DSP squares to the four corner squares – measurements below
- Cut on the score lines to the middle score line twice on opposite sides
- The middle uncut part is the part to attach the handle
- Fold the sides up to meet each other
- Handle: cardstock of choice, 8 1/2 X 1/2
- Decorative Layer (X4): Divinity Designs Pastel DSP, 1 3/4 X 1 3/4, adhere before gluing basket together
- Ribbon: 12″ tied to handle
- Adhere cross on one side and dove on opposite side- see above for paper used for cross

It was a wonderful Easter with Tyler, Amber and the boys, Jaxson & Emmitt!
The boys had matching shirts!

We died eggs but then made deviled eggs out of them so a bit pointless but tradition is tradition!


The boys hunted Easter eggs in their lovely yard on a wonderful sunny day! (It snowed again on Monday!)

All hostess’ need a hostess gift and I found this cute rabbit holding a carrot around a vase of flowers. I couldn’t resist!
Jonathan & Stacia spent the day on the slopes with Emma, Joey and a friend!

You can’t always have both families and, you know, ski season is almost over!
I know, Sal. At least we got pictures.
Thanks for spending time with me today friends! Hopefully you have ideas for next year’s Easter cards.
SAL, SingALleuia
Karen

Riddle for the day:
Question: What 5 letter word typed in all capital letters can be read the same upside down?
Answer: SWIMS


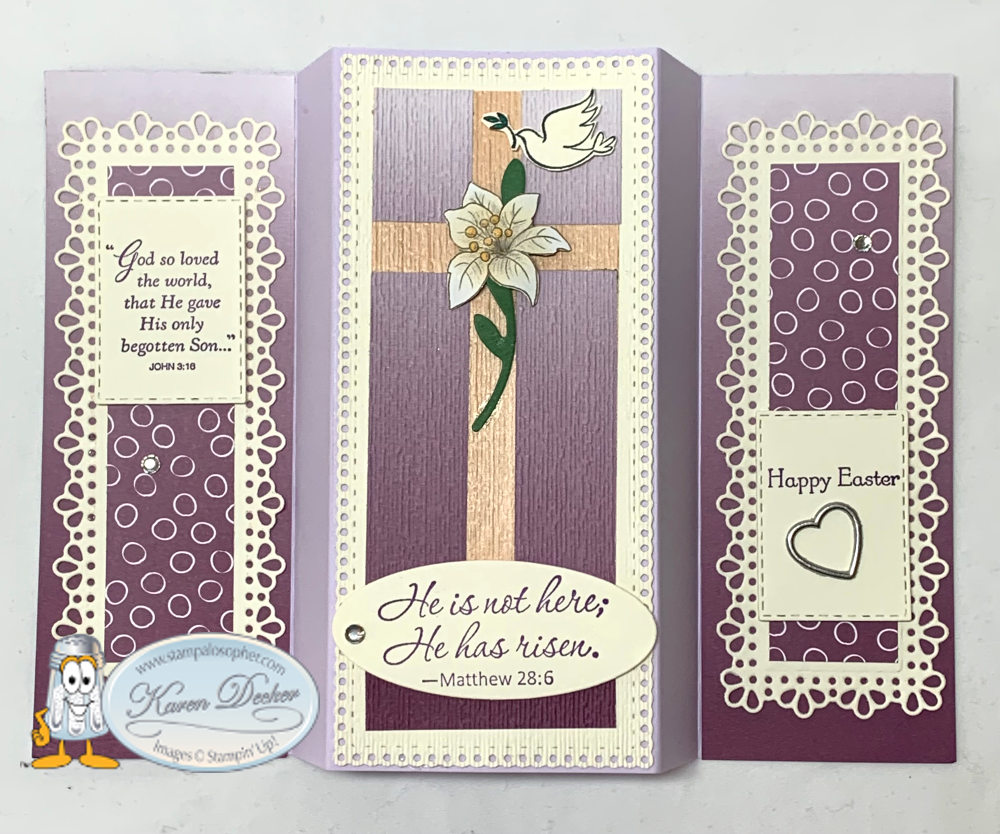
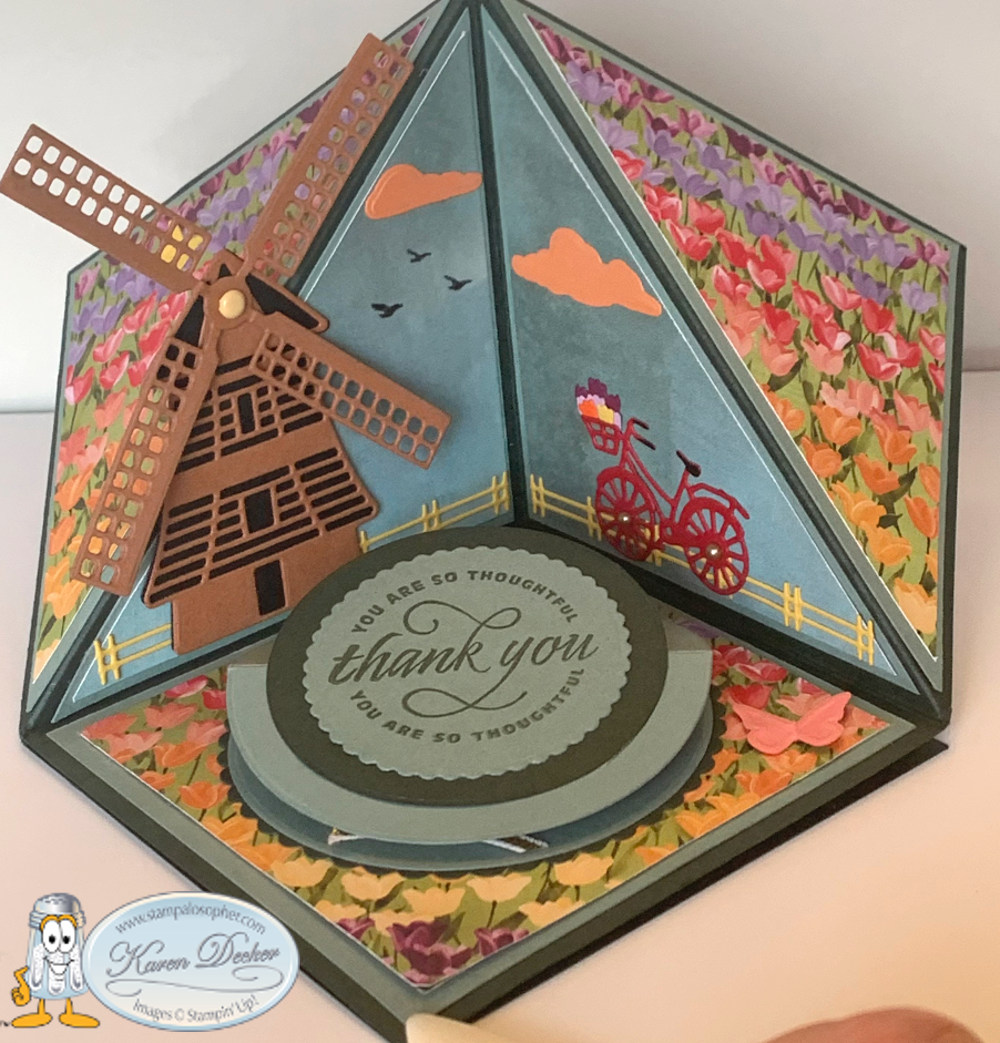
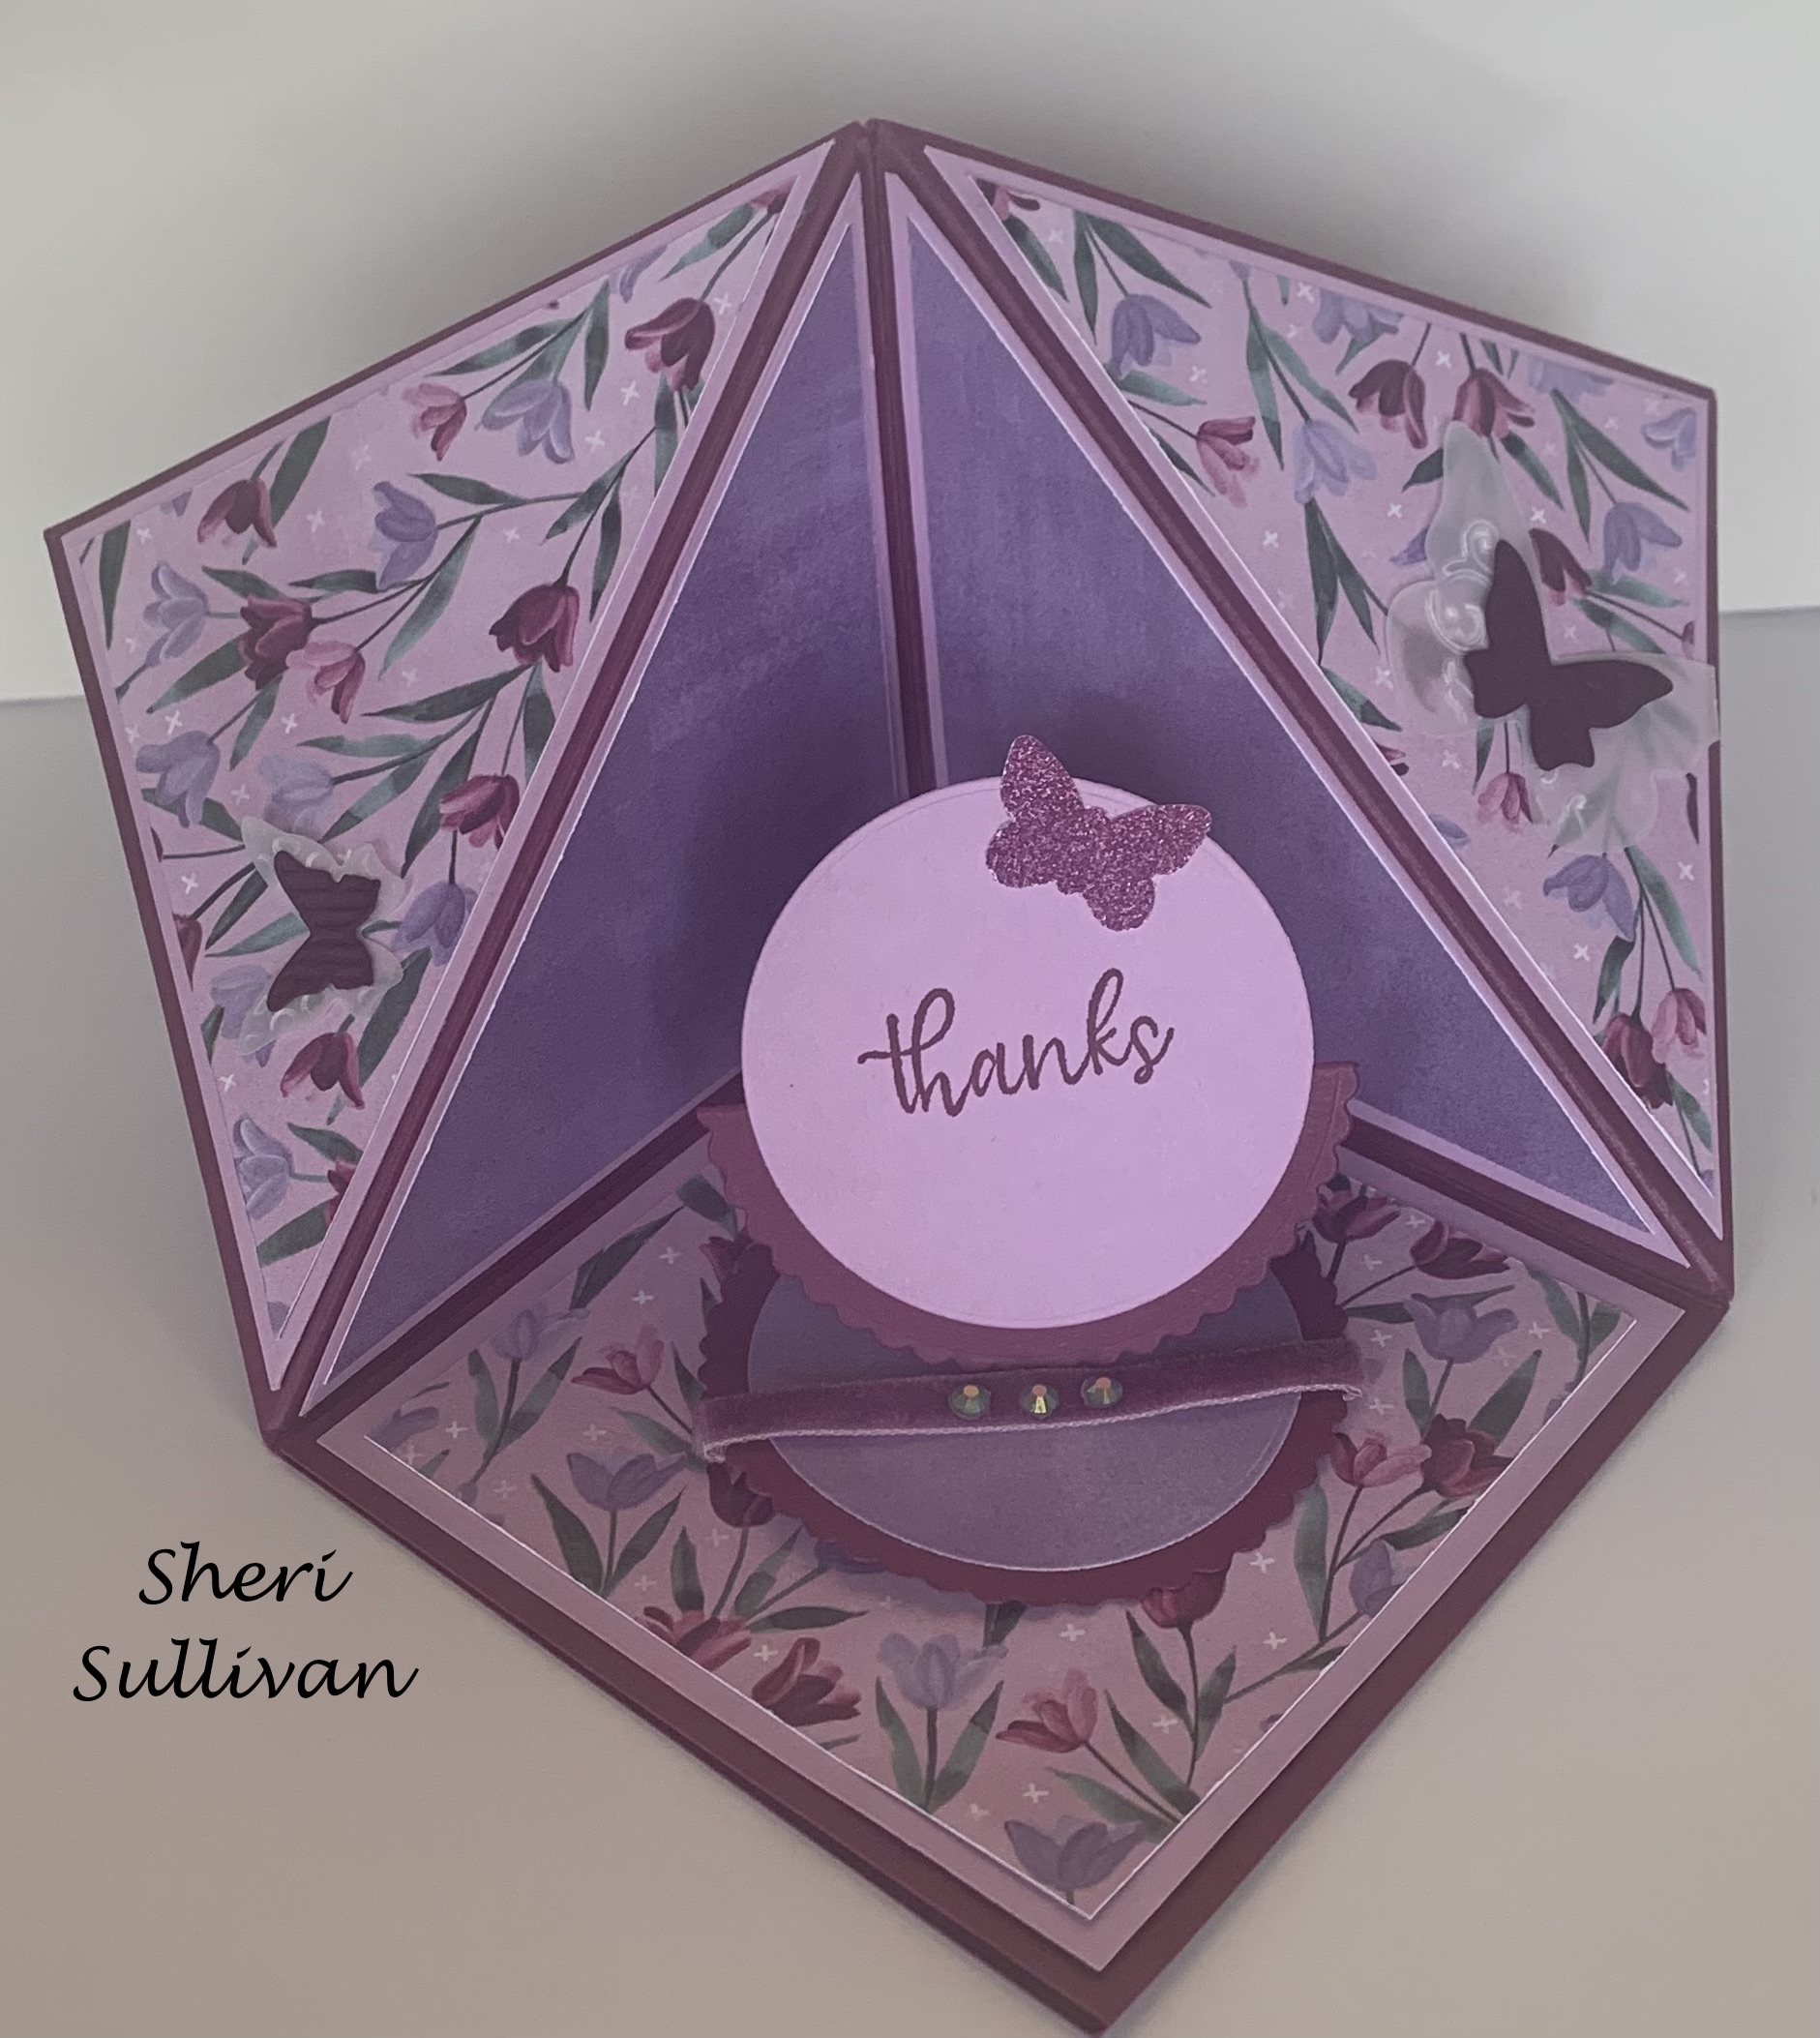
Triangle Corner Pop Up Card for Case The Creator (CTC) #3
Hello Stamping Friends,
Case The Creator Card Challenge
This month we cased Dawn Griffith’s Triangle Corner Pop Up Easel Card!
Yes, Dawn calls it a “Fancy, Schmancy Corner Fun Fold”! Her video is in the instructions.
Case The Creator #3 printable pdf file

I ordered the tiny magnets from Amazon:

 .
.  .
. 
The bicycle is hidden when you open up the easel so be careful with your design. I had a lot of fun with the bicycle! I used the long, tiny tulip die to create a basket of tulips! I will write my greeting under the ‘thank you’ since I went against protocol and made the bottom left another flower display instead of the place to write a note.
Heather made a fabulous graduation card with beautiful gold embossed paper and black! I love the diploma for the easel stand up!
 .
. 
Joy’s beautiful card uses the ‘Expressions In Ink’ designer series paper. We only have until May 2nd to get discontinuing items, like this DSP, from the annual catalog!
 .
.
Sharon’s uses the Tea Time stamp set and Tea Together dies- look at the little heart she put on the lid!

Sheri used the ‘Flowering Fields’ DSP and the ‘Simply Succulents’ stamp set for greetings:
. 
 .
.
Ann used the ‘You’re A Peach’ DSP and the ’Sweet As A Peach Bundle’. Those peaches even look fuzzy! The amazing “Dist ink tive” stamps! These are in the Annual catalog as well so order before May 2.

 .
.
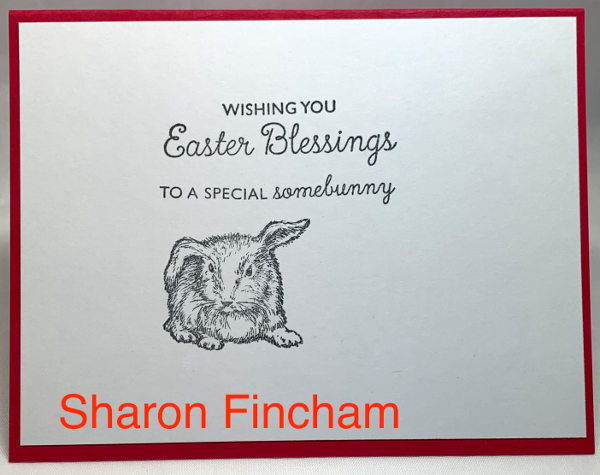
Jo’s little rabbit made us all smile, and eggs from the Arrange A Wreath set and Wreath Builder Dies were perfect with the paper.
 .
.  .
.
 They followed instructions and had a large place for a message.
Indeed! Isn’t it fun to see all the different creations from one set of instructions?!
SAL, Seeing April Leave
Karen
Click on little Sal in the computer to shop.


February Mystery Card #10
Hello Stamping Friends,
Hostess code for March: A3VBV4QZ
On the last Tuesday of each month I have a Zoom meeting to chit chat with one another, talk about the swap cards we made and do a Mystery Card Challenge. Those challenges started up during COVID and were a fun way to craft together on Zoom.
 Does that mean you won’t be doing Mystery Cards in the future?
Good question, Sal! We have one last rotation on this club in April (retirement list!) and then we start all over with a new rotation and new plans for meeting depending on the wishes of the members. Give me a shout out if you want to be part of the new club!
January’s Mystery Card is a great one for using up those little strips of paper you have left from a 6 X 6 DSP after you use a 5 X 4 piece for the front of a card.

Mystery Card Challenge #10 printable pdf file
Lucille made a fun card with bumble bees on blue! So cute !!
 .
.
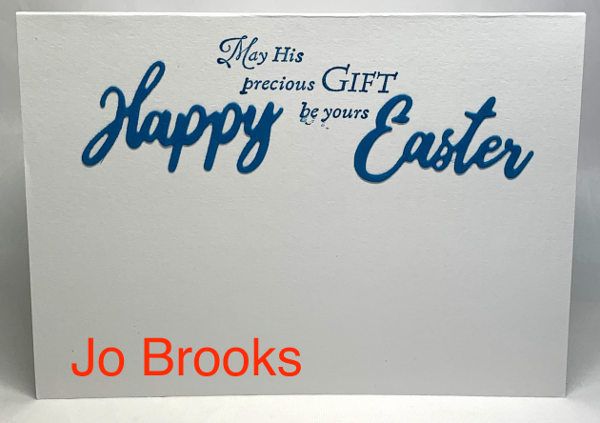
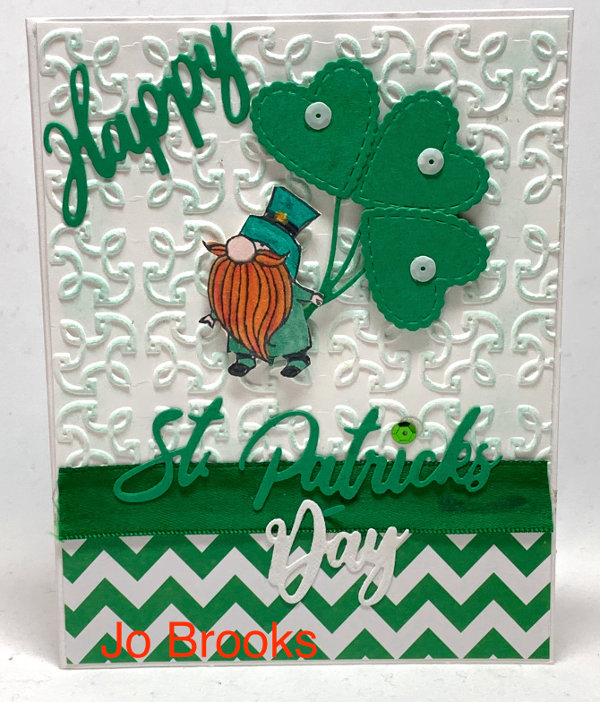
Jo made an Easter card! The greeting is from ‘Fable Friends’ stamped and punched with the ‘Story Label’ punch.

I made a thank you card using scraps left over from the Hydrangea Hill paper and Flirty Flamingo:

 .
. I decided to embellish it a little and add another quarter sheet of black on the back of the Flirty Flamingo. I just shaved off a little on each of the sides to give a slight border. I used Versa Mark to make a little flower using a stamp from the ‘Lots of Heart’ stamp set. The Matte Black Dots are on page 11 of the JJ Mini. The scalloped Basic White is cut using the Stitched So Sweetly Dies. The ‘thank you’ and the ‘you’re all heart’ are both from the ‘Lots of Heart’ stamp set.
 .
. Since I had left over Sale A Bration DSP from another project, I made another card using the same ‘Lots of Heart’ stamp with all the little dots, I connected the dots to make a smiley face and stamped greetings from the same stamp set. The ‘Thinking of You’ is from the ‘Happy Thoughts’ stamp set and punched out with the ‘Tailored Tag’ punch.

 .
. The ‘Lots of Heart’ stamp set is so versatile you won’t want to label it as just a valentine stamp set. For this next card I used Night of Navy for the base and background layers and I used the edge of my Night of Navy marker to barely color the edge of the greeting.

 .
.
What a fun and simple card and those little strips of DSP won’t go to waste. Won’t you join us on our next Zoom meeting with its Mystery Card Challenge? I will include you in the Zoom invitation if you will send me your email. Text 303-815-0838
Hostess code for March: A3VBV4QZ
SAL, Stamp A Lot this lovely March
Karen

Sending Flowers Dies meets Fable Friends
Hello Stamping friends,
I used these dies for a valentine card which you can see by clicking HERE.
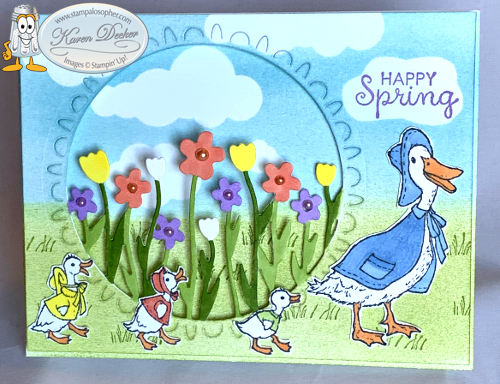
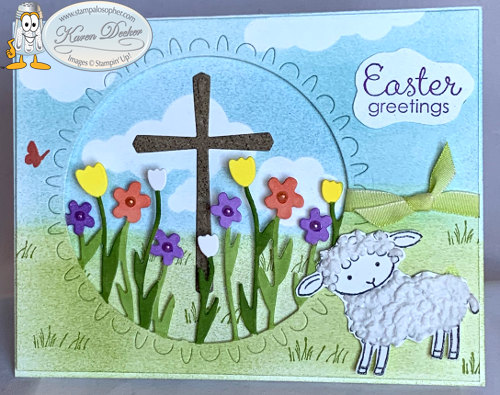
I designed a ‘Happy Spring’ card and a card with an Easter greeting:


The “Happy Spring”, “Easter Greetings”, mama goose with babies and the grass stamp are all in the Fable Friends stamp set in the annual catalog.

The lamb with the puff paint is a retired set called “Easter Lamb”. It has just the one stamp in the set.
The cross is from the ‘Cross of Hope’ die set and cut from a piece of wood-tone paper in the Tropical Oasis Designer Series Paper(DSP). Samples of this paper are also in the 6 X 6 paper stack you receive if you join Stampin’ Up! during Sale A Bration. I cut off the flower from the Sending Flowers die that was right in front of the cross and put that flower in the inside of the card.
The little butterfly on the Easter Card is from the “Enjoy Life” stamp set (annual catalog) and stamped in Calypso Coral.
The inside greeting, ‘today is a day for new beginnings’, is from our Sale A Bration ‘Power of Hope’ stamp set. With a $100 purchase you earn this set and the Stone 3D embossing folder.


I added the sunbeam from the retired ‘Kinda Eclectic’ for my personal Easter cards this year.

There is just something about seeing all those little lambs together that made me want to take another picture!!
We have less than a week, just until March 31, to earn Sale A Bration products or to purchase the coordinating products that include the Sending Flowers Die set. I will show all the products further on in the post.
Recipe:
- Base: Thick Whisper White, 5 1/2 X 8 1/2 scored at 4 1/4
- Top: Thick Whisper White, 4 1/8 X 5 3/8
- Characters: Regular Whisper White, Depending on your choice of character, the goose can lay sideways above the goslings so a 4 X 2 piece should work or use up some of your scraps
- Embellishments: 7″ of ribbon and seven little pearls colored to match the flower with Stampin’ Blends.
 Are you sure you didn’t miss something? Your cards hardly ever have that few pieces.
By using our thick Whisper White we don’t necessarily need another layer in the inside and the ‘Sending Flowers’ die gives incredible dimension to the front so we don’t need more layers. Probably a good thing I did this card with my club because the second card we did had 13 pieces!
Did you post that card already?
Not yet, Sal, but hopefully this week since it uses the Happy Birthday Sale A Bration set which has amazing flowers. But I regress. Let’s look at the steps for this card.
- Make cloud masks, a 3 1/4″ circle mask with your circle dies, and use sticky notes to mask the top of the base and the top of the inside as you sponge each section. I fussy cut a cloud mask around the Happy Spring, Easter greetings, and inside greeting and used the Up and Away thinlets set (in the clearance rack) which has several cloud shapes to cut out. If you don’t like the idea of fussy cutting your own, there are several dies in the catalog that could be modified to look like clouds. For example ‘Lakeside’ dies have a die for a lily pad that could be a cloud.
- Cut out the cross if you are making the Easter card.
- Cut out your front flower circle with the ‘Sending Flowers’ Die. You need this piece to position your clouds in the background.
- Lay your base open flat, mask the back side of the card, and mark 2 1/2″ on your grid sheet to guide you where to sponge the blue and green. I used Balmy Blue and Granny Apple Green and our Sponge Brayers (#141714). The brayers come in a pack with two handles and four sponges for $8. They are so much easier to use than the rubber brayers and they give a nice consistent look. Lay the cutout flowers over top of the front just to position your clouds and the cross then set that piece and the cross piece aside and sponge the base front.
- Remove the cloud masks and without reinking the brayer, lightly sponge over the sky to soften the white of the clouds.

- Likewise, do the inside of the card:
- by first stamping the greeting and then masking the greeting with a cloud shape and adding other cloud shape masks as desired and masking off the other side of the inside of the card.
- sponge the blue sky and the green grass. Remove the masks and do a light sponge over the clouds.
- Now you have the idea so let’s sponge the top flower cut out piece. Mask it with circle cutouts covering only the flowers. I had to use two circle masks since my die was just a little bit small. Stamp the greeting and mask it with a cloud mask and add other clouds as desired then sponge.

- I purchased the gina K Masking Magic sheets from Amazon.
- Using Granny Apple Green and the grass stamp from Fable Friends, stamp little grass clumps on the inside, the front, and the area that will show behind the circle.
- Use Stampin Blends and color your flowers:
- Dk Pineapple Punch
- Lt Highland Heather
- Lt Calypso Coral
- Leave two tulips white
- Leaves of the tulips- Dk Granny Apple Green
- Leaves of the other flowers – Lt Granny Apple Green
- Using the same colors of Stampin’ Blends, color your Pearl Basic Jewels and add to the centers of the five petaled flowers. Stampin’ Blends are alcohol so they won’t rub off the pearls. Regular markers do rub off and we have used Sharpies in the past when we colored rhinestones or pearls- yay for matching colors in our own Stampin’ Blends!
- Stamp your characters in Memento Black so you can color them with Stampin’ Blends or apply puff paint. Fussy cut them out and mount with glue dots.
- Place foam adhesive strips on the back of the front piece and a few dimensionals around the sides of the circle and attach.


but there is ribbon and a butterfly?
Good catch, Sal! The ribbon knot is tied around the front before the adhesive strips are added and the little butterfly is stamped on the front in Calypso Coral before the adhesive strips are added. Whether you want these are not depends on the character you use. The goose stands up so tall that the ribbon wouldn’t work, and the card might get a bit busy if you add a butterfly with all the little goslings. Personal preference.
I stamped the ‘Happy Spring’ with Highland Heather but decided it was a little too light so I stamped Easter Greetings on a separate scrap of Whisper White in Gorgeous Grape and fussy cut it to look like a cloud. I used glue dots to adhere it since I didn’t want it popped up too much and glue dots are just a slight pop up and a bit more than using snail or liquid glue.
I cut a few extra ‘Sending Flowers’ cut outs so the club members could cut off a flower or two or three to put on the insides of their cards and their cards looked awesome. I just used the one flower I cut off the front so you could see the cross better to put on the inside.
SAL, Send A Lot of flowers on a card
Karen

Magic Shutter Easter Card & Mother’s Day Card
Hello Stamping Friends,
My Easter card this year was the Magic Shutter Card. There are many videos on pinterest by that name, though I found if I prop my smart phone up on a stand, I can scroll through the dimensions on a written post like this one as I construct the card. Then there is no stopping and starting a video and trying to take notes, just tap the screen and scroll to the next step. Do you like doing that?


The Delightful Daisy Designer Series Paper (#144137) matched with Wisteria Wonder card stock (#122922) does all the work of making the card beautiful. As you open the card the shutters open like the shutters on a camera for a great “ooooo….” moment. One designer put a picture of her child behind the shutters. With Teeny Tiny Wishes (#127802) this card could say Happy Mother’s Day or Happy Graduation or any of the other tiny wishes.
- The base is Thick Whisper White cardstock cut at 8 1/2″ X 5 1/2″ and scored at 2 1/8″ and 6 3/8″ Tip: After scoring the card base, gently fold the scores bringing the two sides to the middle to exactly match and then hold them in place and use your bone folder to firmly burnish the score lines.
Next let’s make the skinny panels on the fronts and the inside right and left. They are all four the same size. (Note: DSP means Designer Series Paper.)
- Wisteria Wonder = 1 7/8″ X 5 1/4″ make 4
- Delightful Daisy DSP = 1 5/8″ X 5″ make 4
Attach the DSP to the Wisteria Wonder layer and then attach each to the base.
Now let’s make the inside middle panel but it won’t be attached until after the shutters are attached.
- Wisteria Wonder = 3″ X 5 1/4″
- Delightful Daisy DSP = 2 3/4″ X 5″
Attach the DSP to the Wisteria Wonder. The circle in the middle is cut out with a 2 1/2″ layering circle framelit (# 141705) or the retired 2 1/2″ punch. Cut your circle out just slightly above middle. Tip: If you are using a punch, punch out a template on a sticky note and put it on your card panel to guide where you punch. Come down from the Wisteria Wonder top 1 1/4″ which will give you 1 1/2″ at the bottom of the circle cut out.

- Stamp the greeting on a Whisper White Strip 3 1/2″ X 1″ and punch it out with the Bow Builder punch (#137414). Attach it to the center of the circle cut out. The cut out will show behind the shutters so choose what you want to show, or match, as you glue on the greeting. Draw around the greeting with a Wisteria Wonder marker or sponge the greeting edges before gluing to the circle cut out.
You are not going to attach the middle panel yet, but you need to use it to guide where you glue the circle cut out. Hold the panel in place with a sticky note, put glue on the back of your circle cut out with the greeting, and carefully press your circle directly through the opening. Put the panel aside as you make the shutters.

Shutters:
- Wisteria Wonder = 4″ X 3 1/2″ Make two. Mark the center of one piece by coming down 1 3/4″ on the short side and over 2″ on the long side. Use a ruler and draw a line from the middle mark to the top and bottom corners on the short side. Cut out this triangle which you can then use for cutting the other shutter piece. (Save your template for future cards.)

Clip the pointy ends off the shutters. Score the uncut side at 1/2″.

Fold your score line and burnish well then unfold it and place the shutter right along the edge of the fold on the base. Put a piece of sticky tape on the 1/2″ edge.

Remove the sticky tape cover and then fold the side over pressing it onto the sticky tape.
 Repeat on the other side. Layer the shutter’s points with one point on top of the other shutter and one point below.
Most of the cards online use a belly band but I prefer a ribbon that stays attached. I used the retired ribbon punch and punched the edge of the fold on each side. The Pretty Label punch (#143715) would work almost as well. Close each side and punch a little slot in the Whisper White base. I marked 1/2″ up from the bottom with a pencil so both sides would be in line.

Run the ribbon (20″) through the slots. Now you are ready to mount the middle panel. Place an Adhesive Foam Strip (#141825) at the very top of the panel and the very bottom of the panel and then mount the panel over your shutters and ribbon. (You could use the Stampin’ Dimensionals as well but it would take quite a few.)
After the inside was done, I put pearls on each end and tested to see if they would interfere with the shutters. They didn’t –so it worked!
The Card Front
The “Celebrate” thinlit was a Sale A Bration free product that will be available in the new catalog June 1st!
- Three “celebrates” were cut out – two with Wisteria Wonder 3″ X 4 1/4″ and one with Thick Whisper White 1 1/2″ X 4 1/4″. The purples were glued on top of each other and the white was offset a little. I used Tombow liquid glue and drew a thin line of glue on the letters – counted to twenty to let it get tacky- and then glued it on. If you wait just those twenty seconds the glue won’t gush out on your project.
The butterfly is stamped with the “You Move Me” stamps (#144002) and cut out with the “Move Me Thinlits” (#143732).
- Whisper White 1 1/2″ X 3 1/2″ will do both the butterfly and the He Has Risen greeting. Stamp the butterfly first with the solid stamp in Crushed Curry and then stamp the wing detail in Tangerine Tango. (I love two step stamping sets, and the butterfly thinlits even have antennae!) I used a Tangerine Tango marker to draw a thin line on the antennae then attached the little beauty with a glue dot under one wing.
- The greeting is from the retired “Easter Message” stamp set and cut with a Stitched Shape Framelit (#145372).
My Mother’s Day card uses the current Lovely Words Thinlits (#143733) and the Whisper White 1/4″ Organza Ribbon from the Occasions Catalog Page 23 (#145590). The “For You” greeting is from the So Many Shells stamp set (#143695).

The little heart is from the Subtles Enamel Shapes (#141679).
 After I had taken pictures I added another heart on the greeting and one down in the bottom left.
What do you think? The Delightful Daisy Designer Series Paper (#144137) will be retired after May 31 and the retired list comes out on April 9 so it will only be available while supplies last. Click on the little SAL computer image to order this or any other products!
SAL, Share A Love
Karen


Window Shopping Bundle!
 Hurry Stamping Friends,
Don’t let the Window Shopping Bundle get away! It is on page 43 of the Occasions catalog and is just the cutest! It might get carried over in the big catalog come June 1st, however when Stampin’ Up! introduces a product with matching Thinlits it is bundled with 10% savings but not when it is carried over to the next catalog. The bundle is $50.25 which will qualify you for a free Sale A Bration product.
Remember, purchase $50 of anything from any catalog and get one item from Sale A Bration for free. Three additional items were introduced February 21:


Check out the sample items made with these products:

Click on the brochure picture below to see all the other Sale A Bration products. But hurry the Card Tin is already sold out and product is only available while supplies last!

Thank you, Deana, for a wonderful party to introduce the Window Shopping bundle and the Sale A Bration products.
Our project at the party was either a Birthday Box with matching card which uses the Window Shopping stamp set:

or a Thinking of You box and matching card:
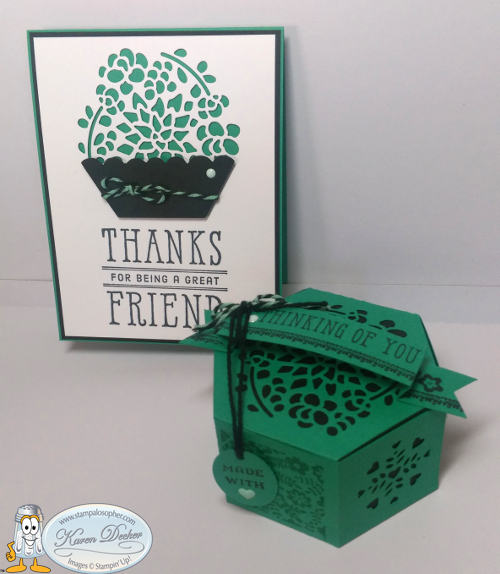
Notice the banners use the Delicate Details free stamp set from Sale A Bration:

The Emerald Envy box uses the third one down and the Dapper Denim box uses the second one down to be a bit more masculine. The flower and cupcake on the edges of the banner are part of the Window Box stamp set! The banner uses a 5 1/2″ X 7/8 inch piece of card stock and the little Thinlit from the set that scores and cuts the end! The video below will show that in detail.


For a thank you gift, I used the same Window Shopping Bundle and made a little St. Patrick’s Day basket.

Hmmm…. It did have chocolate in it at one time; at least the tea light and mints are still there for the picture. I used Cucumber Crush paper and the Mint Macaron ribbon which is still in the Clearance Rack. Why a tea light? Because the door prize was a tea light holder made with Watermelon Wonder card stock:
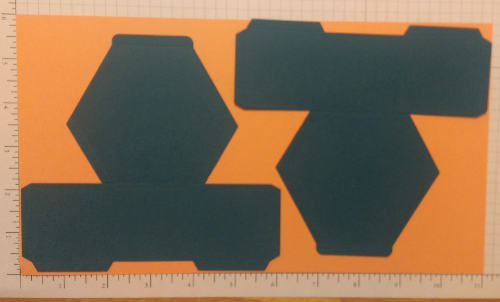
 To make the tealight you use two pieces of the main Thinlit just as you do for the box:
 Remember the middle heart is directional so punch your windows accordingly.
I demonstrated the basket pieces with the same color. You only need one piece of the main box Thinlit for the basket and one piece 8 1/2 X 3/4 for the handle:
 The Thinlit set makes a basket just perfect for a little Easter gift!

The regular box uses two Thinlit cutouts which fit nicely on a 6 X 11 piece of paper:
 The home office has a wonderful video for construction of the box so rather than recreate the wheel I will insert it here. If you are viewing this on your smartphone you may need to click on the little SAL image at the top of the post to go to the main blog where videos work.
Drum roll please: Presenting The Window Box Thinlit dies:

One more quick note – check the bottom of your Big Shot machine once in awhile. The bottom screws need to be kept tightened as well as the screw on the handle. The machine comes with a little tool to keep the handle tightened but you will need a phillips screw driver to tighten the bottom screws.

Cheerio but be back soon! (I just went to the high school’s performance of Oliver. It was exceptional and I can’t get the songs out of my mind- but who would want too?!)
SAL,
Karen (Click on SAL to go to the online store)

Happy Easter
Hello Stamping Friends,
I have so many cards to show you! Let’s start with Easter, though it is a bit late for you to CASE (copy and share everything!) If you need a few last minute cards, Donna Truitt, our Stampalosopher teammate, had a beautiful card for the Elizabeth Stamp A Stack.

The card uses the Work of Art Stamp Set, the Decorative Dots Embossing Folder and the Oval Framelit #5-(counting from smallest to largest). The greenery is from the Bird Builder Punch; the Petite Petal Punch with a pearl center makes the flowers. The wing from the Bird Builder Punch is used for the large leaf at the top. The banner is from the Hearts A Flutter Framelits set (retired) and the greeting is from the Circle of Spring stamp set. You could make a few of these in no time!
Soft Sky: 8 1/2″ X 5 1/2″ Scored at 4 1/4″
Whisper White Top Layer 4″ X 5 1/4″ and egg layer of 3 3/4″ X 5″
Scraps and Inks: Pear Pizzaz, So Saffron, Blushing Bride, Wisteria Wonder, and Soft Sky
I wanted to send Donna an Easter card and couldn’t send her the same one she taught us to make, so I did a bit of revising:

I purchased the Bloomin’ Heart Thinlits Dies intending to use it for a Valentine card but chose to make something else, so the set was paid for but totally neglected – until now! I followed Donna’s example with the Decorative Dots Embossing Folder but went down a size in the Ovals Framelits and used the #4 Oval so I could fill most of the egg with the cut-out. An extra pink flower was placed at the top where the heart shape left a bit of a blank. The Work of Art Stamp Set was used to create the color before cutting out the Bloomin’ Heart:

I was delighted with the Bloomin’ Love stamp set and Thinlits Dies. The stamp has a little guide for stamping so that you can cut out a perfect flower with the thinlit that also has a little guide:
 But you do need to mark how you stamped! Hmmm….. we could have made shamrocks with this set. I sure hope it carries over into the new catalog coming June 1. The greenery that you have never seen is Stampin’ Up! Check it out:
 It is a little piece of the Thinlit! I love how the little buds look and one leaf looks like a heart! So cool. The greeting is from Teeny Tiny Wishes stamped on the banner in the Bloomin Love stamp set. I fussy cut the banner but it does have a framelit in the Large Numbers Framelit Dies set on page 10 of the Occasions catalog.
And for the inside:
 I have used this sunburst from Kinda Eclectic so many times. Celebrating and Sunshine are both in the Crazy About You Stamp set and I used the retired Family Reunion set for the Son stamp. The corner stamp is another stamp in the Bloomin’ Love set with an additional thinlit flower cut out with the Big Shot. The flowers can be stamped solid or there is also a stamp with just the flower outline. A great set with lots of versatility!
I used Soft Sky for the base and our shimmery white card stock for the layers.
Inks: Wisteria Wonder, Daffodil Delight, Wild Wasabi, Pink Pirouette
Contact me if you have any questions.
Have a wonderful day and be sure and check out the sales this week, the pearls are on sale! I will be back with the other cards from the Stamp A Stack, the club cards, and the special Sale A Bration cards.
SAL,
Karen

Welcome to my blog!

Sal Window to Products


