
Home » Father’s Day
Category Archives: Father’s Day
Cards for the Cooks and BBQ Folks
 .
.
 .
.
It was my turn for the monthly shoebox event in June and we made the hamburger punch art card you saw in the last post and this apron card using Stampin’ Up!’s retired Apron of Love stamp set and corresponding Apron Builder Framelits Dies. I started by searching my stash of DSP – designer series paper, to find a plaid design I liked. Dandy Designs DSP had a perfect orange plaid with grapefruit grove so I went with those colors. The reverse side of the plaid just happened to be the stars design which I used for the second layer.
Recipe
- Stamp Set is Apron of Love; Dies are Apron Builder Framelits Dies and inside greeting is from Handsomely Suited
- Ink: Memento Black
- Base: Calypso Coral, 11 X 4 1/4, scored at 5 1/2
- Layer 1 (X2): Basic Black, 5 1/4 X 4, Note: Cut the middle out of this piece with the 4th Largest Deckled Die to be the third layer on the card
- Layer 2: Dandy Designs DSP, 5 X 3 3/4
- Layer 3: Basic Black, 2 3/4 X 4 1/8 cut with 4th largest Deckled Die, or See note at Layer 1
- Layer 4: Grapefruit Grove, 3 3/4 X 2 1/2, die cut with next smallest Deckled Rectangle Die
- Inside Layer 2: Grapefruit Grove, 5 X 3 3/4, The greeting is from Handsomely Suited; mask off the handsome to just get Happy Father’s Day
- Apron: Dandy Designs DSP, 2 1/4 X 3, stamp with outline stamp in Apron of Love stamp set and then die cut
- Apron Ties & Neck Band: Basic Black, 3 X 1 1/4
- Pocket: Calypso Coral, 2 X 1 1/2, stamp with outline stamp and word stamps, then die cut
- Utensils: Silver Foil, 2 X 2, Note: use a scrap of woodgrain DSP to die cut handles
- Hearts: DSP, 1 1/4 X 1 1/4
- Buttons: Black sequins adhered with a glue dot
The apron and the pocket are popped up with dimensionals, the other layers are adhered directly to paper.
These are pictures of the sets.
 .
.  .
.
Another set that works well with cooking is the What’s Cookin’ set and Cookin’ Dies:
 .
.

 You are messing with my mind. Why show pictures if you aren’t able to sell them?
Well, Sal, I plan on using them and it is nice to go to a post instead of going to my stash to see what I have, and others might have this in their stash and will be reminded what a nice set this is.
You made a birthday card with that second set.
Did I not post that one? Hmmmm……. I don’t see that card in the recipe box so let’s do a quick show and tell:
This is how I started the card but it needed something in the window- a tree, a bird, a ….

So I die cut a white layer with the Deckled Rectangle Die, sponged a sunset sky:
- Orchid Oasis – top
- Daffodil Delight – second layer
- Crushed Curry – third layer
- Calypso Coral – fourth layer
I die cut a bird and branch from the Lovebirds die by Elizabeth Craft Designs and colored the branches and birds with the intent of making the birds look like the red finch birds we see at our feeder every day. I die cut a few extra leaves and colored them with Daffodil Delight for falling leaves. I colored the leaves with Stampin’ Blends of Dk Daffodil Delight and Lt Soft Succulent so they have that fall look as well.
 .
.
Now look at the card with the birds, branches and sunset in the background:

Recipe
- Base: Bermuda Bay, 4 1/4 X 11, scored at 5 1/2
- Layer 1: Beauty of the Earth Designer Series Paper, 4 X 5 1/4
- Using the Window Frame Die cut out window from DSP; note: 5/8″ from left and right sides
- Window: Basic Grey, 3 1/4 X 3 3/4
- Glass: Window Sheet, 2 1/2 X 3 1/4
- Counter Top: Another of the DSP pack, 4 X 3/4
- Cooking tools & Bowl: Basic White 2 3/4 X 4, stamp in Basic Grey the bowl, spatula, cups;
- color the stripes on the bowl in Bermuda Bay
- use an Exacto knife to cut a slit in the bowl for the utensils
- Die cut the cutting board from a scrap of wood tone- I think this is Cinnamon Cider
- Stamp the rolling pin on a scrap of bermuda bay and a second time on a wood tone and die cut; cut off the ends of the wood tone rolling pin and adhere to the bermuda bay rolling pin
- Stamp the spatula a second time on Bermuda Bay and die cut – cut off the handle and adhere the top over the die cut on Basic White
- The turner is die cut from black foil
- The whisk is die cut from silver foil
- Greeting: Basic White, 2 X 2, stamp with Basic Grey and greeting in the What’s Cookin’ set, punch with 1 3/4″ circle punch and sponge the edge
- Inside: Basic White, 4 X 5 1/4, die cut with Deckled Rectangle and sponge per above directions
- Greeting is stamped in Tuxedo Black with the Go To Greetings stamp set Happy Birthday
- Embellish with Bermuda Bay dots, a Bermuda Bay heart and a 1/8″ wide Bermuda Bay ribbon
Those are nice sets where you can mix and match the stamps and dies
Quite fun!
I hope we have brought “a pinch of creativity to spice up your crafting world”!
SAL, Share A Love of cooking
Karen
Father’s Day Fun Cards
Punch art is our fun for today as we punch away to make a hamburger with chips and a pickle!


Recipe
- Base: Thick White, 5 1/2 X 8 1/2, scored at 4 1/4
- Layer 1 (X2): Merry Merlot, 5 1/4 X 4
- Tablecloth: Designer Series Paper in red plaid, 5 X 3 3/4; note: with a 6X6 DSP, cut the 5″ first and then the 3 3/4
- Inside: DSP red plaid leftover from cutting the layer, cut to 1″ X 5″
- Plate: Basic White, 4 X 3, die cut with 4th largest oval die, emboss with Tasteful Textile 3D embossing folder
- Greeting: Basic White, 2 1/2 X 5 1/2,
- stamp in memento black ink with greeting from Sprinkles Of Life stamp set
- die cut with Beautiful Shapes Die
- adhere with dimensionals
- Hamburger
- Bun: Crumb Cake, 2 X 6, run crosswise in Raindrop Embossing Folder so half the strip is embossed for the top and half is not for the bottom of the bun to glue directly to the plate

- Punch 2 from large oval punch, sponge edge with soft suede
- Meat: Soft Suede, 2 1/4 X 1 1/2, punch with Large Oval Punch, dob straight down using sponge and Early Espresso to create speckled texture; use dimensionals to pop up on bottom bun slightly offset, all other layers are glued directly to previous layer
- Cheese: Daffodil Delight, 1″ Square punched from scrap, don’t sponge;
- Lettuce: Granny Apple Green, 1 3/4 X 2 3/4, punched with Pretty Label Punch, sponge edge w/green
- Tomatoes (2): Real Red, 2 X 1 1/4, punch with 1″ Circle Punch, sponge edge w/real red
- Onion: Designer Series Paper w/purple, use 1″ circle punch- cut one full circle, then punch along that cutout’s edge with just part of the punch
- Note: When adhering the hamburger to the plate, use two dimensionals on top of each other to be able to have the right depth for attaching the hamburger at the back side, the front just needs a one dimensional layer
- Potato Chips: 1 1/4 X 11 strip of very vanilla envelope paper; run through crimper, use 3/4″ X 15/16″ oval punch to punch 7 potato chips, adhere randomly on plate
- Pickle: Garden Green Scrap, Granny Apple Green Scrap, punch each color with Word Window Punch lining up on a straight edge and punching only half, or punch a full one and cut it in half, then use your scissors to make tiny divots on the edges and then use a Garden Green Marker to add dots for texture
- Embellish with a bee or a dragonfly or an ant; my little bee is from the So Hoppy Together stamp set

Inside Greeting: Basic White, 2 X 2, stamp using Black Memento Ink with greeting from Guy Greetings, cut with another of the Beautiful Shapes Dies
You used a die that isn’t symmetrical – that’s outside the ‘box’ for you
Sure enough! Another of those dies that I said I would never use! Ha
Summer has finally arrived in Castle Rock so I had better go water my plants! Have a wonderful day and thank you for spending part of it with Sal and I!
SAL, Stamp A Lot if you need to get out of the heat
Karen
Copyright
Unless otherwise indicated, all stamped images are 2009-2023 Stampin’ Up! The projects shown are to spice up your personal creativity and may not be copied for publication or contest submission. The content of this website is my sole responsibility and the use of and content of classes, services or products offered are not endorsed by Stampin’ Up!
Pansy Petal Product Class
Hello Stamping Friends,
Hostess Code: ZBP7XPBT
Have you been just thrilled with the new Annual Catalog? I held a catalog launch the day the catalog went live and later in the month a Pansy Product Class to use the new Pansy Patch Stamp Set and Pansy Dies with the gorgeous Pansy Petals Designer Series Paper (DSP).
We made a card that used the dies to cut out pansies from the DSP, a card using only the stamps, a gift card holder showcasing the Designer Series Paper (DSP) and a card using the dies to do awesome punch art— four cards, four different ways to use the bundle!
 Can we see the gift card holder first?
That is a beautiful one! I cased one I saw on Lynn’s Locker changing up the greeting and cut outs and……
Pansy Petals Card #1 Gift Card Holder Showcasing the DSP

 .
. Recipe: Pansy Petals Card #1
- Base: Blackberry Bliss, 4 1/4 X 11, scored at 5 1/2
- Layer: Pansy Petals DSP, 4 X 5 1/2, die cut with the largest Scalloped Contour Die
- cut out the middle with the 3rd smallest Scalloped Contour Die
- Greeting: Basic White 3 1/2 X 3 1/2, stamp with the greeting from the Better Places stamp set and cut out with the Scalloped Contour Die that has the dots and dashes
- Pansies: Pansy Petals DSP, die cut one large and one small pansy from the DSP with Pansy Dies
- Leaves: Pansy Petals DSP, die cut three leaves, one of each color, from the DSP with Pansy Dies
- Card Holder: Soft Succulent, 2 3/4 X 4, die cut with largest Scalloped Contour die
- Adhere with tear and tape on sides and bottom as close to edge as possible
- Embellishment: Flower Flourish with a rhinestone in the middle
- Ink: Blackberry Bliss
- Stamps: Better Places hostess stamp set
Pansy Petals Card #2 with Die Cut pieces on Scalloped Contour Die Layer and then popped up on Designer Series Paper


Recipe – Pansy Petals Card #2
- Base: Calypso coral, 11 X 4 1/4, scored at 5 1/2
- Layer 1: Evening Evergreen, 4 1/8 X 5 3/8
- Layer 2: Pansy Petals DSP, 4 X 5 1/4
- Top Layer: Basic White, 4 X 2 3/4, die cut with 3rd from smallest Scalloped Contour Die
- Inside: Basic White, 4 X 5 1/4
- Inside Strip: Evening Evergreen, 1/8 X 5 1/4
- Flowers:
- Top of leaves and stem: Evening Evergreen, 2 X 2 1/2
- Leaves: Soft Succulent, 2 1/2 X 1 1/4
- Edges of pansy, beard and inside of bud: Calypso Coral, 3 1/2 X 2 1/4
- Inside of petals at back of pansy and outside of bud: Pale Papaya, 3 1/2 X 1 1/2
- Largest petal of the pansy: Basic White, 2 1/8 X 1 5/8
Note: for those of you who may want to teach this class- Save the above pieces with the cut outs already made for a template for your students to follow; glue to a basic black cardstock like this:

- Embellishments: An Elegant Faceted Gem in the middle of the flower and a fussy cut bumble bee and inside flower
- Ink: Evening Evergreen
- Stamp Set: Pansy Patch
- Dies: Pansy Dies, Scalloped Contour Dies
Not so fast, Sal, there are two more cards that we made. The next one uses my favorite die set – the Curvy Dies and greetings from the Quite Curvy Stamp Set. You can only get this for the next two days then it is gone gone gone.
Pansy Petals Card #3 using the Quite Curvy Stamp Set and Curvy Dies (on sale until June 30):


I love how the plain stripes and the very busy flowerdy DSP balance each other out. I saw this combo on Aromas and Art.com with Su Mohr. The inside bottom stripes are from the cutout on the front so die cut the front carefully.
Recipe – Pansy Petals Card #3
- Base: Thick Basic White, 8 1/2 X 5 1/2, scored at 4 1/4
- Top Layer: Pansy Petal DSP, 5 1/2 X 2 1/2, Cut with the Curvy Die on 5 1/2 length; the cut of the curve is 2 1/2″ down from the top on the left and 2″ down from the top on the right.
- Bottom Layer: Pansy Petal DSP-Stripes going vertical, 5 1/2 X 1 1/2; the cut of the curve is 3/4″ on the left and 1 1/4 ” on the right hand side.
- Pansy: Pansy Petal DSP, Die cut one large pansy
- Leaves X 3 : Soft Succulent, 1 X 3 1/2, Die cut three leaves- the die does the embossing of the veins!
- Glue the leaves to the back of the pansy and pop it all up with dimensionals
- Embellishments: Three of the Evening Evergreen In Color Jewels
- Ink: Evening Evergreen
- Stamp Set: Quite Curvy
- Dies: Curvy Dies
Use the Stamparatus to position the curved sentiment from Quite Curvy between the two DSP sections on the front matching the curves of the DSP. If you are concerned that you may not get it stamped correctly, temporarily adhere your top and bottom and then stamp so that you can add a piece of Basic White if you mess up. With the stamparatus, I was able to draw the placement of the card on the grid sheet and the stamp was adhered to the plate with the correct curve. No one had a problem getting it correct.
Pansy Petals Card #4, Stamping the Pansies and Leaves


Recipe – Pansy Petals Card #4
- Base: Thick Basic White, 8 1/2 X 5 1/2, Scored at 4 1/4
- Layer 1: Pacific Point, 5 1/2 X 4 1/4, Cut with the largest Ornate Layer Die (Remember to put a folded piece of dryer sheet underneath your cardstock- it pulls out almost all the little dots so you don’t spend time pocking them out) Layer the dryer sheet, then the cardstock, then the die. Glue this layer directly to the base being careful not to get glue close to the holes.
- Top Layer: Basic White, 3 3/8 X 4 7/8, This will be stamped and then popped up on the Ornate layer
- Embellishments: Three of the Holiday Rhinestone gems
- Inks: Pacific Point, Garden Green, Daffodil Delight, Crumb Cake
- Stamp Sets: Pansy Patch for the front greeting, Encircled In Friendship greeting for the inside
- Dies: Ornate Layers Dies
To stamp:
- Stamp your greeting first at the top so you know how close you can get with the large pansy, full strength in Pacific Point
- Use Pacific Point to ink up the full pansy images, STAMP OFF, then stamp, one large pansy a little left of center and two small pansies. “Ink up, stamp off, stamp on”,,,,,, “Ink up, stamp off, stamp on”. I have to sing that to remember!
- Position the bud so it is above the small pansy and yet not off the paper, ink up in Pacific Point, STAMP OFF, stamp on
- Ink up the detail shadowy stamps in full strength Pacific Point and stamp them over the images
- Using Night of Navy Ink stamp the little beards on the three pansies
- Using Daffodil Delight Ink stamp the centers on the pansies
- Use the Waterfront stamp set and Crumb Cake Ink to stamp the ground in the bottom 3/4″, or freehand with a blender pen
- Now MASK OFF the pansies and the ground to stamp the greenery
- Using Garden Green Ink, ink and stamp the stem going to the bud
- Using Garden Green Ink, ink and then stamp the single stem three times coming down to the ground from the large pansy; one time stamping to the shorter pansy and twice to the taller pansy; use a garden green marker to soften where the edges of the stamp meet when you stamp multiple times
- Using Garden Green Ink, Ink up the small leaves full background, STAMP OFF, stamp on
- Using Garden Green full strength, ink up and stamp the detail shadows of the leaves
- Mine looked funny with the stem to the bud going out of a leaf so I masked the leaves and stamped a little stem between the leaves.
Variety is the spice of life, Sal, and I think we held to our motto of ‘bringing a pinch of creativity to spice up their crafting lives’!
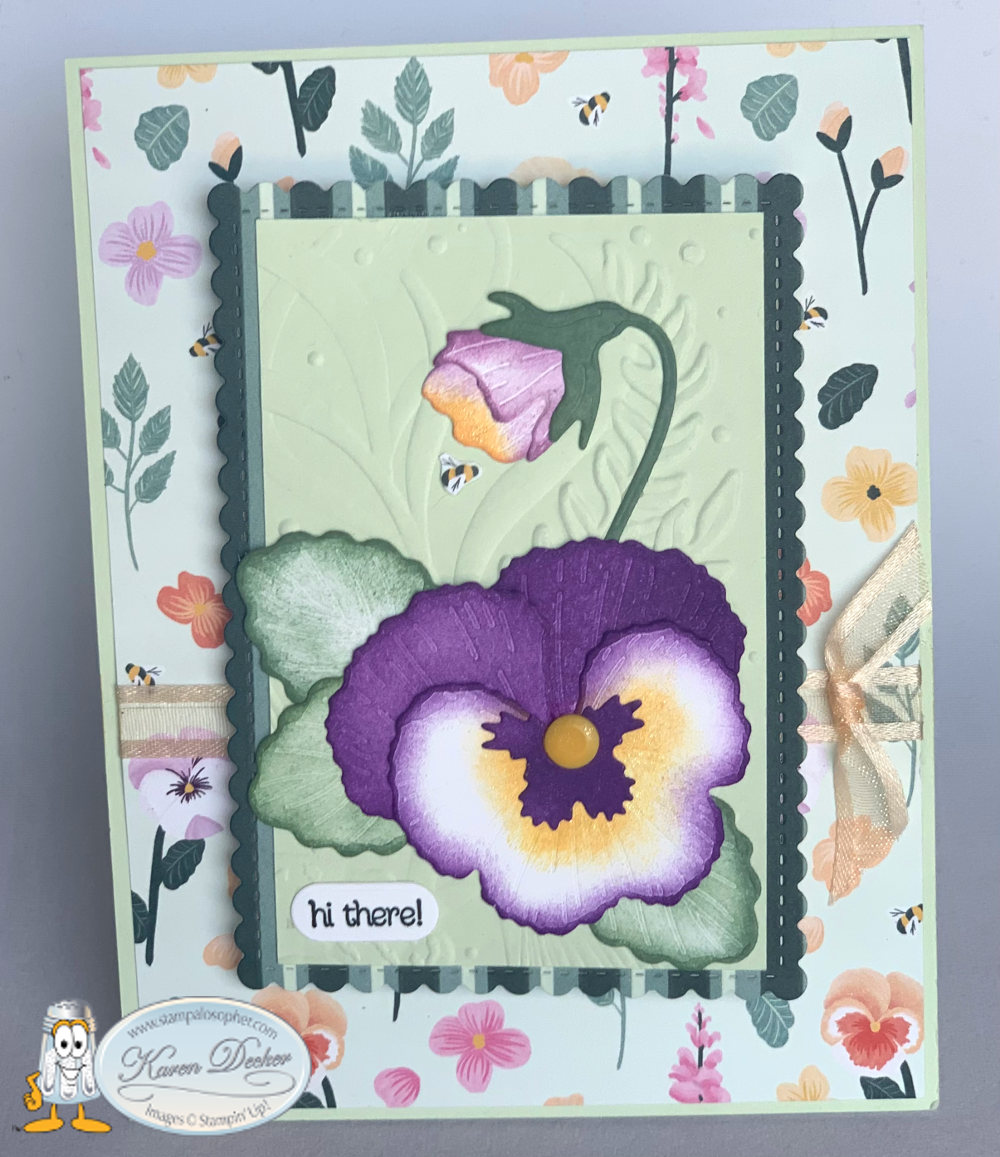
Don’t forget the other pansy cards we made in a previous post- click their picture to go to that post for directions. There’s ribbon on both of these, Sal! I think I liked this sponged pansy best.
 .
. 
And Joy’s swap card with the pansy:
 .
. You now have a seven card collection of pansy cards! If you feel overwhelmed with the number of dies check out this guide made by Gail Ellis of Blue Rose Paper Treasures. Isn’t it great to have others to help us?! Pinterest also has guides to different colors to use for the pansies.

July 1 is the start of the Designer Series Paper (DSP) sale and you can buy the Pansy Patch DSP at 15% off. Here is a cute gif showing the other papers offered in this sale:

That makes me dizzy – may we have a list?
How about a picture and a list?
 .
. 
Use Hostess Code: ZBP7XPBT if you do decide to order and you will help me to buy prizes with hostess dollars for upcoming events. Check out the JJ Mini one more time to make sure you don’t miss anything.
I thank you most sincerely!
SAL, Stamp A Lot, Smile A Little, and always be Salt And Light to those around you!
Karen

Peek A Boo Card and Open Book Easel Card
Hello Stamping Friends,
Let’s look at this month’s club cards for those who have kits and need the instructions or those who want to recreate cards like them!
Peek A Boo Card

Here is the Youtube video: (Did you know you can go to the settings and increase the speed?)

Thanks to Dawn Griffith for these dimensions.
- Base: Basic White, 4 1/4 X 8 1/2 scored at 4 1/4
- Using the 2nd Largest Oval in the Stitched Shapes Framelits, fold the Basic White and cut ovals on the right hand side through both front and back. My ovals are 1/2″ down from the top to the top edge of the framelit, 3/4″ up from the bottom to the bottom edge of framelit and 2 1/4″ from the right side of the Basic White to the left hand side of the framelit.
- Front: Hydrangea Hill Designer Series Paper (DSP), 4 1/4 X 5 1/2
- Inside: Hydrangea Hill DSP, 4 1/4 X 4 1/4 (minus a hair on the horizontal side to take into account the score line)
- Using your Oval Framelit and a sticky note to hold the DSP in place on the Basic White, cut an oval in the front DSP and another oval on the inside DSP. SAVE the cutout from the inside to glue on the mechanism.
- Mechanism A: Highland Heather, 4 1/4 X 5 3/4, scored on the long side at 5 1/2
- Mechanism B: Highland Heather, 4 1/4 X 3, scored on the short side at 2 3/4
- Fold and burnish well the 1/2″ tabs on mechanisms A & B. Attach A to the left side of the front DSP with the tab to the inside and attach B to the inside DSP on the right hand side with the tab hidden on the inside. Note: I used tear and tape and rolled the tiny bit of excess tape back onto itself to prevent any glue from catching on the mechanism.
- Use a pencil to outline the oval on the Highland Heather and stamp your front greeting. I used Blackberry Bliss to give a darker purple color and the friendship greeting in ‘Grace’s Garden’ stamp set.
- Stamp the greeting on the oval cutout for the inside; I used the friend greeting from ‘Heartfelt’
- After attaching the mechanisms, glue your inside DSP to the Basic White and then the front DSP to the Basic White. Note: put the glue on the white not the front DSP because that piece is larger than the Basic White. The small mechanism should go into the middle with the large mechanism at the back.
- Use your pencil again to draw the oval for the inside on the mechanism that peeks in when you open the card. Glue the oval cut out in place
- Embellish with a little piece of ‘Gorgeous Grape Ribbon’ 2 X 1 1/2, two blackberry bliss punched butterflies, 3 pastel pearls and 1 butterfly gem (can you find it hiding on the left hand side?)
Open Book Easel Card
I was so delighted with how this card turned out and patting myself on the back but then had a humbling experience as I tried to do the Facebook Live and the sound echoed and the lighting didn’t work…… The silver lining to the mishaps was that I went to Youtube and learned how to edit a Youtube video so I could cut out the first eight minutes of echoing to make it a little easier for you to endure. Unfortunately, I couldn’t fix the lighting so it still has a bit of a glare – so sorry for that less than professional presentation. If you viewed the first video you see I had both lighting and sound corrected. I made better notes for set up next time.


Thank you to Tina Zinck of the Serene Stamper for teaching me how to make an Open Book Easel Card.
- Base: Misty Moonlight, 5 1/2 X 8 1/2 scored at 2 1/8 and 4 1/4. Fold in half and then Z fold the 2 1/8″ score line
- Bottom Layer at top of easel and the layer at the base of easel (X2): Brass Foil in the ‘World of Good’ DSP, 5 1/8 X 1 7/8, watch the direction of the words as you glue the pieces to the base
- Easel Stand: Misty Moonlight, 5 1/8 X 7/8 and a DSP strip of compasses, 4 7/8 X 5/8; Note the Misty Moonlight has no border but the compasses DSP does have a border
- Globe and Stand: Misty Moonlight, 2 1/4 X 2 1/4, Die cut circle with the circle in the World Map Dies, Use Brass Foil 2 1/4 X 3 1/4 to die cut the globe and the stand
- Book Layers:
- Cinnamon Cider: 5 1/8 X 3 7/8; score at 2 9/16 – one 16th mark past the half mark
- Designer Series Paper: (Beige with words) 4 7/8 X 3 5/8; score at 2 7/16, one 16th mark less than the half mark
- Cinnamon Cider: 4 5/8 X 3 3/8; score at 2 5/16, one 16th mark past the quarter mark
- Designer Series Paper: (Map) 4 3/8 X 3 1/8; score at 2 3/16, one 16th mark less than the quarter mark
- Banner: Cinnamon Cider, 1 X 3, Stamp with Memento Black and embellish with the Antiqued Corners
Curl each of your book layers. Break the fibers with the bone folder then wrap around the Take A Pick tool.
Place Tear and Tape on the middle of each book layer, burnish well, attach to its layer. Note: fold the layer in half to place so you can get it right on the score line of the next layer down.
Place glue dots on the edge of each layer and push the layer in toward the middle to maintain the curl before you push down on the glue dots. Hint: Use less curl if you are mailing and a little more if you are hand delivering.
Place Tear and Tape on the easel top base at 1/16 down from top and over 1/16 on the right and the same on the left and all the way down on the top easel layer to mount the book to your easel base. Mount your book recurling that last layer if needed.
Use glue dots to mount the globe to the bottom of the top page of the book checking placement so that the globe fits correctly on the base.
Stamp your greeting on the Cinnamon Cider strip, embellish with the antique corners and mount with glue dots.
I used white embossing and “Congratulations on this new beginning” on the inside.
That, my friends, is the second of our two club cards for April. May is the catalog launch and then we start a new club rotation in June so contact me if you are interested and I will answer any questions you may have. Text 303-815-0838.
Remember: the World of Good Suite and all its individual products (page 24-26 of the Annual Catalog) are retiring and most have a huge discount right now so head to the online store to purchase them. The Butterfly punch I used on the first card is also retiring (Butterfly Duet, pg. 165) and it is great for quick embellishments in the color of your choice. Butterflies are always good for those times when we get a shadow or smudge on our artwork!
Have a wonderful day!
SAL, Share A Love of stamping

Father’s Day with Enjoy Life
Hello Stampin’ Friends,
(Click the title to go to the main blog if you are viewing in your mobile device)
Hostess Code for June: 2KNDJXFN Use this code if your order is under $150 and our monthly hostess will get the hostess rewards so no free dollars are left unused. If your order is over $150 you will have earned the hostess rewards. You will get a little thank you gift from me for any order outside of club! Club members receive the special reward of receiving card kits.
To all the wonderful men in our life that we need to celebrate and those we will always remember this Father’s Day: Happy Father’s Day!
I used the Enjoy Life stamp set (retired) and the Silhouette Scenes (pg 136) to make three Father’s Day Cards:

The greeting: “When you arise in the morning, think of what a precious privilege it is to be alive: to breathe, to think, to enjoy, to love.”
I did three different inside greetings as well using the “A Good Man” stamp set on page 32.
For my son-in-law, Tyler, with two little boys, Jaxson & Emmitt:


For my son-in-law, Jonathan, with a little girl – Emma:


For Paul:


Here they are at the Cheyenne Mtn. Zoo in Colorado Springs:


Such a great dad and such a great grandpa!

Well, Sal, it isn’t hard. Let me take a picture of the tools I use:

It is a piece of window sheet with several different sizes of circles punched in the sheet. (I placed the window sheet on black for the picture so you could see the different circles.) The largest circle is 1 1/2″, then 1″, 3/4″, and 5/8″ punched circles.
First, I used the Sponge Brayer (#141714 on pg. 147) and Mint Macaron ink and lightly sponged the entire front whisper white piece.
Then I placed the window sheet on that front sponged piece, held it in place with washi tape, and sponged several times over all the circles. I moved the window sheet to a new place on the front piece, secured it with tape, and sponged the circles again.
 May we see that up close, please?
Sure, let me zoom it a bit:

The circles overlap giving the out of focus bokeh look!
I cased this layout from one at StampinSavvy.com. She used a watercolor wash for the background and added long hair to the image of the silhouette. I wanted a masculine silhouette instead so I used our Take Your Pick tool’s pointy end and removed ink from the neckline before stamping so it didn’t have any hair on the neck. I also increased the arm and leg sizes with a Basic Black Stampin’ Write Marker.
We still sell the Basic Black marker individually -pg 147, #100082. I used the black marker to color the edge of the front piece by using the side of the marker- not the tip -to color all around the edge. The Just Jade base was stamped at the bottom with Versa Mark and the grass stamp in Enjoy Life.
For the inside greeting, I used the black marker once again to color the “to be a” of the Enjoy LIfe greeting stamp – see above in red. This brought the same font from the front to the inside. Remember – only use the Stampin’ Write Markers to color the back of your stamps, if you use the alcohol Stampin’ Blends they will stain your stamp.
I used the retired Guy Greetings set for the dad, grandpa and Happy Father’s Day words and the Make A Difference stamp set for a nice exclamation point.
And “voila” we are done!
Not to be a pest, but could we have the recipe?
Of course, it is a great layout that would work with dozens of stamps.
Recipe
- Base: Just Jade 8 1/2 X 5 1/2 scored at 4 1/4
- First Layer: DSP (designer series paper) Forever Greenery 5 1/2 X 1 3/4
- Top Layer: Whisper White 3 X 4 1/4 sponged with Mint Macaron- bokeh technique
- Inside Layer: Whisper White 4 X 5 1/4
- Inside Strip: DSP Forever Greenery 1/2 X 5 1/4
- Stamp Sets: A Good Man, Enjoy Life, Guy Greetings, Summer Days for the tiny butterflies, Make A Difference for the explanation mark
- Ink: Mint Macaron, Tuxedo Memento Black, Versa Mark
- Basic Black Stampin’ Write Marker
- 61/2 Black Twine to wrap DSP and 2 1/2 to tie knot
- Three black jewels for corner
Thank you for stopping by and visiting! I hope you have learned something and will come back. Next week I will post a card with the Summer Days stamp set. If you add your email address at the top right of the page, you will receive an email each time I post. Leaving a comment lets me know there is someone out there and I am not just talking to Sal and myself! I love hearing from you.
Hostess Code for June: 2KNDJXFN Use this code if your order is under $150 and our monthly hostess will get the hostess rewards so no free dollars are left unused. If your order is over $150 you will have earned the hostess rewards. You will get a little thank you gift from me for any order outside of club! Club members have the special reward of receiving card kits so contact me if you are interested in being a part of a club: 303-815-0838 or [email protected].
If you are part of club and my faithful followers – THANK YOU for your support. If you don’t have a demonstrator, I would love to earn your business!
SAL, Sharing A Love of the wonderful Dads in my life
Karen
Click on Sal to order:

May Club Cards and Stamp A Stack Cards
Hello Stamping Friends,
(This is a post; click on the SAL icon to go to the full blog)
Happy Memorial Day Weekend! Hopefully your vacation day is a sunny one.
This post will include cards from our bimonthly club and the Elizabeth Stamp A Stack. Check back in a couple weeks for recipes. Today I will just show you the cards so you can decide if you want to make that last purchase from the catalog before savings and product are gone forever! Tuesday, May 31, is the last day to place an order from the Occasions catalog and the big catalog. Several items have already sold out so hurry!
My favorite project was the Birthday Blooms Surprise Pull Out card. I saw this card on My Tanglewood Cottage and the directions are on Splitcoast Stampers. Scroll through the Splitcoast Stampers pictured instructions to go down to the video (click here) to get the measurements I used.
 The flower image is stamped with Stazon black on a piece of Shimmery White cardstock and colored with Blender Pens using Blushing Bride and Wild Wasabi Ink. The bottom parts of the image’s leaves are fussy cut and then the oval framelit #4 is slipped under the cutout and run through the Big Shot. When you run the stamped image through the Big Shot you will get a nice indentation to fussy cut the oval between the two large leaves. The little flowers in the corner are the top flowers of the image stamped a second time, fussy cut, and mounted on greenery from The Bird Builder Punch. The butterfly is from the hostess Best Thoughts set. It is stamped on vellum and then placed upside down on the Stampin’ Pierce Mat and rubbed with the Stylus to give a nice white color.
When you pull on the ribbon – Voila!

The inside words come from the Best Thoughts hostess set which has the butterfly we used on the front:
 Retiring Products: The Bird Builder Punch (117191), The Best Thoughts hostess set (139234), The Curvy Corner Trio Punch (139683) that made both the corner and the ribbon slider hole, and It’s My Party Designer Series Paper Stack (140552) from which I pulled the green striped paper. You will see more of this paper in another card. The Paper Stack has 48 sheets with 4 each of 12 double-sided 12X12 designs.
The masculine version of the Surprise Pull Out card uses Butterfly Basics, In The Meadow and Guy Greetings stamp sets, all of which carryover to the new catalog- Yay! Once again it uses the “Think outside the Framelit” technique to stamp an image, cut out a little of the image and then slip the framelit under the cutout part and run through the Big Shot.


 I will miss the Blackberry Bliss cardstock which is part of the retiring In Colors (see page 137).
Our technique sheet for club was the Mirror Image technique:

We mirrored the little yorky from the Hey Girl stamp set (#138706) which is retiring. I used the retiring Oval Scallop punch(#119856) to create the clouds. Join my team, or the bimonthly club, and you will make the technique sheets at our meetings. If you live far away or can’t make the meetings, I will mail you a completed technique sheet.
The Stamp A Stack held at the Elizabeth library was another fun time of stamping! Here is the first card:


The Sunburst Sayings stamp set and Sunburst Thinlits Die used on this card are currently bundled for a 15% discount. See page 25 of the Occasions catalog. Though both products are in the new catalog, there is no longer a bundle. Blackberry Bliss and Hello Honey are used together on this card and both are retiring colors in only three days. See page 137 for all the In Color retiring products.
The second card: (Stampers make six cards- two each of three designs for $20)


What could be better than Bermuda Bay with a black accent?! The flower is from the Butterfly Basics stamp set which is carried over to the new catalog, however the Honeycomb Embossing Folder (#129378) is retiring, as well as the Honeycomb Hello stamp set (#134075) which has the little “hello” and a cute little bumble bee that a couple of my stampers added to their card front. The Curvy Corner Trio punch is retiring (#139683) and the Candy Brads (page 161) are being replaced with shaped enamel dots.
The third card demonstrates the Drapery Fold Technique, modified from that found on Laura’s Stamp Pad:


Once again I have used the retiring It’s My Party Designer Series Paper Stack (#140552). Sadly, all the Scallop Circle Punches are retiring (see page 165). I used the 1 3/4″ scallop circle punch and punched the white inside layer of the card so that the main card stock showed. I then stamped “make a wish” in Basic Black with the Party Wishes retiring stamp set (#140651). The ‘It’s My Party’ enamel dots (#140554) are retiring as well. The Happy Birthday is from the Rose Wonder stamp set (#140697) and thankfully it is NOT retiring. If you wanted a stamp set with words that fit many different occasions, this set is a must have. See page 18 of the Occasions catalog. The more masculine version of this card:


The balloons are from the Balloon Bouquet punch (#140609) and will still be available in the next catalog but the mini balloon punch in the Party Punch Pack (#140608) on page 4 of the Occasions catalog is retiring. The punch pack and the Party Wishes stamp set used for the “make a wish” shown above is available as a bundle at a 15% discount in a wood mount (#141073) or clear mount (#141071).
The drapery fold starts with a piece of Designer Series Paper (DSP) that is 4″ X 11 1/2″ so you can get three cuts out of a 12X12. Be careful if your design is one that shouldn’t be upside down. (Yes, I learned that the hard way!)
Score your DSP on the long 11 1/2″ side at: 3″, 4″ , 6″ , 7″ , 9″ , and 10″ .
Turn the paper to the short 4″ side closest to the 10″ score line and make a small score mark or pencil mark at 1″.
Use your cutter to cut diagonally from the 1″ mark to the bottom of the 3″ score line. Make a z fold. I trimmed the right side of the top of the folded DSP to 5 3/8″ so I could have a border around each edge.
I love the way the drapery fold shows both sides of our pretty Designer Series Paper. There are many different fold sizes you can make. I would love to see one you have made!
My next event is the catalog launch on June 18 from 10:00 – 2:00, open house style. I will have catalogs, and you can make new In Color sheets, a bookmark for the catalog and a quick make and take with a new product. Retired product will be available for purchase.
Have a wonderful weekend and remember all those who gave the ultimate sacrifice for our freedom.
SAL (Salute A Life)
Karen
Click on SAL to be redirected to the online store:

Happy Father’s Day- Pinwheel Spinner Card
Hello Stamping Friends,
How the year is flying by! Father’s Day crept up on me this year and I had to employ the help of my DH, darling husband, to make the Father’s Day cards. I had done a spinner card for Mother’s Day using the Sunflower card from Deb Valders Stampladee blog, (thank you, Deb), and thought it only appropriate to do a Father’s Day spinner card. Deb demonstrated how to do a pinwheel spinning card and that seemed masculine enough!
I picked a bright piece of DSP, and matched it with Bermuda Bay and Tangerine Tango for use as the card base and accent border. The greeting comes from the “Guy Greetings” set, a set that did carryover to the new catalog – hurrah!
POSTAGE HELP: The green button makes the card “nonmachinable” which means it will have a 22 cent surcharge to mail. Be very careful when you take your cards to the post office that you use the term “Nonmachinable”. I have taken cards in and been charged the small parcel fee which is about $2.49. The correct cost should be only 71 cents. I have written “Hand Stamp Please” on the envelope and still been charged the small parcel fee. It was nice to meet Dale at our local post office who searched for the correct category and even had a stamp to mark the envelope “Nonmachinable”. No more wasted postage.

Welcome to my blog!

Sal Window to Products


